
Popular categories
Looking for a yarn?


Comments / Questions (7)
![]() Marianne De Vries wrote:
Marianne De Vries wrote:
Hallo, ik ben bij het stukje lijf: daar staat dat je richting middenvoor en middenachter 1 omslag moet maken en aan de binnenkant 2 steken samenbreien. Maar is de binnenkant waar ik de 6 steken heb bijgemaakt in de vorige naald (waar ik de mouwsteken heb afgehaald)? Ik snap er niets van. Ik hoop dat U een antwoord heeft voor mij. Groetjes Marianne.
02.12.2020 - 12:43DROPS Design answered:
Dag Marianne,
Ja, de binnenkant is inderdaad waar je de 6 steken hebt opgezet, dus in de zijnaad.
04.12.2020 - 19:05
![]() Margrét Einarsdóttir wrote:
Margrét Einarsdóttir wrote:
Mér fynnst uppskrifti af berustykkinu ekki vera nógu vel útfærð. Hvar á að seta prjónamerki fyrir útaukningu ? hvað kom margar lykkjur = munstur + sléttar, ég næ þessu ekki, eflaust einhver aulaháttur. Takk Margrét
14.03.2020 - 20:00DROPS Design answered:
Blessuð útaukningin á berustykki í laskalínu er útskýrð aðeins ofar. Það á að auka út fyrir laskalínu hvoru megin við A.2. Vona að þetta gangi núna.
16.03.2020 - 13:09
![]() Sibille wrote:
Sibille wrote:
Hallo, ich habe eine Frage zu Zunahmentip 2. Ihr schreibt: Stricken bis noch 4 Maschen vor dem Markierungsfaden übrig sind, 1 Umschlag, 4 Maschen rechts (der Markierungsfaden sitzt in der Mitte zwischen diesen Maschen), 1 Umschlag. Müsste es nicht heißen: stricken bis noch 2 Maschen vor dem Markierungsfaden sind, Umschlag, 4 Maschen rechts stricken, Umschlag? Bei 4 Maschen ist doch der Umschlag direkt beim Markierungsfaden oder habe ich einen Denkfehler? Danke
02.03.2019 - 15:17DROPS Design answered:
Liebe Sibille, es sollen bis 2 Maschen vor dem Markierungsfaden gestrickt werden, Korrektur wurde gemacht. Viel Spaß beim stricken!
04.03.2019 - 13:08
![]() Lieve Valvekens wrote:
Lieve Valvekens wrote:
Wat is een voorbiessteek?
13.01.2019 - 15:29DROPS Design answered:
Dag Lieve,
Dit zijn de steken voor de knoopsluiting aan de voorkant.
17.01.2019 - 11:33
![]() Elisabetta Vogogna wrote:
Elisabetta Vogogna wrote:
Secondo i vostri esperti sarebbe possibile sostituire, in questo modello, il filato Nepal a quelli suggeriti? Grazie
27.12.2018 - 15:20DROPS Design answered:
Buonasera Elisabetta, il filato Nepal appartiene al gruppo C che uno di quelli consigliati per questo modello. Controlli il suo campione prima di iniziare a lavorare. Buon lavoro!
27.12.2018 - 17:01
![]() Laura wrote:
Laura wrote:
Sto seguendo il modello, anche se uso Alpaca Silk. Secondo me però i diagrammi sono scorretti: dalla foto si direbbe che sono coste, ma volendo seguire il diagramma uscirebbe una grana di riso doppia. Interpreto male io? In ogni caso io preferisco le coste. Grazie e complimenti per il fantastico sito, che seguo da anni!!! Laura
07.11.2017 - 19:27DROPS Design answered:
Buongiorno Laura. Nel diagramma la lavorazione proposta risulta 1 maglia rasata e 2 maglie a legaccio. Può comunque sostituirle con i punti che la soddisfano maggiormente. Buon lavoro!
08.11.2017 - 10:26
![]() Rita wrote:
Rita wrote:
Vorrei adattare questo modello alla lana Puna. E' possibile scegliendo la taglia più piccola? Grazie
26.10.2017 - 12:09DROPS Design answered:
Buongiorno Rita, questo modello è lavorato con 2 capi di filato del gruppo A o 1 capo di filato del gruppo C. DROPS Puna appartiene al gruppo B quindi deve lavorare un campione e riadattare il modello al suo campione. Purtroppo noi non siamo in grado di darle un aiuto così personalizzato, però può rivolgersi al suo rivenditore DROPS di fiducia. Buon lavoro!
26.10.2017 - 14:56
|
|||||||
Woodland Walk Jacket#woodlandwalkjacket |
|||||||
 |
 |
||||||
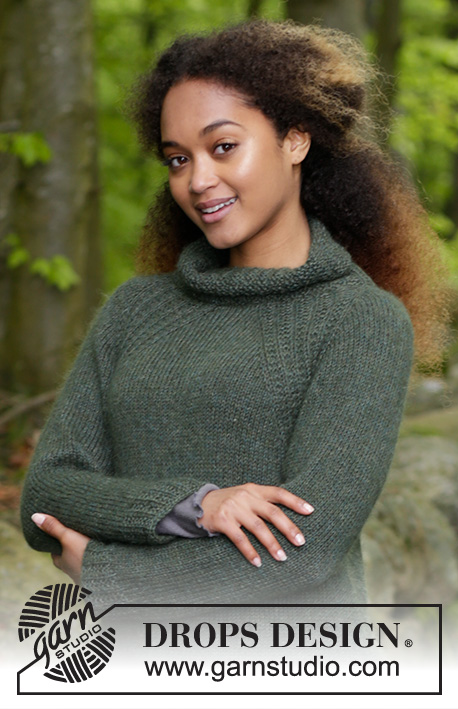
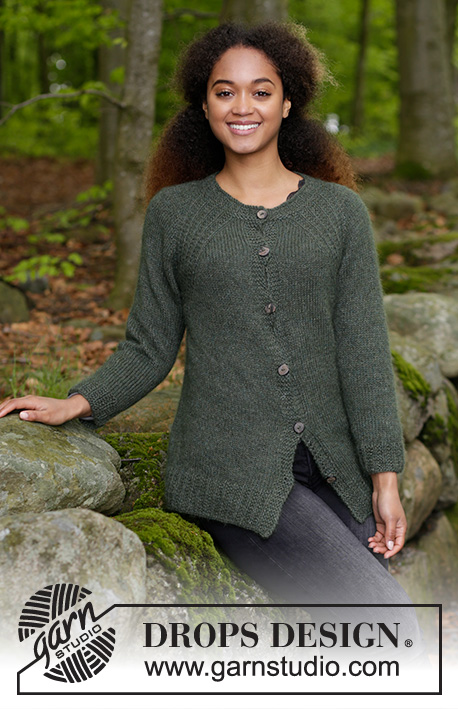
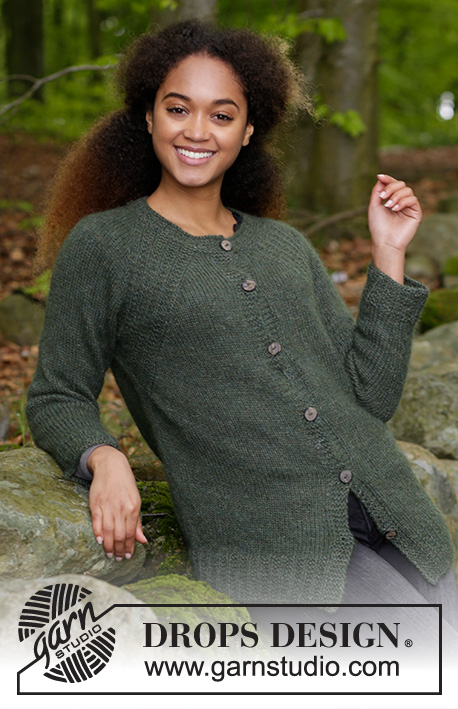
Knitted jacket with raglan and A-shape, worked top down. Size: S - XXXL Piece is knitted in 1 strand DROPS Alpaca and 1 strand DROPS Kid-Silk.
DROPS 183-11 |
|||||||
|
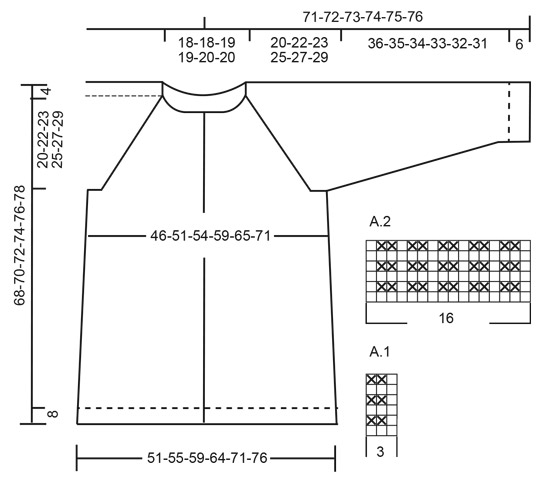
INFORMATION FOR PATTERN: GARTER STITCH (back and forth): 1 ridge = knit 2 rows. INCREASE TIP-1 (evenly): To calculate how to increase evenly, use the total number of stitches on row (e.g. 95 stitches), minus bands (e.g. 10 stitches) and divide the remaining stitches by number of increases to be done (e.g. 5) = 17. In this example make 1 yarn over after approx. every 17th stitch, on next row/round work yarn over twisted to avoid holes. INCREASE TIP-2 (applies to sides of body): All increases are done from right side. Work until 2 stitches remain before marker thread, 1 yarn over, knit 4 (marker thread is in the middle of these stitches), 1 yarn over. On next row purl yarn over twisted to avoid hole. PATTERN: See diagrams A.1 and A.2. Diagrams show all rows in pattern seen from the right side. RAGLAN: Increase for raglan on each side of A.2. Increase 1 stitch on each side of A.2 as follows (= 8 increased stitches per row with increase). Work until A.2, make 1 yarn over, work A.2, make 1 yarn over. On next row purl yarn overs twisted to avoid holes. Then work the new stitches in stockinette stitch. DECREASE TIP: All decreases are done from the right side. Decrease 1 stitch on each side of marker thread as follows: Work until 3 stitches remain before marker thread and knit 2 together, knit 2 (marker thread is between these stitches), slip 1 stitch knitwise, knit 1, pass slipped stitch over stitch worked. BUTTONHOLES: Decrease for buttonholes on right band (when garment is worn). Decrease from right side when 3 stitches remain on row as follows: Make 1 yarn over, knit the next 2 stitches together, knit last stitch. On next row knit yarn over to make holes. Decrease first buttonhole when rib in neck measures approx. 1½-2 cm / ½-¾". Then decrease the next 5-5-6-6-6-6 buttonholes, approx. 10 cm / 4" between each. ---------------------------------------------------------- JACKET: Worked back and forth on circular needle, top down from mid front. An elevation in the back of neck can be worked to get a better fit so that yoke is somewhat higher in the neck. This elevation can be skipped, to make the neck the same at the front and back - see explanation on elevation in pattern. After yoke work body back and forth on circular needle. Work sleeves in the round on double pointed needles, top down. NECK EDGE: Cast on 95-95-98-101-104-104 stitches (including 5 band stitches in each side towards mid front) on circular needle size 4.5 mm / US 7 with 1 strand Alpaca + 1 strand Kid-Silk (= 2 strands). Purl 1 row from wrong side, then work as follows from right side: 5 band stitches in GARTER STITCH - see explanation above, A.1 (= 3 stitches) until 6 stitches remain on needle, knit 1 and finish with 5 band stitches in garter stitch. Continue pattern like this for 2 cm / ¾" - remember BUTTONHOLES! Switch to circular needle size 5 mm / US 8. Work 2 ridges, at the same time on first row increase 1-5-18-19-20-24 stitches evenly – read INCREASE TIP-1 (evenly) = 96-100-116-120-124-128 stitches. Now work elevation in the back of neck or start to work the yoke if you don’t want an elevation. ELEVATION IN BACK OF NECK: Skip this paragraph if you do not want an elevation. Work 48-50-58-60-62-64 stitches and insert a marker here (= mid back). Begin from right side and knit 11-11-12-13-13-14 past marker, turn, tighten yarn and purl 22-22-24-26-26-28. Turn, tighten yarn and knit 33-33-36-39-39-42, turn, tighten yarn and purl 44-44-48-52-52-56. Turn piece, tighten yarn and knit the rest of the row. Purl 1 row back from the wrong side and finish with 5 band stitches in garter stitch. YOKE: Insert a marker here. NOW MEASURE PIECE FROM HERE! Work pattern as follows AT THE SAME TIME on first row from right side increase for RAGLAN - see explanation above (= 8 stitches increasen on row): 5 band stitches in garter stitch, knit 5-6-10-11-12-13 (= front piece), A.2 (= 16 stitches), knit 1 (= sleeve), A.2, knit 10-12-20-22-24-26 (= back piece), A.2, knit 1 (= sleeve), A.2, knit 5-6-10-11-12-13 (= front piece), 5 band stitches in garter stitch. Increase for raglan like this on every other row (every row from right side) 21-24-25-27-30-32 times = 264-292-316-336-364-384 stitches. After all increases for raglan continue size S with 2 rows without increase for raglan, then continue in all sizes as follows: Piece measures 20-22-23-25-27-29 cm / 8"-8¾"-9"-9¾"-10½"-11½" from marker. If the piece is shorter than this, continue with pattern as before without increasing more stitches until piece have the correct measurements. Work next row as follows (continue pattern as before): Work 41-45-47-51-55-59 stitches (= front piece), slip the next 55-61-69-71-77-79 stitches on a stitch holder (= sleeve), cast on 6-6-8-8-10-12 new stitches on needle (= under sleeve), work the next 72-80-84-92-100-108 stitches (= back piece), slip the next 55-61-69-71-77-79 stitches on a stitch holder (= sleeve), cast on 6-6-8-8-10-12 new stitches on needle (= under sleeve), work the remaining 41-45-47-51-55-59 stitches (= front piece). BODY: = 166-182-194-210-230-250 stitches. NOW MEASURE THE PIECE FROM HERE! Insert a marker thread in each side (= the middle of the new stitches cast-on under each sleeve = 3-3-4-4-5-6 new stitches on each side of marker thread). Continue back and forth with 5 band stitches in garter stitch in each side towards mid front, stockinette stitch and continue A.2 over the 10-10-7-8-8-9 stitches in the remaining pattern on front/back piece but on every other row make 1 yarn over at the edge of every A.2 (= towards mid front and mid back) and knit 2 together inside every A.2 (towards the sides). Number of stitches will stay the same but stitches in A.2 will gradually disappear and there will be more stitches in stockinette stitch. When all stitches in A.2 are gone, continue with stockinette stitch and 5 band stitches in garter stitch in each side towards mid front, AT THE SAME TIME on first row from right side increase 1 stitch on each side of marker thread in each side – read INCREASE TIP-2. Increase like this every 14th-14th-14th-14th-12th-12th row 4-4-4-4-5-5 times = 182-198-210-226-250-270 stitches. When piece measures 36-36-37-37-37-37 cm / 14¼"-14¼"-14½"-14½"-14½"-14½", increase 15-11-14-16-13-17 stitches evenly on next row from right side = 197-209-224-242-263-287 stitches. Switch to circular needle size 4.5 mm / US 7. Work 5 band stitches in garter stitch, A.1 until 6 stitches remain, knit 1, 5 band stitches in garter stitch. Work pattern like this for 8 cm / 3⅛". Bind off knitting from right side. Piece measures approx. 68-70-72-74-76-78 cm / 26¾"-27½"-28⅜"-29⅛"-30"-30¾" from shoulder and down. SLEEVE: Slip the 55-61-69-71-77-79 stitches from stitch holder in one side of piece on double pointed needles size 5 mm / US 8 and cast in addition on 6-6-8-8-10-12 new stitches mid under sleeve = 61-67-77-79-87-91 stitches on needles. Insert a marker thread in the middle of the new stitches - NOW MEASURE PIECE FROM HERE. Work in stockinette stitch in the round at the same time decrease stitches in A.2 the same way as on body (number of stitches stays the same). When stitches in A.2 have been decreased, work stockinette stitch over all stitches. When piece measures 6 cm / 2⅜" in all sizes, decrease 2 stitches mid under sleeve - read DECREASE TIP. Decrease like this every 6th-5th-3rd-3rd-3rd-2nd round 12-13-18-18-20-22 times in total = 37-41-41-43-47-47 stitches. When piece measures 36-35-34-33-32-31 cm / 14¼"-13¾"-13½"-13"-12½"-12¼", increase 5-4-4-2-1-1 stitches evenly = 42-45-45-45-48-48 stitches. Switch to circular needle size 4.5 mm / US 7. Work A.1 over all stitches. When piece measures 42-41-40-39-38-37 cm / 16½"-16"-15¾"-15¼"-15"-14½", bind off all stitches by knitting. Work the other sleeve the same way. ASSEMBLY: Sew the openings under the sleeves. Sew the buttons on to left band. |
|||||||
Diagram explanations |
|||||||
|
|||||||
 |
|||||||
Have you finished this pattern?Tag your pictures with #dropspattern #woodlandwalkjacket or submit them to the #dropsfan gallery. Do you need help with this pattern?You'll find 32 tutorial videos, a Comments/Questions area and more by visiting the pattern on garnstudio.com. © 1982-2026 DROPS Design A/S. We reserve all rights. This document, including all its sub-sections, has copyrights. Read more about what you can do with our patterns at the bottom of each pattern on our site. |
|||||||


With over 40 years in knitting and crochet design, DROPS Design offers one of the most extensive collections of free patterns on the internet - translated to 17 languages. As of today we count 324 catalogs and 12290 patterns - 12280 of which are translated into English (US/in).
We work hard to bring you the best knitting and crochet have to offer, inspiration and advice as well as great quality yarns at incredible prices! Would you like to use our patterns for other than personal use? You can read what you are allowed to do in the Copyright text at the bottom of all our patterns. Happy crafting!
Post a comment to pattern DROPS 183-11
We would love to hear what you have to say about this pattern!
If you want to leave a question, please make sure you select the correct category in the form below, to speed up the answering process. Required fields are marked *.