
Popular categories
Looking for a yarn?


Comments / Questions (70)
![]() Lisa Lebrija wrote:
Lisa Lebrija wrote:
Hej Så blev jeg færdig med denne flotte trøje. Opskriften var lidt kringlet, men da jeg først fandt ud af den gik det fint. Den har en god pasform. Andre der har problemer med den er meget velkommen til at kontakte mig på: Lebrija snabel a it.dk jeg hjælper gerne.
02.11.2016 - 23:39DROPS Design answered:
Hej Lisa. Det var godt at höre du kom videre - og tak for dit tilbud!
03.11.2016 - 15:58
![]() Anna Maria wrote:
Anna Maria wrote:
Under ærmer står der vend vrangen ud og strik glatstrik, et svar fra jer skriver retstrik altså en pind ret derefter en pind vrang, hvad er det regtige? Opskrift forket eller svar forkert?
01.11.2016 - 17:37DROPS Design answered:
Hej Anna. Det er MØNSTER paa aermet som hun spurgte om. Det skal du strikke i retstrik - ikke glat. Efter mönstret skal du rigtig nok strikke videre i glatstrik med vrangen ud.
02.11.2016 - 12:26
![]() Inger Sørensen wrote:
Inger Sørensen wrote:
Ser nu, at jeg ikke er den eneste, der strander ved nederste kant. Forstår stadig ikke hvad der er galt. Ryggens domino sluttede med en vrangpind, ligeså med begge forstykkers dominoer. Når de samles kan jeg ikke starte med højre forstykke, hvis der stadig skal startes med retsiden. Håber I kan hjælpe, var lige ved at opgive.
01.11.2016 - 12:57DROPS Design answered:
Hej Inger. Du starter med at strikke underkanten separat (de 16-12 m) og strikker först sammen med dominoen til slut i vrangpinden.
03.11.2016 - 16:25
![]() Elze wrote:
Elze wrote:
Onderkant rechterachterpand tot punt domino breien, dus eerst de laatste mindering, dus 8e naald en dan begrijp ik het niet. 4 steken (incl. de mindering) terug op dezelfde naald en dan nog eens minderen? Ik begrijp het echt niet. Help mij au.b.!
30.10.2016 - 11:54
![]() Inger Andersson wrote:
Inger Andersson wrote:
Nederkanten är bekymret. Jag har lagt upp de 16 maskorna på höger framstycke men om jag ska sticka till markeringen så blir det hela dominorutans botten. Av det blir det ingen kant. Hur ska jag göra?
25.10.2016 - 16:32DROPS Design answered:
Hej Inger, aller nederst i mønsteret på nettet finder du en ny video som viser hvordan kanten strikkes. God fornøjelse!
22.12.2016 - 09:39
![]() Elze De Ron-van Meesche wrote:
Elze De Ron-van Meesche wrote:
Mijn vriendin in California is weg van jullie wol en patronen. Kan zij vanuit U.S.A. ook op jullie site komen en naar patronen zoeken? Groet van Elze
25.10.2016 - 13:16DROPS Design answered:
Hoi Elze. Natuurlijk kan dat. Wij hebben zelfs een US pagina (kies English USD/CAD) en hier kan ze ook onze producten bestellen bij onze US winkel, die toevallig in Californië ligt: Nordic Mart
25.10.2016 - 14:29
![]() Audooren Myriam wrote:
Audooren Myriam wrote:
De mouw van de Tauriel Cardigan is dat volledig rechts gebreid grt Myriam
21.10.2016 - 10:33DROPS Design answered:
Hoi Myriam. Je breit eerst het patroon en dat wordt in ribbelst gebreid, daarna keer je het werk binnenstebuiten en breit door in tricotst (Lees PATROON).
21.10.2016 - 15:02
![]() Lisa Lebrija wrote:
Lisa Lebrija wrote:
Hej. Jeg er ved ærmerne, og vil godt høre om det mønster jeg skal begynde med på strømpepinde, skal strikkes i glat? Der står strik 6 P ret osv. Når mønsteret er færdigt skal jeg vende arbejdet og strikke videre i glat. Når jeg gør det, synes jeg ikke arbejdet ligner det på billedet. Det ser jo ikke pænt ud. Jeg troede mønsteret var strikket i retriller.
19.10.2016 - 04:20DROPS Design answered:
Hej Lisa. Du skal strikke retstrik, og naar du strikker rundt, saa er det 1 p r, 1 p vr - altsaa ikke glat.
19.10.2016 - 12:32
![]() Elze wrote:
Elze wrote:
Ik kan niet meer verder omdat Ik de onderkant niet begrijp Alle steken op de pen. DAN beginnen met 16 steken op een andere naald? ik begrijp het niet! HELP
15.10.2016 - 18:00DROPS Design answered:
Hoi Elze. Zoals eerder uitgelegd, dan zet je 16 st op een eigen nld en breit eerst de goede kant (1 r , 1 omsl enzovoort). Keer het werk en brei terug op de nld tot je 1 st over hebt van de 16 st. Deze brei je nu samen met de eerste 2 st van de dominovierkant (die op een andere nld staan). En ga door. Dus je breit de 16 st steeds heen en weer met strepen tegelijkertijd met het samenbreien met de st van het vierkantje in de nld die worden aangegeven.
17.10.2016 - 16:27
![]() Hanne Lund Rasmussen wrote:
Hanne Lund Rasmussen wrote:
Hej igen. Har nu fundet ud af opskriften 🤗 Ikke pga af jeres svar , men ved at nærstudere billedet af modellen. Jeg tror at opskriften ville være meget lettere at forstå , hvis I gjorde det mere tydeligt at nedre kant strikkes på tværs og begyndende med de 16/12 nyopståede masker. Mvh Hanne
12.10.2016 - 14:40
|
||||||||||||||||
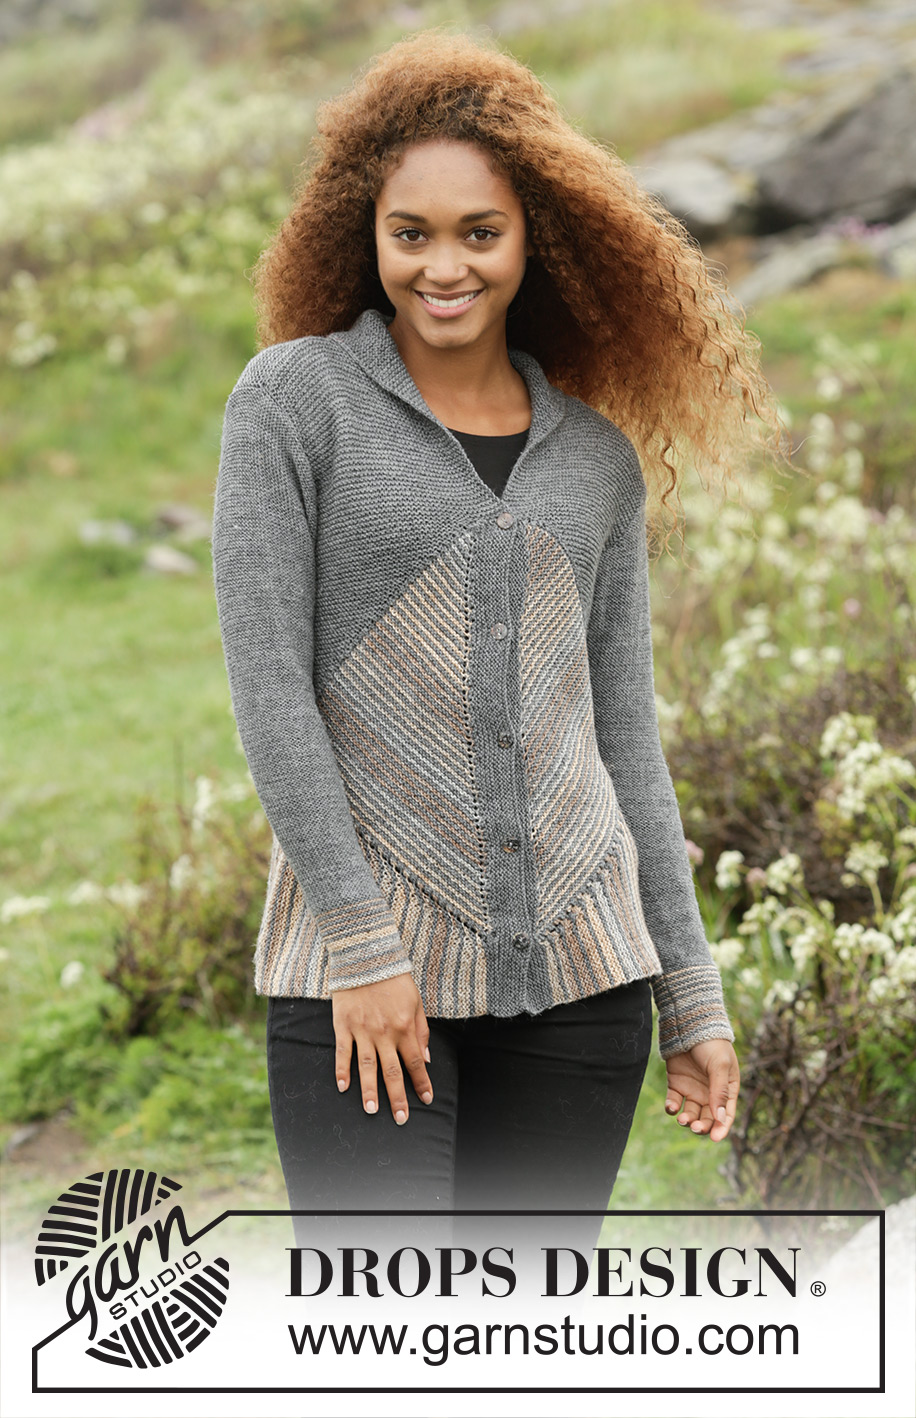
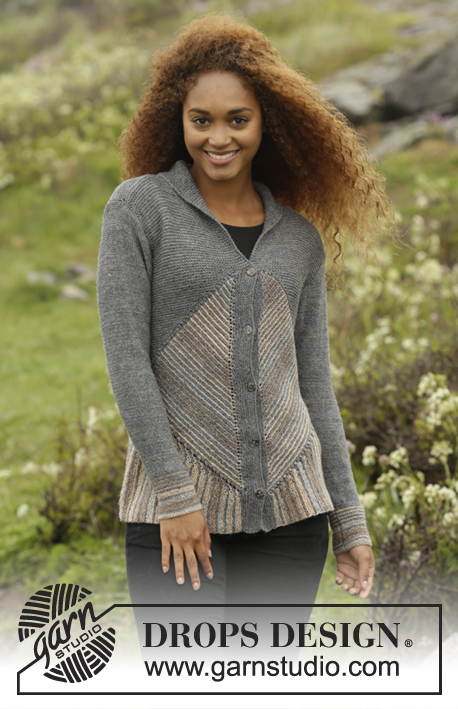
Tauriel Cardigan#taurielcardigan |
||||||||||||||||
 |
 |
|||||||||||||||
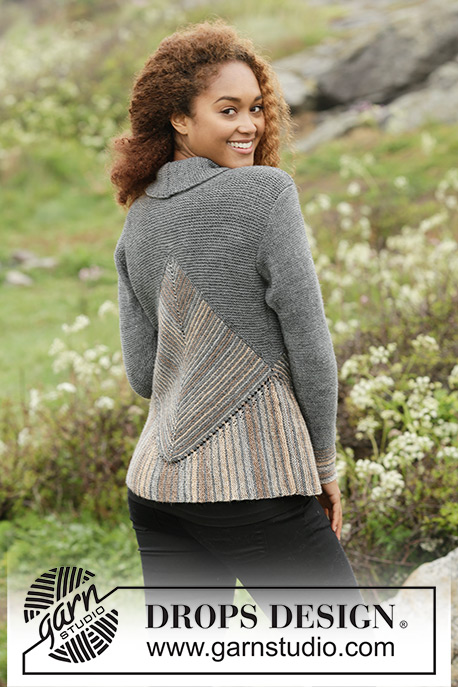
Knitted DROPS jacket in garter st with domino squares, stripes and shawl collar in ”Fabel”. Size: S - XXXL.
DROPS 173-15 |
||||||||||||||||
|
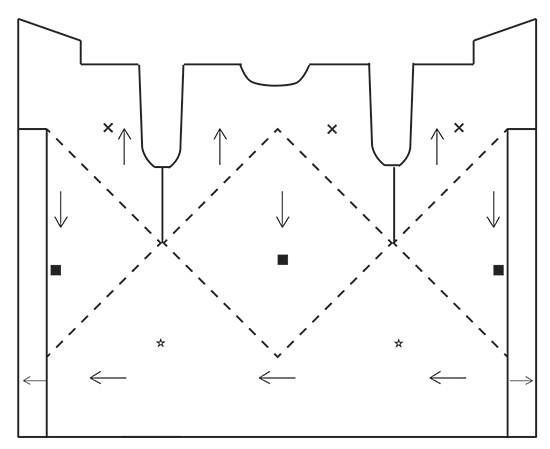
GARTER ST (back and forth): K all rows. 1 ridge = K2 rows. STRIPES: * Work 1 ridge in GARTER ST - see explanation above, with sand. Work 1 ridge with gray. *, repeat from *-* until finished measurements. First row with new color is always from RS. DOMINO SQUARE: Insert 1 marker in the middle st. ROW 1 (= RS): K until st with marker, 1 YO, K 1 (st with marker), 1 YO, K the rest of row (= 2 sts inc). ROW 2 (= WS): K all sts. Repeat 1st and 2nd row, i.e. inc 2 sts in the middle of the square on every row from RS. HALF A DOMINO SQUARE LEFT: Insert 1 marker in the first st. ROW 1 (= RS): K 1 (st with marker), 1 YO, K the rest of row. ROW 2 (= WS): K all sts. Repeat 1st and 2nd row, i.e. inc 1 st inside 1 st of square at beg of every row from RS. HALF A DOMINO SQUARE RIGHT: Insert 1 marker in the last st. ROW 1 (= RS): K until st with marker, 1 YO, K 1 (st with marker). ROW 2 (= WS): K all sts. Repeat 1st and 2nd row, i.e. inc 1 st inside 1 st of square at end of every row from RS. INCREASE TIP (applies to sleeve): Work until 2 sts remain before marker, 1 YO (= 1 st inc), K 4 (marker is in the middle of these sts), 1 YO (= 1 sts inc). Work YO twisted on next round. PATTERN (applies to sleeve): Work * 3 ridges with sand, work 1 ridge with gray *, repeat from *-* 4 times in total, then work stripes as follows: Work * 1 ridge with sand, work 1 ridge with gray *, repeat from *-* 4 times in total. Now work piece in gray until finished measurements. Turn piece inside out to that WS is outwards and continue in stockinette st. BUTTONHOLES: Dec for buttonholes on right band. 1 buttonhole = K 2 tog and make 1 YO. ---------------------------------------------------------- JACKET: Work first 3 domino squares – see square on chart, then work 1 edge to sts on domino squares (i.e. bottom edge of jacket) with short rows - see star on chart. Edge is worked from mid front to mid back and mid front again. Finally work a yoke on jacket over domino square - se cross on chart. BACK PIECE: DOMINO SQUARE: Cast on 5 sts on circular needle size 3.5 mm / US 4 with gray. K 1 row from WS. Switch color to sand and work DOMINO SQUARE - see explanation above, back and forth and STRIPES – see explanation above. REMEMBER THE KNITTING GAUGE Work Domino square and stripes until piece measures 38-42-46-50-56-62 cm / 15"-16½"-18"-19 ¾"-22"-24½" at the widest = approx. 62-68-74-82-90-100 ridges, adjust so that last ridge is with sand, and approx. 64-70-76-84-92-102 sts on each side of st with marker (= approx. 129-141-153-169-185-205 sts in total on needle). Work 1 ridge with gray and inc as before (i.e. 1 st on each side of st with marker) and inc 4 sts evenly on each side of mid st on row from RS (= 10 sts inc in total on row from RS) = approx. 69-75-81-89-97-107 sts on each side of st with marker (= approx. 139-151-163-179-195-215 sts in total on needle). Slip sts on a stitch holder and work left front piece domino square. LEFT FRONT PIECE: DOMINO SQUARE: Cast on 3 sts on circular needle size 3.5 mm / US 4 with gray. K 1 row from WS. Switch color to sand and work HALF DOMINO SQUARE LEFT – see explanation above, back and forth and stripes, until piece measures 19-21-23-25-28-31 cm / 7½"-8 ¼"-9"-9 ¾"-11"-12 ¼" on the widest = approx. 62-68-74-82-90-100 ridges, adjust with back piece (= approx. 65-71-77-85-93-103 sts). Work 1 ridge with gray and inc as before (i.e. 1 st after st with marker) and inc 4 sts evenly on row from RS (= 5 sts inc in total on row from RS) = approx. 70-76-82-90-98-108 sts. Slip sts on a stitch holder and work right front piece domino square. RIGHT FRONT PIECE: DOMINO SQUARE: Cast on 3 sts on circular needle size 3.5 mm / US 4 with gray. K 1 row from WS. Switch color to sand and work HALF DOMINO SQUARE RIGHT – see explanation above, back and forth in stripes, until piece measures 19-21-23-25-28-31 cm / 7½"-8 ¼"-9"-9 ¾"-11"-12 ¼" on the widest = approx. 62-68-74-82-90-100 ridges, adjust with back piece (= approx. 65-71-77-85-93-103 sts). Work 1 ridge with gray and inc as before (i.e. 1 st before st with marker) and inc 4 sts evenly on row from RS (= 5 sts inc in total on row from RS) = approx. 70-76-82-90-98-108 sts. Slip all sts from domino back on needle in sequence without working them as follows: Sts from right front piece domino square are on needle, insert 1 marker, slip sts from back piece domino square back on needle, insert 1 marker, slip sts from left front piece domino square back on needle = approx. 279-303-327-359-391-431 sts in total. Then work bottom edge from right front piece, over back piece, to left front piece as follows: BOTTOM EDGE: Work piece tog with sts from mid front (i.e. tip of domino on right front piece) and to the side, down to tip mid back, up to the side and down to mid front (i.e. tip of domino on left front piece). Cast on 16-16-12-12-12-12 sts on circular needle size 3.5 mm / US 4 with gray. Work short rows and stripes as follows: RIGHT FRONT PIECE BOTTOM EDGE: Work tog with sts from tip mid front and out to marker in the side as follows: ROW 1 (= RS): K 1, 1 YO and K rest of row (= 1 st inc). ROW 2 (= WS): K until 1 st remains on row, work next st tog with the first 2 sts from domino (= K 3 tog = 2 sts dec from domino) Switch to sand. ROW 3 (= RS): As 1st row. ROW 4 (= WS): K until 5 sts remain on row, turn piece. ROW 5 (= RS): K all sts. ROW 6 (= WS): K until 3 sts remain on row, turn piece. ROW 7 (= RS): K all sts. ROW 8 (= WS): K until 1 st remains on row, work next st tog with the first 2 sts from domino (= K 3 tog = 2 sts dec from domino). Switch color to gray. Repeat 1st to 8th row until all sts from tip of domino out to the side until marker (i.e. right front piece domino square = approx. 70-76-82-90-98-108 sts) has been worked tog with the edge. RIGHT BACK PIECE BOTTOM EDGE: Worked tog with sts from the side and down to tip of domino square on back piece as follows: ROW 1 (= RS): K 1, 1 YO, K 2 twisted tog, K 2 twisted tog, K the rest of row (= 1 st dec). ROW 2 (= WS): K until 1 st remains on row, work next st tog with the first 2 sts from domino (= K 3 tog = 2 sts dec from domino). Switch to sand. ROW 3 (= RS): As 1st row. ROW 4 (= WS): K until 5 sts remain on row, turn piece. ROW 5 (= RS): K all sts. ROW 6 (= WS): K until 3 sts remain on row, turn piece. ROW 7 (= RS): K all sts. ROW 8 (= WS): K until 1 st remains on row, work next st tog with the first 2 sts from domino (= K 3 tog = 2 sts dec from domino) Switch color to gray. Repeat 1st to 8th row down to tip mid back (= approx. 69-75-81-89-97-107 sts). NOTE: On last repetition of 8th or 2nd row slip the first 3 sts from domino back on needle. ( = K 4 sts tog = 3 sts dec). LEFT BACK PIECE BOTTOM EDGE: Work tog with sts from tip of domino square on back piece and out to marker in the side as right front piece bottom edge. LEFT FRONT PIECE BOTTOM EDGE: Worked tog with sts from the side and down to tip of domino square on front piece as right back piece bottom edge. BACK PIECE: Now work yoke on back piece with gray as follows: RIGHT BACK PIECE: Pick up 64-70-76-84-92-102 sts with gray from RS on needle size 3.5 mm / US 4 on one side of domino, pick up 2 sts on tip of domino, pick up 64-70-76-84-92-102 sts down the other side of domino = 130-142-154-170-186-206 sts. K 1 row from WS and inc 15-13-13-11-13-9 sts evenly on each side of tip (= 30-26-26-22-26-18 sts inc in total) = 80-84-90-96-106-112 sts on each side (= 160-168-180-192-212-224 sts in total). Then work over the first 80-84-90-96-106-112 sts (i.e. in right side of piece seen from RS) as follows: READ ALL OF THE FOLLOWING SECTION BEFORE CONTINUING! WORK SHORT ROWS, SHORT RIDGES AND INC IN THE SIDE AT THE SAME TIME AS FOLLOWS: SHORT ROWS: Row 1 (= RS): K the first 2 sts tog, turn piece (= 1 st). Row 2 (= WS): K back. Row 3 (= RS): K 1, insert 1 marker, K the next 2 sts from domino tog, turn piece (= 2 sts). Move the marker upwards when working. Row 4 (= WS): K back. Row 5 (= RS): K 2, K the next 2 sts tog, turn piece (= 3 sts). Row 6 (= WS): K back. Row 7 (= RS): K 3, K the next 2 sts tog, turn piece (= 4 sts). Row 8 (= WS): K back. Continue the short rows like this, i.e. work over 2 sts more on every row from RS but work them 2 K tog, i.e. 2 sts become 1 st. Continue like this until all sts up to tip of domino have been worked. SHORT RIDGES: Applies only to size L-XL-XXL-XXXL: When piece measures 0-0-2-2-2-2 cm / 0-0-¾"-¾"-¾"-¾", work 0-0-1-1-1-1 short ridge (i.e. work from RS until where the last turn was, turn piece and work back = 2 rows = 1 short ridge) over the sts already worked, work short ridge every 0-0-5-4-3-2 cm / 0-0-2"-1½"-1"-¾" 0-0-4-6-8-11 times in total. INC IN THE SIDE: When yoke measures 1 cm / ⅜", inc 1 st inside 1 edge st at beg of next row from RS. Inc like this every 1½-1-1-½-½-½ cm / ½"-⅜"-⅜"-¼"-¼"-¼" 9-12-14-17-19-22 times in total = 10-13-15-18-20-23 sts before marker. When yoke measures 15-14-15-14-15-14 cm / 6"-5½"-6"-5½"-6"-5½" (measured along the side), bind off for armhole at beg of every row from RS as follows: bind off 3 sts a total of 1-1-2-2-2-3 times, 2 sts a total of 1-2-2-3-4-4 times and 1 st a total of 4-5-4-5-5-5 times (i.e. 1 st remains before marker). Piece measures approx. 19-21-23-25-28-31 cm / 7½"-8 ¼"-9"-9 ¾"-11"-12 ¼" measured in the side from domino and up. When the short rows have been worked, there are 40-42-45-48-53-56 sts in total on needle. Slip sts on 1 stitch holder and work left back piece. LEFT BACK PIECE: = 80-84-90-96-106-112 sts. READ ALL OF THE FOLLOWING SECTION BEFORE CONTINUING! WORK SHORT ROWS, SHORT RIDGES AND INC IN THE SIDE AT THE SAME TIME AS FOLLOWS: SHORT ROWS: Row 1 (= WS): Work the first 2 sts from domino, turn piece. Row 2 (= RS): Work the 2 sts K tog (= 1 st). Row 3 (= WS): K 1, insert 1 marker, work the next 2 sts from domino, turn piece (= 3 sts). Move the marker upwards when working. Row 4 (= RS): K 2 tog, K 1 (= 2 sts). Row 5 (= WS): K 2, work the next 2 sts from domino, turn piece (= 4 sts). Row 6 (= RS): K 2 tog, K the rest of row. Row 7 (= WS): K, work the next 2 sts from domino, turn piece (= 4 sts). Row 8 (= RS): K 2 tog, K the rest of row. Continue the short rows like this, i.e. work over 2 sts more from domino on every row from WS and dec 1 st at beg of the every row from RS, i.e. 2 sts become 1 st. Continue like this until all sts up to tip of domino have been worked. SHORT RIDGES: Applies only to size L-XL-XXL-XXXL: When piece measures 0-0-2-2-2-2 cm / 0-0-¾"-¾"-¾"-¾", work 0-0-1-1-1-1 short ridge (i.e. work from WS until where the last turn was, turn piece and work back = 2 rows = 1 short ridge) over the sts already worked, work short ridge every 0-0-5-4-3-2 cm / 0-0-2"-1½"-1"-¾" 0-0-4-6-8-11 times in total. INC IN THE SIDE: When yoke measures 1 cm / ⅜", inc 1 st inside 1 edge st at end of next row from RS. Inc like this every 1½-1-1-½-½-½ cm/⅜"-⅜"-¼"-¼"-¼" 9-12-14-17-19-22 times in total = 10-13-15-18-20-23 sts before marker. When yoke measures 15-14-15-14-15-14 cm / 6"-5½"-6"-5½"-6"-5½" (measured along the side), bind off for armhole at beg of every row from WS as follows: bind off 3 sts a total of 1-1-2-2-2-3 times, 2 sts a total of 1-2-2-3-4-4 times and 1 st a total of 4-5-4-5-5-5 times (i.e. 1 st remains after marker). Piece measures approx. 19-21-23-25-28-31 cm / 7½"-8 ¼"-9"-9 ¾"-11"-12 ¼" measured in the side from domino and up. When the short rows have been worked, there are 40-42-45-48-53-56 sts in total on needle. BACK PIECE: Slip sts from right and left back piece on to same needle = 80-84-90-96-106-112 sts. Work in garter st. When piece measures 13-11-11-9-8-5 cm / 5"-4½"-4½"-3½"-3"-2" from tip of domino (approx. 2 cm / ¾" remain), bind off the middle 24-24-26-26-28-28 sts for neck and finish each shoulder separately = 28-30-32-35-39-42 sts remain on shoulder. On next row from the neck dec 1 st = 27-29-31-34-38-41 sts. Work in garter st until piece measures 15-13-13-11-10-7 cm / 6"-5"-5"-4½"-4"-2 ¾" from tip of domino. Bind off. The whole piece measures approx. 60-62-64-66-71-74 cm / 23½"-24½"-25 ¼"-26"-28"-29". Work the other shoulder the same way. RIGHT FRONT PIECE: Pick up 66-72-78-86-94-104 sts with gray from RS on circular needle size 3.5 mm / US 4 on the side of domino. K 1 row from WS and inc 14-12-12-10-12-8 sts evenly = 80-84-90-96-106-112 sts. Cut the yarn. Then work short rows and inc as on left back piece (beg from WS): When all sts from domino have been worked, cast on 8 sts at the end of next row from WS for band = 48-50-53-56-61-64 sts (includes 8 band sts). Continue in garter st. When piece measures 60-62-64-66-71-74 cm / 23½"-24½"-25 ¼"-26"-28"-29" in total (adjust with back piece), bind off the first 27-29-31-34-38-41 sts for shoulder on next row from WS = 21-21-22-22-23-23 sts remain on needle, work the rest of row. Then work shawl collar in garter st, beg from RS as follows: * Work 2 rows back and forth over the first 15-15-16-16-17-17 sts, work 2 rows back and forth over all sts *, repeat from *-* until shawl collar measures 8-8-9-9-10-10 cm / 3⅛"-3⅛"-3½"-3½"-4"-4" at the shortest. Bind off. RIGHT BAND: Pick up approx. 104-113-117-127-140-154 sts with gray in edge sts from RS from bottom edge of jacket up along domino mid front up to where the 8 band sts were cast on (adjust no of sts to avoid a wavy band or a tight band). Work band in garter st tog with the 8 band sts as follows: Pick up 1 st in each of the 8 band sts from RS on double pointed needle size 3.5 mm / US 4, leave sts on double pointed needle and work the tog with ridges as follows: On every row from RS work last st from band tog with 1 st from the 8 band sts. When 5 ridges have been worked, dec for 5-5-5-6-6-6 BUTTONHOLES – see explanation above, evenly on next row from RS (top button hole is in the transition between band and front piece). Bind off when the 8 band sts have been worked tog with band. LEFT FRONT PIECE: Pick up 66-72-78-86-94-104 sts with gray from RS on circular needle size 3.5 mm / US 4 on the side of domino. K 1 row from WS and inc 14-12-12-10-12-8 sts evenly = 80-84-90-96-106-112 sts. Then work short rows and inc as on right back piece. When all sts from domino have been worked, cast on 8 sts at the end of next row from RS for band = 48-50-53-56-61-64 sts (includes 8 band sts). Work in garter st. When piece measures 60-62-64-66-71-74 cm / 23½"-24½"-25 ¼"-26"-28"-29" in total (adjust with back piece), bind off the first 27-29-31-34-38-41 sts for shoulder on next row from RS = 21-21-22-22-23-23 sts remain on needle, work the rest of row. Then work shawl collar in garter st, beg from WS as follows: * Work 2 rows back and forth over the first 15-15-16-16-17-17 sts, work 2 rows back and forth over all sts *, repeat from *-* until shawl collar measures 8-8-9-9-10-10 cm / 3⅛"-3⅛"-3½"-3½"-4"-4" at the shortest. Bind off. LEFT BAND: Pick up approx. 104-113-117-127-140-154 sts with gray in edge sts from RS from where the 8 band sts were cast on, over domino and down along the entire jacket (adjust no of sts to avoid a wavy band or a tight band). Work band in garter st tog with the 8 band sts as follows: Pick up 1 st in each of the 8 band sts from RS on double pointed needle size 3.5 mm / US 4, leave sts on double pointed needle and work the tog with ridges as follows: On every row from WS work last st from band tog with 1 st from the 8 band sts. Bind off when the 8 band sts have been worked tog with band. SLEEVE: Worked in the round on double pointed needles. Cast on 46-48-50-54-56-58 sts on double pointed needles size 3.5 mm / US 4 with sand. Work PATTERN - see explanation above. When piece measures 14-12-10-8-3 cm / 5½"-4 ¾"-4"-3"-1", insert 1 marker at beg of round, inc 1 st on each side of marker – see INCREASE TIP. Inc like this every 1½ cm / ½" 21-22-23-24-25-26 times in total = 88-92-96-102-106-110 sts. When piece measures 48-47-46-45-43-42 cm / 19"-18½"-18"-17 ¾"-17"-16½" (shorter measurements in the larger sizes because of longer sleeve cap and wider shoulders). Continue to work back and forth and bind off for sleeve cap at beg of every row in each side of piece as follows: bind off 4 sts 2 times, 2 sts 3 times and 1 st 2 times, then bind off 2 sts in each side until piece measures 56-56-56-56-55-54 cm / 22"-22"-22"-22"-21½"-21 ¼", then bind off 3 sts 1 time in each side of piece. Bind off the remaining sts. Make another sleeve the same way. ASSEMBLY: Assemble with gray. Sew the shoulder seams. Sew the collar tog mid back and sew it to the neckline. Sew in sleeves with WS outwards, i.e. stockinette st is turned inwards. Sew side seams down to bottom edge in outer loop of edge sts. Sew on buttons. |
||||||||||||||||
Diagram explanations |
||||||||||||||||
|
||||||||||||||||
 |
||||||||||||||||
 |
||||||||||||||||
Have you finished this pattern?Tag your pictures with #dropspattern #taurielcardigan or submit them to the #dropsfan gallery. Do you need help with this pattern?You'll find 23 tutorial videos, a Comments/Questions area and more by visiting the pattern on garnstudio.com. © 1982-2026 DROPS Design A/S. We reserve all rights. This document, including all its sub-sections, has copyrights. Read more about what you can do with our patterns at the bottom of each pattern on our site. |
||||||||||||||||


With over 40 years in knitting and crochet design, DROPS Design offers one of the most extensive collections of free patterns on the internet - translated to 17 languages. As of today we count 324 catalogs and 12290 patterns - 12280 of which are translated into English (US/in).
We work hard to bring you the best knitting and crochet have to offer, inspiration and advice as well as great quality yarns at incredible prices! Would you like to use our patterns for other than personal use? You can read what you are allowed to do in the Copyright text at the bottom of all our patterns. Happy crafting!
Post a comment to pattern DROPS 173-15
We would love to hear what you have to say about this pattern!
If you want to leave a question, please make sure you select the correct category in the form below, to speed up the answering process. Required fields are marked *.