
Popular categories
Looking for a yarn?


Comments / Questions (44)
![]() Dolfin wrote:
Dolfin wrote:
Bonjour à la fin après les rangs en point mousse où on fait les rangs raccourcis, vous dites : Tricoter 2 côtes mousse sur toutes les mailles, Le travail étant en plein milieu puisqu'on a laissé des mailles en attente de chaque côté, dois t-on finir la ligne pour se retrouver au début du rang ou dois t-on arrêter le travail où on est, et reprendre au début du rang pour faire les rangs en entier. Merci
19.12.2017 - 22:09DROPS Design answered:
Bonjour Mme Dolfin, pour éviter de couper le fil, on tricote d'abord les mailles jusqu'à la fin du rang, puis au rang retour, sur l'autre partie des mailles en attente (de l'autre côté du rang). Bon tricot!
20.12.2017 - 09:24
![]() DOLFIN wrote:
DOLFIN wrote:
Bonjour à partir du rang 7, j'ai du mal à comprendre ce qu'il faut faire, pour le rang 7 je fais 1m end, 1env, 1end, 1 env, 1 end, 1 env et 3 end etc Mais pour le rang 8 et tous les rangs pairs, dois-je comprendre qu'il faut tricoter tout le rang à l'envers ? Pouvez-vous me l'expliquer autrement que tel qu'expliqué par rapport au dessin. Merci Je débute et c'est un peu compliqué . Bonne journée
02.12.2017 - 09:49DROPS Design answered:
Bonjour Mme Dolfin, au rang 8 de A.1 vous tricotez les mailles comme elles se présentent = 2 m env, 1 m end, 1 m env, 1 m end, 1 m env, 1 m end, 3 m env, 1 m end, 1 m env, 1 m end, 1 m env, 1 m end, 1 m env = lisez le diagramme de gauche à droite sur l'envers. Bon tricot!
04.12.2017 - 09:12
![]() Francesca wrote:
Francesca wrote:
Buonasera, ho terminato l'esecuzione degli schemi A4 A3 e A2. Devo fare A5 all'interno delle 4 maglie iniziali e finali, non capisco: A5 va ripetuto per tutte le 253 maglie interne ai bordi? Grazie mille, saluti Francesca
17.09.2017 - 17:13DROPS Design answered:
Buonasera Francesca, si, esattamente deve lavorare il diagramma A.5 su tutte le maglie, tranne le 4 maglie ai bordi a ogni lato. Buon lavoro!
17.09.2017 - 19:18
![]() Nyllie wrote:
Nyllie wrote:
Thanks for reply assumed that was the case. Gave it a try and finished it up about an hour after posting.
09.02.2016 - 19:41
![]() Nyllie wrote:
Nyllie wrote:
Almost done.... Finished up to this point = 129-((AT THE SAME TIME on first row inc 12-16-20-24 sts evenly = 141-152-163-174 sts. Loosely bind off. )) Need clarification on the section in (()). What row do you mean to increase 12 stitches on? Is it the first row after 129 stitches where you do not work the 10 stitches on each outermost end?
09.02.2016 - 02:19DROPS Design answered:
Dear Nyllie, when you have 129 sts, you first work 8 rdiges over 4 sts less on every row. Then, work 2 ridges over all sts, but on the 1st of these 4 rows, inc 12 sts evenly. Happy knitting!
09.02.2016 - 10:09
![]() Nyllie wrote:
Nyllie wrote:
Could you please ignore the last 2 questions I asked. Have had another go at the pattern and all is worked out. Thanks.
07.02.2016 - 01:56DROPS Design answered:
Dear Nyllie, see answers below - thank you for your patience.
08.02.2016 - 12:30
![]() Nyllie wrote:
Nyllie wrote:
Now working on A.6 - A.8. Says to work the 5 stitches in A.6, however my chart for A.6 shows 6 stitches and the numbers will not work if I use 6. I will be left with only 3 stitches for chart A.8. Is there an error in the chart?
06.02.2016 - 21:59DROPS Design answered:
Dear Nyllie, A.6 = 6 sts, written pattern will be edited, thank you. Happy knitting!
08.02.2016 - 12:00
![]() Nyllie wrote:
Nyllie wrote:
On row 10 in chart A.5 where is the best place to increase 2 stitches.....?One just before band on one side and just after on other side? Thanks
06.02.2016 - 18:31DROPS Design answered:
Dear Nyllie, just inc 1-2 sts (see size) evenly on the row - read more here. Happy knitting!
08.02.2016 - 11:30Henrike wrote:
Ich moechte diese Jacke nachstricken, habe aber erst die Anleitung "studiert". In der Anleitung steht: 429-489-529-549 M...anschlagen. Dann steht: Wenn A.1 1 x in der Höhe gestr wurde, sind 261-297-321-333 M auf der Nadel. Ich verstehe nicht recht: Hat die Jacke also einen leicht keilförmigen Schnitt? Ich stelle diese Frage, denn die Grafik zeigt gerade vertikale, kastenförmige Linien. Danke
25.01.2016 - 01:29DROPS Design answered:
Durch die Abnahmen in A.1 erziehen Sie die Spitzen unten, der untere Rand wird dadurch ganz leicht volantartig. Die Jacke an sich ist nicht keilförmig, sondern gerade, ohne Taillierung oder A-Schnitt.
29.01.2016 - 11:12
![]() Linda Hvid wrote:
Linda Hvid wrote:
Med forlov, men min garnforhandler kan altså heller ikke gennemskue de mål nederst på tegningen. Kunne du ikke være så sød at oversætte, så brystmålene bliver tilgængelige? Det vil være grumme ærgerligt at strikke forkert størrelse. Indrømmer blankt, at jeg er skuffet over dit svar.
08.01.2016 - 19:51DROPS Design answered:
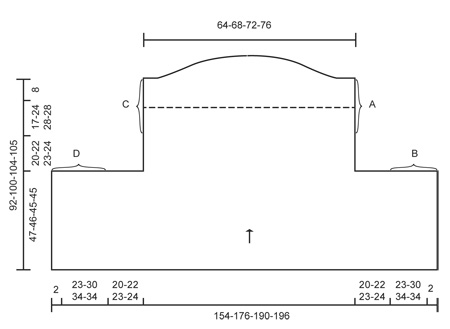
Hej Linda. Hvis I kigger paa tegningen - og laeser mönstret igennem, saa ser I at, D og C og A og B skal syes sammen = det er aermegabene. Den överste del (64-68-72-76) er overkanten med kragen og nederst er saa bredden paa hele jakken (154-176 osv) og tallene i hver side er forkant, forstykke og side under aermet (f.eks. 2, 23 og 20 cm i str. S/M). Er du tilfreds med dette svar? ;-) God fornöjelse med det.
13.01.2016 - 16:02
|
||||||||||||||||||||||||||||
Lothlorien#lothloriencardigan |
||||||||||||||||||||||||||||
 |
 |
|||||||||||||||||||||||||||
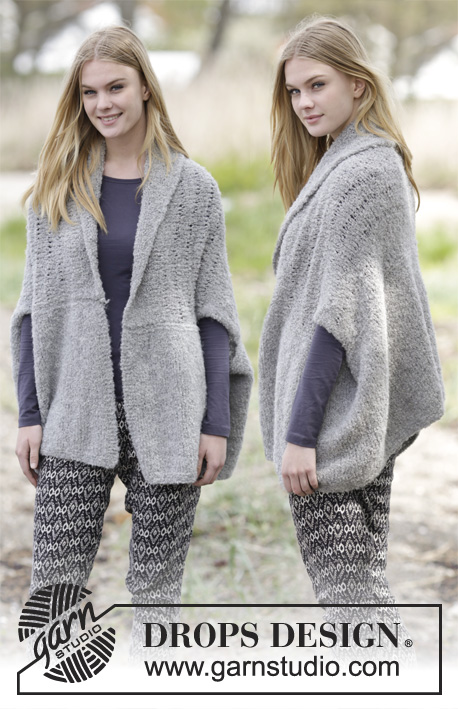
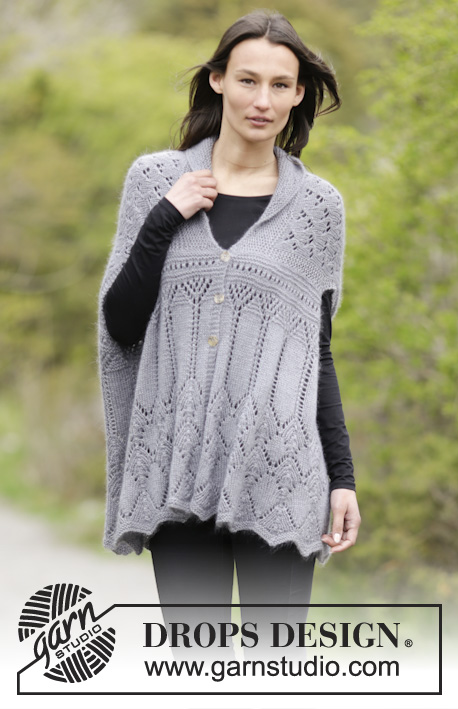
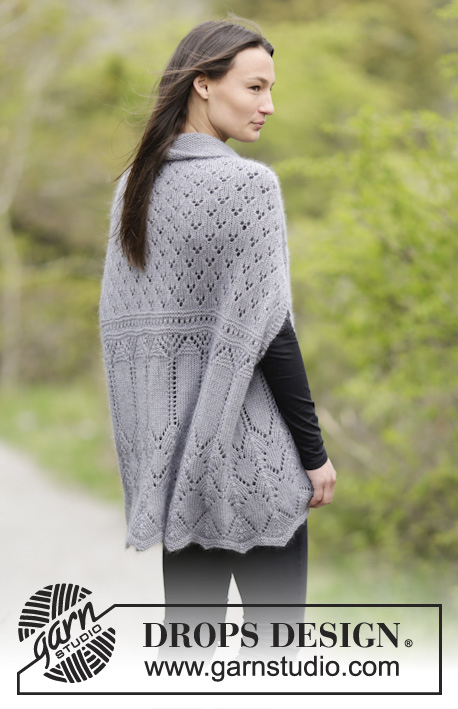
Knitted DROPS jacket in garter st with lace pattern and shawl collar in "BabyAlpaca Silk" and "Kid-Silk". Size S-XXXL.
DROPS 166-43 |
||||||||||||||||||||||||||||
|
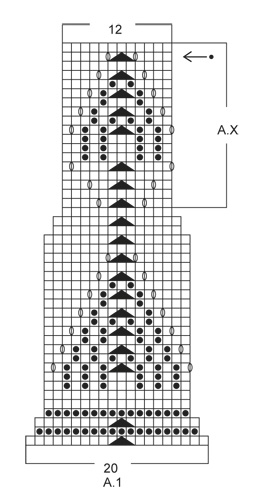
GARTER ST (back and forth): K all rows. 1 ridge = K2 rows. PATTERN: See diagrams A.1 to A.8. The diagrams show all rows in pattern seen from RS. INCREASE TIP: Inc 1 st by making 1 YO, on next row K YO twisted (i.e. work in the back loop of st instead front) to avoid holes. BUTTONHOLES: Dec for buttonholes on right band (i.e. the first 4 sts seen from RS). 1 buttonhole = K tog second and third st from edge and make 1 YO. Dec for buttonholes when piece measures: SIZE S/M: 29, 37 and 45 cm / 11½",14½",17¾" SIZE L/XL: 28, 36 and 44 cm / 11",14¼",17¼" SIZE XXL: 27, 35 and 43 cm / 10½",13¾",17" SIZE XXXL: 27, 35 and 43 cm / 10½",13¾",17" ---------------------------------------------------------- JACKET: Worked back and forth on circular needle. work on 2 circular needle size 80 cm / 31½" to make room for all sts at beg of piece. Beg at the bottom of back piece and front piece, then bind off sts in each side, continue on back piece, then work shawl collar before sewing piece tog. Cast on 429-489-529-549 sts on circular needle size 5 mm / US 8 with 1 strand BabyAlpaca Silk and 1 strand Kid-Silk (= 2 strands). Work pattern as follows from RS: 4 band sts in GARTER ST - see explanation above, work last st in A.1, A.1 (= 20 sts) 21-24-26-27 times in width, 4 band sts in garter st. REMEMBER THE KNITTING GAUGE Work the 4 band sts in garter st until finished measurements. When entire A.1 has been worked 1 time vertically, there are 261-297-321-333 sts on needle. Repeat A.X 1 more time vertically. Remember BUTTONHOLES - see explanation above. Then repeat the 2 last rows in A.X 11-10-9-9 more times vertically. Piece measures approx. 38-37-36-36 cm / 15"-14½"-14¼"-14¼" from cast-on edge. Now work as follows: 4 band sts in garter st, A.2 (= 6 sts), A.3 (= 12 sts) 20-23-25-26 times in width, A.4 (= 7 sts), 4 band sts in garter st. When A.2-A.4 have been worked 1 time vertically, continue with A.5 inside band sts in each side. NOTE: On 7th row work last st before band sts K, and on 10th row inc 2-1-2-1 sts = 263-298-323-334 sts. When entire A.5 has been worked 1 time vertically, work 2 rows in stockinette st, AT THE SAME TIME at beg of these 2 rows bind off 77-91-100-102 sts = 109-116-123-130 sts. Now continue as follows: 4 sts in garter st, A.6 (= 6 sts), A.7 (= 7 sts) until 8 sts remain, A.8 (= 4 sts), 4 sts in garter st. When piece measures 84-92-96-97 cm / 33"-36¼"-37¾"-38¼" - adjust to finish after 6th or 12th row in A.6-A.8 - switch to circular needle size 4.5 mm / US 7 and continue in garter st until finished measurements. Work the first 45-48-50-53 sts, insert 1 marker in next st, work 4-4-5-5 sts, insert a marker in next st, work 7-8-9-10 sts, insert a marker in next st, work 4-4-5-5 sts, insert a marker in next st, work the next 45-48-50-53 sts (= 4 markers). On next row from RS, inc 1 st before the 4 sts with markers – READ INCREASE TIP (= 4 sts inc). Repeat inc alternately on right and left side of each marker every 4th row 4 more times (= 20 sts inc) = 129-136-143-150 sts. On next ridge do not work the outermost 10-14-16-18 sts in each side, then on the next 8 ridges work over 4 sts less on every row. Work 2 ridges over all sts, AT THE SAME TIME on first row inc 12-16-20-24 sts evenly = 141-152-163-174 sts. Loosely bind off. ASSEMBLY: Sew seam A and B tog (see chart). Sew in outer loops of edge sts to avoid a chunky seam. Armhole = 20-22-23-24 cm / 8"-8¾"-9"-9½" Repeat in the other side. I.e. sew seam C and D tog the same way. Fasten off. |
||||||||||||||||||||||||||||
Diagram explanations |
||||||||||||||||||||||||||||
|
||||||||||||||||||||||||||||
 |
||||||||||||||||||||||||||||
 |
||||||||||||||||||||||||||||
 |
||||||||||||||||||||||||||||
Have you finished this pattern?Tag your pictures with #dropspattern #lothloriencardigan or submit them to the #dropsfan gallery. Do you need help with this pattern?You'll find 18 tutorial videos, a Comments/Questions area and more by visiting the pattern on garnstudio.com. © 1982-2026 DROPS Design A/S. We reserve all rights. This document, including all its sub-sections, has copyrights. Read more about what you can do with our patterns at the bottom of each pattern on our site. |
||||||||||||||||||||||||||||


With over 40 years in knitting and crochet design, DROPS Design offers one of the most extensive collections of free patterns on the internet - translated to 17 languages. As of today we count 325 catalogs and 12298 patterns - 12288 of which are translated into English (US/in).
We work hard to bring you the best knitting and crochet have to offer, inspiration and advice as well as great quality yarns at incredible prices! Would you like to use our patterns for other than personal use? You can read what you are allowed to do in the Copyright text at the bottom of all our patterns. Happy crafting!
Post a comment to pattern DROPS 166-43
We would love to hear what you have to say about this pattern!
If you want to leave a question, please make sure you select the correct category in the form below, to speed up the answering process. Required fields are marked *.