
Popular categories
Looking for a yarn?


Comments / Questions (141)
![]() Hannah wrote:
Hannah wrote:
When decreasing for the sleeve on the main dress how do i decrease before the marker?
11.08.2020 - 16:09DROPS Design answered:
Dear Hannah, when decrease at each A.3 you will decrease as explained under DECREASE TIP, is before A.3 with K2 together - and after A.3 with slip 1 as if to K, K1, psso. Happy knitting!
11.08.2020 - 16:29
![]() Sara wrote:
Sara wrote:
I am a bit confused about the A2 pattern do I use the purl stitch on the first line since it’s the wrong side and then line 2 do all K? I tried it and it doesn’t seem right please advise. Thanks
20.07.2020 - 21:17DROPS Design answered:
Hi Sara, A.2 is worked in the round on the dress, so round 2 is knitted. Happy crafting!
21.07.2020 - 07:26
![]() Eileen Doucette wrote:
Eileen Doucette wrote:
I'm am so confused about A.3 .I get moving marker and using last stitch of previous row. I think a video would help with this pattern where to start decreasing to show what row to form the A line. I'm frustrated and have knitted for years! please help me with this section. I do read the questions and answers that others have asked in English language. After the very first row of A.3 I end up with 191 stitches instead of 192 is this correct? Please help me. thanks Eileen
16.02.2020 - 15:21DROPS Design answered:
Dear Eileen, A.3 is worked over 3 stitches: 1 yarn over, slip 1 st as if to K, K 2 tog, psso, (you have decreased 2 stitches) 1 yarn over = there are always 3 stitches - make sure you didn't forget a yarn over on first round. Then start to decrease, you are repeating A.3 a total of 6 times in the round and you should decrease 6 stitches on each decrease round. On first decrease round, work *A.3, dec 1 st - see DECREASE TIP, 27 sts in stocking st*, repeat from *-*; on next decrease round work: *A.3, 26 sts in stocking st, dec 1 st*, repeat from *-* around. Happy knitting!
17.02.2020 - 09:21
![]() Eileen Doucette wrote:
Eileen Doucette wrote:
Could you please help me figure out A.2 pattern. For the 2nd row of pattern, it shows to knit 13, YO sl 1 st, k2 tog. Psso st then Yo again. For size 2 then repeat pattern. 6 times? or all around the dress? Thanks, Eileen
12.02.2020 - 20:57DROPS Design answered:
Hi Eileen, The 2nd round of A.2 is knit all stitches. Round 3, from right to left is : K2, 1 YO, slip 1 stitch, knit 1 and pass the slipped stitch over, K7, K2 together, 1 YO, K7, 1 YO, slip 1 stitch, knit 1 and pass the slipped stitch over, K7, K2 together, 1 YO, K1 and repeat this pattern to end of round. Happy knitting!
13.02.2020 - 10:34
![]() Martina Nikodemová wrote:
Martina Nikodemová wrote:
¨Dobrý den, potřebovala bych poradit, s pletením těchto krásných šatiček. Pochopila jsem, že se plete v kruhových řadách bez švu, ale nevím jak mám plést tu rubovou stranu :-(........zkoušela jsem najít na netu nějaký návod, ale nic jsem nenašla..... mohla byste mi poradit nebo někam nasměrovat děkuji Nikodemová
04.01.2020 - 20:59DROPS Design answered:
Milá Martino, při pletení v kruhových řadách pleteme vlastně stále jen lícovou stranu. Rubové (a lícové) řady budete plést jen v místě, kde je pletenina rozdělená na jednotlivé díly - tj. v horní části hrudníku, po uzavření ok pro průramky. Hodně zdaru! Hana
05.01.2020 - 12:56
![]() Brigitte wrote:
Brigitte wrote:
Très joli modèle tricoté deux fois en 6 ans : la première fois en coton mérinos bleu jeans avec un fil glitter argent, la seconde fois en lilas et agrémenté de sequins de couleur. Ma petite-fille aime beaucoup ces 2 robes.
02.01.2020 - 16:22
![]() Merete wrote:
Merete wrote:
Jeg skjønner ikke hvordan jeg skal få til å gjøre dette. Feller jeg først på retten og så tilbake på vrangen. Jeg har 60 masker og skal sitte igjen med 52. Det er åtte masker felt. Det virker som om det er mange flere BAKSTK: = 56-60-64-68-74 m. Fortsett fellingene til ermhull i hver side på beg av hver p slik: 2 m 1 gang og 1 m 2-2-1-1-2 ganger = 48-52-58-62-66 m.
18.11.2019 - 23:23DROPS Design answered:
Hej Merete, Vi vil gerne hjælpe dig, men vi skal vide hvilken størrelse du strikker, hvor langt du er i opskriften, og hvad du ikke får til at stemme :)
04.12.2019 - 11:41
![]() Olga Baranová wrote:
Olga Baranová wrote:
Dobrý den,z návodu na pletené šatky jsem nepochopila, zda pracovat na kruhových jehlicích dokola bez švu, nebo rub´-líc a nakonec sešít. Děkuji za odpověď Olga Baranová
14.10.2019 - 11:57DROPS Design answered:
Dobrý den, paní Baranová, šatičky jsou pletené v kruhu dohromady, bez sešívání. Pouze je potřeba nakonec vsadit/všít rukávy, zapošít otvor v podpaží a lem u krku. Hodně zdaru! Hana
14.10.2019 - 12:46
![]() Sisko wrote:
Sisko wrote:
Tilasin langat wendy darling by drops deisin pitsimekkoon.vaidoin langan toiseen lankasuosikoissa olevaan drops cotton light, mutta nyt on ogelma kun kudottu neulos venyy kauheasti ja ei saa neulottua kuin 6cm yhdellä kerällä. lankahan ei riitä mihinkään ja mekostahan tulee painava . Lapsi jolle neulon on 5v. pienikokoinen ja hyvin hoikka . miten saan mittasuhteet oikein ja mitä olen tehnyt väärin?
10.10.2019 - 09:59DROPS Design answered:
Hei, aina kun ohjeen lanka vaihdetaan johonkin toiseen lankaan tulee ottaa huomioon lankojen eri ominaisuudet ja juoksevuus. Cotton Merino -langassa on 110 m/kerä ja Cotton Light -langassa on 105 m/kerä, joten menekin tulisi olla melkein sama kuin ohjeessa, voit tarvita yhden kerän enemmän. Polyesteri on raskaampaa kuin villa, joten varmaan tästä syystä neule venyy. Ennen kuin aloitat neulomisen, sinun tulee myös tarkistaa neuletiheys. Mikäli tiheys eroaa ohjeen tiheydestä, sinun tulee vaihtaa ohuempiin/paksumpiin puikkoihin. Saat aina parhaimman tuloksen, kun käytät ohjeessa mainittua lankaa.
17.12.2019 - 17:09
![]() Dorthe wrote:
Dorthe wrote:
Hej. Jeg undre mig over at jeg skal starte en maske før, efter mønster A2 så kommer A3 jo ikke til at følges opad Er det en fejl i opskriften?
03.10.2019 - 10:18DROPS Design answered:
Hej Dorthe, det har du allerede gjort over de sidste 8 pinde i A.2, så ja det stemmer at A.3 skal komme over de andre masker i A.2. God fornøjelse!
03.10.2019 - 11:41
|
|||||||||||||||||||
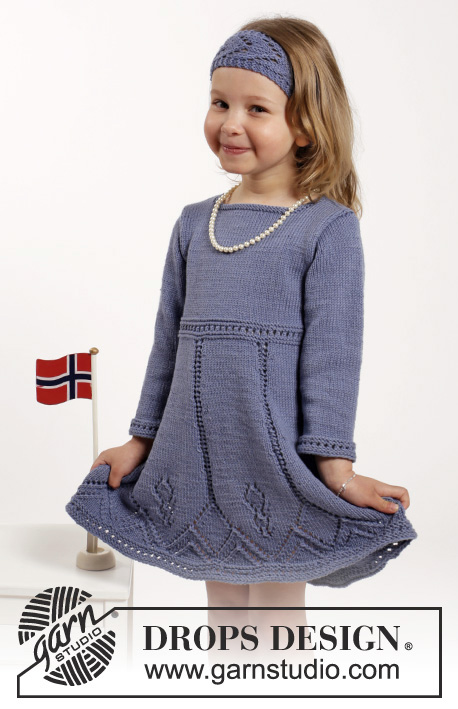
Wendy Darling#wendydarlingdress |
|||||||||||||||||||
 |
 |
||||||||||||||||||
Knitted dress and hair band with lace pattern in DROPS Cotton Merino. Size children 2 - 10 years
DROPS Children 26-6 |
|||||||||||||||||||
|
PATTERN: See diagrams A.1 to A.4. DECREASE TIP: Dec as follows before A.3: K 2 tog. Dec as follows after A.3: Slip 1 st as if to K, K 1, psso BUTTONHOLES: Dec for buttonholes on left back piece. Dec by working second and third st tog from mid back, then make a YO. Dec for buttonholes when band measures 2 and 4 cm / ¾" and 1½". GARTER ST (back and forth): K all rows. 1 ridge = K2 rows. ---------------------------------------------------------- DRESS: Worked in the round on circular needle from bottom up. Cast on 192-192-224-224-256 sts on circular needle size 3.5 mm / US 4 with Cotton Merino. Work A.1. Then work A.2 (= 6-6-7-7-8 repetitions in width). When A.2 has been worked 1 time vertically, work as follows - beg 1 st before first st on round: * A.3 (= 3 sts), 29 sts in stockinette st *, repeat from *-* 6-6-7-7-8 times. AT THE SAME TIME when piece measures 15 cm / 6", dec 1 st before every A.3 – READ DECREASE TIP (= 6-6-7-7-8 sts dec). Repeat dec alternately before and after A.3 every every 1-1½-1½-2-2 cm / ⅜"-½"-½"-¾"-¾" a total of 12-10-12-10-12 times = 120-132-140-154-160 sts. Continue in stockinette st and A.3 until piece measures 27-29-32-35-37 cm / 10½"-11½"-12½"-13¾"-14½". Now work A.1 over all sts, on first row in A.1 adjust no of sts to 124-132-140-148-160. Insert 2 markers in the piece; one at the beg of round and 1 after 62-66-70-74-80 sts = sides. Continue in stockinette st over all sts. When piece measures 34-37-41-45-49 cm / 13½"-14½"-16"-17¾"-19¼", bind off 6 sts in each side for armholes (i.e. 3 sts on both sides of every marker) and finish each piece separately. BACK PIECE: = 56-60-64-68-74 sts. Continue bind off for armholes in each side at beg of every row as follows: 2 sts 1 time and 1 st 2-2-1-1-2 times = 48-52-58-62-66 sts. When piece measures 38-42-47-52-57 cm / 15"-16½"-18½"-20½"-22½", slip the first 22-24-27-29-31 sts (from RS) on 1 stitch holder for right shoulder (work them first) and finish each shoulder separately. LEFT SHOULDER: = 26-28-31-33-35 sts. Continue in stockinette st but work the first 4 sts on needle (towards middle) in garter st (= button band). Dec for BUTTONHOLES - see explanation above. When piece measures 44-48-53-58-63 cm / 17¼"-19"-21"-22¾"-24¾", slip the first 4 sts on a stitch holder (work them first), then bind off the next 10-11-12-13-13 sts for neck. Then bind off 1 st on next row towards the neck = 11-12-14-15-17 sts remain on the shoulder. Bind off when piece measures 46-50-55-60-65 cm / 18"-19¾"-21½"-23½"-25½". RIGHT SHOULDER: Slip the 22-24-27-29-31 sts from stitch holder back on needle and cast on 4 new sts at the end of first row from RS (= button band) = 26-28-31-33-35 sts. Work as left shoulder but reversed, do not dec for buttonholes. FRONT PIECE: = 56-60-64-68-74 sts. Bind off for armhole in the sides as on back piece = 48-52-58-62-66 sts. When piece measures 41-45-50-55-60 cm / 16"-17¾"-19¾"-21½"-23½", slip the middle 18-20-22-24-24 sts on a stitch holder for neck and finish each shoulder separately. Then bind off on every row towards neck: 2 sts 1 time and 1 st 2 times = 11-12-14-15-17 sts remain on shoulder. Bind off when piece measures 46-50-55-60-65 cm / 18"-19¾"-21½"-23½"-25½". SLEEVE: Worked in the round on double pointed needles. Cast on 40-42-44-46-48 sts on double pointed needles size 3.5 mm / US 4 with Cotton Merino. Work A.1 over all sts, then work in stockinette st. Insert 1 marker at beg of round = mid under sleeve. When piece measures 6 cm / 2⅜", inc 1 st on each side of marker. Inc every 6-3½-3-3-3 cm / 2½"-1¼"-1"-1"-1" 2-4-6-7-8 more times = 46-52-58-62-66 sts. When piece measures 20-23-26-29-32 cm / 8"-9"-10¼"-11½"-12½", bind off 6 sts mid under sleeve for sleeve cap. Then work sleeve back and forth while AT THE SAME TIME dec for sleeve cap in each side as follows: Dec 2 sts in each side until piece measures 24-27-30-33-36 cm / 9½"-10½"-11¾"-13"-14¼". Bind off 3 sts in each side, then bind off the remaining sts. Piece measures approx. 25-28-31-34-37 cm / 9¾"-11"-12¼"-13½"-14½". ASSEMBLY: Sew the shoulder seams. Sew in sleeves. Sew the buttons on to right band. Then place the 4 sts from right back piece behind the 4 sts on the left back piece and fasten with small sts. NECK EDGE: Pick up approx. 72 to 88 sts (includes sts on stitch holders) around the neck on circular needle size 3.5 mm / US 4. Work 2 ridges. Bind off. ---------------------------------------------------------- HAIR BAND: Cast on 15 sts on needle size 3.5 mm / US 4 with Cotton Merino. Work 1 ridge in GARTER ST - see explanation above, then work A.4 over all sts. Continue with A.4 until piece measures 41-42-43-44 cm / 16"-16½"-17"-17¼" (lightly pull piece when measuring), work a ridge, bind off. Sew cast-on and bind-off edge tog with grafting/kitchener stitches. |
|||||||||||||||||||
Diagram explanations |
|||||||||||||||||||
|
|||||||||||||||||||
 |
|||||||||||||||||||
 |
|||||||||||||||||||
Have you finished this pattern?Tag your pictures with #dropspattern #wendydarlingdress or submit them to the #dropsfan gallery. Do you need help with this pattern?You'll find 29 tutorial videos, a Comments/Questions area and more by visiting the pattern on garnstudio.com. © 1982-2026 DROPS Design A/S. We reserve all rights. This document, including all its sub-sections, has copyrights. Read more about what you can do with our patterns at the bottom of each pattern on our site. |
|||||||||||||||||||


With over 40 years in knitting and crochet design, DROPS Design offers one of the most extensive collections of free patterns on the internet - translated to 17 languages. As of today we count 324 catalogs and 12285 patterns - 12275 of which are translated into English (US/in).
We work hard to bring you the best knitting and crochet have to offer, inspiration and advice as well as great quality yarns at incredible prices! Would you like to use our patterns for other than personal use? You can read what you are allowed to do in the Copyright text at the bottom of all our patterns. Happy crafting!
Post a comment to pattern DROPS Children 26-6
We would love to hear what you have to say about this pattern!
If you want to leave a question, please make sure you select the correct category in the form below, to speed up the answering process. Required fields are marked *.