
Popular categories
Looking for a yarn?


Comments / Questions (69)
![]() Liv Holan wrote:
Liv Holan wrote:
Har nå gjort 2 forsøk i str. M ved å strikke raglan etter denne oppskriften. strikket hele raglan oppskriften. Skal jeg nå for tredje gang starte pånytt så vil jeg være 100% sikker på at iallefall oppskriften er riktig. Garnet filtrer seg opp etter alle forsøkene jeg har gjort. Har benyttet drops "Belle". Ønsker en kompensasjon ved å få tilsendt nytt garn gratis og fraktfritt.
23.05.2015 - 19:49DROPS Design answered:
Hej Liv, Jo opskriften stemmer. Hvor i opskriften går det galt for dig? Skriv hvor du er, hvor mange masker du har og hvad du ikke får til at stemme, så svarer vi så hurtigt som muligt.
25.05.2015 - 12:10
![]() Kristina wrote:
Kristina wrote:
Mona og Hanne Grenli stillede afgørende spørgsmål i sidst i marts måned. Jeg har nu strikket til og med A2, og begyndte raglan, 0 m før 2., 3 m før 3. osv. DETTE FUNGEREDE IKKE og det er virkelig skuffende at måtte pille op og begynde forfra.... Og så kan jeg ikke engang det, for der er ikke kommet en rettelse. Ellers så blusen og mønstret fantastisk ud, strikket i baby merino.
20.05.2015 - 20:43DROPS Design answered:
Hej Kristina, Mona og Hanne. Jo, opskriften stemmer! Man starter med 30 m imellem mærketrådene på hvert ærme. Raglanudtagningerne sker yderst i hver side af de 30 m, med det yderste omslag ved selve mærketråden. Det yderste omslag vil da strikkes i glatstrik som på for og rygstk fremover og raglanudtagningerne fortsætter ved mærket i hvert hjørne på samme måde fremover. Følger du opskriften vil A.2 være midt på forstykket.
22.05.2015 - 14:44
![]() Pagand wrote:
Pagand wrote:
Tricoté en quelques heures, très agréable à porter. Mille merci pour ces nouveaux modèles sans coutures vraiment trop jolis.
19.05.2015 - 01:35
![]() Daisy wrote:
Daisy wrote:
Bonjour, J'arrive à la fin du motif A2 et je constate que les augmentations du raglan sont toutes du côté des manches. En effet au centre, entre le premier et le deuxième marqueur (idem pour le dos) il y a toujours 45 mailles, ce qui fait que le raglan descend à la verticale sur le devant. Faut-il déplacer les marqueurs à chaque tour ? si oui de combien de mailles, une ou deux ? Merci d'avance de votre réponse.
17.05.2015 - 07:59DROPS Design answered:
Bonjour Daisy, les augmentations (jetés) pour le raglan se font avant/après les mailles du raglan qui doivent former une ligne: 1 jeté, (1 m torse à l'end, 1 m end, 1 m torse à l'end), 1 jeté - alignez toujours ces 3 m = ligne du raglan à chacun des 4 raglans. Le nombre de mailles de chaque pièce augmente de 2 m à chaque tour d'augmentation. Bon tricot!
18.05.2015 - 09:49
![]() Beate Bera wrote:
Beate Bera wrote:
Liebe Drops Design, vielen Dank im Voraus! Ich stricke Größe L. Es sieht so aus, als wenn die Zunahmen alle von schräg rechts oben nach links unten verlaufen. Eigentlich müsste der Verlauf doch gegenläufig sein, oder? Herzlich Beate
27.04.2015 - 17:35DROPS Design answered:
Die Zunahmen sind korrekt, wenn Sie genau hinschauen, sehen Sie, dass die Raglanlinie auf der anderen Seite entsprechend andersherum verläuft. Wenn Sie immer an den Markierern zunehmen und die Markierer dabei in der Breite nicht versetzen (das darf natürlich nicht passieren), verlaufen die Zunahmen korrekt, die Raglanlinie wird dann automatisch schräg.
28.04.2015 - 23:12
![]() Beate Bera wrote:
Beate Bera wrote:
Ich verstehe die Raglanzunahmen nicht, kann mir auch nicht vorstellen, wie das aussehen soll. Kann mir jemand ein Detail- Foto von den Zunahmen senden? Vielleicht auch ein Foto vom fertigen Produkt, in dem man das Muster an den Ärmeln sehen kann? Ich bedanke mich im Voraus!
25.04.2015 - 23:05DROPS Design answered:
Liebe Beate, an dieser Stelle können wir Ihnen kein weiteres Foto bieten. Aber wenn Sie sagen, welche Größe Sie stricken, kann ich Ihnen vielleicht genauer erklären, wie Sie die Raglanzunahmen stricken müssen.
26.04.2015 - 21:06
![]() Senta wrote:
Senta wrote:
In der Anleitung zum Ärmel steht: "Alle M im Muster A.5 str." das soll doch bestimmt A.3 heißen, wie für den Rumpfabschluss?
15.04.2015 - 09:56DROPS Design answered:
Ja, das ist richtig, es wird gleich geändert, danke für den Hinweis!
15.04.2015 - 09:58
![]() Mareka Krentner wrote:
Mareka Krentner wrote:
Encore une question, les 8 augmentations du raglan se font du côté des manches tous les 2 tours, 2 augmentations après le marqueur de la manche et 2 augmentations juste avant le dernier marqueur de la manche. Le devant et dos pas d'augmentation toujours les 45 mailles du début (taille s) jusqu'au manche . Merci de votre aide.
13.04.2015 - 19:26DROPS Design answered:
Bonjour Mme Krentner, à chaque tour d'augmentation, on a 2 m en plus pour chaque pièce (manches, dos, devant), les jetés se tricotent à l'endroit et augmentent le nombre de mailles de chaque partie. Bon tricot!
14.04.2015 - 09:37
![]() Mareka Krentner wrote:
Mareka Krentner wrote:
Bonjour, j'ai encore un problème, pour le raglan (taille S) quand vous dites augmenter 2 mailles à chaque marqueur, les 2 premières augmentations se situent juste après le 1er marqueur, là où il y a 45 mailles et où on commence le diagramme A2 ensuite. J'aimerai bien que vous me le confirmiez, merci de votre patience.
13.04.2015 - 15:45DROPS Design answered:
Bonjour Mme Krentner, on augmente 2 m à chaque marqueur avec 1 jeté avant (1 m torse à l'end, 1 m end, 1 m torse à l'end) et 1 jeté après ces 3 m. Ces jetés sont les augmentations du raglan et "appartiennent" à la pièce concernée, le marqueur doit rester en place avant le jeté et vous conservez ainsi ces 3 m tricotées les unes au-dessus des autres. A.2 doit rester centré et on a 1 m en + de chaque côté à chaque augmentation. Bon tricot!
14.04.2015 - 09:29
![]() Vibeke wrote:
Vibeke wrote:
Når jeg skal dele efter udtagningerne til raglan, skal der så tælles masker fra første mærkning i starten af arbejdet? Hvis ja, ligger raglanudtagningerne jo skæve!! Altså, forstykket starter v/ raglan, tæller til forstykket (her 103), slutter 14 masker Før venstre raglans udtagninger, derefter skal der tælles til ærmet........Dette kan jeg ikke forstå!! Please help me!
10.04.2015 - 19:11DROPS Design answered:
Hej Vibeke. Du taeller fra starten af pinden ikke fra start af raglan.
17.04.2015 - 15:34
|
|||||||||||||||||||
Serene Spring |
|||||||||||||||||||
 |
 |
||||||||||||||||||
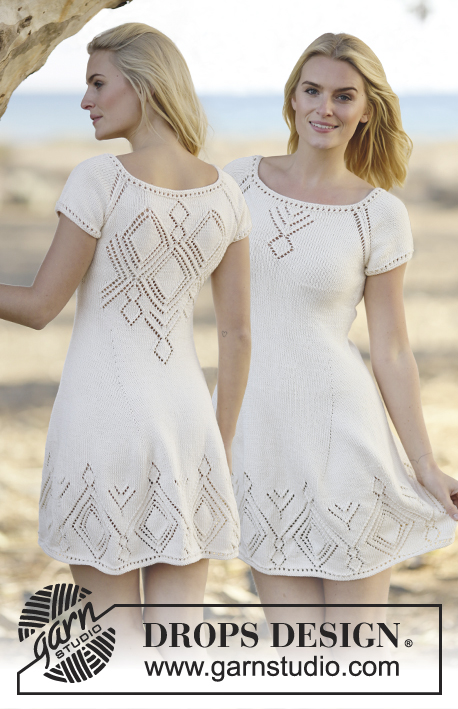
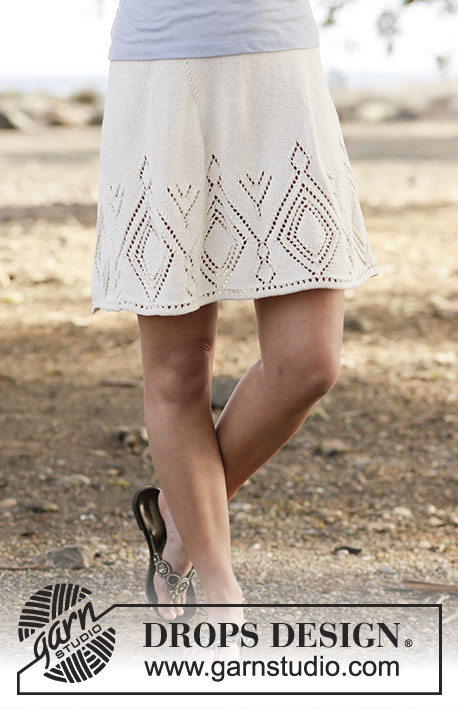
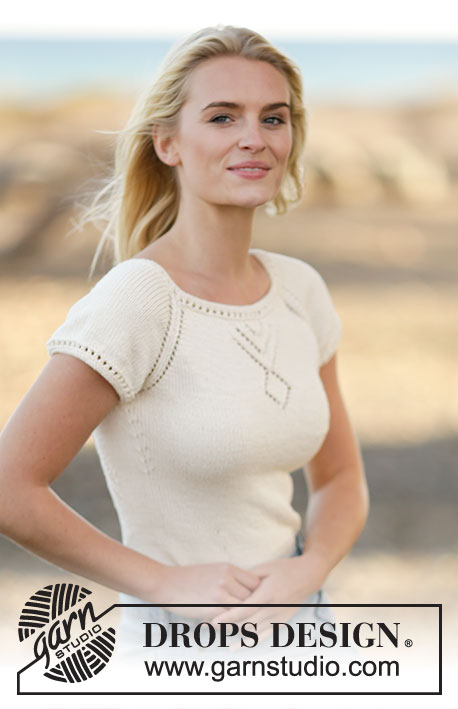
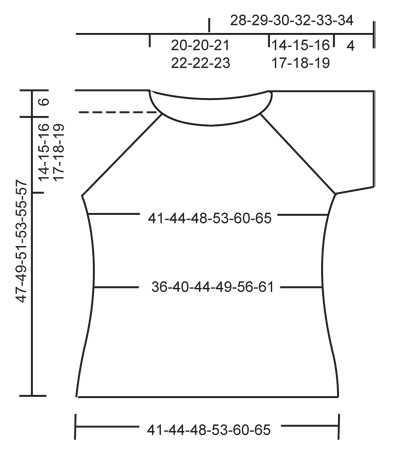
Knitted DROPS top with lace pattern and raglan in ”Belle”. Worked top down. Size: S - XXXL.
DROPS Extra 0-1104 |
|||||||||||||||||||
|
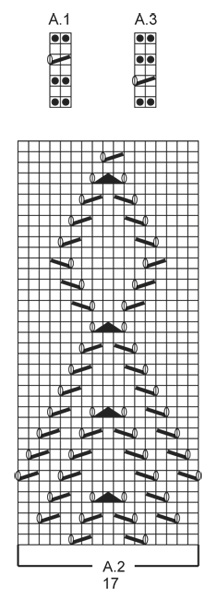
PATTERN: See diagrams A.1 to A.3. DECREASE TIP: Dec 1 st before marker as follows: Work until 2 sts remain before marker, slip 1 st as if to K, K 1, psso. Dec 1 st after marker as follows: K 2 tog. RAGLAN: Inc differently for raglan in the different sizes: SIZE S-M: Inc 2 sts at each marker (= 8 sts inc in total) as follows: Inc 1 st on each side of each marker (= 8 sts inc) as follows: 1 YO, K 1 twisted, K 1, K 1 twisted, 1 YO. Do not work YOs twisted on next round, they should make holes, repeat inc every other round 17-19 more times. NOTE: The inc on each side of 1st marker (= in the last st on round) is worked as follows: at beginning of round, K 1 twisted, 1 YO. At the end of round: 1 YO, K 1 twisted, K.1 (= st with marker) SIZE L-XL-XXL-XXXL: Inc every other round as follows: Inc 2 sts on each side of eash marker (= 16 sts inc in total) as follows: 1 YO,K 1, 1 YO, K 1 twisted, K 1(= st with marker), K 1 twisted, 1 YO, K 1, 1 YO (first and last YO K twisted on next round, they should not make holes, the 2 sts in the middle should make holes). Repeat inc on every other round 1-1-1-3 more times. NOTE: The inc on each side of 1st marker(= in the last st on round) is worked as follows: at beginning of round, K 1 twisted, 1 YO, K 1, 1 YO. At the end of round: 1 YO, K 1, 1 YO, K 1 twisted, K.1 (= st with marker) Then inc like this: Inc 1 sts on each side of each marker (= 8 sts inc in total) as follows: 1 YO, K 1 twisted, K 1(= st with maker), K 1 twisted, 1 YO. Do not K YOs twisted on next round, they should make holes. Repeat inc every other round 19-20-22-21 more times in total. INCREASE TIP: Beg 1 st before marker and inc as follows: 1 YO, K 2 (marker is between these 2 sts), 1 YO. On next round K YOs twisted to avoid holes. ---------------------------------------------------------- TOP: Worked in the round on circular needle, top down. YOKE: Cast on 134-134-140-144-144-148 sts on circular needle size 3.5 mm / US 4 with Belle. Work A.1 (= 2 sts) over all sts. When A.1 has been worked 1 time vertically, switch to circular needle size 4 mm / US 6. On next round K all sts and inc 16-20-14-22-42-46 sts evenly = 150-154-154-166-186-194 sts. On next round insert 4 markers as follows: Insert 1st marker in last st on last round, K 45-47-49-55-65-71 sts (= front piece), K 1 st and insert 2nd marker in this st, K 28-28-26-26-26-24 sts (= sleeve), K 1 st and insert 3rd marker in this st, K 45-47-49-55-65-71 sts (= back piece), K 1 st and insert 4th marker in this st, K 28-28-26-26-26-24 sts (= sleeve). REMEMBER THE KNITTING GAUGE Then work as follows - AT THE SAME TIME inc for RAGLAN - see explanation above. Work half the raglan inc for 1st marker (see explanation above). K 14-15-16-19-24-27 sts, A.2 (= 17 sts), K until 1-1-2-2-2-2 st remains before 2nd marker, work RAGLAN - see explanation above, K until 1-1-2-2-2-2 sts remain before 3rd marker, work raglan, K until 1-1-2-2-2-2 st remain before 4th marker, work raglan, K until 1-1-2-2-2-2 sts remain before 1st marker, work raglan. Work inc sts in stockinette st. When A.2 has been worked 1 time vertically, work in stockinette st over all these sts. After all inc are done there are 294-314-338-358-394-426 sts on needle. Piece measures approx. 14-15-16-17-18-19 cm / 5½"-6"-6¼"-6¾"-7"-7½". Continue with stockinette st and work as follows: Work the first 81-87-95-103-117-129 sts (= front piece), slip the next 66-70-74-76-80-84 sts on a stitch holder for sleeve, cast on 6-6-6-8-8-8 sts under sleeve (insert a marker in the middle of the new sts), work the next 81-87-95-103-117-129 sts (= back piece), slip the next 66-70-74-76-80-84 sts on a stitch holder for sleeve, cast on 6-6-6-8-8-8 sts under sleeve (insert a marker in the middle of the new sts) = 174-186-202-222-250-274 sts remain on needle. Insert 1 marker in piece, NOW MEASURE PIECE FROM HERE. BODY: Continue in stockinette st. When piece measures 3 cm / 1", dec 1 st on each side of each markers in the sides (= 4 sts dec) - READ DECREASE TIP! Repeat dec every 2½-4-4-4-4-4 cm / ⅞"-1½"-1½"-1½"-1½"-1½"" 5-3-3-3-3-3 more times = 150-170-186-206-234-258 sts. When piece measures 20 cm / 8" in all sizes, inc 1 st on each side of each marker in the sides (= 4 sts inc) - READ INCREASE TIP. Repeat inc every 2-4-4-4-4-4 cm / ⅞"-1½"-1½"-1½"-1½"-1½" 5-3-3-3-3-3 more times = 174-186-202-222-250-274 sts. When piece measures 31-32-33-34-35-36 cm / 12¼"-12½"-13"-13⅜"-13¾"-14¼", switch to circular needle size 3.5 mm / US 4. Work A.3 (= 2 sts) over all sts. Bind off. SLEEVE: Worked in the round on double pointed needles. Slip sts from stitch holder back on double pointed needles size 4 mm / US 6 and cast on 6-6-6-8-8-8 sts under sleeve = 72-76-80-84-88-92 sts. Work in stockinette st for 2 cm / ¾", on next round dec 8 sts evenly = 64-68-72-76-80-84 sts. Switch to double pointed needles size 3.5 mm / US 4. Work A.3 over all sts. Bind off. Work the other sleeve the same way. ASSEMBLY: Sew the opening under the sleeves. |
|||||||||||||||||||
Diagram explanations |
|||||||||||||||||||
|
|||||||||||||||||||
 |
|||||||||||||||||||
 |
|||||||||||||||||||
Have you finished this pattern?Tag your pictures with #dropspattern or submit them to the #dropsfan gallery. Do you need help with this pattern?You'll find 20 tutorial videos, a Comments/Questions area and more by visiting the pattern on garnstudio.com. © 1982-2026 DROPS Design A/S. We reserve all rights. This document, including all its sub-sections, has copyrights. Read more about what you can do with our patterns at the bottom of each pattern on our site. |
|||||||||||||||||||


With over 40 years in knitting and crochet design, DROPS Design offers one of the most extensive collections of free patterns on the internet - translated to 17 languages. As of today we count 324 catalogs and 12258 patterns - 12248 of which are translated into English (US/in).
We work hard to bring you the best knitting and crochet have to offer, inspiration and advice as well as great quality yarns at incredible prices! Would you like to use our patterns for other than personal use? You can read what you are allowed to do in the Copyright text at the bottom of all our patterns. Happy crafting!
Post a comment to pattern DROPS Extra 0-1104
We would love to hear what you have to say about this pattern!
If you want to leave a question, please make sure you select the correct category in the form below, to speed up the answering process. Required fields are marked *.