
Popular categories
Looking for a yarn?


Comments / Questions (195)
![]() Faye wrote:
Faye wrote:
Can you give me a visual of where to start the shawl collar? I have made it this far and it looks gorgeous but now I am stuck.
13.06.2017 - 03:33DROPS Design answered:
Hi Faye, You begin the shawl collar from the right side of the piece (it doesn't matter which end of the piece you start from) and around the whole piece, so that it goes up one side, around the neck and then down the other side. I hope this helps, Kind regards, Deirdre
13.06.2017 - 08:37
![]() Marie Ekström wrote:
Marie Ekström wrote:
Hej! Har problem med ärmarna. Det står att bakstycket ska avslutas med varv 2 i A.z. Garnet ska klippas av och därefter ska luftmaskor etc virkas och sedan fortsäter man med A3. A.2 och A1 på balstycket. Där är här mitt problem uppstår. Eftersom jag avslutar med A.z v 2 fungerar det inte med A.3-A.1. Borde jag inte avslutat med v 3 i A.z ( det som börjar med 3 stolpar i samma maska)? Mvh / Marie
22.05.2017 - 21:55DROPS Design answered:
Hej Marie, du börjar med det varvet du har kommit till i diagrammet, så du fortsätter över ryggen som du har virkat tidigare.
29.05.2017 - 17:08
![]() Barbara Grüne wrote:
Barbara Grüne wrote:
Ich habe eine Frage zur Befestigung des Schalkragens. Ivh habe die beiden kurzen Teile zusammengenäht und dann am Rückenteil angehäkelt. Wo befestige ich die beiden äußeren, längeren Enden des Kragens?
04.04.2017 - 10:54DROPS Design answered:
Liebe Frau Grüne, der Schalkragen (die kürzere der langen Seiten) wird an der Halskante am Ruckenteil zusammengenäht und die letzte Reihe von beidem Schalkragen werden zusammengenäht. Viel Spaß beim häkeln!
04.04.2017 - 13:34
![]() Betty wrote:
Betty wrote:
I have also watched a video on the stitches but there was no sound so it was no help
28.02.2017 - 02:06
![]() Betty wrote:
Betty wrote:
The pattern is unclear on how to completely assemble the pieces together for the final product. Could you be so kind as to instruct me how to attach the front pieces to the back, and where to start? Also, where on the pieces to connect to where on the back? Thank you so much!
28.02.2017 - 02:02DROPS Design answered:
Dear Betty, you will crochet upper sleeve/shoulder tog (see under assembly) beg either from shoulder or sleeve edge. Then crochet sides tog starting from bottom edge to the armhole then crochet under sleeves tog from armhole to sleeve edges. Happy crocheting!
28.02.2017 - 09:07
![]() Barbara Grüne wrote:
Barbara Grüne wrote:
Ich habe es mir noch einmal angesehen und habe es jetzt verstanden. Vielen Dank für Ihre Geduld.
25.02.2017 - 13:07
![]() Barbara Grüne wrote:
Barbara Grüne wrote:
Danke für die Antwort, aber für die Größe XXL sollen laut Anleitung 121 LM und nicht 111 LM angeschlagen werden.
24.02.2017 - 21:10DROPS Design answered:
Liebe Frau Grüne, in der Grösse XXL häkeln Sie so: A.1 (= über die ersten 8 Lm), A.2 (= 24 Lm), A.3 (= 5 Lm), je 1 Stb in die nächsten 11 Lm, A.1, A.2 (= 12 Lm), A.3, je 1 Stb in die nächsten 11 Lm, A.1, A.2 über die nächsten 24 Lm und A.3 = (8+24+5)+11+(8+12+5)+ 11+ (8+24+5) = 121 Lm. Viel Spaß beim häkeln!
27.02.2017 - 09:03
![]() Barbara Grüne wrote:
Barbara Grüne wrote:
Zur Anfrage vom 12.02.2017: wann kann ich mit einer Antwort vom Designteam rechnen?
24.02.2017 - 14:08DROPS Design answered:
Liebe Frau Grüne, Maschenanzahl ist korrekt - siehe Anwort Ihrer Anfrage 12.02.2017. Viel Spaß beim häkeln!
24.02.2017 - 14:10
![]() Teresa Banker wrote:
Teresa Banker wrote:
I want to make the jacket and have been given a beautiful bag of heather grey yarn. It is an extra fine yarn but not the Merino that the pattern uses. The yarn I was given contains 14 ounces by weight. This is a mill-end bag of 4 skeins with no other description except the weight. Do you think this will be enough yarn to complete the jacket?
22.02.2017 - 04:15DROPS Design answered:
Dear Mrs Banker, We are able to provide free patterns thanks to our yarns sold throughout the world. You will therefore understand that we can only recomand you to contact our DROPS Store for any further help & assistance. Thank you for your comprehension.
22.02.2017 - 10:11
![]() Barbara Grüne wrote:
Barbara Grüne wrote:
Hallo, für die Größe XXL für das Rückenteil 121 Luftmaschen anschlagen. Dann: A1+2x A2+A3+11 Stb+A1+2x A2+A3+11 Stb+A1+2x A2+A3=133 Maschen. Verringere ich die 11 Stb auf 6 Stb habe ich zwar 121 Maschen, dann passt es zum Vorderteil nicht mehr. Ich bitte um Hilfe.
12.02.2017 - 13:10DROPS Design answered:
Liebe Frau Grüne, Maschenanzahl stimmt in der Größe XXL: A1 über 8 Lm, A2 über 24 Lm, A3 über 5 Lm, 1 Stb in 6 Lm, A1 (8 Lm), A2 (= 12 Lm), A3 (5 Lm), 1 Stb in 6 Lm, A1 (8 Lm), A2 über 24 Lm, A3 ( 5 Lm) = 8+24+5+6+8+12+5+6+8+24+5= 111 Lm. Viel Spaß beim häkeln!
13.02.2017 - 11:18
|
||||||||||||||||||||||
Shining Star#shiningstarcardigan |
||||||||||||||||||||||
 |
 |
|||||||||||||||||||||
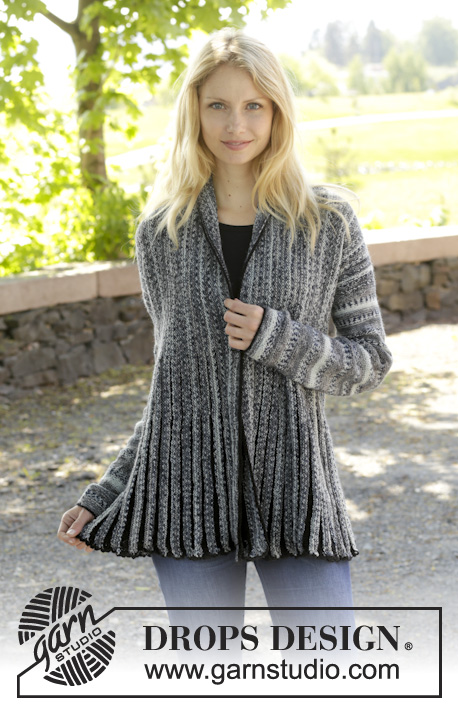
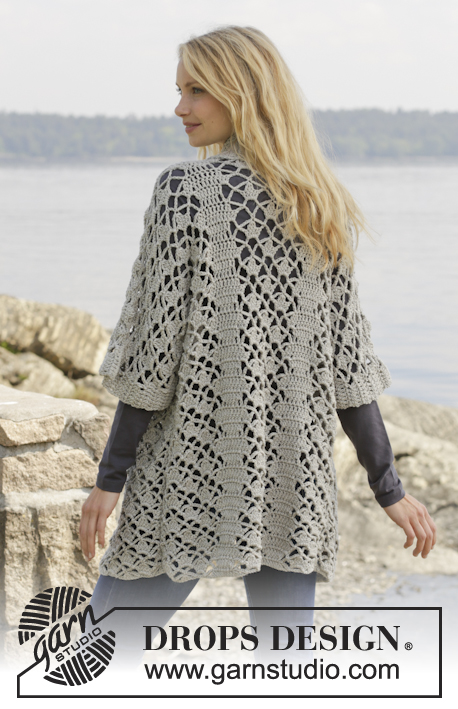
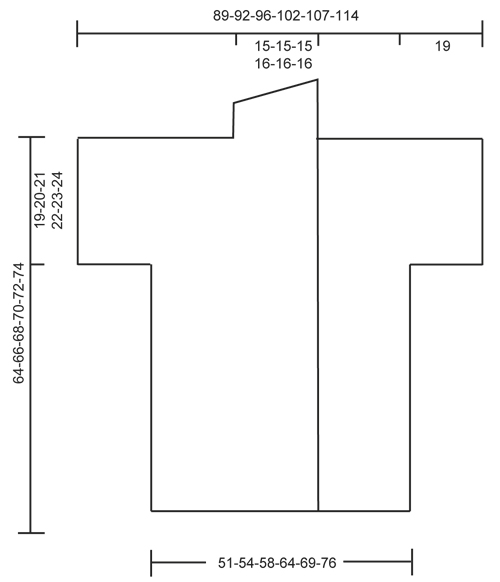
Crochet DROPS jacket with lace pattern and shawl collar in ”Merino Extra Fine”. Size: S - XXXL.
DROPS 157-18 |
||||||||||||||||||||||
|
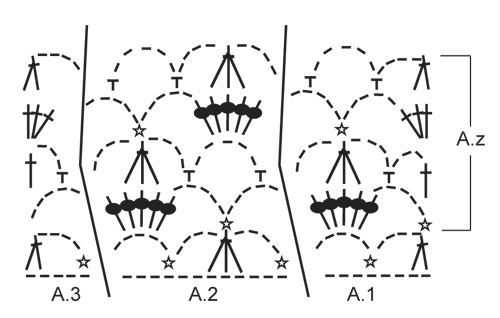
CROCHET INFO: Replace first dc at beg of every dc row with 3 ch. PATTERN: See diagrams A.1-A.3. ---------------------------------------------------------- BACK PIECE: Worked back and forth. Work 83-87-93-101-111-121 ch on hook size 5 mm / H/8 with Merino Extra Fine. Then work as follows from RS: Work A.1 – see explanation above, over the first 8 ch, NOTE: Replace 1st dc with 3 ch – see CROCHET INFO above, A.2 over the next 12-12-12-12-24-24 ch, A.3 over the next ch 5, 1 dc in each of the next 4-6-9-13-6-11 ch, A.1, A.2, A.3, 1 dc in each of the next 4-6-9-13-6-11 ch, A.1, A.2 over the next 12-12-12-12-24-24 ch and A.3. Then repeat A.z vertically until finished measurements. NOTE: On 1st row in A.z (= from WS) work as follows: Work A.3, A.2 1-1-1-1-2-2 times in width, A.1, 3 ch (replace 1 dc), 1 dc in each of the next 2-4-7-11-4-9 dc, 3 ch (replace 1 dc), 1 sc in next st, A.3, A.2, A.1, 3 ch (replace 1 dc), 1 dc in each of the next 2-4-7-11-4-9 dc, 3 ch (replace 1 dc), 1 sc in next st, A.3, A.2 1-1-1-1-2-2 times in width and A.1. REMEMBER THE CROCHET GAUGE! When piece measures approx. 45-46-47-48-49-50 cm / 17¾"-18"-18½"-19"-19¼"-19¾", adjust to finish with 2nd row in A.z - cut the yarn. Then work sleeves as follows: Work 29 loose ch, beg from WS and continue A.3, A.2 and A.1 and dc over back piece as before and finish with 31 loose ch, turn piece. Now work 1st row in A.1-A.3 over ch from RS, AT THE SAME TIME continue with pattern over back piece as before (i.e. work 4th row in A.z over these sts) as follows: Work 1 dc in each of the first ch 6, A.1 over the next 8 ch, A.2 2 times in width (i.e. work last A.2 over the last ch 5, then work the rest of A.2 over A.1), work A.2 1-1-1-1-2-2 times in width as before, A.3, 1 dc in each of the next 4-6-9-13-6-11 dc, A.1, A.2, A.3, 1 dc in each of the next 4-6-9-13-6-11 dc, A.1, A.2 1-1-1-1-2-2 times in width, then work A.2 2 times in width (i.e. work the first A.2 over A.3 and the next 6 ch), A.3 over the next 5 ch and 1 dc in each of the last 6 ch. Continue this pattern until piece measures approx. 62-64-66-68-70-72 cm / 24⅜"-25¼"-26"-26¾"-27½"-28⅜" - adjust to finish after a row from WS. Then finish each shoulder/sleeve separately as follows: RIGHT SHOULDER/SLEEVE: Work 6 dc, A.1 1 time and A.2 3-3-3-3-4-4 times, A.3, 1 dc in each of the next 4-6-9-13-6-11 dc. Turn and work pattern as before. Continue like this until piece measures 64-66-68-70-72-74 cm / 25¼"-26"-26¾"-27½"-28⅜"-29⅛" in total, adjust to finish with a whole repetition of A.z. Fasten off. LEFT SHOULDER/SLEEVE: Work the left shoulder/sleeve the same way but reversed, work A.1 instead of A.3 at beg of row. RIGHT FRONT PIECE: Worked back and forth. Work 63-65-70-74-81-86 ch (includes 3 ch to turn with) on hook size 5 mm / H/8 with Merino Extra Fine. Work 1 dc in 4th ch from hook, 1 dc in each of the next 5-5-7-7-9-9 ch (= band), A.1 over the next 8 ch, A.2 over the next 12 ch, A.3 over the next ch 5, 1 dc in each of the next 4-6-9-13-6-11 ch, A.1 over the next 8 ch, A.2 over the next 12-12-12-12-24-24 ch, A.3 over the last 5 ch. Then repeat A.z vertically until finished measurements. NOTE: On 1st row in A.z (= from WS) work as follows: Work A.3, A.2 1-1-1-1-2-2 times in width, A.1, 3 ch (replace 1 dc), 1 sc in next st, 1 dc in each of the next 2-4-7-11-4-9 dc, 3 ch (replace 1 dc), A.3, A.2, A.1, 3 ch (replace 1 dc), 1 sc in next st, 1 dc in each of the next 5-5-7-7-9-9 dc. When piece measures approx. 45-46-47-48-49-50 cm / 17¾"-18"-18½"-19"-19¼"-19¾", adjust to finish with 2nd row in A.z. Cut the yarn. Then work 29 loose ch for sleeve and continue as on back piece. When piece measures 64-66-68-70-72-74 cm / 25¼"-26"-26¾"-27½"-28⅜"-29⅛", adjust to finish with a whole repetition of A.z (i.e. last row is from RS) - cut the yarn. Then work shawl collar. SHAWL COLLAR: Work shawl collar back and forth, beg from RS as follows: Work 1 dc in each of the first 6-6-8-8-10-10 dc, 1 dc in first dc on A.1, * 3 dc in next ch-space *, repeat from *-* 2 more times, 1 dc in next dc, * 3 dc in next ch-space *, repeat from *-* 2 more times, 1 dc in last dc in A.3, 0-0-0-1-1-1 dc in next dc = 27-27-29-30-32-32 dc. Then work short rows over band sts as follows: ROW 1 (WS): 5 sc, 5 hdc, 17-17-19-20-22-22 dc ROW 2 (RS): Work 1 dc in each of the 27-27-29-30-32-32 sts. Repeat these 2 rows until piece measures approx. 10 cm / 4" on the most narrow part – adjust to finish with 2nd row (RS). Fasten off. LEFT FRONT PIECE: Work as right but reversed. Work according to diagram A.3 instead of A.1 at beg of row. When piece measures 45-46-47-48-49-50 cm / 17¾"-18"-18½"-19"-19¼"-19¾", adjust to finish with 2nd row in A.z, work as before over front piece from WS, then work 31 loose ch for sleeve. When piece measures 64-66-68-70-72-74 cm / 25¼"-26"-26¾"-27½"-28⅜"-29⅛", adjust to finish with a whole repetition of A.z (i.e. last row is from RS), work shawl collar. NOTE: There is no need to cut the yarn. ASSEMBLY: Place front pieces on top of back piece and work the shoulders as follows: 1 sc through both layers, * ch 3, 1 sc in next ch-space *, repeat from *-* along the entire shoulder/sleeve and finish with 1 sc. Work the sides tog as follows: 1 sc, * ch 3, 1 sc in ch-space on next row *, repeat from *-* along the entire side and finish with 1 sc. Work tog under sleeves as follows: * 1 sc in ch in next ch-space, 3 ch *, repeat from *-* and finish with 1 sc. |
||||||||||||||||||||||
Diagram explanations |
||||||||||||||||||||||
|
||||||||||||||||||||||
 |
||||||||||||||||||||||
 |
||||||||||||||||||||||
Have you finished this pattern?Tag your pictures with #dropspattern #shiningstarcardigan or submit them to the #dropsfan gallery. Do you need help with this pattern?You'll find 8 tutorial videos, a Comments/Questions area and more by visiting the pattern on garnstudio.com. © 1982-2026 DROPS Design A/S. We reserve all rights. This document, including all its sub-sections, has copyrights. Read more about what you can do with our patterns at the bottom of each pattern on our site. |
||||||||||||||||||||||


With over 40 years in knitting and crochet design, DROPS Design offers one of the most extensive collections of free patterns on the internet - translated to 17 languages. As of today we count 325 catalogs and 12298 patterns - 12288 of which are translated into English (US/in).
We work hard to bring you the best knitting and crochet have to offer, inspiration and advice as well as great quality yarns at incredible prices! Would you like to use our patterns for other than personal use? You can read what you are allowed to do in the Copyright text at the bottom of all our patterns. Happy crafting!
Post a comment to pattern DROPS 157-18
We would love to hear what you have to say about this pattern!
If you want to leave a question, please make sure you select the correct category in the form below, to speed up the answering process. Required fields are marked *.