
Popular categories
Looking for a yarn?


Comments / Questions (195)
![]() Evelyne wrote:
Evelyne wrote:
Bonjour, j'effectue actuellement ce modèle mais je suis perdue quant au milieu (a1a2a3) (?) (a1a2a3) pour la taille L je dois faire 9 B au 1rg, 7B au 2em rg et pour les rgs Suivants ? Le milieu indiqué dans le modèle ne correspond pas à la vidéo. Merci de m'aider car je n'obtiens pas le rendu qu'il faut.
21.03.2019 - 16:10DROPS Design answered:
Bonjour Evelyne, au 1er rang de A.z seulement, on va crochetre 3 ml, 7 brides et 3 ml, aux autres rangs, on aura 9 brides. Les 3 ml qui encadrent ces 7 brides compensent la hauteur du motif sur ce rang - cf vidéo. Bon crochet!
21.03.2019 - 16:12
![]() Katherine Smith wrote:
Katherine Smith wrote:
Hello, I'm a bit confused about where the pattern says "Then finish each shoulder/sleeve separately as follows." Are these separate pieces (and if so, how long a foundation chain should I make for them)? Or are they worked into the back piece (and if so, from where)? I also noticed they only add 2 cm to the total length of the piece, and so I don't understand how they fit in with the piece as a whole. Are there pictures of the completed pieces before assembly, by any chance? Thank you
06.03.2019 - 07:34DROPS Design answered:
Dear Mrs Smith, from now on you will continue the 2 missing cm for whole length on each shoulder/sleeve. Turn piece and work from RS the sts explained for RIGHT SHOULDER/SLEEVE for 2 cm (adjust after a whole repeat of A.z) and fasten off. Then work 2nd schoulder/sleeve the same way but reversed. In the middle of back piece you won't work over the middle stitches for neck on back piece. Happy crocheting!
06.03.2019 - 09:48
![]() Elize wrote:
Elize wrote:
Aftrer casting on 29 ch and work back piece and cast on 31ch, turn and work A1-A3 on the 31 ch, I keep on ending up with 3ch before backpiece, I did use 3ch in very beginning for the first dc of the cluster, can you please assist, I'm confussed, because you need to add 29 and 31 stitches and work A1-A3 over those ch but the diagram for A1-A3 only consist out of 25 ch, Thank you
06.03.2019 - 06:05DROPS Design answered:
Dear Elize, at the beg of row the first 3 chains are for turning, so that you work over the 29 sts: 6 tr, A.1 over the next 8 ch, A.2 2 times in width (i.e. work last A.2 over the last 5 ch, then work the rest of A.2 over A.1) = 6+8+12+5 = 31 (with first 3 ch= 1st tr). And at the end of row: A.2 2 times in width (i.e. work the first A.2 over A.3 and the next 6 ch), A.3 over the next 5 ch and 1 tr in each of the last 6 ch = 6+12+5+6= 29 chains. Happy crocheting!
06.03.2019 - 09:57
![]() Donna wrote:
Donna wrote:
It is Donna again I did get the back worked now have a question about how the shawl collar attaches to the back piece .Do you work it with the front and then sew it to the back or is it someway worked into the back neck ?
05.03.2019 - 16:57DROPS Design answered:
Dear Donna, collar is worked over the 6-8-10 sts mid front with short rows (different height of sts to get a curved shape) starting from WS on right front piece and from RS on left front piece, worked for 10 cm. Then sew both collar (right and left) tog then sew collar along neckline on back piece. Happy crocheting!
06.03.2019 - 08:50
![]() Donna wrote:
Donna wrote:
I am working with this pattern and I don't usually work with diagram patterns . I have got to the point where I don't know what I am suppose to do . Can you help me ? I have the Back worked to the area where you start sleeve .The pattern says cut yarn Then work sleeve as follows Please someone take a look at this pattern Drops 157-18 and tell me where I can understand what to do from here. Thanks
03.03.2019 - 20:41DROPS Design answered:
Dear Donna, after you have cut the yarn, you will crochet new chains (=29 chains) for first sleeve, then work next row from WS over the sts on back piece as before, and crochet 31 chains for 2nd sleeve. Turn and work now 1st row in A.1-A.3 over the chains and continue over back piece as before (= 4th row in A.z). Happy crocheting!
04.03.2019 - 11:12
![]() Cindy Franklin wrote:
Cindy Franklin wrote:
This is a very beautiful pattern but very confusing to read and follow....hope it turns out good as i do love the pattern.
02.12.2018 - 14:44DROPS Design answered:
Dear Mrs Franklin, should you have any question, feel free to ask them here and remember you can contact your DROPS store - even per mail or telephone - for any individual assistance. Happy crocheting!
03.12.2018 - 10:48Barbara wrote:
I've complete sweater to shawl collar. Can you please give instructions on how to work this part of the pattern? Pattern states 30 dc, for my size, but then says work short rows over band, 20 sts. Repeat ROW 2 until 4" on the most narrow part. I'm confused and don't understand.
01.12.2018 - 21:17DROPS Design answered:
Dear Barbara, you will work short rows so that the collar will be larger outwards and shorter innwards(towards shoulder), on row 1 (from WS) work 5 sc, 5 hd, 20 dc, turn and work 30 dc (row 2 = from RS), turn and repeat these 2 rows. The outside of collar will be higher/longer than the inside due to row 2. Continue repeating these 2 rows until the shorter side measures approx. 4" from the shoulder. Happy crocheting!
03.12.2018 - 09:00
![]() Vera wrote:
Vera wrote:
Hoi, ik begrijp de instructies om de delen aan elkaar te haken niet goed. In de beschrijving staat dat je de schouders met 1 v door beide lagen (panden) haakt, dan 3 l, dan 1 v in de vlg losse lus. Is die v ook door beide lagen dus door 2 losse lussen tegelijk van de 2 panden? Of is het zoals in de video van vierkanten samen haken 1 v in 1 laag, dan 3 l, dan 1 v in de volgende laag, dan weer 3 l en dan zigzaggen heen en weer tussen de panden? Alvast bedankt!
21.10.2018 - 18:07DROPS Design answered:
Dag Vera,
In dit geval maak je geen 'zigzaggend' patroon, maar haak je steeds door beide lagen bij het in elkaar haken van de delen.,
24.10.2018 - 21:18Judith Matisons wrote:
Hello I would really like to tackle this pattern. My question is: After casting on and completing the first four lines of the pattern, the instruction says "Then repeat A.z vertically until finished measurements" What does A.z refer to please? Is it the entire pattern from A.1 to A.3?
06.10.2018 - 05:42DROPS Design answered:
Dear Mrs Matisons, you should repeat A.1-A.2 and A.3 in width as before and repeat A.z (= the last 4 rows) in height. Happy crocheting!
08.10.2018 - 08:00
![]() Jacqueliene wrote:
Jacqueliene wrote:
Ik ben een beginnende haakster en snap het patroon wel maar ik zet 111 lossen op dan volg ik a1 a2 en a3 maar dan komen er stkjes tussen hoeveel moet ik er precies tussen doen ook 4 zoals in het filmpje want dan komt het niet uit bij mij hopelijk begrijpt u mijn vraag alvast bedankt
05.09.2018 - 11:41DROPS Design answered:
Dag Jacqueline, Bij de beschrijving van het achterpand staat op een gegeven moment dat je 1 stk in elke van de volgende 4-6-9-13-6-11 lossen moet haken. In de video wordt de kleinse maat gehaakt, dus dan zijn het 4 stokjes. In jou geval moet je dan dus 2 stokjes haken.
06.09.2018 - 10:32
|
||||||||||||||||||||||
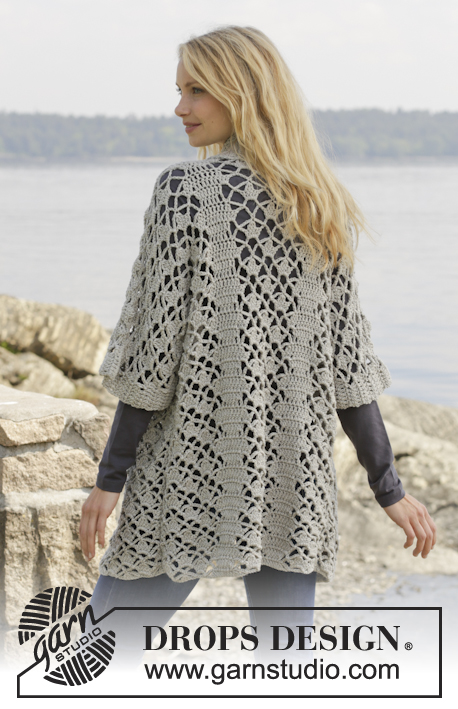
Shining Star#shiningstarcardigan |
||||||||||||||||||||||
 |
 |
|||||||||||||||||||||
Crochet DROPS jacket with lace pattern and shawl collar in ”Merino Extra Fine”. Size: S - XXXL.
DROPS 157-18 |
||||||||||||||||||||||
|
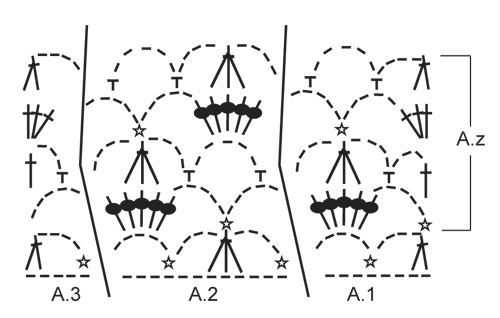
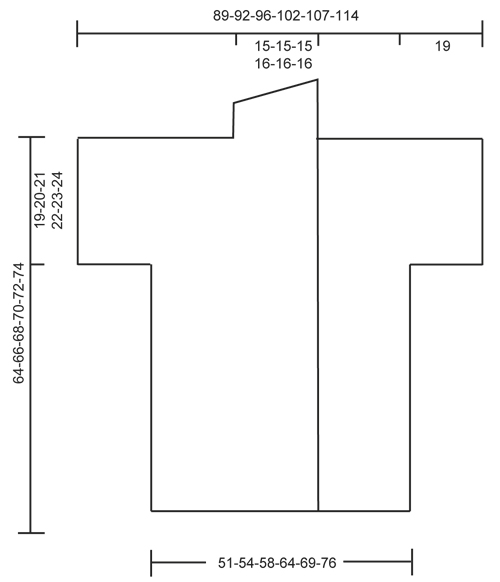
CROCHET INFO: Replace first dc at beg of every dc row with 3 ch. PATTERN: See diagrams A.1-A.3. ---------------------------------------------------------- BACK PIECE: Worked back and forth. Work 83-87-93-101-111-121 ch on hook size 5 mm / H/8 with Merino Extra Fine. Then work as follows from RS: Work A.1 – see explanation above, over the first 8 ch, NOTE: Replace 1st dc with 3 ch – see CROCHET INFO above, A.2 over the next 12-12-12-12-24-24 ch, A.3 over the next ch 5, 1 dc in each of the next 4-6-9-13-6-11 ch, A.1, A.2, A.3, 1 dc in each of the next 4-6-9-13-6-11 ch, A.1, A.2 over the next 12-12-12-12-24-24 ch and A.3. Then repeat A.z vertically until finished measurements. NOTE: On 1st row in A.z (= from WS) work as follows: Work A.3, A.2 1-1-1-1-2-2 times in width, A.1, 3 ch (replace 1 dc), 1 dc in each of the next 2-4-7-11-4-9 dc, 3 ch (replace 1 dc), 1 sc in next st, A.3, A.2, A.1, 3 ch (replace 1 dc), 1 dc in each of the next 2-4-7-11-4-9 dc, 3 ch (replace 1 dc), 1 sc in next st, A.3, A.2 1-1-1-1-2-2 times in width and A.1. REMEMBER THE CROCHET GAUGE! When piece measures approx. 45-46-47-48-49-50 cm / 17¾"-18"-18½"-19"-19¼"-19¾", adjust to finish with 2nd row in A.z - cut the yarn. Then work sleeves as follows: Work 29 loose ch, beg from WS and continue A.3, A.2 and A.1 and dc over back piece as before and finish with 31 loose ch, turn piece. Now work 1st row in A.1-A.3 over ch from RS, AT THE SAME TIME continue with pattern over back piece as before (i.e. work 4th row in A.z over these sts) as follows: Work 1 dc in each of the first ch 6, A.1 over the next 8 ch, A.2 2 times in width (i.e. work last A.2 over the last ch 5, then work the rest of A.2 over A.1), work A.2 1-1-1-1-2-2 times in width as before, A.3, 1 dc in each of the next 4-6-9-13-6-11 dc, A.1, A.2, A.3, 1 dc in each of the next 4-6-9-13-6-11 dc, A.1, A.2 1-1-1-1-2-2 times in width, then work A.2 2 times in width (i.e. work the first A.2 over A.3 and the next 6 ch), A.3 over the next 5 ch and 1 dc in each of the last 6 ch. Continue this pattern until piece measures approx. 62-64-66-68-70-72 cm / 24⅜"-25¼"-26"-26¾"-27½"-28⅜" - adjust to finish after a row from WS. Then finish each shoulder/sleeve separately as follows: RIGHT SHOULDER/SLEEVE: Work 6 dc, A.1 1 time and A.2 3-3-3-3-4-4 times, A.3, 1 dc in each of the next 4-6-9-13-6-11 dc. Turn and work pattern as before. Continue like this until piece measures 64-66-68-70-72-74 cm / 25¼"-26"-26¾"-27½"-28⅜"-29⅛" in total, adjust to finish with a whole repetition of A.z. Fasten off. LEFT SHOULDER/SLEEVE: Work the left shoulder/sleeve the same way but reversed, work A.1 instead of A.3 at beg of row. RIGHT FRONT PIECE: Worked back and forth. Work 63-65-70-74-81-86 ch (includes 3 ch to turn with) on hook size 5 mm / H/8 with Merino Extra Fine. Work 1 dc in 4th ch from hook, 1 dc in each of the next 5-5-7-7-9-9 ch (= band), A.1 over the next 8 ch, A.2 over the next 12 ch, A.3 over the next ch 5, 1 dc in each of the next 4-6-9-13-6-11 ch, A.1 over the next 8 ch, A.2 over the next 12-12-12-12-24-24 ch, A.3 over the last 5 ch. Then repeat A.z vertically until finished measurements. NOTE: On 1st row in A.z (= from WS) work as follows: Work A.3, A.2 1-1-1-1-2-2 times in width, A.1, 3 ch (replace 1 dc), 1 sc in next st, 1 dc in each of the next 2-4-7-11-4-9 dc, 3 ch (replace 1 dc), A.3, A.2, A.1, 3 ch (replace 1 dc), 1 sc in next st, 1 dc in each of the next 5-5-7-7-9-9 dc. When piece measures approx. 45-46-47-48-49-50 cm / 17¾"-18"-18½"-19"-19¼"-19¾", adjust to finish with 2nd row in A.z. Cut the yarn. Then work 29 loose ch for sleeve and continue as on back piece. When piece measures 64-66-68-70-72-74 cm / 25¼"-26"-26¾"-27½"-28⅜"-29⅛", adjust to finish with a whole repetition of A.z (i.e. last row is from RS) - cut the yarn. Then work shawl collar. SHAWL COLLAR: Work shawl collar back and forth, beg from RS as follows: Work 1 dc in each of the first 6-6-8-8-10-10 dc, 1 dc in first dc on A.1, * 3 dc in next ch-space *, repeat from *-* 2 more times, 1 dc in next dc, * 3 dc in next ch-space *, repeat from *-* 2 more times, 1 dc in last dc in A.3, 0-0-0-1-1-1 dc in next dc = 27-27-29-30-32-32 dc. Then work short rows over band sts as follows: ROW 1 (WS): 5 sc, 5 hdc, 17-17-19-20-22-22 dc ROW 2 (RS): Work 1 dc in each of the 27-27-29-30-32-32 sts. Repeat these 2 rows until piece measures approx. 10 cm / 4" on the most narrow part – adjust to finish with 2nd row (RS). Fasten off. LEFT FRONT PIECE: Work as right but reversed. Work according to diagram A.3 instead of A.1 at beg of row. When piece measures 45-46-47-48-49-50 cm / 17¾"-18"-18½"-19"-19¼"-19¾", adjust to finish with 2nd row in A.z, work as before over front piece from WS, then work 31 loose ch for sleeve. When piece measures 64-66-68-70-72-74 cm / 25¼"-26"-26¾"-27½"-28⅜"-29⅛", adjust to finish with a whole repetition of A.z (i.e. last row is from RS), work shawl collar. NOTE: There is no need to cut the yarn. ASSEMBLY: Place front pieces on top of back piece and work the shoulders as follows: 1 sc through both layers, * ch 3, 1 sc in next ch-space *, repeat from *-* along the entire shoulder/sleeve and finish with 1 sc. Work the sides tog as follows: 1 sc, * ch 3, 1 sc in ch-space on next row *, repeat from *-* along the entire side and finish with 1 sc. Work tog under sleeves as follows: * 1 sc in ch in next ch-space, 3 ch *, repeat from *-* and finish with 1 sc. |
||||||||||||||||||||||
Diagram explanations |
||||||||||||||||||||||
|
||||||||||||||||||||||
 |
||||||||||||||||||||||
 |
||||||||||||||||||||||
Have you finished this pattern?Tag your pictures with #dropspattern #shiningstarcardigan or submit them to the #dropsfan gallery. Do you need help with this pattern?You'll find 8 tutorial videos, a Comments/Questions area and more by visiting the pattern on garnstudio.com. © 1982-2026 DROPS Design A/S. We reserve all rights. This document, including all its sub-sections, has copyrights. Read more about what you can do with our patterns at the bottom of each pattern on our site. |
||||||||||||||||||||||


With over 40 years in knitting and crochet design, DROPS Design offers one of the most extensive collections of free patterns on the internet - translated to 17 languages. As of today we count 325 catalogs and 12298 patterns - 12288 of which are translated into English (US/in).
We work hard to bring you the best knitting and crochet have to offer, inspiration and advice as well as great quality yarns at incredible prices! Would you like to use our patterns for other than personal use? You can read what you are allowed to do in the Copyright text at the bottom of all our patterns. Happy crafting!
Post a comment to pattern DROPS 157-18
We would love to hear what you have to say about this pattern!
If you want to leave a question, please make sure you select the correct category in the form below, to speed up the answering process. Required fields are marked *.