
Popular categories
Looking for a yarn?


Comments / Questions (195)
![]() Anna wrote:
Anna wrote:
Liebes Drops-Team, ich verzweifle bei dieser Anleitung langsam. Wie häkle ich an den Blendenstäbchen hoch? Ich finde das nicht in der Anleitung und auch nicht im Video.... Es wird ja nur das Rückenteil erklärt im Video.... Ich finde dazu auch nichts in einer anderen Sprache - bitte um kurze Erklärung. Vielen lieben Dank.
28.01.2023 - 20:40DROPS Design answered:
Liebe Anna, für die Blenden häkelt man einfach Stäbchen, dh 1 Stb in die 5-5-7-7-9-9 Stb am Anfang der Hinreihe / am Ende der Rückreihe beim rechten Vorderteil z.B. - (gleichzeitig 3 Lm vor den BlendeMaschen bei der 1. Reihe in A.z häkeln - wie unter BITTE BEACHTEN. Viel Spaß beim häkeln!
30.01.2023 - 09:10
![]() Lana Sommer Bloedow wrote:
Lana Sommer Bloedow wrote:
Como vc ser a gola xaile com uma explicação fácil de entender? Podem me ajudar?
28.09.2022 - 20:24
![]() Lana Dommer Bloedow wrote:
Lana Dommer Bloedow wrote:
Como se faz a gola xaile Explicação simples e fácil de entender.
28.09.2022 - 20:22
![]() Lana Sommer Obrigafs wrote:
Lana Sommer Obrigafs wrote:
Explicar melhor como se faz a gola. Talvez tirar uma foto bem aberta, para poder ver os pontos feitos. Gosto de fazer vendo o modelo pronto, copiando os pontos. Se possível, me orientem? Obrigada!
28.09.2022 - 20:13
![]() Ambra Gregorio-Bäthge wrote:
Ambra Gregorio-Bäthge wrote:
Mi la persona che scrive le spiegazioni di questo bel cardigan è VERAMENTE competente? Vorrei tanto iniziare questo bellissimo lavoro, ma 19 pagine di risposte a richieste di ulteriori spiegazioni oltre a quelle iniziali, mi fanno pensare che sia un'impresa forse troppo difficile per me, benché io lavori all'uncinetto da più di 40 anni! In tutti questi anni di esperienza, ho notato che se un lavoro è BEN SPIEGATO, non è necessario chiedere aiuto "perché non si capisce"... 👎 😬
01.04.2022 - 04:44
![]() Frédérique wrote:
Frédérique wrote:
C’est bon, j’ai trouvé mon erreur! Le A2 de la deuxième série se fait une fois sur 12 mailles et non 2 fois sur 24 mailles. Ce sont les 12 mailles qui me manquaient. :)
18.11.2021 - 00:04
![]() Frédérique wrote:
Frédérique wrote:
Bonjour, j’ai déjà un problème dès le 1er rang du dos. J’ai monté 111 mailles pour la taille XXL, mais cela ne suffit pas. Il en faudrait 123 selon mes calculs: A1+A2+A3+6B+A1+A2+A3+6B+A1+A2+A3= 8 + 24+ 5 + 6B+ 8+24+5+6B+8+24+5=123. Ou alors, j’ai mal compris. .. Merci de votre aide
17.11.2021 - 23:42DROPS Design answered:
Bonjour Frédérique, crochetez ainsi vos 111 mailles en l'air: A.1 = 8 m, A.2 = 24 m, A.3 = 5 m, 6 brides, A.1 = 8 m, A.2 =12 m, A.3 = 5 m, 6 brides, A.1 = 8 m, A.2 = 24 m, A.3 = 5 m soit 8+24+5+6+8+12+5+6+8+24+5=111 mailles. En espérant que ceci puisse vous aider. Bon crochet!
18.11.2021 - 08:46
![]() Frances Miller wrote:
Frances Miller wrote:
I know the back piece has instructions to make left shoulder and right shoulder but do you make the shoulder for the front pieces too?
13.11.2021 - 19:35DROPS Design answered:
Dear Frances, since you have separate right and left pieces for the fronts, and the collar is knitted on, you will have instructions for increasin on the sleeves, and how to do the colar, but since there are no stitches cast off for the neckline, no need to mark the shoulders separately. Happy Stitching.
14.11.2021 - 00:27
![]() Saba Hatem wrote:
Saba Hatem wrote:
Hi,in written patren, in back piece, raw 9(,A.1, A.2 over the next 12-12-12-12-24-24 ch).I think a1 is incorrect and only a2 is correct،Is this true?
01.06.2021 - 05:55DROPS Design answered:
Dear Mrs Hatem, do you mean at the very beginning of back piece? Written pattern is correct, you start with A.1, then repeat A.2 a total of 2 or 4 times (see size), and finish with A.3 = that's the whole lace pattern to work - then you work these one more time at the end of the row. Happy crocheting!
01.06.2021 - 08:33
![]() Catherine wrote:
Catherine wrote:
I love the look of the pattern but having to go back and forth between instructions and diagram over and over again is very annoying and confusing. If someone is going to write down a pattern they should do a complete job of one of the two. I can eventually figure it out but I’ve also been crocheting since I was 11 and I’m 64. If someone is fairly new to crochet having a pattern go back and forth like this would be super frustrating. I’d give up and use a better written pattern.
17.05.2021 - 03:36
|
||||||||||||||||||||||
Shining Star#shiningstarcardigan |
||||||||||||||||||||||
 |
 |
|||||||||||||||||||||
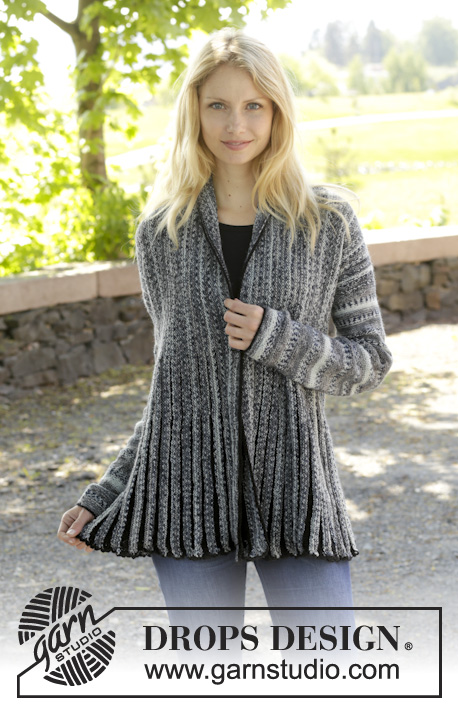
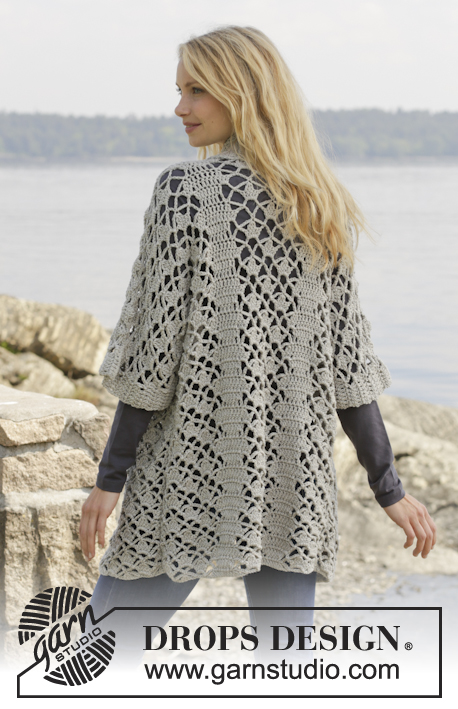
Crochet DROPS jacket with lace pattern and shawl collar in ”Merino Extra Fine”. Size: S - XXXL.
DROPS 157-18 |
||||||||||||||||||||||
|
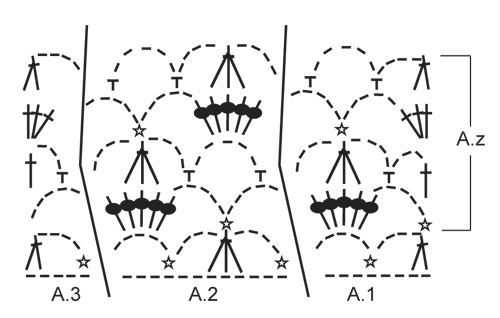
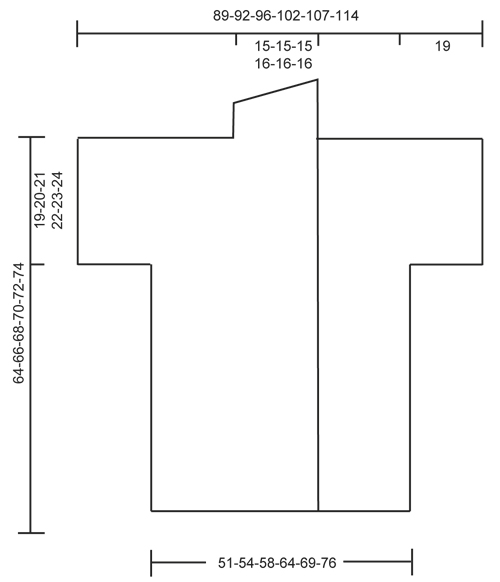
CROCHET INFO: Replace first dc at beg of every dc row with 3 ch. PATTERN: See diagrams A.1-A.3. ---------------------------------------------------------- BACK PIECE: Worked back and forth. Work 83-87-93-101-111-121 ch on hook size 5 mm / H/8 with Merino Extra Fine. Then work as follows from RS: Work A.1 – see explanation above, over the first 8 ch, NOTE: Replace 1st dc with 3 ch – see CROCHET INFO above, A.2 over the next 12-12-12-12-24-24 ch, A.3 over the next ch 5, 1 dc in each of the next 4-6-9-13-6-11 ch, A.1, A.2, A.3, 1 dc in each of the next 4-6-9-13-6-11 ch, A.1, A.2 over the next 12-12-12-12-24-24 ch and A.3. Then repeat A.z vertically until finished measurements. NOTE: On 1st row in A.z (= from WS) work as follows: Work A.3, A.2 1-1-1-1-2-2 times in width, A.1, 3 ch (replace 1 dc), 1 dc in each of the next 2-4-7-11-4-9 dc, 3 ch (replace 1 dc), 1 sc in next st, A.3, A.2, A.1, 3 ch (replace 1 dc), 1 dc in each of the next 2-4-7-11-4-9 dc, 3 ch (replace 1 dc), 1 sc in next st, A.3, A.2 1-1-1-1-2-2 times in width and A.1. REMEMBER THE CROCHET GAUGE! When piece measures approx. 45-46-47-48-49-50 cm / 17¾"-18"-18½"-19"-19¼"-19¾", adjust to finish with 2nd row in A.z - cut the yarn. Then work sleeves as follows: Work 29 loose ch, beg from WS and continue A.3, A.2 and A.1 and dc over back piece as before and finish with 31 loose ch, turn piece. Now work 1st row in A.1-A.3 over ch from RS, AT THE SAME TIME continue with pattern over back piece as before (i.e. work 4th row in A.z over these sts) as follows: Work 1 dc in each of the first ch 6, A.1 over the next 8 ch, A.2 2 times in width (i.e. work last A.2 over the last ch 5, then work the rest of A.2 over A.1), work A.2 1-1-1-1-2-2 times in width as before, A.3, 1 dc in each of the next 4-6-9-13-6-11 dc, A.1, A.2, A.3, 1 dc in each of the next 4-6-9-13-6-11 dc, A.1, A.2 1-1-1-1-2-2 times in width, then work A.2 2 times in width (i.e. work the first A.2 over A.3 and the next 6 ch), A.3 over the next 5 ch and 1 dc in each of the last 6 ch. Continue this pattern until piece measures approx. 62-64-66-68-70-72 cm / 24⅜"-25¼"-26"-26¾"-27½"-28⅜" - adjust to finish after a row from WS. Then finish each shoulder/sleeve separately as follows: RIGHT SHOULDER/SLEEVE: Work 6 dc, A.1 1 time and A.2 3-3-3-3-4-4 times, A.3, 1 dc in each of the next 4-6-9-13-6-11 dc. Turn and work pattern as before. Continue like this until piece measures 64-66-68-70-72-74 cm / 25¼"-26"-26¾"-27½"-28⅜"-29⅛" in total, adjust to finish with a whole repetition of A.z. Fasten off. LEFT SHOULDER/SLEEVE: Work the left shoulder/sleeve the same way but reversed, work A.1 instead of A.3 at beg of row. RIGHT FRONT PIECE: Worked back and forth. Work 63-65-70-74-81-86 ch (includes 3 ch to turn with) on hook size 5 mm / H/8 with Merino Extra Fine. Work 1 dc in 4th ch from hook, 1 dc in each of the next 5-5-7-7-9-9 ch (= band), A.1 over the next 8 ch, A.2 over the next 12 ch, A.3 over the next ch 5, 1 dc in each of the next 4-6-9-13-6-11 ch, A.1 over the next 8 ch, A.2 over the next 12-12-12-12-24-24 ch, A.3 over the last 5 ch. Then repeat A.z vertically until finished measurements. NOTE: On 1st row in A.z (= from WS) work as follows: Work A.3, A.2 1-1-1-1-2-2 times in width, A.1, 3 ch (replace 1 dc), 1 sc in next st, 1 dc in each of the next 2-4-7-11-4-9 dc, 3 ch (replace 1 dc), A.3, A.2, A.1, 3 ch (replace 1 dc), 1 sc in next st, 1 dc in each of the next 5-5-7-7-9-9 dc. When piece measures approx. 45-46-47-48-49-50 cm / 17¾"-18"-18½"-19"-19¼"-19¾", adjust to finish with 2nd row in A.z. Cut the yarn. Then work 29 loose ch for sleeve and continue as on back piece. When piece measures 64-66-68-70-72-74 cm / 25¼"-26"-26¾"-27½"-28⅜"-29⅛", adjust to finish with a whole repetition of A.z (i.e. last row is from RS) - cut the yarn. Then work shawl collar. SHAWL COLLAR: Work shawl collar back and forth, beg from RS as follows: Work 1 dc in each of the first 6-6-8-8-10-10 dc, 1 dc in first dc on A.1, * 3 dc in next ch-space *, repeat from *-* 2 more times, 1 dc in next dc, * 3 dc in next ch-space *, repeat from *-* 2 more times, 1 dc in last dc in A.3, 0-0-0-1-1-1 dc in next dc = 27-27-29-30-32-32 dc. Then work short rows over band sts as follows: ROW 1 (WS): 5 sc, 5 hdc, 17-17-19-20-22-22 dc ROW 2 (RS): Work 1 dc in each of the 27-27-29-30-32-32 sts. Repeat these 2 rows until piece measures approx. 10 cm / 4" on the most narrow part – adjust to finish with 2nd row (RS). Fasten off. LEFT FRONT PIECE: Work as right but reversed. Work according to diagram A.3 instead of A.1 at beg of row. When piece measures 45-46-47-48-49-50 cm / 17¾"-18"-18½"-19"-19¼"-19¾", adjust to finish with 2nd row in A.z, work as before over front piece from WS, then work 31 loose ch for sleeve. When piece measures 64-66-68-70-72-74 cm / 25¼"-26"-26¾"-27½"-28⅜"-29⅛", adjust to finish with a whole repetition of A.z (i.e. last row is from RS), work shawl collar. NOTE: There is no need to cut the yarn. ASSEMBLY: Place front pieces on top of back piece and work the shoulders as follows: 1 sc through both layers, * ch 3, 1 sc in next ch-space *, repeat from *-* along the entire shoulder/sleeve and finish with 1 sc. Work the sides tog as follows: 1 sc, * ch 3, 1 sc in ch-space on next row *, repeat from *-* along the entire side and finish with 1 sc. Work tog under sleeves as follows: * 1 sc in ch in next ch-space, 3 ch *, repeat from *-* and finish with 1 sc. |
||||||||||||||||||||||
Diagram explanations |
||||||||||||||||||||||
|
||||||||||||||||||||||
 |
||||||||||||||||||||||
 |
||||||||||||||||||||||
Have you finished this pattern?Tag your pictures with #dropspattern #shiningstarcardigan or submit them to the #dropsfan gallery. Do you need help with this pattern?You'll find 8 tutorial videos, a Comments/Questions area and more by visiting the pattern on garnstudio.com. © 1982-2026 DROPS Design A/S. We reserve all rights. This document, including all its sub-sections, has copyrights. Read more about what you can do with our patterns at the bottom of each pattern on our site. |
||||||||||||||||||||||


With over 40 years in knitting and crochet design, DROPS Design offers one of the most extensive collections of free patterns on the internet - translated to 17 languages. As of today we count 325 catalogs and 12298 patterns - 12288 of which are translated into English (US/in).
We work hard to bring you the best knitting and crochet have to offer, inspiration and advice as well as great quality yarns at incredible prices! Would you like to use our patterns for other than personal use? You can read what you are allowed to do in the Copyright text at the bottom of all our patterns. Happy crafting!
Post a comment to pattern DROPS 157-18
We would love to hear what you have to say about this pattern!
If you want to leave a question, please make sure you select the correct category in the form below, to speed up the answering process. Required fields are marked *.