
Popular categories
Looking for a yarn?


Comments / Questions (195)
![]() Yvette wrote:
Yvette wrote:
De telling van de maat XXL klopt volgens mij niet. De telling moet op 111 uitkomen maar volgens het patroon komt deze hoger uit. Waar zit de fout in het patroon??? Ik heb deze vraag al eerder gesteld maar geen reactie gekregen
08.07.2024 - 13:27
![]() Yvette wrote:
Yvette wrote:
Klopt de patroon telling wel van het lange vest. Ik zet 111 losse op. De patroon telling komt op maat XXL komt op 118 steken uit. Wat klopt er niet
21.06.2024 - 06:41
![]() Leslie wrote:
Leslie wrote:
Pattern states R.S. A1-A3 , 1 dc in next 6 ( size med.) repeat. Then w.s Az row 1 for the block of 6 dc I will ch 3, 4 dc, ch 3. I get this. But what do I do with this block of dc in Az row 2, Az row 3 and Az row 4? I have watched the video repeatedly in this section but can’t seem to get it.
18.01.2024 - 16:55DROPS Design answered:
Dear Leslie as the first/last stitch A.z is 1 slip stitch, you will replace the first/last dc on each side with 3 chain's o that the 6 dc will be worked: diagrams ending with A.`1, 3 chains, 4 dc, 3 chains, diagrams starting with A.3. Happy crocheting!
19.01.2024 - 08:48
![]() Nina wrote:
Nina wrote:
Hej! Jag får inte ihop maskantalet… Jag virkar storlek M. På första varvet ska man virka 6 stolpar mellan A3 - som avslutas med 2 stolpar tillsammans - och A1 - som börjar med 2 stolpar tillsammans. Då får jag så att säga 8 stolpar ihop. På nästa varv får jag bara ihop 6 stolpar över de 8 från föregående varv: 3 luftmaskor=1 stolpe följt av 4 stolpar och 3 luftmaskor=1 stolpe - alltså 6 stolpar tillsammans…???
25.04.2023 - 22:28
![]() Inmaculada wrote:
Inmaculada wrote:
Hola de nuevo. Lo estoy empezando y no me cuadran los puntos en la primera vuelta. Comienza diciendo "ver explicaciones arriba sobre los primeros 8 p de cad" y éstas no aparecen. No encuentro nada referente a eso. Me pueden decir que hay de especial sobre esos primeros 8 puntos? Igual por eso no me cuadran. Gracias y saludos
21.04.2023 - 10:30DROPS Design answered:
Hola Inmaculada, no hay nada especial en esos puntos. Tienes que trabajar A.1 sobre esos puntos y la nota es sobre A.1 y no los 8 puntos de cadeneta (A.1-ver explicaciones arriba, sobre 8 puntos de cadeneta). A.1 es el diagrama encontrado debajo las instrucciones del patrón, justo antes del esquema de medidas.
23.04.2023 - 18:58
![]() Inmaculada wrote:
Inmaculada wrote:
A diferencia de otros, es muy complicado de interpretar. Es liosa la división del esquema en A1, A2 y A3 cuando podrían indicar las repeticiones del esquema completo entre los p. a. de cada talla. No se que es cuello chal por lo que se trabaja a ciegas sin saber si se interpretan bien las instrucciones. Tampoco se como se une a la espalda. Un dibujo ayudaría. No se puede trabajar sin saber qué estás haciendo. No puedo traducir los comentarios que seguro me ayudarían. Saludos
20.04.2023 - 14:15
![]() Ulrike Aksoy wrote:
Ulrike Aksoy wrote:
Wird der schalkragen separat gehäkelt oder an einem Vorderteil angehäkekt? ich verstehe diesen Teil der Anleitung nicht. Danke
07.04.2023 - 09:29DROPS Design answered:
Liebe Ulrike, der Schalkragen beginnt an der Naht der Schulter. An der schmalsten Seite sollten es 10 cm sein. Es wird auf beiden Seiten des Vorderteils gearbeitet und dann auf der Rückseite zusammengenäht, wie in den FERTIGSTELLEN beschrieben. Wenn Sie aus irgendeinem Grund mehr als 10 cm benötigen, sollten Sie arbeiten, bis Sie die erforderlichen Maße erreicht haben. Viel Spaß beim Häkeln!
09.04.2023 - 12:11
![]() Maryam wrote:
Maryam wrote:
Hi, I have finished the right front piece, and I'm confused about the collar. I have worked the shape of trapezoid along 27 stitches on the right front piece, with longer side at the band, yet if I don't continue toward the back piece, how am I supposed to attach the two collars at the back, since the will be a 15 cm gap in the middle of back piece that I haven't chrocheted?
06.04.2023 - 20:38DROPS Design answered:
Dear Maryam, the shawl collar is started on the seam of the shoulder. It should be 10cm on the narrowest side. It's worked on each side of the front piece and then sewn together on the back as explained in the ASSEMBLY. If for some reason you need more than 10 cm you should work until reaching the necessary measurements. Happy crochetting!
08.04.2023 - 22:57
![]() Anna wrote:
Anna wrote:
Liebes DROPS-Team, muss man wirklich bei den Ärmeln den Rapport A3 in genau 6 LM häkeln? Ohne LM sozusagen dazwischen? Oder versteh ich das falsch? Danke fürs Feedback! Liebe Grüße
09.02.2023 - 09:22DROPS Design answered:
Liebe Anna, für die Ärmel häkelt man 29 Lm, dann das Muster genauso wie zuvor (= A.3, A.2 und A.1 mit den Stäbchen) häkeln und 29 Lm häkeln = die 29 Lm beidseitig sind für die Ärmel, die werden dann so gehäkelt: 6 Stäbchen, A.1 (8 M), A.2 (je 5 M, das lezte A.2 endet über A.1). Viel Spaß beim häkeln!
09.02.2023 - 10:19
![]() Anna wrote:
Anna wrote:
Und, bitte wo ist erklärt, wie ich die Stäbchengruppen häkle? Wieviele, in welche Stäbchen usw? Das wäre bitte auch extrem nett, wenn Ihr mir da helfen könntet. Vielen Dank!
29.01.2023 - 11:22
|
||||||||||||||||||||||
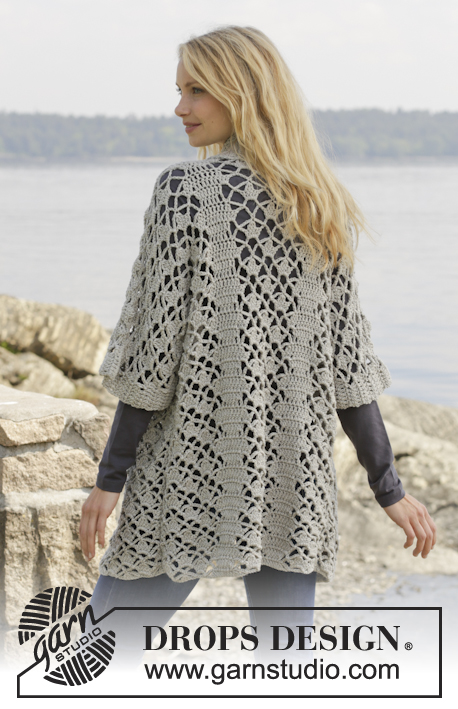
Shining Star#shiningstarcardigan |
||||||||||||||||||||||
 |
 |
|||||||||||||||||||||
Crochet DROPS jacket with lace pattern and shawl collar in ”Merino Extra Fine”. Size: S - XXXL.
DROPS 157-18 |
||||||||||||||||||||||
|
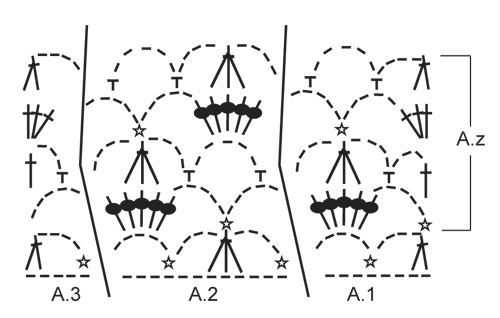
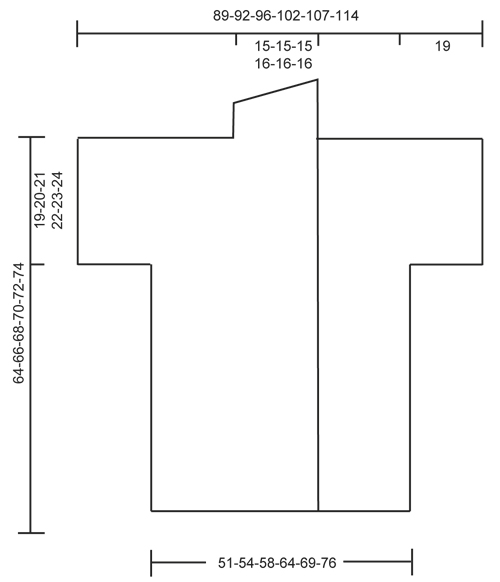
CROCHET INFO: Replace first dc at beg of every dc row with 3 ch. PATTERN: See diagrams A.1-A.3. ---------------------------------------------------------- BACK PIECE: Worked back and forth. Work 83-87-93-101-111-121 ch on hook size 5 mm / H/8 with Merino Extra Fine. Then work as follows from RS: Work A.1 – see explanation above, over the first 8 ch, NOTE: Replace 1st dc with 3 ch – see CROCHET INFO above, A.2 over the next 12-12-12-12-24-24 ch, A.3 over the next ch 5, 1 dc in each of the next 4-6-9-13-6-11 ch, A.1, A.2, A.3, 1 dc in each of the next 4-6-9-13-6-11 ch, A.1, A.2 over the next 12-12-12-12-24-24 ch and A.3. Then repeat A.z vertically until finished measurements. NOTE: On 1st row in A.z (= from WS) work as follows: Work A.3, A.2 1-1-1-1-2-2 times in width, A.1, 3 ch (replace 1 dc), 1 dc in each of the next 2-4-7-11-4-9 dc, 3 ch (replace 1 dc), 1 sc in next st, A.3, A.2, A.1, 3 ch (replace 1 dc), 1 dc in each of the next 2-4-7-11-4-9 dc, 3 ch (replace 1 dc), 1 sc in next st, A.3, A.2 1-1-1-1-2-2 times in width and A.1. REMEMBER THE CROCHET GAUGE! When piece measures approx. 45-46-47-48-49-50 cm / 17¾"-18"-18½"-19"-19¼"-19¾", adjust to finish with 2nd row in A.z - cut the yarn. Then work sleeves as follows: Work 29 loose ch, beg from WS and continue A.3, A.2 and A.1 and dc over back piece as before and finish with 31 loose ch, turn piece. Now work 1st row in A.1-A.3 over ch from RS, AT THE SAME TIME continue with pattern over back piece as before (i.e. work 4th row in A.z over these sts) as follows: Work 1 dc in each of the first ch 6, A.1 over the next 8 ch, A.2 2 times in width (i.e. work last A.2 over the last ch 5, then work the rest of A.2 over A.1), work A.2 1-1-1-1-2-2 times in width as before, A.3, 1 dc in each of the next 4-6-9-13-6-11 dc, A.1, A.2, A.3, 1 dc in each of the next 4-6-9-13-6-11 dc, A.1, A.2 1-1-1-1-2-2 times in width, then work A.2 2 times in width (i.e. work the first A.2 over A.3 and the next 6 ch), A.3 over the next 5 ch and 1 dc in each of the last 6 ch. Continue this pattern until piece measures approx. 62-64-66-68-70-72 cm / 24⅜"-25¼"-26"-26¾"-27½"-28⅜" - adjust to finish after a row from WS. Then finish each shoulder/sleeve separately as follows: RIGHT SHOULDER/SLEEVE: Work 6 dc, A.1 1 time and A.2 3-3-3-3-4-4 times, A.3, 1 dc in each of the next 4-6-9-13-6-11 dc. Turn and work pattern as before. Continue like this until piece measures 64-66-68-70-72-74 cm / 25¼"-26"-26¾"-27½"-28⅜"-29⅛" in total, adjust to finish with a whole repetition of A.z. Fasten off. LEFT SHOULDER/SLEEVE: Work the left shoulder/sleeve the same way but reversed, work A.1 instead of A.3 at beg of row. RIGHT FRONT PIECE: Worked back and forth. Work 63-65-70-74-81-86 ch (includes 3 ch to turn with) on hook size 5 mm / H/8 with Merino Extra Fine. Work 1 dc in 4th ch from hook, 1 dc in each of the next 5-5-7-7-9-9 ch (= band), A.1 over the next 8 ch, A.2 over the next 12 ch, A.3 over the next ch 5, 1 dc in each of the next 4-6-9-13-6-11 ch, A.1 over the next 8 ch, A.2 over the next 12-12-12-12-24-24 ch, A.3 over the last 5 ch. Then repeat A.z vertically until finished measurements. NOTE: On 1st row in A.z (= from WS) work as follows: Work A.3, A.2 1-1-1-1-2-2 times in width, A.1, 3 ch (replace 1 dc), 1 sc in next st, 1 dc in each of the next 2-4-7-11-4-9 dc, 3 ch (replace 1 dc), A.3, A.2, A.1, 3 ch (replace 1 dc), 1 sc in next st, 1 dc in each of the next 5-5-7-7-9-9 dc. When piece measures approx. 45-46-47-48-49-50 cm / 17¾"-18"-18½"-19"-19¼"-19¾", adjust to finish with 2nd row in A.z. Cut the yarn. Then work 29 loose ch for sleeve and continue as on back piece. When piece measures 64-66-68-70-72-74 cm / 25¼"-26"-26¾"-27½"-28⅜"-29⅛", adjust to finish with a whole repetition of A.z (i.e. last row is from RS) - cut the yarn. Then work shawl collar. SHAWL COLLAR: Work shawl collar back and forth, beg from RS as follows: Work 1 dc in each of the first 6-6-8-8-10-10 dc, 1 dc in first dc on A.1, * 3 dc in next ch-space *, repeat from *-* 2 more times, 1 dc in next dc, * 3 dc in next ch-space *, repeat from *-* 2 more times, 1 dc in last dc in A.3, 0-0-0-1-1-1 dc in next dc = 27-27-29-30-32-32 dc. Then work short rows over band sts as follows: ROW 1 (WS): 5 sc, 5 hdc, 17-17-19-20-22-22 dc ROW 2 (RS): Work 1 dc in each of the 27-27-29-30-32-32 sts. Repeat these 2 rows until piece measures approx. 10 cm / 4" on the most narrow part – adjust to finish with 2nd row (RS). Fasten off. LEFT FRONT PIECE: Work as right but reversed. Work according to diagram A.3 instead of A.1 at beg of row. When piece measures 45-46-47-48-49-50 cm / 17¾"-18"-18½"-19"-19¼"-19¾", adjust to finish with 2nd row in A.z, work as before over front piece from WS, then work 31 loose ch for sleeve. When piece measures 64-66-68-70-72-74 cm / 25¼"-26"-26¾"-27½"-28⅜"-29⅛", adjust to finish with a whole repetition of A.z (i.e. last row is from RS), work shawl collar. NOTE: There is no need to cut the yarn. ASSEMBLY: Place front pieces on top of back piece and work the shoulders as follows: 1 sc through both layers, * ch 3, 1 sc in next ch-space *, repeat from *-* along the entire shoulder/sleeve and finish with 1 sc. Work the sides tog as follows: 1 sc, * ch 3, 1 sc in ch-space on next row *, repeat from *-* along the entire side and finish with 1 sc. Work tog under sleeves as follows: * 1 sc in ch in next ch-space, 3 ch *, repeat from *-* and finish with 1 sc. |
||||||||||||||||||||||
Diagram explanations |
||||||||||||||||||||||
|
||||||||||||||||||||||
 |
||||||||||||||||||||||
 |
||||||||||||||||||||||
Have you finished this pattern?Tag your pictures with #dropspattern #shiningstarcardigan or submit them to the #dropsfan gallery. Do you need help with this pattern?You'll find 8 tutorial videos, a Comments/Questions area and more by visiting the pattern on garnstudio.com. © 1982-2026 DROPS Design A/S. We reserve all rights. This document, including all its sub-sections, has copyrights. Read more about what you can do with our patterns at the bottom of each pattern on our site. |
||||||||||||||||||||||


With over 40 years in knitting and crochet design, DROPS Design offers one of the most extensive collections of free patterns on the internet - translated to 17 languages. As of today we count 325 catalogs and 12298 patterns - 12288 of which are translated into English (US/in).
We work hard to bring you the best knitting and crochet have to offer, inspiration and advice as well as great quality yarns at incredible prices! Would you like to use our patterns for other than personal use? You can read what you are allowed to do in the Copyright text at the bottom of all our patterns. Happy crafting!
Post a comment to pattern DROPS 157-18
We would love to hear what you have to say about this pattern!
If you want to leave a question, please make sure you select the correct category in the form below, to speed up the answering process. Required fields are marked *.