
Popular categories
Looking for a yarn?


Comments / Questions (195)
![]() Cinzia wrote:
Cinzia wrote:
Buongiorno! Terminato il davanti dx c'è scritto di iniziare il collo a scialle lavorando 1m.a nelle prime 6 ma: quali ma? Quelle del bordo del davanti?
03.09.2014 - 07:41DROPS Design answered:
Buongiorno Cinzia. Sì esatto, sono le 6 maglie alte del bordo davanti. Buon lavoro!
03.09.2014 - 08:58Kajsa wrote:
Jag skulle behöva hjälp med ärmarna. I instruktionerna står det att jag ska virka 29 lösa maskor, blir denna länk bara hängande i ena ändan av bakstycket? Och i andra ändan av sammma varv bör man avsluta med 31 lösa maskor, men om man ska fortsätta varvet efter det med a.1-a.3, är problemet att enligt mönstret krävs 25 maskor för a.1-a.3, så vad gör jag med de 6 maskor som blir över? Ska jag bara hoppa över dem och fortsätta på varv 4 över bakstycket, eller vad är det jag missar?
02.09.2014 - 09:07DROPS Design answered:
Hej Kajsa, Ja de 29 lösa maskorna är till ärmen, dem virkar du över i slutet av nästa varv, enligt beskrivningen. Lycka till!
05.09.2014 - 13:33
![]() Cinzia wrote:
Cinzia wrote:
Eccomi di nuovo! Credo che finchè non ho finito il lavoro non vi libererete di me!!!! Perche' per le maniche la dx è di 29 cat e per la sx 31 cat? Con 31 cat riesco a fare a1/a2/a3 set completo invece con 29 mancano 2 cat per il set a3/a2/a1!! Grazie
31.08.2014 - 18:54DROPS Design answered:
Buongiorno Cinzia. Sulle prime 31 cat, lavori: 1 m.a in ognuna delle prime 6 cat, A1 (8 cat), A2 (12 cat), A2 (sulle ultime 5 cat e poi sulle m della riga precedente). Prosegua come indicato e finisca la riga come segue: A2 (una parte sopra le m della riga precedente e l’ultima parte su 6 cat), A2 (12 cat), A3 (5 cat) e poi 1 m.a in ognuna delle ultime 6 cat. Buon lavoro!
01.09.2014 - 09:50
![]() Cinzia wrote:
Cinzia wrote:
Grazie veramente! Siete corretti precisi e veloci nelle risposte ! Grazie ancora!
30.08.2014 - 12:35
![]() Cinzia Achilli wrote:
Cinzia Achilli wrote:
Spero di che questa sia l'ultima volta che vi disturbo ... Almeno per questo modello!! Ricollegandomi alla mia ultima email: taglio il filo avvio 29 cat mi riaggancio al dietro e arrivata alla fine della riga del dietro senza tagliare il filo avvio 31 cat per la 2* manica e poi proseguo trovandomi sul dritto del lavoro Ho capito bene? Grazieeeee!!!!
30.08.2014 - 10:38DROPS Design answered:
Buongiorno Cinzia. Sì, ha capito correttamente. Se dovesse avere altre difficoltà, ci può scrivere senza alcun problema. Buon lavoro!
30.08.2014 - 11:16
![]() Cinzia wrote:
Cinzia wrote:
Fine messaggio: credo che il 21/8/14 Miemie abbia scritto per lo stesso problema ma purtroppo non mi è chiara la traduzione ! Grazie è urgente!!! Grazie di cuore
29.08.2014 - 09:08DROPS Design answered:
Buongiorno Cinzia. Deve tagliare il filo per poter avviare le cat delle maniche. Quindi: avvii 29 cat (prima manica), prosegua (iniziando sul rovescio) lavorando il dietro come già impostato, avvii 31 cat (seconda manica). In questo modo ha attaccato entrambe le maniche al dietro. La riga successiva (sul diritto del lavoro) è descritta nel paragrafo che inizia con: Lavorare 1 m.a in ognuna delle prime 6 cat… Buon lavoro!
29.08.2014 - 09:31
![]() Cinzia wrote:
Cinzia wrote:
Segue messaggio Le 29 catenelle le devo attaccare al pezzo dietro? Anche le 31? Allora perche tagliare il filo?
29.08.2014 - 09:05DROPS Design answered:
Buongiorno Cinzia. Deve tagliare il filo per poter attaccare entrambe le maniche al dietro, nel corso della stessa riga, sul rovescio del lavoro. Ci riscriva se ancora in difficoltà. Buon lavoro!
29.08.2014 - 09:33
![]() Cinzia wrote:
Cinzia wrote:
Salve non riesco a proseguire il lavoro al punto delle maniche ( dietro) Perche devo tagliare il filo se è un UNICO pezzo?
29.08.2014 - 09:03DROPS Design answered:
Buongiorno Cinzia. Deve tagliare il filo per poter attaccare entrambe le maniche al dietro, nel corso della stessa riga, sul rovescio del lavoro. Ci riscriva se ancora in difficoltà. Buon lavoro!
29.08.2014 - 09:33
![]() Cinzia wrote:
Cinzia wrote:
Praticamente vorrei sapere se c'è un altro modo per contattarvi altrimenti non posso andare avanti..help me! A presto Cinzia
28.08.2014 - 09:32DROPS Design answered:
Buongiorno Cinzia. Per un aiuto più personalizzato, può rivolgersi al seguente indirizzo mail: italy@garnstudio.com Le verrà risposto quanto prima. Grazie e buon lavoro!
29.08.2014 - 11:17
|
||||||||||||||||||||||
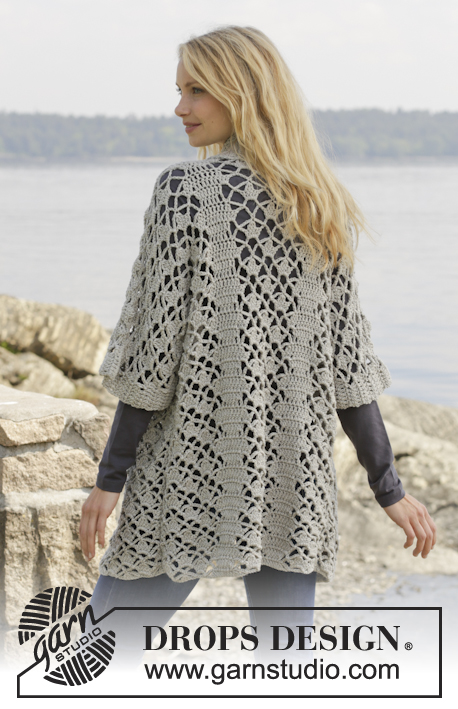
Shining Star#shiningstarcardigan |
||||||||||||||||||||||
 |
 |
|||||||||||||||||||||
Crochet DROPS jacket with lace pattern and shawl collar in ”Merino Extra Fine”. Size: S - XXXL.
DROPS 157-18 |
||||||||||||||||||||||
|
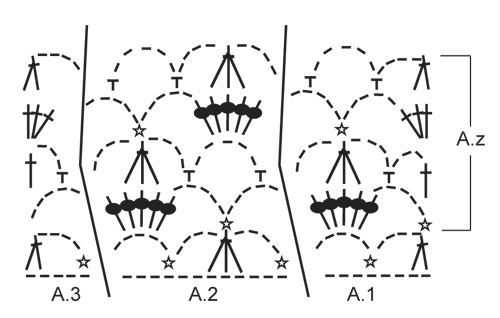
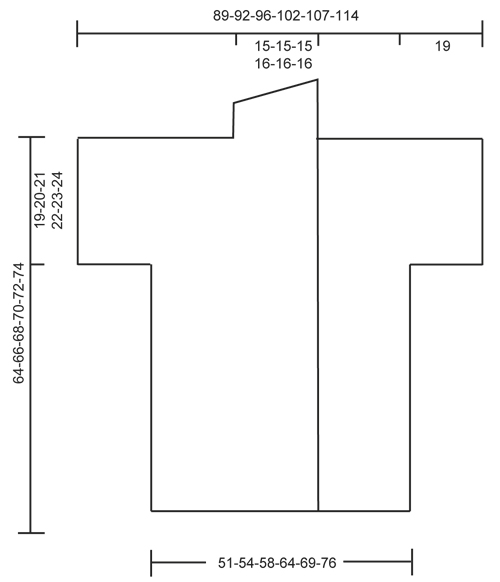
CROCHET INFO: Replace first dc at beg of every dc row with 3 ch. PATTERN: See diagrams A.1-A.3. ---------------------------------------------------------- BACK PIECE: Worked back and forth. Work 83-87-93-101-111-121 ch on hook size 5 mm / H/8 with Merino Extra Fine. Then work as follows from RS: Work A.1 – see explanation above, over the first 8 ch, NOTE: Replace 1st dc with 3 ch – see CROCHET INFO above, A.2 over the next 12-12-12-12-24-24 ch, A.3 over the next ch 5, 1 dc in each of the next 4-6-9-13-6-11 ch, A.1, A.2, A.3, 1 dc in each of the next 4-6-9-13-6-11 ch, A.1, A.2 over the next 12-12-12-12-24-24 ch and A.3. Then repeat A.z vertically until finished measurements. NOTE: On 1st row in A.z (= from WS) work as follows: Work A.3, A.2 1-1-1-1-2-2 times in width, A.1, 3 ch (replace 1 dc), 1 dc in each of the next 2-4-7-11-4-9 dc, 3 ch (replace 1 dc), 1 sc in next st, A.3, A.2, A.1, 3 ch (replace 1 dc), 1 dc in each of the next 2-4-7-11-4-9 dc, 3 ch (replace 1 dc), 1 sc in next st, A.3, A.2 1-1-1-1-2-2 times in width and A.1. REMEMBER THE CROCHET GAUGE! When piece measures approx. 45-46-47-48-49-50 cm / 17¾"-18"-18½"-19"-19¼"-19¾", adjust to finish with 2nd row in A.z - cut the yarn. Then work sleeves as follows: Work 29 loose ch, beg from WS and continue A.3, A.2 and A.1 and dc over back piece as before and finish with 31 loose ch, turn piece. Now work 1st row in A.1-A.3 over ch from RS, AT THE SAME TIME continue with pattern over back piece as before (i.e. work 4th row in A.z over these sts) as follows: Work 1 dc in each of the first ch 6, A.1 over the next 8 ch, A.2 2 times in width (i.e. work last A.2 over the last ch 5, then work the rest of A.2 over A.1), work A.2 1-1-1-1-2-2 times in width as before, A.3, 1 dc in each of the next 4-6-9-13-6-11 dc, A.1, A.2, A.3, 1 dc in each of the next 4-6-9-13-6-11 dc, A.1, A.2 1-1-1-1-2-2 times in width, then work A.2 2 times in width (i.e. work the first A.2 over A.3 and the next 6 ch), A.3 over the next 5 ch and 1 dc in each of the last 6 ch. Continue this pattern until piece measures approx. 62-64-66-68-70-72 cm / 24⅜"-25¼"-26"-26¾"-27½"-28⅜" - adjust to finish after a row from WS. Then finish each shoulder/sleeve separately as follows: RIGHT SHOULDER/SLEEVE: Work 6 dc, A.1 1 time and A.2 3-3-3-3-4-4 times, A.3, 1 dc in each of the next 4-6-9-13-6-11 dc. Turn and work pattern as before. Continue like this until piece measures 64-66-68-70-72-74 cm / 25¼"-26"-26¾"-27½"-28⅜"-29⅛" in total, adjust to finish with a whole repetition of A.z. Fasten off. LEFT SHOULDER/SLEEVE: Work the left shoulder/sleeve the same way but reversed, work A.1 instead of A.3 at beg of row. RIGHT FRONT PIECE: Worked back and forth. Work 63-65-70-74-81-86 ch (includes 3 ch to turn with) on hook size 5 mm / H/8 with Merino Extra Fine. Work 1 dc in 4th ch from hook, 1 dc in each of the next 5-5-7-7-9-9 ch (= band), A.1 over the next 8 ch, A.2 over the next 12 ch, A.3 over the next ch 5, 1 dc in each of the next 4-6-9-13-6-11 ch, A.1 over the next 8 ch, A.2 over the next 12-12-12-12-24-24 ch, A.3 over the last 5 ch. Then repeat A.z vertically until finished measurements. NOTE: On 1st row in A.z (= from WS) work as follows: Work A.3, A.2 1-1-1-1-2-2 times in width, A.1, 3 ch (replace 1 dc), 1 sc in next st, 1 dc in each of the next 2-4-7-11-4-9 dc, 3 ch (replace 1 dc), A.3, A.2, A.1, 3 ch (replace 1 dc), 1 sc in next st, 1 dc in each of the next 5-5-7-7-9-9 dc. When piece measures approx. 45-46-47-48-49-50 cm / 17¾"-18"-18½"-19"-19¼"-19¾", adjust to finish with 2nd row in A.z. Cut the yarn. Then work 29 loose ch for sleeve and continue as on back piece. When piece measures 64-66-68-70-72-74 cm / 25¼"-26"-26¾"-27½"-28⅜"-29⅛", adjust to finish with a whole repetition of A.z (i.e. last row is from RS) - cut the yarn. Then work shawl collar. SHAWL COLLAR: Work shawl collar back and forth, beg from RS as follows: Work 1 dc in each of the first 6-6-8-8-10-10 dc, 1 dc in first dc on A.1, * 3 dc in next ch-space *, repeat from *-* 2 more times, 1 dc in next dc, * 3 dc in next ch-space *, repeat from *-* 2 more times, 1 dc in last dc in A.3, 0-0-0-1-1-1 dc in next dc = 27-27-29-30-32-32 dc. Then work short rows over band sts as follows: ROW 1 (WS): 5 sc, 5 hdc, 17-17-19-20-22-22 dc ROW 2 (RS): Work 1 dc in each of the 27-27-29-30-32-32 sts. Repeat these 2 rows until piece measures approx. 10 cm / 4" on the most narrow part – adjust to finish with 2nd row (RS). Fasten off. LEFT FRONT PIECE: Work as right but reversed. Work according to diagram A.3 instead of A.1 at beg of row. When piece measures 45-46-47-48-49-50 cm / 17¾"-18"-18½"-19"-19¼"-19¾", adjust to finish with 2nd row in A.z, work as before over front piece from WS, then work 31 loose ch for sleeve. When piece measures 64-66-68-70-72-74 cm / 25¼"-26"-26¾"-27½"-28⅜"-29⅛", adjust to finish with a whole repetition of A.z (i.e. last row is from RS), work shawl collar. NOTE: There is no need to cut the yarn. ASSEMBLY: Place front pieces on top of back piece and work the shoulders as follows: 1 sc through both layers, * ch 3, 1 sc in next ch-space *, repeat from *-* along the entire shoulder/sleeve and finish with 1 sc. Work the sides tog as follows: 1 sc, * ch 3, 1 sc in ch-space on next row *, repeat from *-* along the entire side and finish with 1 sc. Work tog under sleeves as follows: * 1 sc in ch in next ch-space, 3 ch *, repeat from *-* and finish with 1 sc. |
||||||||||||||||||||||
Diagram explanations |
||||||||||||||||||||||
|
||||||||||||||||||||||
 |
||||||||||||||||||||||
 |
||||||||||||||||||||||
Have you finished this pattern?Tag your pictures with #dropspattern #shiningstarcardigan or submit them to the #dropsfan gallery. Do you need help with this pattern?You'll find 8 tutorial videos, a Comments/Questions area and more by visiting the pattern on garnstudio.com. © 1982-2026 DROPS Design A/S. We reserve all rights. This document, including all its sub-sections, has copyrights. Read more about what you can do with our patterns at the bottom of each pattern on our site. |
||||||||||||||||||||||


With over 40 years in knitting and crochet design, DROPS Design offers one of the most extensive collections of free patterns on the internet - translated to 17 languages. As of today we count 325 catalogs and 12298 patterns - 12288 of which are translated into English (US/in).
We work hard to bring you the best knitting and crochet have to offer, inspiration and advice as well as great quality yarns at incredible prices! Would you like to use our patterns for other than personal use? You can read what you are allowed to do in the Copyright text at the bottom of all our patterns. Happy crafting!
Post a comment to pattern DROPS 157-18
We would love to hear what you have to say about this pattern!
If you want to leave a question, please make sure you select the correct category in the form below, to speed up the answering process. Required fields are marked *.