
Popular categories
Looking for a yarn?


Comments / Questions (195)
![]() Regina wrote:
Regina wrote:
Der Schalkragen ist mir völlig unklar. Die Anleitung liest sich, als ob man ein einfaches Rechteck anfügt, das Bild zeigt aber eine Schräge. Leider ist genau dieser Steile auf dem Goto durch die Haare des Models verdeckt.
14.03.2026 - 05:17DROPS Design answered:
Liebe Regina, den Schalkragen häkeln Sie so über alle die restlichen 27-32 Maschen: Beim rechten Vorderteil häkeln Sie bei Rückreien: 5 fM, 5 hStb, dann 17-22 Stb, bei Hinreihen häkeln Sie 27-32 Stb; so häkelt man "höhere/längere" Maschen = Stäbchen bei der äusserste Seite vom Kragen und in jeder 2. Reihen (Rückreihen) kleinere Maschen: Hlb Stb/ fM damit die äussereste Seite breiter wird so wird der Schalkragen besser aussehen. Viel Spaß beim Häkeln!
16.03.2026 - 08:00
![]() Wendy Campbell wrote:
Wendy Campbell wrote:
I have been crocheting for 65 years and that pattern makes absolutely no sense whatsoever. I really wanted to make it, but don’t understand it from the first row makes no sense.
07.01.2026 - 22:01
![]() Eva wrote:
Eva wrote:
Jag försöker virka drops mönster 157-18 storlek XXXL och jag kan inte komma igång för jag får inte mönstret att stämma. Jag lägger upp 121 maskor o de räcker inte till första mönsterraden. (8+24+5)×3+2x11= 133. Vad gör jag för fel?
19.07.2025 - 19:48DROPS Design answered:
Hei Eva. Det er ikke (8+24+5) x 3. Noen steder hekler du over x antall masker, mens andre steder står at man hekler etter diagram (og da er det kun maskeantallet diagrammet viser). Du hekler A.1 over 8 masker + A.2 over 24 masker + A.3 over 5 masker + 1 stav i hver av de neste 11 maskene + A.1 (= 8 masker) + A.2 (= 12 masker) + A.3 (over 5 masker) + 1 stav i hver av de neste 11 maskene + A.1(=8 masker) + A.2 over 24 masker + A.3 (=5 masker) = 121 masker. Bare tall: 8+24+5+11+8+12+5+11+8+24+5 = 121 masker. mvh DROPS Design
11.08.2025 - 09:47
![]() Anne wrote:
Anne wrote:
Als ik voor maat L 93 lossen haak en netjes doe zoals het patroon zegt kom ik op het niet uit en houd ik 5 lossen over.....wat doe ik fout?
18.07.2025 - 14:16
![]() Ruth wrote:
Ruth wrote:
Hei, stemmer det at dette er fargen på avbildet jakke: g f.nr 08, lys beige? eller er det nr 08 Gråbeige (Mix) ??? Ser ikke ut som lys beige på bildet 😀🤔
02.07.2025 - 20:50DROPS Design answered:
Hej Ruth, jo det er 08, farven kan have skiftet navn. Farvekortet er opdateret , så vælg den farve som passer dig :)
03.07.2025 - 12:12
![]() Karine J wrote:
Karine J wrote:
Bonjour,je fais ce modèle en xl, je bloque pour faire les manches. J'ai donc arrêter le dos a 48cm de hauteur, monter 29 mailles et après je fais quoi sur ces 29 m et je les raccroche au dos a quel moment? Pouvez vous svp me donner la marche à suivre pour tout le rang. Merci beaucoup
16.06.2025 - 19:08DROPS Design answered:
Bonjour Karine, ces 29 ml sont les mailles de la manche, vous crochetez maintenant les mailles du dos comme avant sur l'envers en crochetant A.3, A.2 et A.1 et les brides exactement comme avant, à la fin de ce rang, montez souplement 31 ml, puis tournez et crochetez le rang suivant en point fantaisie comme indiqué avec les brides entre. Bon crochet!
17.06.2025 - 09:17
![]() Blown Away wrote:
Blown Away wrote:
With all the text it took to write it this crazy way you could have just written a normal pattern. I’ve crocheted since 17 and am 68 and have never seen a pattern like this.
14.02.2025 - 04:06
![]() Willy Mensink wrote:
Willy Mensink wrote:
Hoe moet ik verder over de 13 stokjes breien?
10.10.2024 - 21:54
![]() Jurina wrote:
Jurina wrote:
Sorry laatste vraag voor ik het echt opgeef. Ik heb nu op de 31 losse 6 stokjes a1 a2 en a3 gehaakt dan achterpand az4 dan heb ik de 29 losse nog dan a1 a2 en a3 maar dan moet ik nog 6 stokjes maar heb maar 4 losse over. De drops store verwijst me naar jullie aangezien ze teveel vragen krijgen dus jullie zijn mijn enige hulp.
22.08.2024 - 10:36
![]() Jurina wrote:
Jurina wrote:
Sorry dat ik een vraag stel die al zo vaak gevraagd is maar na het lezen en proberen en nog eens lezen kom ik er nog steeds niet uit. Achterpand is 47 cm hoog. Dus nu 29 losse opgezet aan het achterpand vastgezet dan 3e toer van az gehaakt op het rugpand en dan 31 losse gehaakt. Nu werk keren. Moet ik nu eerst 6 stokjes haken voor ik begin met a3 tot a1 en met welke toer begin ik de losse. Sorry ik kom er maar niet uit. En de ene kant 29 losse en de andere kant 31 losse. Ik blijf het proberen.
17.08.2024 - 22:54DROPS Design answered:
Dag Jurina,
Nadat je het werk hebt gekeerd (na het haken van de 31 lossen), haak je de eerste toer van A.1-A.3 over die lossen (dus over de mouw), daarna zet je het patroon voort over het achterpand, zoals je bezig was, dus die 6 stokjes komen op het achterpand. Na het achterpand haak je verder over de 29 lossen die aan het andere einde hangen en daar haak je ook de eerste toer van A.1-A.3 over.
21.08.2024 - 18:55
|
||||||||||||||||||||||
Shining Star#shiningstarcardigan |
||||||||||||||||||||||
 |
 |
|||||||||||||||||||||
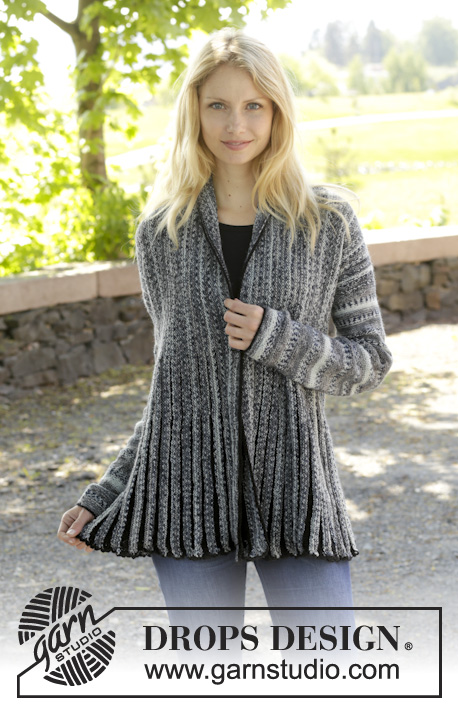
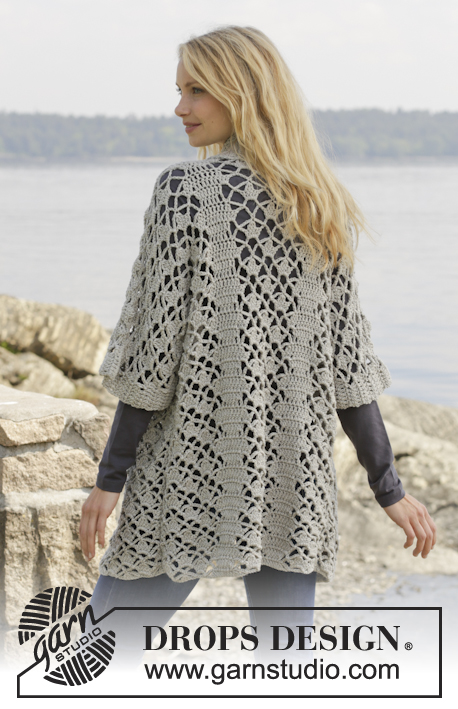
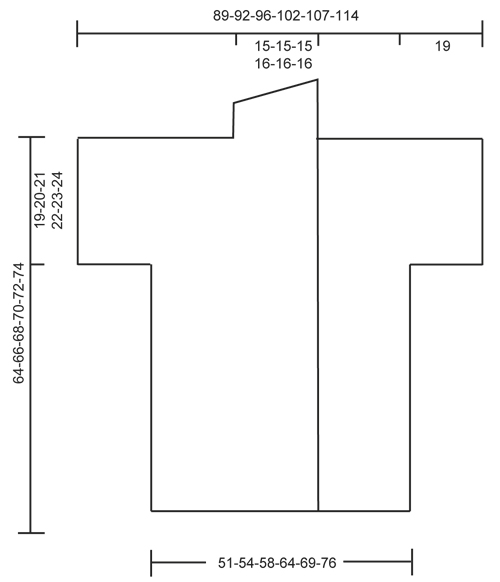
Crochet DROPS jacket with lace pattern and shawl collar in ”Merino Extra Fine”. Size: S - XXXL.
DROPS 157-18 |
||||||||||||||||||||||
|
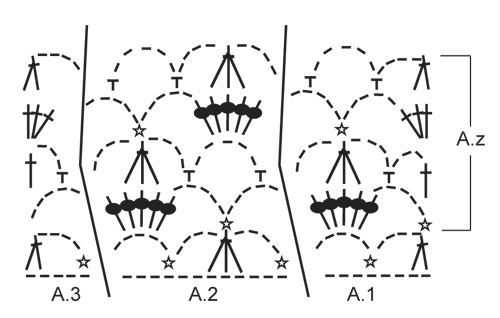
CROCHET INFO: Replace first dc at beg of every dc row with 3 ch. PATTERN: See diagrams A.1-A.3. ---------------------------------------------------------- BACK PIECE: Worked back and forth. Work 83-87-93-101-111-121 ch on hook size 5 mm / H/8 with Merino Extra Fine. Then work as follows from RS: Work A.1 – see explanation above, over the first 8 ch, NOTE: Replace 1st dc with 3 ch – see CROCHET INFO above, A.2 over the next 12-12-12-12-24-24 ch, A.3 over the next ch 5, 1 dc in each of the next 4-6-9-13-6-11 ch, A.1, A.2, A.3, 1 dc in each of the next 4-6-9-13-6-11 ch, A.1, A.2 over the next 12-12-12-12-24-24 ch and A.3. Then repeat A.z vertically until finished measurements. NOTE: On 1st row in A.z (= from WS) work as follows: Work A.3, A.2 1-1-1-1-2-2 times in width, A.1, 3 ch (replace 1 dc), 1 dc in each of the next 2-4-7-11-4-9 dc, 3 ch (replace 1 dc), 1 sc in next st, A.3, A.2, A.1, 3 ch (replace 1 dc), 1 dc in each of the next 2-4-7-11-4-9 dc, 3 ch (replace 1 dc), 1 sc in next st, A.3, A.2 1-1-1-1-2-2 times in width and A.1. REMEMBER THE CROCHET GAUGE! When piece measures approx. 45-46-47-48-49-50 cm / 17¾"-18"-18½"-19"-19¼"-19¾", adjust to finish with 2nd row in A.z - cut the yarn. Then work sleeves as follows: Work 29 loose ch, beg from WS and continue A.3, A.2 and A.1 and dc over back piece as before and finish with 31 loose ch, turn piece. Now work 1st row in A.1-A.3 over ch from RS, AT THE SAME TIME continue with pattern over back piece as before (i.e. work 4th row in A.z over these sts) as follows: Work 1 dc in each of the first ch 6, A.1 over the next 8 ch, A.2 2 times in width (i.e. work last A.2 over the last ch 5, then work the rest of A.2 over A.1), work A.2 1-1-1-1-2-2 times in width as before, A.3, 1 dc in each of the next 4-6-9-13-6-11 dc, A.1, A.2, A.3, 1 dc in each of the next 4-6-9-13-6-11 dc, A.1, A.2 1-1-1-1-2-2 times in width, then work A.2 2 times in width (i.e. work the first A.2 over A.3 and the next 6 ch), A.3 over the next 5 ch and 1 dc in each of the last 6 ch. Continue this pattern until piece measures approx. 62-64-66-68-70-72 cm / 24⅜"-25¼"-26"-26¾"-27½"-28⅜" - adjust to finish after a row from WS. Then finish each shoulder/sleeve separately as follows: RIGHT SHOULDER/SLEEVE: Work 6 dc, A.1 1 time and A.2 3-3-3-3-4-4 times, A.3, 1 dc in each of the next 4-6-9-13-6-11 dc. Turn and work pattern as before. Continue like this until piece measures 64-66-68-70-72-74 cm / 25¼"-26"-26¾"-27½"-28⅜"-29⅛" in total, adjust to finish with a whole repetition of A.z. Fasten off. LEFT SHOULDER/SLEEVE: Work the left shoulder/sleeve the same way but reversed, work A.1 instead of A.3 at beg of row. RIGHT FRONT PIECE: Worked back and forth. Work 63-65-70-74-81-86 ch (includes 3 ch to turn with) on hook size 5 mm / H/8 with Merino Extra Fine. Work 1 dc in 4th ch from hook, 1 dc in each of the next 5-5-7-7-9-9 ch (= band), A.1 over the next 8 ch, A.2 over the next 12 ch, A.3 over the next ch 5, 1 dc in each of the next 4-6-9-13-6-11 ch, A.1 over the next 8 ch, A.2 over the next 12-12-12-12-24-24 ch, A.3 over the last 5 ch. Then repeat A.z vertically until finished measurements. NOTE: On 1st row in A.z (= from WS) work as follows: Work A.3, A.2 1-1-1-1-2-2 times in width, A.1, 3 ch (replace 1 dc), 1 sc in next st, 1 dc in each of the next 2-4-7-11-4-9 dc, 3 ch (replace 1 dc), A.3, A.2, A.1, 3 ch (replace 1 dc), 1 sc in next st, 1 dc in each of the next 5-5-7-7-9-9 dc. When piece measures approx. 45-46-47-48-49-50 cm / 17¾"-18"-18½"-19"-19¼"-19¾", adjust to finish with 2nd row in A.z. Cut the yarn. Then work 29 loose ch for sleeve and continue as on back piece. When piece measures 64-66-68-70-72-74 cm / 25¼"-26"-26¾"-27½"-28⅜"-29⅛", adjust to finish with a whole repetition of A.z (i.e. last row is from RS) - cut the yarn. Then work shawl collar. SHAWL COLLAR: Work shawl collar back and forth, beg from RS as follows: Work 1 dc in each of the first 6-6-8-8-10-10 dc, 1 dc in first dc on A.1, * 3 dc in next ch-space *, repeat from *-* 2 more times, 1 dc in next dc, * 3 dc in next ch-space *, repeat from *-* 2 more times, 1 dc in last dc in A.3, 0-0-0-1-1-1 dc in next dc = 27-27-29-30-32-32 dc. Then work short rows over band sts as follows: ROW 1 (WS): 5 sc, 5 hdc, 17-17-19-20-22-22 dc ROW 2 (RS): Work 1 dc in each of the 27-27-29-30-32-32 sts. Repeat these 2 rows until piece measures approx. 10 cm / 4" on the most narrow part – adjust to finish with 2nd row (RS). Fasten off. LEFT FRONT PIECE: Work as right but reversed. Work according to diagram A.3 instead of A.1 at beg of row. When piece measures 45-46-47-48-49-50 cm / 17¾"-18"-18½"-19"-19¼"-19¾", adjust to finish with 2nd row in A.z, work as before over front piece from WS, then work 31 loose ch for sleeve. When piece measures 64-66-68-70-72-74 cm / 25¼"-26"-26¾"-27½"-28⅜"-29⅛", adjust to finish with a whole repetition of A.z (i.e. last row is from RS), work shawl collar. NOTE: There is no need to cut the yarn. ASSEMBLY: Place front pieces on top of back piece and work the shoulders as follows: 1 sc through both layers, * ch 3, 1 sc in next ch-space *, repeat from *-* along the entire shoulder/sleeve and finish with 1 sc. Work the sides tog as follows: 1 sc, * ch 3, 1 sc in ch-space on next row *, repeat from *-* along the entire side and finish with 1 sc. Work tog under sleeves as follows: * 1 sc in ch in next ch-space, 3 ch *, repeat from *-* and finish with 1 sc. |
||||||||||||||||||||||
Diagram explanations |
||||||||||||||||||||||
|
||||||||||||||||||||||
 |
||||||||||||||||||||||
 |
||||||||||||||||||||||
Have you finished this pattern?Tag your pictures with #dropspattern #shiningstarcardigan or submit them to the #dropsfan gallery. Do you need help with this pattern?You'll find 8 tutorial videos, a Comments/Questions area and more by visiting the pattern on garnstudio.com. © 1982-2026 DROPS Design A/S. We reserve all rights. This document, including all its sub-sections, has copyrights. Read more about what you can do with our patterns at the bottom of each pattern on our site. |
||||||||||||||||||||||


With over 40 years in knitting and crochet design, DROPS Design offers one of the most extensive collections of free patterns on the internet - translated to 17 languages. As of today we count 325 catalogs and 12298 patterns - 12288 of which are translated into English (US/in).
We work hard to bring you the best knitting and crochet have to offer, inspiration and advice as well as great quality yarns at incredible prices! Would you like to use our patterns for other than personal use? You can read what you are allowed to do in the Copyright text at the bottom of all our patterns. Happy crafting!
Post a comment to pattern DROPS 157-18
We would love to hear what you have to say about this pattern!
If you want to leave a question, please make sure you select the correct category in the form below, to speed up the answering process. Required fields are marked *.