
Popular categories
Looking for a yarn?


Comments / Questions (112)
Linda Weiss wrote:
For the 12-18 month size, how many balls yarn for the cardigan and for the trip would I need? I am following the US pattern. I could use your help in ordering this yarn. Thank you
16.10.2017 - 02:41DROPS Design answered:
Dear Mrs Weiss, you will need 200 g BabyAlpaca Silk powder (= 4 balls) + 1 ball BabyAlpaca Silk off white for the jacket + 1 ball each colour BabyAlpaca Silk for the hat (see pattern for the hat a href="https://www.garnstudio.com/pattern.php?id=6596&cid=17">here. Happy crocheting!
16.10.2017 - 10:06
![]() Linda Weiss wrote:
Linda Weiss wrote:
How much yarn would I need for the body and also the trim for size 6-12 months? Would this yarn be itchy because it's alpaca wool? Also, what is the washing instructions for it? Are there any corrections on this pattern? This garment is adorable! I'm making it for my nephew's baby. Thank you, Linda
15.10.2017 - 00:43DROPS Design answered:
Dear Linda, thank you for your note. The amount in the pattern is given for the whole long sleeved cardigan. However, the piece is so tiny, the sleevs do not change the necessary amounts considerably. The sensitivity to yarn is so individual, but the Baby Alpaca Silk is one of the softest yarns we have, and there are many happily babies wearing items made from it. You can find the care instructions here. Happy crafting.
15.10.2017 - 23:02
![]() Dinah wrote:
Dinah wrote:
Hallo liebes Drops-Team, ich glaube einen Fehler in der Anleitung zur zweiten Größe gefunden zu haben. Und zwar sind pro "Raglanreihe" ja 16 Zunahmen. Allerdings ist der Unterschied, zwischen vor und nach den Zunahmen nicht durch 16 teilbar. Das heißt man kommt nicht auf die vorgegebenen 178. Kann das sein? Oder habe ich nur einen Denkfehler? Liebe Grüße
06.05.2017 - 12:36DROPS Design answered:
Liebe Dinah, nach der ersten Zunahmen haben Sie 98 Stb, dann die Zunahmen (= 16 M.) 5 Mal insgesamt wiederholen = 16 x 5 = 80 M zugenommen. Dann haben Sie 98 + 80 = 178 Stb. Viel Spaß beim häkeln!
08.05.2017 - 10:30
![]() Inger Lise wrote:
Inger Lise wrote:
Tror det blir enklere å forstå oppskr hvis det er tydelig at man ved 1. raglanøkn øker kun 12 m (4 i hver mrkmaske minus 4 mrkmsk) samt at man inkl øvrige økn øker tils. 5-6-7-8 (9-10) ganger. Kan være forvirrende at det står oppgit "totalt" antall økn som da _ikke_ inkl først økn (selv om det som er riktig slik det står), og det er ikke så lett å se at 1. økn gir bare 12 ekstra st (selv om totalant er oppgitt). Siden det jo hender det er feil i oppskr, er det lett å begynne å tvile... :)
23.04.2017 - 12:54
![]() Katia wrote:
Katia wrote:
I am stuck... first of all i don't understand how to work 2ch over the 2ch of the previous row. after that if I get it: (On row with dc work 2 dc + 2 ch + 2 dc in both ch-spaces). ) I have to 2dc+2ch+dc in each of the 2 ch-spaces from the sc(ws) row. And then: I should have 2dc+2ch+2dc+2dc+2ch+2dc (cuz of both chspaces)... (RS) So... on my next ws i have to 2ch in both of the 2ch i have? (times 4, cuz of the stich markers) I don't get how it works after that... How do i continu?
20.10.2016 - 16:05DROPS Design answered:
Dear Katia, you are crocheting for the inc 2dc,2ch, 2dc then on next row (from WS), work 2 sc,2ch,2sc. On next row, work around both ch-space from 2 previous row: 2 dc, 2 ch, 2 dc. Happy crocheting!
20.10.2016 - 16:44
![]() Linnea wrote:
Linnea wrote:
Jag får det inte till att bli 198 maskor när oket och ökningen till raglan är färdigt. Jag vet inte hur man ska räkna. Ska man räkna både stolpar och luftmaskor?
01.09.2016 - 22:30DROPS Design answered:
Hej Linnea. Du öker 16 m per gang (2 st+2 lm + 2 st om hver lm-bue = 4 nye masker x 4 raglanmarkeringer). Du startede med 102 st og öker i alt 6 ganger: 96 nye masker = 198 i alt. Du taeller kun stolparne.
05.09.2016 - 12:57
![]() Michelle Bahnsen wrote:
Michelle Bahnsen wrote:
Jeg forstår ikke helt udtagningerne ved kraven. Diagrammet viser at ved række 1 skal der tages ud på hver side af mærketrådene, men i de andre kommentarer står der at man skal gentage udtagningerne på hele rækken, hvilket så ikke ville stemme med at der blev taget ud på hver side af mærketrådene? Og skal det være st på 2 rækker og ikke strukturmønster under udtagningerne?
25.07.2016 - 14:23DROPS Design answered:
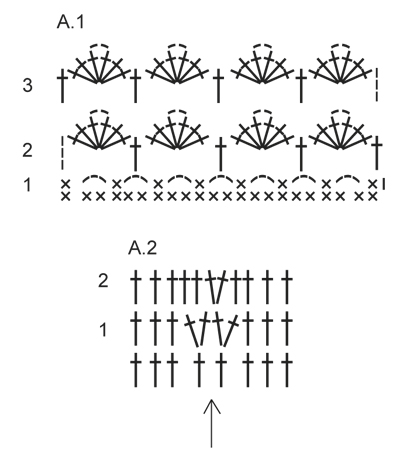
Jo efter 3-4cm øger du til kraven på række 1 og 2 i A.2. Du hækler 3m øger i næste 2 masker, hækler 6m og øger i næste 2m, fortsæt med at hækle 6m imellem øgningerne. God fornøjelse!
29.03.2017 - 15:11
![]() Gail wrote:
Gail wrote:
Is this a UK terms pattern please, thankyou
19.05.2016 - 01:00DROPS Design answered:
Dear Gail, to get the pattern in UK-English, change language under the picture by scrolling down until you get "English (UK/cm)" - like here. Happy crocheting!
19.05.2016 - 09:08
![]() Joke wrote:
Joke wrote:
Als ik in de eerste toer in de markeersteek 2stk 2l 2stk maak heb ik toch 5 st meer en geen 3 of moet ik alleen de stokjes tellen.
15.05.2016 - 12:14DROPS Design answered:
Hoi Joke. Door het haken van de 2 stk/2 l/2 stk heb je 2 stk bij elke markeerder (= 8 nieuwe st op de toer) en 2 st meer tussen elke markeerder.
18.05.2016 - 16:16
![]() Ylene wrote:
Ylene wrote:
Ik ben toe aan het structuurpatroon. Als ik het goed begrijp komt er nu een toer met vaste en 2 lossen boven de lossen van de vorige toer. Hierna moet ik het werk weer keren en dan een toer stokjes en moet ik meerderen. Hier loop ik vast. Hoe moet ik het nou doen bij de 2l. Als ik het zo lees moet ik in beide lossen 2stk -2l -2stk haken maar dan meerder ik er toch 32 per toer en niet 16? Of moet ik in de 1e lossen 2 stokjes doen dan weer 2 lossen en dan in de 2e lossen ook weer 2 stokjes?
24.04.2016 - 20:31DROPS Design answered:
Hoi Ylene. Je haakt 2 stk, 2 l, 2 stk in de lus van de vorige toer = 4 nieuwe stk. Je hebt 4 raglanlijnen = 16 nieuwe stk. Je herhaalt dit op elke toer aan de goede kant (dus toer met stk volgens structuurpatroon.
25.04.2016 - 14:03
|
|||||||||||||
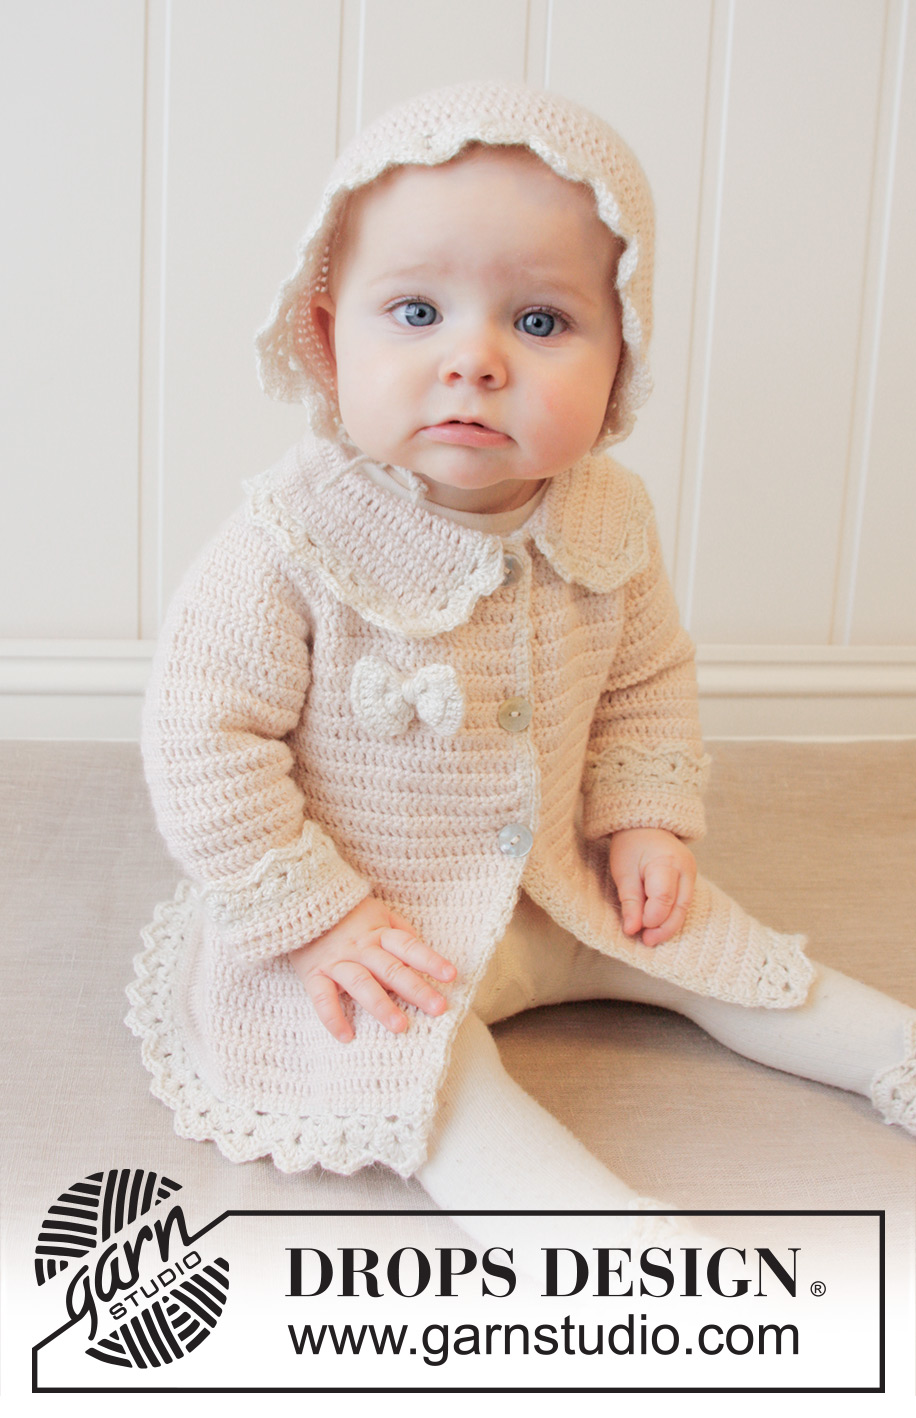
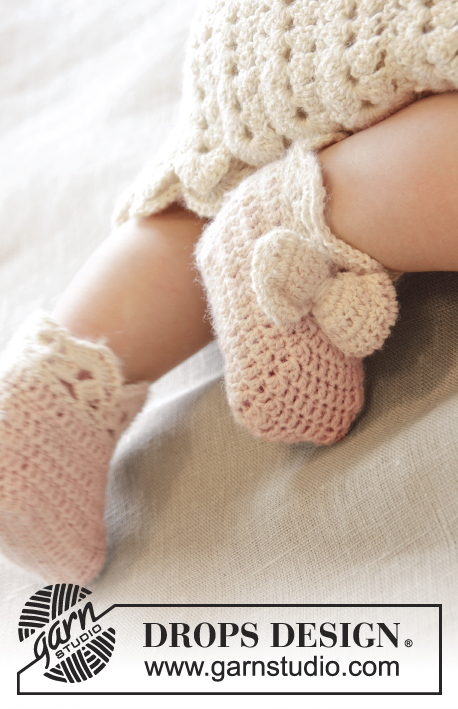
Little Lady Rose#littleladyrosecardigan |
|||||||||||||
|
|
|||||||||||||
Crochet baby jacket with raglan and fan edges, worked top down in DROPS BabyAlpaca Silk. Size 0-4 years.
DROPS Baby 25-12 |
|||||||||||||
|
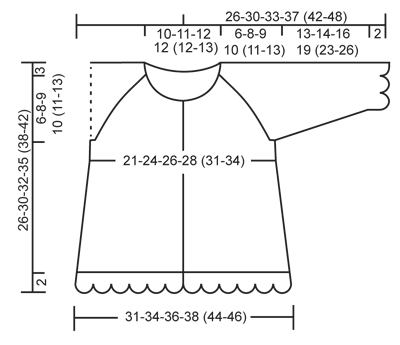
CROCHET INFO: Replace first sc at beg of every sc row with ch 1, finish row with 1 sc in 3rd ch from beg of previous row. Replace first dc at beg of every dc row with ch 3, finish row with 1 dc in ch from beg of previous row. TEXTURE ROWS: * 1 row sc (worked from WS), 1 row dc (worked from RS) *, repeat from *-* (1 row sc + 1 row dc = 1 texture row). INCREASE TIP: Inc 1 sc/dc by working 2 sc/dc in same st. DECREASE TIP: Work 1 sc/dc but wait with last pull through (= 2 sts on hook), then work next sc/dc but on last pull through, pull yarn through all sts on hook = 1 sc/dc dec. PATTERN: See diagram A.1. (A.2 applies to inc on collar). ---------------------------------------------------------- JACKET: The piece is worked top down. Worked back and forth from mid front. YOKE: Ch 83-87-91-91 (91-95) (includes 1 ch to turn with) on hook size 3.5 mm/E/4 with powder. Work 1 sc in 2nd ch from hook, then work 1 sc in every ch the entire row = 82-86-90-90 (90-94) sc on row (includes 5 band sts in each side towards mid front). Now insert 4 markers in piece for raglan as follows (beg mid front – NOTE: Do NOT work while inserting markers): Skip 15-16-17-17 (17-18) sc (= left front piece), insert 1 marker in next sc, skip 14 sc (= sleeve), insert 1 marker in next sc, skip 20-22-24-24 (24-26) sc (= back piece), insert 1 marker in next sc, skip 14 sc (= sleeve) and insert last marker in next sc (there are now 15-16-17-17 (17-18) sc on right front piece after last marker). READ ALL OF THE FOLLOWING SECTION BEFORE CONTINUING: READ CROCHET INFO and work next row as follows from RS: Work 1 dc in every sc but in every sc with marker work 2 dc + 2 ch + 2 dc = 94-98-102-102 (102-106) dc on row. Then work TEXTURE ROWS - see explanation above (work back and forth with 1 sc/dc in every st from previous row – but on every row with sc from WS work 2 ch over the 2 ch from previous row in raglan lines. On row with dc work 2 dc + 2 ch + 2 dc in both ch-spaces). AT THE SAME TIME on first row from RS (i.e. on row with dc) inc for raglan as follows: Work 2 dc + 2 ch + 2 dc in every ch-space in every raglan line (= 16 dc inc on row – note: work around both ch-spaces). Repeat inc on every row from RS 3-4-5-6 (7-8) more times (= 4-5-6-7 (8-9) times in total) = 158-178-198-214 (230-250) sts. REMEMBER THE CROCHET GAUGE! After last inc for raglan work 1 row with sc from WS as before. Work next row as follows from RS: Work 1 dc in each of the first 25-28-31-33 (35-38) sc (= left front piece), skip the next 34-38-42-46 (50-54) sc (= sleeve), work 6-6-6-6 (8-8) ch, work 1 dc in each of the next 40-46-52-56 (60-66) sc (= back piece), skip the next 34-38-42-46 (50-54) sc (= sleeve), work 6-6-6-6 (8-8) ch and work 1 dc in each of the last 25-28-31-33 (35-38) sc (= right front piece). Then finish body and sleeves separately. BODY: NOW MEASURE PIECE FROM HERE! Work 1st row from WS – work 1 sc in every dc from previous row and 1 sc in each of the 6-6-6-6 (8-8) ch under each armhole = 102-114-126-134 (146-158) sc on row. Insert 1 marker 28-31-34-36 (39-42) sts in from each side (= 46-52-58-62 (68-74) sts on back piece). Continue back and forth with TEXTURE ROWS. AT THE SAME TIME when piece measures 2-2-2-3 (2-3) cm / ¾"-¾"-¾"-1" (¾"-1"), inc 1 st on each side of both markers – READ INCREASE TIP (= 4 sts inc). Repeat inc approx. every 1-1½-1½-1½ (1½-1½) cm / ⅜"-½"-½"-½" (½"-½") , 10-10-10-10 (13-13) more times (= 11-11-11-11 (14-14) times in total) = 146-158-170-178 (202-214) sts. When piece measures approx. 15-17-18-20 (22-24) cm / 6"-6¾"-7"-8" (8¾"-9½") from armhole – make sure all that inc are done, work 1 row sc from WS AT THE SAME TIME inc 2-2-2-0 (0-0) sc evenly – READ INCREASE TIP = 148-160-172-178 (202-214) sc. Fasten off. Switch to off white and work 1 row sc from WS with 1 sc in every sc from previous row. Then work Fan pattern according to diagram A.1, i.e. work as follows: ROW 1 (= RS): ch 1, 1 sc in first st, * ch 3, skip 2 sc, 1 sc in next st *, repeat from *-* the entire row = 49-53-57-59 (67-71) ch-spaces, turn. ROW 2 (= WS): ch 3 (= 1 dc), 3 dc + 2 ch + 3 dc in first ch-space, * 1 dc in next ch-space, 3 dc + 2 ch + 3 dc in next ch-space *, repeat from *-* the entire row and finish with 1 dc in first sc from beg of previous row = 25-27-29-30 (34-36) dc-groups with 1 dc between every dc-group, turn piece. ROW 3 (= RS): ch 3 (= 1 dc), 3 dc + 2 ch + 3 dc in ch-space in the mid of first dc-group, * 1 dc in next dc, 3 dc + 2 ch + 3 dc in ch-space in the mid of next dc-group *, repeat from *-* the entire row and finish with 1 dc in 3rd ch from beg of previous row = 25-27-29-30 (34-36) dc-groups with 1 dc between every dc-group. Fasten off. SLEEVE: = 34-38-42-46 (50-54) sts. Insert 1 marker here – NOW MEASURE PIECE FROM HERE. Work 1st row from RS with powder as follows: work 3-3-3-3 (4-4) ch, work 1 dc in each stitch and work 3-3-3-3 (4-4) ch. Turn piece, work 1 sc in 2nd ch from hook, work 1 sc in each of the next 1-1-1-1 (2-2) ch, 1 sc in every dc from previous row and 1 dc in each of the 3-3-3-3 (4-4) ch from beg of previous row = 40-44-48-52 (58-62) sts on row. Then work TEXTURE ROWS back and forth as before with dc from RS and sc from WS. AT THE SAME TIME when sleeve measures 2-2-3-3 (3-3) cm / ¾"-¾"-1"-1" (1"-1") from marker, dec 1 st in each side - SEE DECREASE TIP! Repeat dec every 8-5-3-3 (2½-2½) cm / 3"-2"-1⅛"-1⅛" (⅞"-⅞"), 1-2-4-5 (7-8) more times (= 2-3-5-6 (8-9) times in total in each side) = 36-38-38-40 (42-44) sts. When sleeve measures approx. 13-14-16-19 (23-26) cm / 5"-5½"-6¼"-7½" (9"-10¼") from marker – finish after 1 row with sc from WS, fasten off. Switch to off white. Work 1 row sc from WS AT THE SAME TIME inc 4-2-2-6 (4-2) sc evenly = 40-40-40-46 (46-46) sc. Then work Fan pattern according to diagram A.1, beg from RS, the same way as on bottom of jacket. After 1st row there are 13-13-13-15 (15-15) ch-spaces on row and after 2nd row there are 7-7-7-8 (8-8) dc-groups with 1 dc between every dc-group. ASSEMBLY: Sew underarm seams tog edge to edge in outer loops of edge sts. Sew the openings under the sleeves. Sew the buttons on to left front piece. Upper button should be approx. 1 cm / ½" from neckline and there should be approx. 5 to 7 cm / 2-2¾" between each button. Button through dc in texture pattern. ELEVATION IN BACK OF NECK: For better fit work a small elevation at the back of neck. Insert 1 marker in st in each corner in neck, i.e. at beg of every raglan line. Work on hook size 3.5 mm/E with powder as follows: Begin in 11th st from mid front, work 1 sc in every st until 1 st remains before st with marker, work 1 hdc in next st, 1 dc in st with marker and 1 hdc in next st, then work 1 sc in every st until 1 st remains before next st with marker, 1 hdc in next st, 1 dc in st with marker and 1 hdc in next st. Continue like this until 10 sts remain before mid front in the other side. Turn piece and work 1 sc in every sc but at every marker work 3 sc tog, i.e. work 1 sc in hdc but wait with last YO and pull through, work 1 sc in st with marker but wait with last YO and pull through, work 1 sc in next hdc but now pull last YO through all 4 sts on hook (= 2 sc dec). Fasten off. COLLAR: Work on hook size 3.5 mm/E with powder as follows: Beg in 4th st from mid front and work 1 sc in every sc around the neck until 3 sc remain on row AT THE SAME TIME work 5th and 6th st tog – READ DECREASE TIP = approx. 57-60-64-64 (64-67) sc remain. Make sure that markers at each raglan line moves upwards - remove the markers from the sts they are in and place them between the st they were in and the next st toward the sleeve. Then work texture rows back and forth as on body with 1 st in every st. AT THE SAME TIME after 3-3-3-4 (4-4) cm / 1"-1"-1"-1½" (1½"-1½"), inc on the next 2 rows as shown in A.2. After last inc, collar measures approx. 5-5-5-6 (6-6) cm / 2"-2"-2"-2½" (2½"-2½"). Fasten off. CROCHET EDGE ALONG MID FRONT: Work with off white as follows: Begin from WS at the bottom on left front piece and work 1 row sc up along mid front and then over the 3 sts at the top of neck before collar beg - work approx. 2 sc in every dc-row and 1 sc in every sc-row. Turn piece and work as follows: * ch 3, skip 2 sc, 1 sc in next st *, repeat from *-* the entire row to bottom of band. Fasten off and repeat along right front piece, beg from WS at the top by neck. CROCHET EDGE AROUND COLLAR: Work with off white as follows: Beg from RS where collar beg after the 3 sts at the top of neck and work 1 row sc around the entire collar until where collar ends before the top 3 sts in neck in the other side. Turn piece and work as follows: * ch 3, skip approx. 2 sts, 1 sc in next sc *, repeat from *-*, NOTE: Make sure that no of ch-spaces can be divided by 2 + 1. Turn piece and work a finishing edge with fans as follows from RS: Work sl sts until mid of first ch-space, 3 ch (= 1 dc), * 3 dc + 2 ch + 3 dc in next ch-space, 1 dc in next ch-space *, repeat from *-* the entire row. Fasten off. BOW: Ch 11 on hook size 3.5 mm/E with off white. Work first row as follows: 1 dc in 4th ch from hook, 1 dc in each of the next 7 ch = 9 dc on row. Turn piece and work TEXTURE ROWS back and forth until piece measures approx. 10 cm / 4" – finish after 1 row with sc. Fasten off. Sew short sides tog to form a ring and twine some yarn around the mid of bow to tighten it neatly in the middle. Fasten bow at the top on right front piece. |
|||||||||||||
Diagram explanations |
|||||||||||||
|
|||||||||||||
 |
|||||||||||||
 |
|||||||||||||
Have you finished this pattern?Tag your pictures with #dropspattern #littleladyrosecardigan or submit them to the #dropsfan gallery. Do you need help with this pattern?You'll find 10 tutorial videos, a Comments/Questions area and more by visiting the pattern on garnstudio.com. © 1982-2026 DROPS Design A/S. We reserve all rights. This document, including all its sub-sections, has copyrights. Read more about what you can do with our patterns at the bottom of each pattern on our site. |
|||||||||||||


With over 40 years in knitting and crochet design, DROPS Design offers one of the most extensive collections of free patterns on the internet - translated to 17 languages. As of today we count 325 catalogs and 12298 patterns - 12288 of which are translated into English (US/in).
We work hard to bring you the best knitting and crochet have to offer, inspiration and advice as well as great quality yarns at incredible prices! Would you like to use our patterns for other than personal use? You can read what you are allowed to do in the Copyright text at the bottom of all our patterns. Happy crafting!
Post a comment to pattern DROPS Baby 25-12
We would love to hear what you have to say about this pattern!
If you want to leave a question, please make sure you select the correct category in the form below, to speed up the answering process. Required fields are marked *.