
Popular categories
Looking for a yarn?


Comments / Questions (112)
![]() Sabine wrote:
Sabine wrote:
Liebes Drops-Team, es bereitet große Freude, die Arbeit entstehen zu sehen, danke für die Anleitung. Wie ist der HÖHERE HINTERE HALSAUSSCHNITT zu verstehen: man häkelt den gesamten Halsausschnitt bis auf die ersten und letzten 10Maschen, richtig!? Doch es gibt 4 Raglanlinien, in der Beschreibung werden jedoch nur 2 Raglanlinien umhäkeln. Werden nur die hinteren beiden Raglanlinien markiert und entsprechend der Anleitung umhäkelt? Dank vorab für die Hilfe! :-)
25.04.2019 - 09:21DROPS Design answered:
Liebe Sabine, es werden 4 Markierungen eingesetzt, dh 1 an jeder Raglanline, nach den 2 beschriebenen Markierern häkeln Sie weiter wie zuvor bis 10 M bleiben. Viel Spaß beim häkeln!
29.04.2019 - 10:39
![]() Lorraine Upton wrote:
Lorraine Upton wrote:
I'm having a problem with this one do you increase on the 1.5cm row or the next
12.04.2019 - 16:53DROPS Design answered:
Dear Lorraine, you increase on the 1,5 cm row. But if you increase one row after, do not mind - the difference is not so big :-) Happy crocheting!
13.04.2019 - 08:26
![]() Lorraine Upton wrote:
Lorraine Upton wrote:
When in the pattern its says repeat inc every 1.5cm is that in rows or stitches across
01.04.2019 - 12:49DROPS Design answered:
Dear Mrs Upton, this is meant in height = in rows. Happy crocheting!
01.04.2019 - 16:02
![]() Cheloye Penwell wrote:
Cheloye Penwell wrote:
One of the more challenging patterns I’ve worked. Worth every minute. Beautiful design!
07.03.2019 - 00:43
![]() Lucy Layton wrote:
Lucy Layton wrote:
Hello, I'm really struggling with this pattern! On the yoke I have the base correct, 90....but if I add 4dc at each marker (2dc + 2ch + 2dc), that's 16dc over the run, but the pattern only says 102 stitches at the end of the first run.....which is only 12dc??? Can u help please? Thank you
25.02.2019 - 12:22DROPS Design answered:
Dear Mrs Layton, you are working 2 dc,2ch,2 dc in 1 sc = you increase only 3 sts on each of 4 markers = 90 sts + 12 sts increased = 102 sts. Happy crocheting!
25.02.2019 - 12:46
![]() Coby wrote:
Coby wrote:
Ik ben aan de mouwen toe. Ik ben geëindigd met vasten toen ik de 42 steken voor de mouwen moest overslaan. De 1e toer van de mouw is weer vasten aan de verkeerde kant. De volgende toer worden wel weer stokjes. Is dit juist? Heeft dit geen invloed op de structuur?
10.01.2019 - 14:30DROPS Design answered:
Dag Coby,
Bij de mouw wordt ter hoogte van de pas inderdaad het patroon tijdelijk verbroken met een extra toer vasten.
11.01.2019 - 10:36Fanny wrote:
In the description of the size in cm, what size is meant?
18.12.2018 - 02:09DROPS Design answered:
Dear Fanny, this refers to the baby's height in cm. Happy crocheting!
18.12.2018 - 08:44
![]() Coby wrote:
Coby wrote:
Ik heb de pas gehaakt en begin nu aan de meerderingen. De eerste keer aan weerszijden van de 34e steek van het voorpand. Wanneer daarna? Blijft het steeds aan weerszijden van diezelfde steek een stukje hoger?
05.12.2018 - 15:18DROPS Design answered:
Dag Coby,
Klopt! Je neemt de markeerdraad mee omhoog en je meerdert inderdaad steeds op dezelfde manier aan weerszijden van diezelfde steek.
06.12.2018 - 10:38
![]() Melina wrote:
Melina wrote:
Hallo liebes Team Ich hänge bei dem höheren hinteren halsauschnitt fest Ich verstehe nicht wo man da anfangen muss Ich hoffe ihr könnt mir helfen
12.11.2018 - 15:00DROPS Design answered:
Liebe Melina, die Erhöhung für den Halsauschnitt beginnen Sie von der Vorderseite in der 11. M von der vorderen Mitten (Jackeöffnung) dann mit fM, H-Stb, Stb, H-Stb und fM wie beschrieben häkeln, bis 10 M am Ende der Reihe (auf der anderen Seite vom Halsauschnitt) übrig sind. Wenden Sie und dann die 2. Reihe wie beschrieben (fM, bei jeder Markierung zunehmen...) und dann Faden abschneiden und erst jetzt wird der Kragen gehäkelt. Viel Spaß beim häkeln!
12.11.2018 - 15:33
![]() Cornelis wrote:
Cornelis wrote:
Is er een tekening beschikbaar van de mouw? Ik begrijp de opzet van de mouw niet goed???
09.08.2018 - 17:22DROPS Design answered:
Dag Cornelis, Er is helaas geen tekening van de mouw. De mouw haak je vanaf de pas, van boven naar beneden. Als het goed is heb je steken voor de mouw overgeslagen, bij de overgang van de pas naar het lijf. Op deze overgeslagen steken haak je de mouw.
20.08.2018 - 09:47
|
|||||||||||||
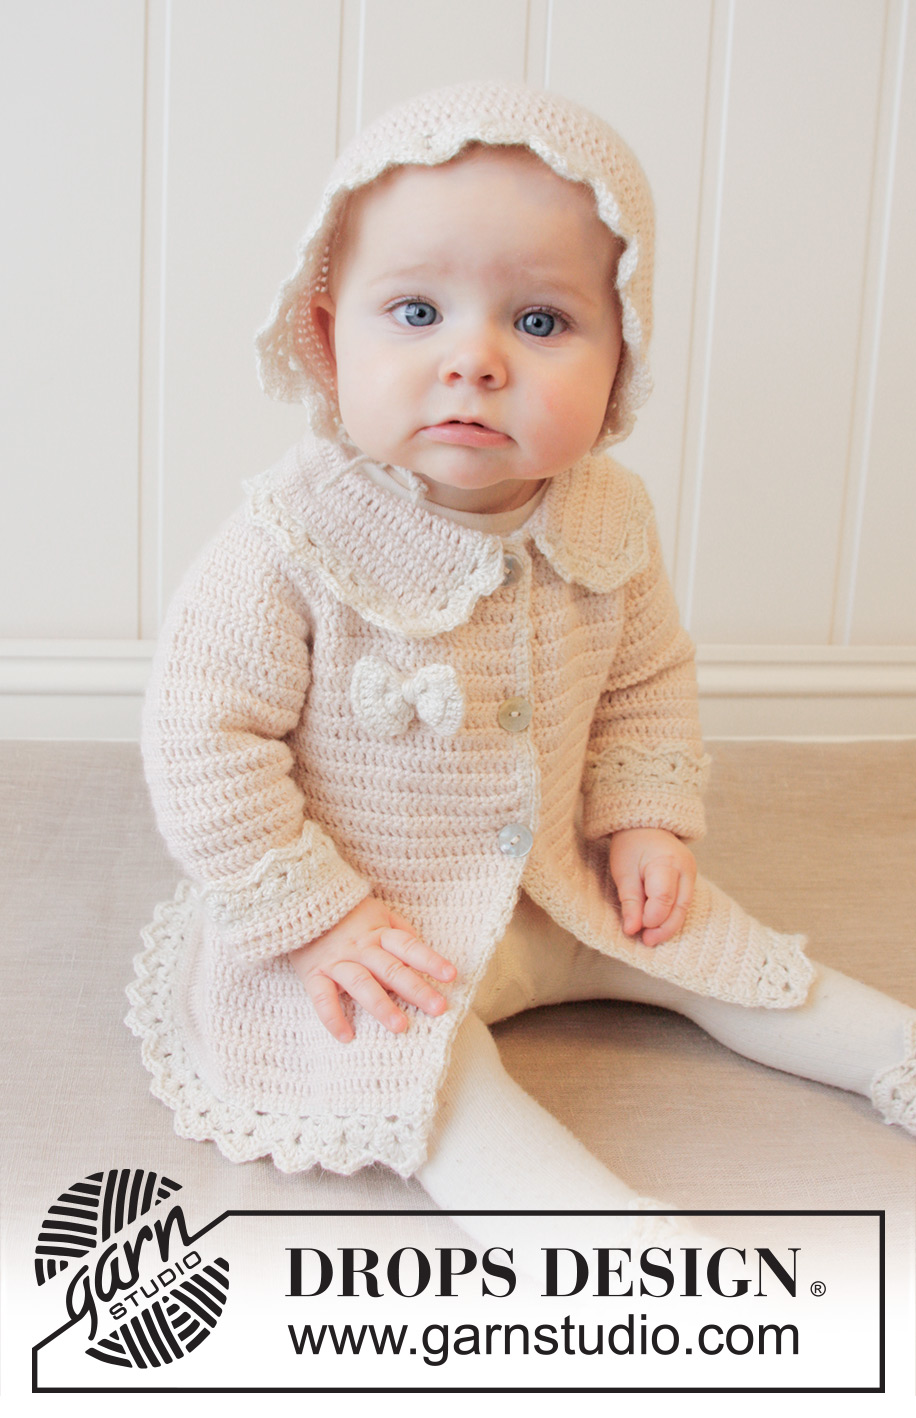
Little Lady Rose#littleladyrosecardigan |
|||||||||||||
|
|
|||||||||||||
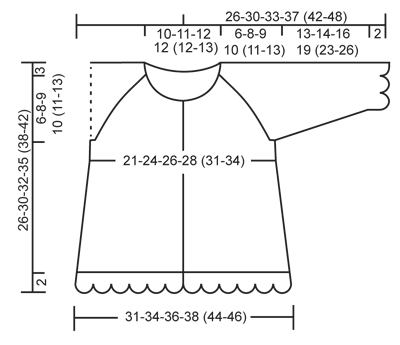
Crochet baby jacket with raglan and fan edges, worked top down in DROPS BabyAlpaca Silk. Size 0-4 years.
DROPS Baby 25-12 |
|||||||||||||
|
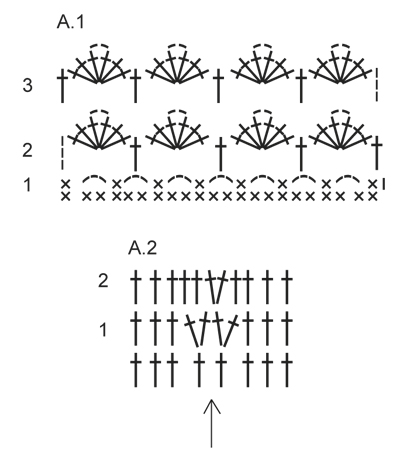
CROCHET INFO: Replace first sc at beg of every sc row with ch 1, finish row with 1 sc in 3rd ch from beg of previous row. Replace first dc at beg of every dc row with ch 3, finish row with 1 dc in ch from beg of previous row. TEXTURE ROWS: * 1 row sc (worked from WS), 1 row dc (worked from RS) *, repeat from *-* (1 row sc + 1 row dc = 1 texture row). INCREASE TIP: Inc 1 sc/dc by working 2 sc/dc in same st. DECREASE TIP: Work 1 sc/dc but wait with last pull through (= 2 sts on hook), then work next sc/dc but on last pull through, pull yarn through all sts on hook = 1 sc/dc dec. PATTERN: See diagram A.1. (A.2 applies to inc on collar). ---------------------------------------------------------- JACKET: The piece is worked top down. Worked back and forth from mid front. YOKE: Ch 83-87-91-91 (91-95) (includes 1 ch to turn with) on hook size 3.5 mm/E/4 with powder. Work 1 sc in 2nd ch from hook, then work 1 sc in every ch the entire row = 82-86-90-90 (90-94) sc on row (includes 5 band sts in each side towards mid front). Now insert 4 markers in piece for raglan as follows (beg mid front – NOTE: Do NOT work while inserting markers): Skip 15-16-17-17 (17-18) sc (= left front piece), insert 1 marker in next sc, skip 14 sc (= sleeve), insert 1 marker in next sc, skip 20-22-24-24 (24-26) sc (= back piece), insert 1 marker in next sc, skip 14 sc (= sleeve) and insert last marker in next sc (there are now 15-16-17-17 (17-18) sc on right front piece after last marker). READ ALL OF THE FOLLOWING SECTION BEFORE CONTINUING: READ CROCHET INFO and work next row as follows from RS: Work 1 dc in every sc but in every sc with marker work 2 dc + 2 ch + 2 dc = 94-98-102-102 (102-106) dc on row. Then work TEXTURE ROWS - see explanation above (work back and forth with 1 sc/dc in every st from previous row – but on every row with sc from WS work 2 ch over the 2 ch from previous row in raglan lines. On row with dc work 2 dc + 2 ch + 2 dc in both ch-spaces). AT THE SAME TIME on first row from RS (i.e. on row with dc) inc for raglan as follows: Work 2 dc + 2 ch + 2 dc in every ch-space in every raglan line (= 16 dc inc on row – note: work around both ch-spaces). Repeat inc on every row from RS 3-4-5-6 (7-8) more times (= 4-5-6-7 (8-9) times in total) = 158-178-198-214 (230-250) sts. REMEMBER THE CROCHET GAUGE! After last inc for raglan work 1 row with sc from WS as before. Work next row as follows from RS: Work 1 dc in each of the first 25-28-31-33 (35-38) sc (= left front piece), skip the next 34-38-42-46 (50-54) sc (= sleeve), work 6-6-6-6 (8-8) ch, work 1 dc in each of the next 40-46-52-56 (60-66) sc (= back piece), skip the next 34-38-42-46 (50-54) sc (= sleeve), work 6-6-6-6 (8-8) ch and work 1 dc in each of the last 25-28-31-33 (35-38) sc (= right front piece). Then finish body and sleeves separately. BODY: NOW MEASURE PIECE FROM HERE! Work 1st row from WS – work 1 sc in every dc from previous row and 1 sc in each of the 6-6-6-6 (8-8) ch under each armhole = 102-114-126-134 (146-158) sc on row. Insert 1 marker 28-31-34-36 (39-42) sts in from each side (= 46-52-58-62 (68-74) sts on back piece). Continue back and forth with TEXTURE ROWS. AT THE SAME TIME when piece measures 2-2-2-3 (2-3) cm / ¾"-¾"-¾"-1" (¾"-1"), inc 1 st on each side of both markers – READ INCREASE TIP (= 4 sts inc). Repeat inc approx. every 1-1½-1½-1½ (1½-1½) cm / ⅜"-½"-½"-½" (½"-½") , 10-10-10-10 (13-13) more times (= 11-11-11-11 (14-14) times in total) = 146-158-170-178 (202-214) sts. When piece measures approx. 15-17-18-20 (22-24) cm / 6"-6¾"-7"-8" (8¾"-9½") from armhole – make sure all that inc are done, work 1 row sc from WS AT THE SAME TIME inc 2-2-2-0 (0-0) sc evenly – READ INCREASE TIP = 148-160-172-178 (202-214) sc. Fasten off. Switch to off white and work 1 row sc from WS with 1 sc in every sc from previous row. Then work Fan pattern according to diagram A.1, i.e. work as follows: ROW 1 (= RS): ch 1, 1 sc in first st, * ch 3, skip 2 sc, 1 sc in next st *, repeat from *-* the entire row = 49-53-57-59 (67-71) ch-spaces, turn. ROW 2 (= WS): ch 3 (= 1 dc), 3 dc + 2 ch + 3 dc in first ch-space, * 1 dc in next ch-space, 3 dc + 2 ch + 3 dc in next ch-space *, repeat from *-* the entire row and finish with 1 dc in first sc from beg of previous row = 25-27-29-30 (34-36) dc-groups with 1 dc between every dc-group, turn piece. ROW 3 (= RS): ch 3 (= 1 dc), 3 dc + 2 ch + 3 dc in ch-space in the mid of first dc-group, * 1 dc in next dc, 3 dc + 2 ch + 3 dc in ch-space in the mid of next dc-group *, repeat from *-* the entire row and finish with 1 dc in 3rd ch from beg of previous row = 25-27-29-30 (34-36) dc-groups with 1 dc between every dc-group. Fasten off. SLEEVE: = 34-38-42-46 (50-54) sts. Insert 1 marker here – NOW MEASURE PIECE FROM HERE. Work 1st row from RS with powder as follows: work 3-3-3-3 (4-4) ch, work 1 dc in each stitch and work 3-3-3-3 (4-4) ch. Turn piece, work 1 sc in 2nd ch from hook, work 1 sc in each of the next 1-1-1-1 (2-2) ch, 1 sc in every dc from previous row and 1 dc in each of the 3-3-3-3 (4-4) ch from beg of previous row = 40-44-48-52 (58-62) sts on row. Then work TEXTURE ROWS back and forth as before with dc from RS and sc from WS. AT THE SAME TIME when sleeve measures 2-2-3-3 (3-3) cm / ¾"-¾"-1"-1" (1"-1") from marker, dec 1 st in each side - SEE DECREASE TIP! Repeat dec every 8-5-3-3 (2½-2½) cm / 3"-2"-1⅛"-1⅛" (⅞"-⅞"), 1-2-4-5 (7-8) more times (= 2-3-5-6 (8-9) times in total in each side) = 36-38-38-40 (42-44) sts. When sleeve measures approx. 13-14-16-19 (23-26) cm / 5"-5½"-6¼"-7½" (9"-10¼") from marker – finish after 1 row with sc from WS, fasten off. Switch to off white. Work 1 row sc from WS AT THE SAME TIME inc 4-2-2-6 (4-2) sc evenly = 40-40-40-46 (46-46) sc. Then work Fan pattern according to diagram A.1, beg from RS, the same way as on bottom of jacket. After 1st row there are 13-13-13-15 (15-15) ch-spaces on row and after 2nd row there are 7-7-7-8 (8-8) dc-groups with 1 dc between every dc-group. ASSEMBLY: Sew underarm seams tog edge to edge in outer loops of edge sts. Sew the openings under the sleeves. Sew the buttons on to left front piece. Upper button should be approx. 1 cm / ½" from neckline and there should be approx. 5 to 7 cm / 2-2¾" between each button. Button through dc in texture pattern. ELEVATION IN BACK OF NECK: For better fit work a small elevation at the back of neck. Insert 1 marker in st in each corner in neck, i.e. at beg of every raglan line. Work on hook size 3.5 mm/E with powder as follows: Begin in 11th st from mid front, work 1 sc in every st until 1 st remains before st with marker, work 1 hdc in next st, 1 dc in st with marker and 1 hdc in next st, then work 1 sc in every st until 1 st remains before next st with marker, 1 hdc in next st, 1 dc in st with marker and 1 hdc in next st. Continue like this until 10 sts remain before mid front in the other side. Turn piece and work 1 sc in every sc but at every marker work 3 sc tog, i.e. work 1 sc in hdc but wait with last YO and pull through, work 1 sc in st with marker but wait with last YO and pull through, work 1 sc in next hdc but now pull last YO through all 4 sts on hook (= 2 sc dec). Fasten off. COLLAR: Work on hook size 3.5 mm/E with powder as follows: Beg in 4th st from mid front and work 1 sc in every sc around the neck until 3 sc remain on row AT THE SAME TIME work 5th and 6th st tog – READ DECREASE TIP = approx. 57-60-64-64 (64-67) sc remain. Make sure that markers at each raglan line moves upwards - remove the markers from the sts they are in and place them between the st they were in and the next st toward the sleeve. Then work texture rows back and forth as on body with 1 st in every st. AT THE SAME TIME after 3-3-3-4 (4-4) cm / 1"-1"-1"-1½" (1½"-1½"), inc on the next 2 rows as shown in A.2. After last inc, collar measures approx. 5-5-5-6 (6-6) cm / 2"-2"-2"-2½" (2½"-2½"). Fasten off. CROCHET EDGE ALONG MID FRONT: Work with off white as follows: Begin from WS at the bottom on left front piece and work 1 row sc up along mid front and then over the 3 sts at the top of neck before collar beg - work approx. 2 sc in every dc-row and 1 sc in every sc-row. Turn piece and work as follows: * ch 3, skip 2 sc, 1 sc in next st *, repeat from *-* the entire row to bottom of band. Fasten off and repeat along right front piece, beg from WS at the top by neck. CROCHET EDGE AROUND COLLAR: Work with off white as follows: Beg from RS where collar beg after the 3 sts at the top of neck and work 1 row sc around the entire collar until where collar ends before the top 3 sts in neck in the other side. Turn piece and work as follows: * ch 3, skip approx. 2 sts, 1 sc in next sc *, repeat from *-*, NOTE: Make sure that no of ch-spaces can be divided by 2 + 1. Turn piece and work a finishing edge with fans as follows from RS: Work sl sts until mid of first ch-space, 3 ch (= 1 dc), * 3 dc + 2 ch + 3 dc in next ch-space, 1 dc in next ch-space *, repeat from *-* the entire row. Fasten off. BOW: Ch 11 on hook size 3.5 mm/E with off white. Work first row as follows: 1 dc in 4th ch from hook, 1 dc in each of the next 7 ch = 9 dc on row. Turn piece and work TEXTURE ROWS back and forth until piece measures approx. 10 cm / 4" – finish after 1 row with sc. Fasten off. Sew short sides tog to form a ring and twine some yarn around the mid of bow to tighten it neatly in the middle. Fasten bow at the top on right front piece. |
|||||||||||||
Diagram explanations |
|||||||||||||
|
|||||||||||||
 |
|||||||||||||
 |
|||||||||||||
Have you finished this pattern?Tag your pictures with #dropspattern #littleladyrosecardigan or submit them to the #dropsfan gallery. Do you need help with this pattern?You'll find 10 tutorial videos, a Comments/Questions area and more by visiting the pattern on garnstudio.com. © 1982-2026 DROPS Design A/S. We reserve all rights. This document, including all its sub-sections, has copyrights. Read more about what you can do with our patterns at the bottom of each pattern on our site. |
|||||||||||||


With over 40 years in knitting and crochet design, DROPS Design offers one of the most extensive collections of free patterns on the internet - translated to 17 languages. As of today we count 325 catalogs and 12298 patterns - 12288 of which are translated into English (US/in).
We work hard to bring you the best knitting and crochet have to offer, inspiration and advice as well as great quality yarns at incredible prices! Would you like to use our patterns for other than personal use? You can read what you are allowed to do in the Copyright text at the bottom of all our patterns. Happy crafting!
Post a comment to pattern DROPS Baby 25-12
We would love to hear what you have to say about this pattern!
If you want to leave a question, please make sure you select the correct category in the form below, to speed up the answering process. Required fields are marked *.