
Popular categories
Looking for a yarn?


Comments / Questions (112)
![]() Kim Grahn wrote:
Kim Grahn wrote:
Jag undra om det finns något mönster på mössan? Jag har virkat koftan och den blev jätte fin och skulle gärna vilja virka mössan också. V.h. Kim
30.10.2014 - 15:21DROPS Design answered:
Hej Kim, Ja mönstret på mössan hittar du under BabyDROPS 25-14 Lycka till!
31.10.2014 - 10:03
![]() Ida Costagliola wrote:
Ida Costagliola wrote:
"Sulle righe di m.a lavorare 2 m.a + 2 cat + 2 m.a intorno ai due archi di cat). ALLO STESSO TEMPO, nel corso della prima riga sul diritto del lavoro (quindi riga di m.a), aumentare per il raglan come segue: Lavorare 2 m.a + 2 cat + 2 m.a in ogni arco di cat in ogni linea del raglan" vuol dire che quando lavoro il giro a maglia alta, quando arrivo agli archi, devo fare 2maglie alte+2cat+2maglie alte + 2maglie alte+2cat+2maglie alte (prendendo i due archi contemporaneamente)...è corretto?
24.10.2014 - 21:14DROPS Design answered:
Buonasera Ida. Abbiamo corretto il testo. Nei giri a m.a, negli archi, deve lavorare 2 m.a + 2 cat + 2 m.a, lavorando nei due archi contemporaneamente. Quindi per ogni raglan vengono aumentate 4 m.a e su tutto il giro vengono aumentate 16 m.a. Grazie e buon lavoro!
25.10.2014 - 18:36
![]() Fanny wrote:
Fanny wrote:
Hej igen, jag försökte att sätta markörerna, men det är ju bara 90 m nu (tror jag) så maskorna tar ju slut där de står att jag ska sätta dom, förstår inte hur jag ska tänka där.
23.10.2014 - 15:07DROPS Design answered:
Hej Fanny, räkna från mitt fram (rita gärna först så du ser systemet) 17m (framst) 1markör 14m (ärm) 1markör 24m (rygg) 1 markör 14m (ärm) 1markör 17m (framst)= 90m totalt. Lycka till!
28.10.2014 - 09:50
![]() Eeva wrote:
Eeva wrote:
Kysymykseni koskee hihaa. Hihan ohje tuntuisi alkavan ikäänkuin keskeltä. "HIHA: =34-38-42-46 (50-54) s. Kiinnitä merkkilanka työhön." Siis mihin kohtaan kiinnitetään merkkilanka? Tuntuu kuin hihan ohjeesta olisi jäänyt ensimmäinen lause vahingossa pois.
18.10.2014 - 23:43DROPS Design answered:
Tämä jakku virkataan alhaalta ylös, eli ensiksi virkataan kaarroke. Kun kaarroke on valmis, se jaetaan hihoja ja miehustaa varten, eli hihoja varten jätetään 34-38-42-46 (50-54) s odottamaan. Kun virkkaat hihaa, kiinnitä aluksi merkkilanka näiden silmukoiden silmukkaan. Tämä on hihan yläosa.
20.10.2014 - 16:08
![]() Stephanie wrote:
Stephanie wrote:
I want to make sure that I am understanding this correctly. On the Increase rows of the collar, in the first row I would do *3 st in next 3 st, then 2 st in next 2 st, then 3 st in next 3 st*, repeat from *to* meaning I would continue 3 st in next 3, 2 st in next 2, 3 st in next 3, 3 st in next 3, 2 st in next 2, 3 st in next 3 etc. Is this correct? Thanks
09.10.2014 - 17:32DROPS Design answered:
Yes, it's correct!
09.10.2014 - 22:44
![]() Stephanie wrote:
Stephanie wrote:
I still am confused about the collar. I see the chart, but I don't see where I am told to place the increase stitches or how many of these increase stitches I will have in each row.
08.10.2014 - 00:08DROPS Design answered:
Dear Stephanie, in row 1 in A.2 you will work *1 st in next 3 sts, 2 sts in next st, 1 st in next 3 sts*, repeat from *-* all the row, then on 2nd row, work *1 st in next 4 sts, 2 sts in next st, 1 st in next 5 sts*, repeat from *-* - your inc will be evenly spaced. Happy crocheting!
08.10.2014 - 10:54
![]() Stephanie wrote:
Stephanie wrote:
I'm a bit stuck on the collar. I have gotten to the rows where I am to start the increase. I'm not understanding where I am to place these increase stitches or how many times I am to have them in the row. Could please help clarify for me. Thanks
07.10.2014 - 16:10DROPS Design answered:
Dear Stephanie, inc for collar are done as in diagram A.2 (rows 1 and 2), work these 2 rows (repeating diagram) to make the inc but working the textured rows at the same time. You will have 2 inc in each repeat of A.2 on row 1 and 1 inc in each repeat of A.2 on row 2. Happy crocheting!
07.10.2014 - 16:31
![]() Kirsti Kristiansen wrote:
Kirsti Kristiansen wrote:
Finner ut at det er en feil i mønsteret. Jeg hekler etter 6-9 mnd, og jeg får ikke antall staver til å stemme. Etter første økning raglan er det 102 staver. Så skal det økes 5 ganger til - dvs +80 staver. Da blir totalt antall staver etter 6 økinger totalt 182 (102+80). I mønsteret står det at du nå skal ha 198... resten av mønsteret er lagt opp etter masketall 198 - men da må det bety at man skal ha 6 økerunder i tillegg til startomgangen, eller....?
07.10.2014 - 16:00DROPS Design answered:
Hej Kirsti, Du øger til raglan ialt 6 gange på str 6-9 mnd (6x16=96+102=198) God fornøjele!
25.11.2014 - 08:48
![]() Stephanie wrote:
Stephanie wrote:
I am confused on what to do to start the sleeves. The instructions start out with a count, but I'm not sure what they are counting. My sleeve opening is more than 50 st.
28.09.2014 - 03:03DROPS Design answered:
Dear Stephanie, in size 2 years, you have skipped 50 sts for each sleeve at the end of yoke, you start then sleeve with ch 4 (underarm), 1 st in each of the 50 sts, finish with 6 ch. Work then 1st row as follows: 1 dc in 4th ch from hook, 1 dc in the next 2 ch, 1 dc in each of the 50 sts from sleeve, 1 dc in each of the 4 ch from beg of previous row = 58 sts. Happy knitting!
29.09.2014 - 09:32
![]() Salme wrote:
Salme wrote:
Hei! Miten tuo lisäys tapahtuu? Siis 2p+2kjs+2p? En saa millään laskuopilla silmukkamäärä täsmäämään!
20.09.2014 - 22:19DROPS Design answered:
Työssä on 82-86-90-90 (90-94) ks ennen lisäyksiä. Lisäät 3 p jokaisen merkkilangan kohdalla, eli työhön lisätään yht. 12 s = 94-98-102-102 (102-106) p.
23.09.2014 - 16:29
|
|||||||||||||
Little Lady Rose#littleladyrosecardigan |
|||||||||||||
|
|
|||||||||||||
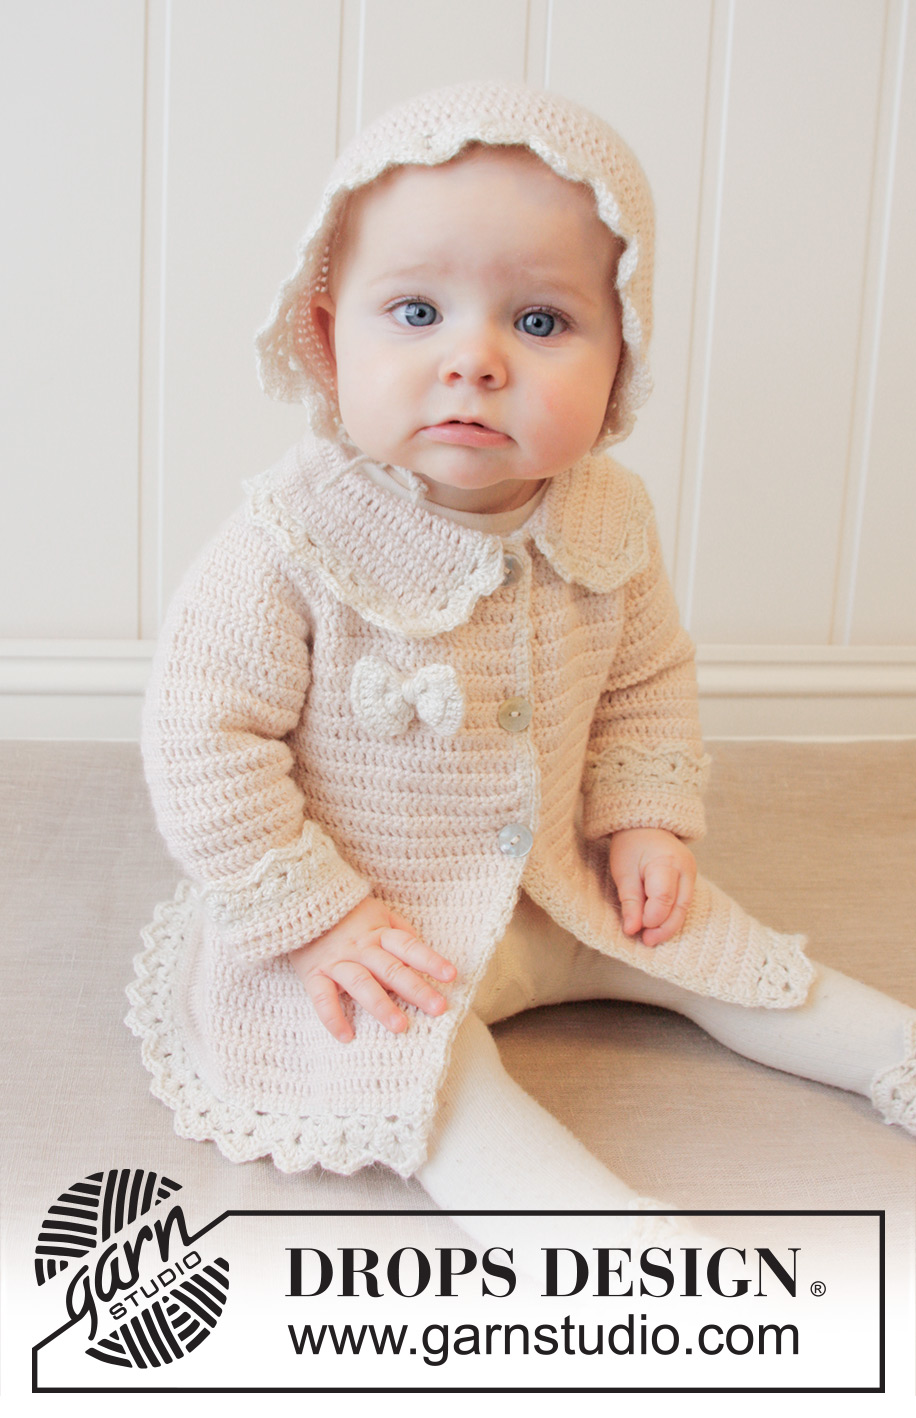
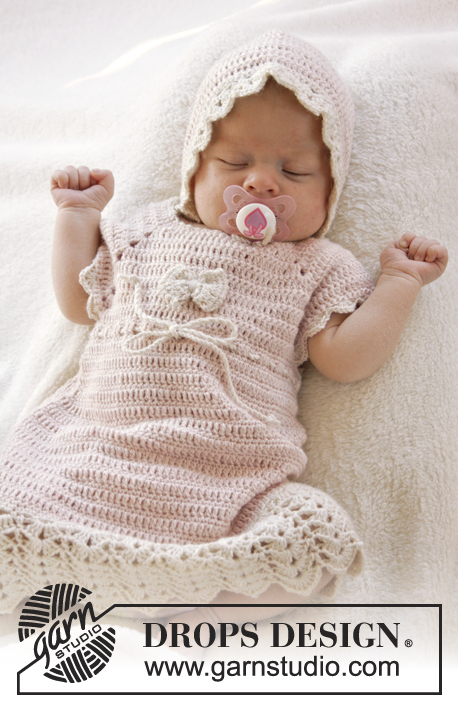
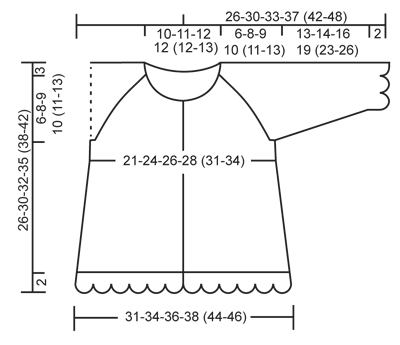
Crochet baby jacket with raglan and fan edges, worked top down in DROPS BabyAlpaca Silk. Size 0-4 years.
DROPS Baby 25-12 |
|||||||||||||
|
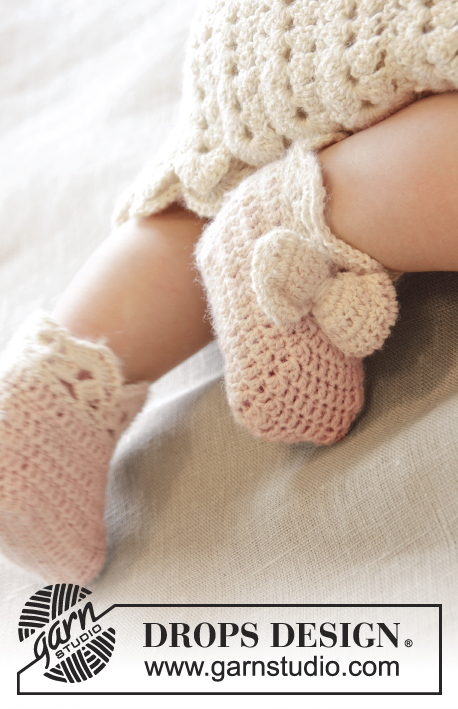
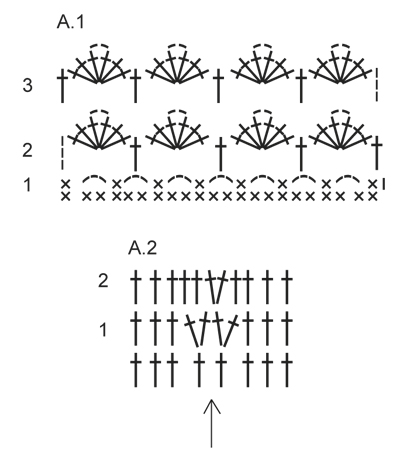
CROCHET INFO: Replace first sc at beg of every sc row with ch 1, finish row with 1 sc in 3rd ch from beg of previous row. Replace first dc at beg of every dc row with ch 3, finish row with 1 dc in ch from beg of previous row. TEXTURE ROWS: * 1 row sc (worked from WS), 1 row dc (worked from RS) *, repeat from *-* (1 row sc + 1 row dc = 1 texture row). INCREASE TIP: Inc 1 sc/dc by working 2 sc/dc in same st. DECREASE TIP: Work 1 sc/dc but wait with last pull through (= 2 sts on hook), then work next sc/dc but on last pull through, pull yarn through all sts on hook = 1 sc/dc dec. PATTERN: See diagram A.1. (A.2 applies to inc on collar). ---------------------------------------------------------- JACKET: The piece is worked top down. Worked back and forth from mid front. YOKE: Ch 83-87-91-91 (91-95) (includes 1 ch to turn with) on hook size 3.5 mm/E/4 with powder. Work 1 sc in 2nd ch from hook, then work 1 sc in every ch the entire row = 82-86-90-90 (90-94) sc on row (includes 5 band sts in each side towards mid front). Now insert 4 markers in piece for raglan as follows (beg mid front – NOTE: Do NOT work while inserting markers): Skip 15-16-17-17 (17-18) sc (= left front piece), insert 1 marker in next sc, skip 14 sc (= sleeve), insert 1 marker in next sc, skip 20-22-24-24 (24-26) sc (= back piece), insert 1 marker in next sc, skip 14 sc (= sleeve) and insert last marker in next sc (there are now 15-16-17-17 (17-18) sc on right front piece after last marker). READ ALL OF THE FOLLOWING SECTION BEFORE CONTINUING: READ CROCHET INFO and work next row as follows from RS: Work 1 dc in every sc but in every sc with marker work 2 dc + 2 ch + 2 dc = 94-98-102-102 (102-106) dc on row. Then work TEXTURE ROWS - see explanation above (work back and forth with 1 sc/dc in every st from previous row – but on every row with sc from WS work 2 ch over the 2 ch from previous row in raglan lines. On row with dc work 2 dc + 2 ch + 2 dc in both ch-spaces). AT THE SAME TIME on first row from RS (i.e. on row with dc) inc for raglan as follows: Work 2 dc + 2 ch + 2 dc in every ch-space in every raglan line (= 16 dc inc on row – note: work around both ch-spaces). Repeat inc on every row from RS 3-4-5-6 (7-8) more times (= 4-5-6-7 (8-9) times in total) = 158-178-198-214 (230-250) sts. REMEMBER THE CROCHET GAUGE! After last inc for raglan work 1 row with sc from WS as before. Work next row as follows from RS: Work 1 dc in each of the first 25-28-31-33 (35-38) sc (= left front piece), skip the next 34-38-42-46 (50-54) sc (= sleeve), work 6-6-6-6 (8-8) ch, work 1 dc in each of the next 40-46-52-56 (60-66) sc (= back piece), skip the next 34-38-42-46 (50-54) sc (= sleeve), work 6-6-6-6 (8-8) ch and work 1 dc in each of the last 25-28-31-33 (35-38) sc (= right front piece). Then finish body and sleeves separately. BODY: NOW MEASURE PIECE FROM HERE! Work 1st row from WS – work 1 sc in every dc from previous row and 1 sc in each of the 6-6-6-6 (8-8) ch under each armhole = 102-114-126-134 (146-158) sc on row. Insert 1 marker 28-31-34-36 (39-42) sts in from each side (= 46-52-58-62 (68-74) sts on back piece). Continue back and forth with TEXTURE ROWS. AT THE SAME TIME when piece measures 2-2-2-3 (2-3) cm / ¾"-¾"-¾"-1" (¾"-1"), inc 1 st on each side of both markers – READ INCREASE TIP (= 4 sts inc). Repeat inc approx. every 1-1½-1½-1½ (1½-1½) cm / ⅜"-½"-½"-½" (½"-½") , 10-10-10-10 (13-13) more times (= 11-11-11-11 (14-14) times in total) = 146-158-170-178 (202-214) sts. When piece measures approx. 15-17-18-20 (22-24) cm / 6"-6¾"-7"-8" (8¾"-9½") from armhole – make sure all that inc are done, work 1 row sc from WS AT THE SAME TIME inc 2-2-2-0 (0-0) sc evenly – READ INCREASE TIP = 148-160-172-178 (202-214) sc. Fasten off. Switch to off white and work 1 row sc from WS with 1 sc in every sc from previous row. Then work Fan pattern according to diagram A.1, i.e. work as follows: ROW 1 (= RS): ch 1, 1 sc in first st, * ch 3, skip 2 sc, 1 sc in next st *, repeat from *-* the entire row = 49-53-57-59 (67-71) ch-spaces, turn. ROW 2 (= WS): ch 3 (= 1 dc), 3 dc + 2 ch + 3 dc in first ch-space, * 1 dc in next ch-space, 3 dc + 2 ch + 3 dc in next ch-space *, repeat from *-* the entire row and finish with 1 dc in first sc from beg of previous row = 25-27-29-30 (34-36) dc-groups with 1 dc between every dc-group, turn piece. ROW 3 (= RS): ch 3 (= 1 dc), 3 dc + 2 ch + 3 dc in ch-space in the mid of first dc-group, * 1 dc in next dc, 3 dc + 2 ch + 3 dc in ch-space in the mid of next dc-group *, repeat from *-* the entire row and finish with 1 dc in 3rd ch from beg of previous row = 25-27-29-30 (34-36) dc-groups with 1 dc between every dc-group. Fasten off. SLEEVE: = 34-38-42-46 (50-54) sts. Insert 1 marker here – NOW MEASURE PIECE FROM HERE. Work 1st row from RS with powder as follows: work 3-3-3-3 (4-4) ch, work 1 dc in each stitch and work 3-3-3-3 (4-4) ch. Turn piece, work 1 sc in 2nd ch from hook, work 1 sc in each of the next 1-1-1-1 (2-2) ch, 1 sc in every dc from previous row and 1 dc in each of the 3-3-3-3 (4-4) ch from beg of previous row = 40-44-48-52 (58-62) sts on row. Then work TEXTURE ROWS back and forth as before with dc from RS and sc from WS. AT THE SAME TIME when sleeve measures 2-2-3-3 (3-3) cm / ¾"-¾"-1"-1" (1"-1") from marker, dec 1 st in each side - SEE DECREASE TIP! Repeat dec every 8-5-3-3 (2½-2½) cm / 3"-2"-1⅛"-1⅛" (⅞"-⅞"), 1-2-4-5 (7-8) more times (= 2-3-5-6 (8-9) times in total in each side) = 36-38-38-40 (42-44) sts. When sleeve measures approx. 13-14-16-19 (23-26) cm / 5"-5½"-6¼"-7½" (9"-10¼") from marker – finish after 1 row with sc from WS, fasten off. Switch to off white. Work 1 row sc from WS AT THE SAME TIME inc 4-2-2-6 (4-2) sc evenly = 40-40-40-46 (46-46) sc. Then work Fan pattern according to diagram A.1, beg from RS, the same way as on bottom of jacket. After 1st row there are 13-13-13-15 (15-15) ch-spaces on row and after 2nd row there are 7-7-7-8 (8-8) dc-groups with 1 dc between every dc-group. ASSEMBLY: Sew underarm seams tog edge to edge in outer loops of edge sts. Sew the openings under the sleeves. Sew the buttons on to left front piece. Upper button should be approx. 1 cm / ½" from neckline and there should be approx. 5 to 7 cm / 2-2¾" between each button. Button through dc in texture pattern. ELEVATION IN BACK OF NECK: For better fit work a small elevation at the back of neck. Insert 1 marker in st in each corner in neck, i.e. at beg of every raglan line. Work on hook size 3.5 mm/E with powder as follows: Begin in 11th st from mid front, work 1 sc in every st until 1 st remains before st with marker, work 1 hdc in next st, 1 dc in st with marker and 1 hdc in next st, then work 1 sc in every st until 1 st remains before next st with marker, 1 hdc in next st, 1 dc in st with marker and 1 hdc in next st. Continue like this until 10 sts remain before mid front in the other side. Turn piece and work 1 sc in every sc but at every marker work 3 sc tog, i.e. work 1 sc in hdc but wait with last YO and pull through, work 1 sc in st with marker but wait with last YO and pull through, work 1 sc in next hdc but now pull last YO through all 4 sts on hook (= 2 sc dec). Fasten off. COLLAR: Work on hook size 3.5 mm/E with powder as follows: Beg in 4th st from mid front and work 1 sc in every sc around the neck until 3 sc remain on row AT THE SAME TIME work 5th and 6th st tog – READ DECREASE TIP = approx. 57-60-64-64 (64-67) sc remain. Make sure that markers at each raglan line moves upwards - remove the markers from the sts they are in and place them between the st they were in and the next st toward the sleeve. Then work texture rows back and forth as on body with 1 st in every st. AT THE SAME TIME after 3-3-3-4 (4-4) cm / 1"-1"-1"-1½" (1½"-1½"), inc on the next 2 rows as shown in A.2. After last inc, collar measures approx. 5-5-5-6 (6-6) cm / 2"-2"-2"-2½" (2½"-2½"). Fasten off. CROCHET EDGE ALONG MID FRONT: Work with off white as follows: Begin from WS at the bottom on left front piece and work 1 row sc up along mid front and then over the 3 sts at the top of neck before collar beg - work approx. 2 sc in every dc-row and 1 sc in every sc-row. Turn piece and work as follows: * ch 3, skip 2 sc, 1 sc in next st *, repeat from *-* the entire row to bottom of band. Fasten off and repeat along right front piece, beg from WS at the top by neck. CROCHET EDGE AROUND COLLAR: Work with off white as follows: Beg from RS where collar beg after the 3 sts at the top of neck and work 1 row sc around the entire collar until where collar ends before the top 3 sts in neck in the other side. Turn piece and work as follows: * ch 3, skip approx. 2 sts, 1 sc in next sc *, repeat from *-*, NOTE: Make sure that no of ch-spaces can be divided by 2 + 1. Turn piece and work a finishing edge with fans as follows from RS: Work sl sts until mid of first ch-space, 3 ch (= 1 dc), * 3 dc + 2 ch + 3 dc in next ch-space, 1 dc in next ch-space *, repeat from *-* the entire row. Fasten off. BOW: Ch 11 on hook size 3.5 mm/E with off white. Work first row as follows: 1 dc in 4th ch from hook, 1 dc in each of the next 7 ch = 9 dc on row. Turn piece and work TEXTURE ROWS back and forth until piece measures approx. 10 cm / 4" – finish after 1 row with sc. Fasten off. Sew short sides tog to form a ring and twine some yarn around the mid of bow to tighten it neatly in the middle. Fasten bow at the top on right front piece. |
|||||||||||||
Diagram explanations |
|||||||||||||
|
|||||||||||||
 |
|||||||||||||
 |
|||||||||||||
Have you finished this pattern?Tag your pictures with #dropspattern #littleladyrosecardigan or submit them to the #dropsfan gallery. Do you need help with this pattern?You'll find 10 tutorial videos, a Comments/Questions area and more by visiting the pattern on garnstudio.com. © 1982-2026 DROPS Design A/S. We reserve all rights. This document, including all its sub-sections, has copyrights. Read more about what you can do with our patterns at the bottom of each pattern on our site. |
|||||||||||||


With over 40 years in knitting and crochet design, DROPS Design offers one of the most extensive collections of free patterns on the internet - translated to 17 languages. As of today we count 325 catalogs and 12298 patterns - 12288 of which are translated into English (US/in).
We work hard to bring you the best knitting and crochet have to offer, inspiration and advice as well as great quality yarns at incredible prices! Would you like to use our patterns for other than personal use? You can read what you are allowed to do in the Copyright text at the bottom of all our patterns. Happy crafting!
Post a comment to pattern DROPS Baby 25-12
We would love to hear what you have to say about this pattern!
If you want to leave a question, please make sure you select the correct category in the form below, to speed up the answering process. Required fields are marked *.