
Popular categories
Looking for a yarn?


Comments / Questions (44)
![]() Irina Paglialunga wrote:
Irina Paglialunga wrote:
Vielen Dank für diese tolle Erfahrung. Super Beschreibung. Mein Mr. Bunny ist super geworden. Bin begeistert
22.01.2021 - 00:05
![]() Jos wrote:
Jos wrote:
Dat broekje is mij niet duidelijk... het broekje zelf is dus het geel van het onderste stuk van het lijf... maar waar is de beschrijving van de pijpjes dan? Met groet
27.06.2020 - 15:33DROPS Design answered:
Dag Jos,
Het is niet een los broekje, maar de pijpen van de poten en het onderste deel van het lijf wordt in geel gebreid. En aan de onderkant van het gele stuk wordt een rand gemaakt. Hierdoor lijkt het een broekje.
30.06.2020 - 13:42
![]() Kathleen Dewaegenaere wrote:
Kathleen Dewaegenaere wrote:
Ik snap niet waarom u bij het breien van het lijf na 5 cm verandert naar de kleur geel en dan zegt dat is de broek. De broek bestaat toch uit 2 delen en het lijf maar uit 1 deel.
20.06.2020 - 10:48DROPS Design answered:
Dag Kathleen,
De broek wordt niet los gebreid en aangetrokken, maar is onderdeel van het lijf/de poten. De poten worden dus ook gedeeltelijk met geel gebreid en op het eind wordt een rand gebreid langs de onderkant van het gele gedeelte op de poten.
30.06.2020 - 11:20
![]() Carol Cooley (Mrs) wrote:
Carol Cooley (Mrs) wrote:
A substitute for DROPS Baby Merino please. What is a thread? I have no idea. Sorry. Thank you. The pattern needs about a dozen pages or 6 double-sided sheets of paper. Perhaps this could be reduced if anyone has time - just an idea. Thank you. Oh dear - I have just noticed Captcha at the bottom of the page. Greee. Smile.
04.04.2020 - 13:27DROPS Design answered:
Dear Mrs Cooley, read more about alternatives here or use our yarn converter to find alternatives to DROPS Baby Merino. Do not hesitate to contact your DROPS store for any further individual assistance choosing a yarn. Happy knitting!
09.04.2020 - 13:10
![]() Angelika wrote:
Angelika wrote:
Hallo, ich suche bisher vergebens die Anleitung für die Hose beim Hasen-Modell DROPS Baby 25-8. Wo finde ich diese? Vielen Dank für eine Antwort und liebe Grüße
30.06.2019 - 12:24DROPS Design answered:
Liebe Angelika, es gibt keine separate Hose, die Hose wird am Ende der Beine gestrickt (ab ca 8 cm Bein), dann wird eine Bordüre für die Hose gehäkelt. Viel Spaß beim stricken!
01.07.2019 - 07:37
![]() Nina Svengård Åkre wrote:
Nina Svengård Åkre wrote:
Hei! Jeg har tenkt å strikke denne søte kaninen og jeg ser oppskrift på selve kaninen og genseren. Men hvor er oppskriften på buksa?
23.05.2019 - 13:56DROPS Design answered:
Hei Nina. Buksen er en del av benet, og er ikke et eget plagg. Når benet måler 8 cm strikkes slik: "Bytt til lys gul, strikk 1 p rett fra retten og 1 p rett fra vrangen. Deretter strikkes det slik..." God fornøyelse
23.05.2019 - 14:06
![]() Fabiola Romero wrote:
Fabiola Romero wrote:
Gracias, su explicación es muy entendible se puede realizar fácilmente y queda muy bonito el conejo
04.05.2019 - 03:35
![]() Solis Thoresson wrote:
Solis Thoresson wrote:
Håller på med öronen. Hur stickar man runt på 2 stickor?
01.04.2019 - 13:39DROPS Design answered:
Hei Solis. Du legger opp og fordeler maskene på 2 pinner, og har en 3 pinne som du strikker med. God fornøyelse
02.04.2019 - 13:15
![]() Torsten wrote:
Torsten wrote:
Ich würde den Hasen gerne größer Stricken habt Ihr einen Tipp wie ich das mache mit den Zunahmen und abnahmen oder den cm ?
07.03.2019 - 09:19DROPS Design answered:
Liebe Torsten, leider können wir nicht jede Anleitung nach jeder Anfrage anpassen, gerne können Sie sich aber für weitere persönnliche Hilfe an Ihrem DROPS Laden wenden - auch telefonisch oder per Email. Viel Spaß beim stricken!
07.03.2019 - 10:02Cleopatra Thanda Sibanda wrote:
Hie,am having trouble joining the legs ,is there a tutorial video I can follow?
15.12.2018 - 22:01DROPS Design answered:
Dear Mrs Sibanda, legs are worked back and forth bottom up. You then sew the seam under foot, up to top of leg. After you have stuffed the leg, thread a yellow strand in the cast off sts and tighten - sew to bottom body. Happy knitting!
17.12.2018 - 09:50
|
|
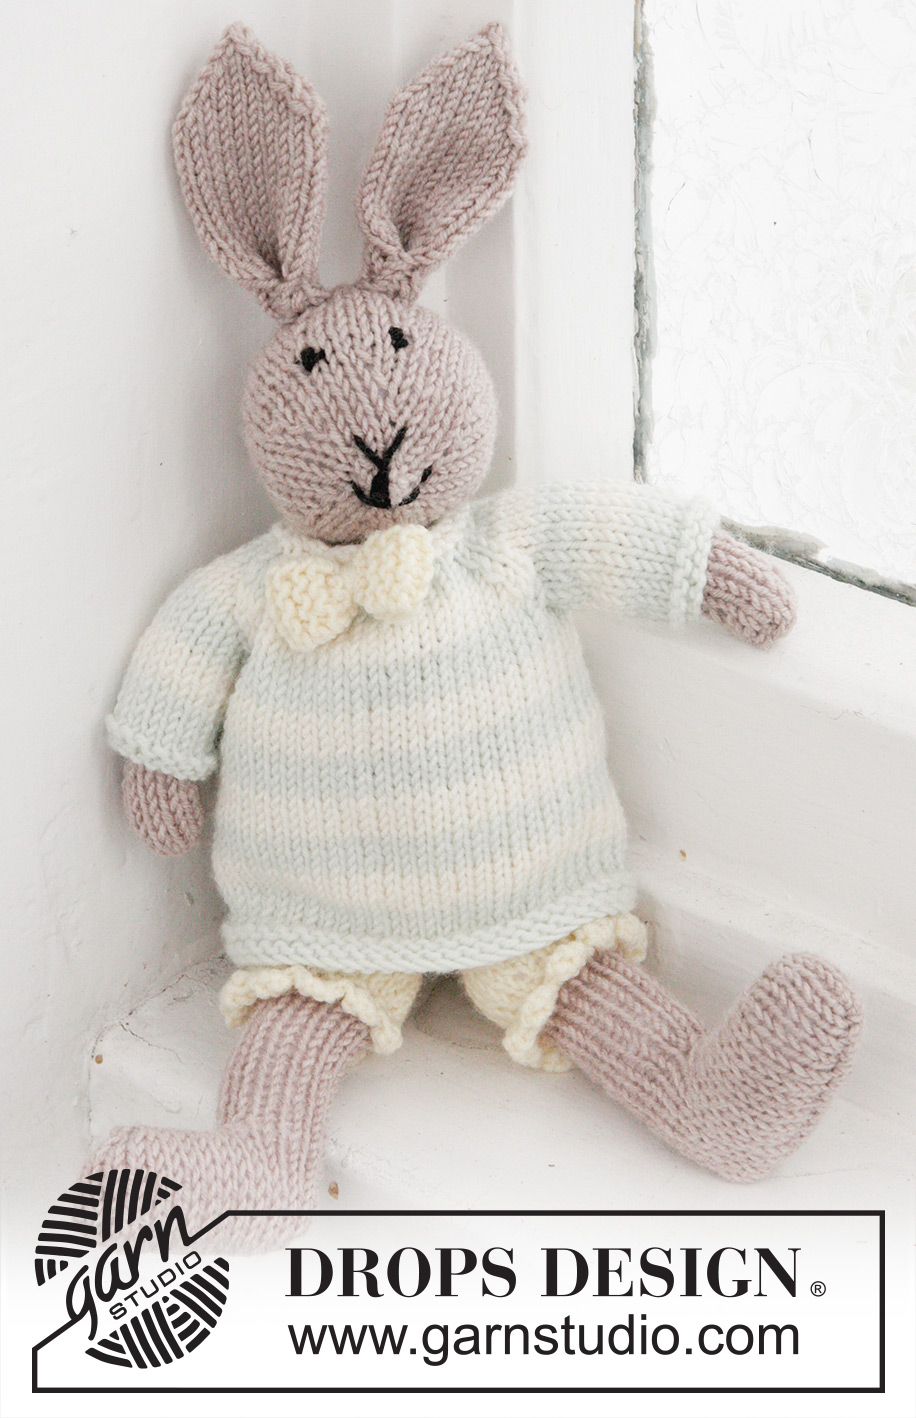
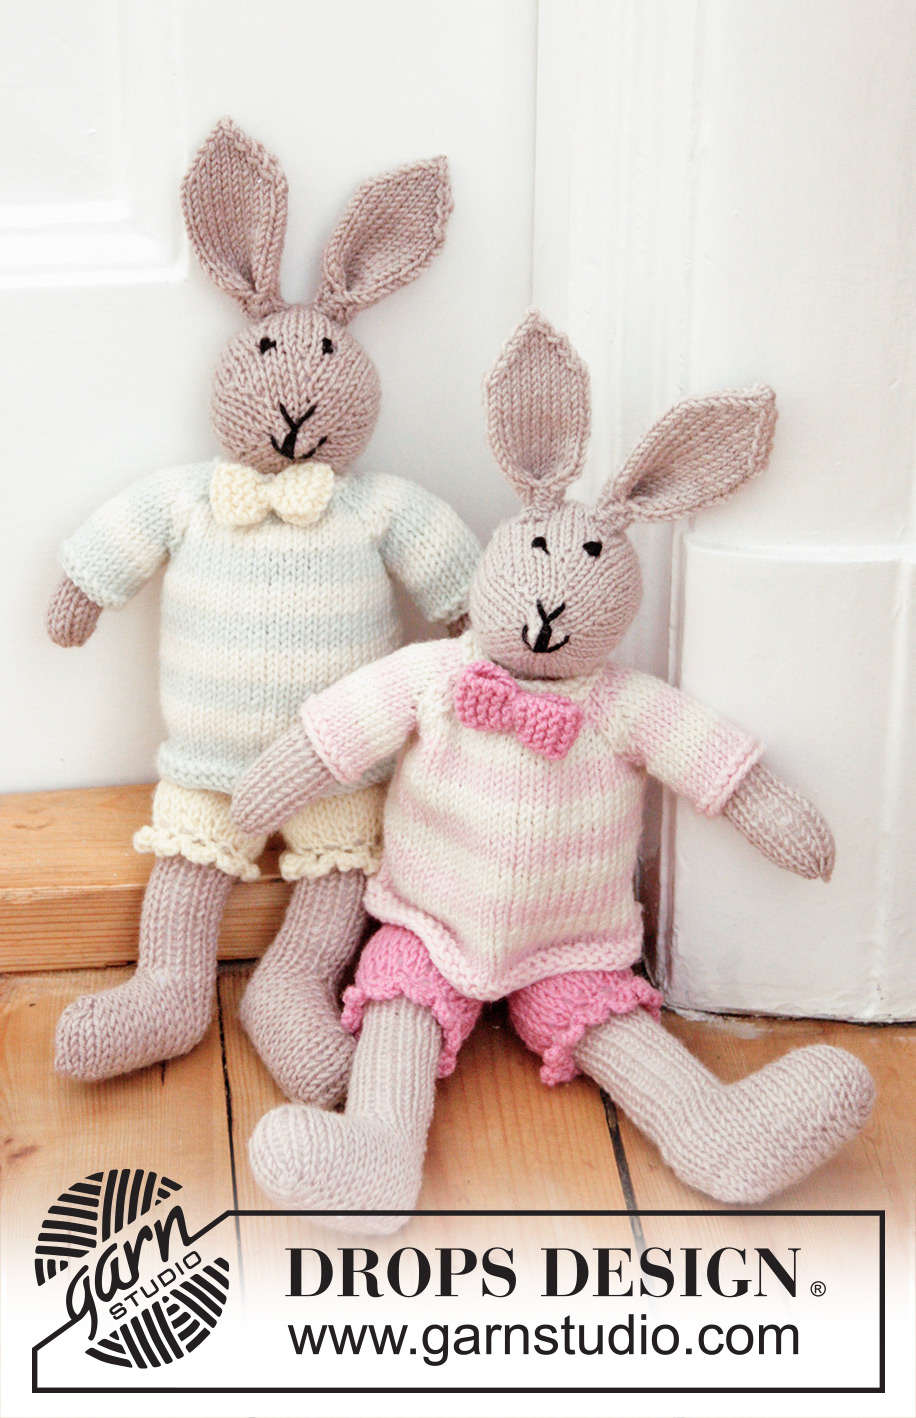
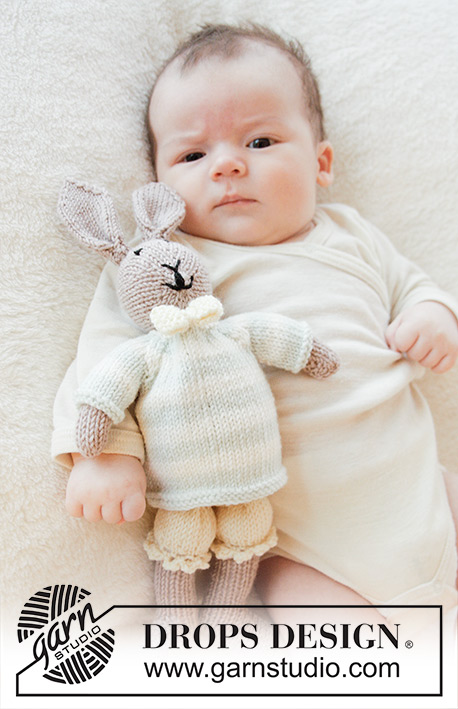
Mr. Bunny#dropsmrbunny |
|
 |
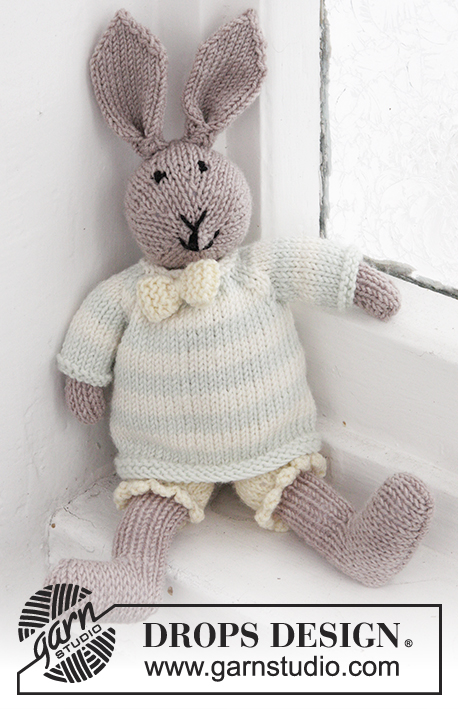 |
Knitted bunny toy with pants, jumper and bow in DROPS BabyMerino
DROPS Baby 25-8 |
|
|
MAGIC CIRCLE: To avoid hole in the middle beg with this technique: Hold yarn end in the left hand and make a loop around left index finger (from left to right). Hold the loop with left thumb and index finger. Insert needle through loop, get yarn from ball (i.e. place yarn 1 time over needle from you), pull yarn back through loop, 1 YO (now place yarn from the back and towards you) and pull YO through sts on needle, * insert needle through loop, 1 YO (place yarn from the back and towards you), pull YO through loop, 1 YO (from the back and towards you) and pull YO through outermost st on right needle (i.e. the last st made) *, repeat from *-* until there are 6 sts on needle. Then work as explained in pattern – AT THE SAME TIME pull yarn end so that loop is tighten tog and the hole disappears. INCREASE TIP: Inc 1 st by making 1 YO. On next round/row work YO twisted to avoid holes. GARTER ST (back and forth on needle): K all rows. 1 ridge = K2 rows. STRIPES: * 4 rounds/rows light mint, 4 rounds/rows off white *, repeat from *-*. ---------------------------------------------------------- HEAD: Worked in the round on double pointed needles from snout and back. Make a MAGIC CIRCLE with light beige - see explanation above = 6 sts on needle. Distribute sts on 3 double pointed needles size 3 mm / US 2.5 (work with fourth needle) and work in the round as follows: ROUND 1: K all sts. ROUND 2: * K 1, 1 YO *, repeat from *-* the entire round = 12 sts. ROUND 3: K all sts (always K YOs twisted to avoid holes). ROUND 4: * K 2, 1 YO *, repeat from *-* the entire round = 18 sts. ROUND 5: K all sts. ROUND 6: * K 3, 1 YO *, repeat from *-* the entire round = 24 sts. ROUND 7: K all sts. ROUND 8: * K 4, 1 YO *, repeat from *-* the entire round = 30 sts. ROUND 9: K all sts. ROUND 10: * K 5, 1 YO *, repeat from *-* the entire round = 36 sts. ROUND 11-12: K all sts = 36 sts. Insert 1 marker after the first 3 sts at beg of round and 1 marker after another 6 sts. Then inc 1 st inside the 2 markers - READ INCREASE TIP (= 2 sts inc). Repeat inc every other round 2 more times (= 3 inc in total in each side) = 42 sts. ROUND 18-19: K all sts = 42 sts. ROUND 20: * K 5, K 2 tog *, repeat from *-* the entire round = 36 sts. ROUND 21: K all sts. ROUND 22: * K 4, K 2 tog *, repeat from *-* the entire round = 30 sts. ROUND 23: K all sts. Continue dec like this on every other round (i.e. on every round with dec work 1 st less before working 2 sts tog = 6 sts dec per round) until 12 sts remain on needle, cut the yarn and pull it through sts on needle (without tightening). Embroider eyes, mouth and snout with black, fill the head with poly stuffing, tighten tog sts and fasten (= mid back of head). EAR: Worked in the round from bottom up. Cast on 8 sts with light beige and distribute sts on 2 double pointed needles (work with third needle). ROUND 1-2: K all sts. ROUND 3: * K 1, 1 YO, K 2, 1 YO, K 1 *, repeat from *-* 1 more time = 12 sts on needle. ROUND 4: K all sts (always K YOs twisted to avoid holes). ROUND 5: * K 1, 1 YO, K 4, 1 YO, K 1 *, repeat from *-* 1 more time = 16 sts on needle. ROUND 6: K all sts. ROUND 7: * K 1, 1 YO, K 6, 1 YO, K 1 *, repeat from *-* 1 more time = 20 sts on needle. Then work in stockinette st in the round until piece measures approx. 5½ cm / 2¼". Then dec as follows: ROUND 1: * Slip 1 st as if to K, K 1, psso, K 6, K 2 tog *, repeat from *-* 1 more time = 16 sts. ROUND 2: K all sts. ROUND 3: * Slip 1 st as if to K, K 1, psso, K 4, K 2 tog *, repeat from *-* 1 more time = 12 sts. ROUND 4: K all sts. Continue dec like this every other round until 4 sts remain on needle (i.e. on every round with dec work 2 sts less between dec in each side). On next round K2 tog around. Cut the yarn and pull it through sts, tighten tog and fasten. Fold each side at the bottom of ear towards the middle so that a pleat is formed in the mid of ear. Sew tog at the bottom with a couple of stitches and fasten ear on head. Work another ear the same way. BODY: Worked in the round, top down. Cast on 16 sts with light beige and distribute sts on 4 double pointed needles (work with fifth needle). ROUND 1-2: K all sts. ROUND 3: * K 2, 1 YO *, repeat from *-* the entire round = 24 sts. ROUND 4: K all sts (always K YOs twisted to avoid holes). ROUND 5: * K 2, 1 YO *, repeat from *-* the entire round = 36 sts. ROUND 6: K all sts. ROUND 7: * K 3, 1 YO *, repeat from *-* the entire round = 48 sts. Then work in stockinette st in the round until piece measures 5½ cm / 2¼". Switch to light yellow and K 1 round and P 1 round. Then work 8 rounds in stockinette st. Continue to dec as follows: ROUND 1: * K 6, K 2 tog *, repeat from *-* the entire round = 42 sts. ROUND 2: K all sts. ROUND 3: * K 5, K 2 tog *, repeat from *-* the entire round = 36 sts. ROUND 4: K all sts. Continue dec like this on every other round (i.e. on every round with dec work 1 st less before working 2 sts tog = 6 sts dec per round) until 12 sts remain on needle, cut the yarn and pull it through sts on needle (without tightening). Fill body with poly stuffing, tighten tog sts on yarn and fasten. Sew head to body (light yellow should be down (= pants)). LEG: Worked back and forth, bottom up. Cast on 30 sts on double pointed needles size 3 mm / US 2.5 with light beige. Work in stockinette st back and forth for 3 cm / 1". Then work as follows: ROW 1 (= RS): 1 edge st in GARTER ST – see explanation above, K 10, K2 tog 4 times, K 10 and 1 edge st in garter st = 26 sts. ROW 2 (= WS): 1 edge st in garter st, P 5, bind off the next 14 sts, P 5 and 1 edge st in garter st = 6 sts remain in each side. ROW 3 (= RS): Work the first 6 sts on needle and then the next 6 sts on needle (the 14 bind off sts form a hole in the mid of piece). Then work in stockinette st back and forth over the 12 sts with 1 edge st in garter st in each side until leg measures approx. 8 cm / 3". Switch to light yellow, K 1 row from RS and K 1 row from WS. Then work as follows: ROW 1 (= RS): * K 1, 1 YO *, repeat from *-* until 1 st remains and finish with K 1 = 23 sts. ROW 2 (= WS): P but K edge sts in each side and P YOs twisted to avoid holes. ROW 3: * K 2, 1 YO *, repeat from *-* until 1 st remains and finish with K 1 = 34 sts. Then work in stockinette st back and forth with 1 edge st in garter st in each side until leg measures approx. 12 cm / 4¾", bind off. Sew opening mid on top of foot with grafting/kitchener sts. Sew foot tog mid under and continue up along mid back - sew in front loop of outermost st. Fill leg with some poly stuffing. Baste a strand up and down through bind-off edge at the top of leg (on the yellow). Tighten tog to make it baggy. Work another leg the same way and fasten both legs on body. LACE EDGE Crochet a lace edge on hook size 3 mm / C with light yellow at the bottom around pants on each leg as follows (crochet in P sts): 1 sc in first st, * ch 4, 1 dc in 4th ch from hook, 1 sc in next P st on pants *, repeat from *-* the entire round and finish with 1 sl st in first sc from beg of round. Fasten off. ARM: Work back and forth on double pointed needles from top and down. Cast on 10 sts with light beige and work in stockinette st back and forth with 1 edge st in garter st in each side until arm measures 9 cm / 3½". Cut the yarn (make it long enough to use for sewing the arm tog), pull yarn through sts on needle (= at the bottom of arm), tighten tog and then sew arm tog in front loop of outermost st. Fill arm with poly stuffing and fasten at the top of body by neck (below the head). Work another arm the same way and fasten in the opposite side. JUMPER: Piece is worked in the round on double pointed needles up to armhole, then work back and forth on needle. BODY: Cast on 60 sts with light mint. P 1 round, K 1 round and P 1 round. Then work in stockinette st and STRIPES - see explanation above. When piece measures approx. 9 cm / 3½" – adjust so that last round in a stripe with light mint remains, work next round as follows: bind off 6 sts for armhole, work 24 sts, bind off the next 6 sts for armhole and work the last 24 sts. Put piece aside and knit the sleeves. SLEEVE: Worked in the round on double pointed needles. Cast on 20 sts with light mint. K 1 round and P 1 round. Then work in stockinette st and STRIPES in the round. When 11 rounds with stripes have been worked (i.e. last round in a stripe with light mint remains), work next round as follows: bind off 6 sts for armhole and work the remaining 14 sts. Cut the yarn, put piece aside and Make another sleeve. YOKE: Slip sleeves on to same needle as body where armholes were bound off (without working them first) = 76 sts on needle. Beg round from RS mid back on body and continue stripes as follows (1st round = off white): ROUND 1: 1 edge st in garter st, K 9, K 2 tog, K 2 twisted tog, K 10 (= sleeve), K 2 tog, K 2 twisted tog, K 20 (= front), K 2 tog, K 2 twisted tog, K 10 (= sleeve), K 2 tog, K 2 twisted tog, K 9 and 1 edge st in garter st = 68 sts. Then work back and forth from mid back. ROW 2 (= WS): P but work edge sts in garter st. ROW 3 (= RS): 1 edge st in garter st, K 8, K 2 tog, K 2 twisted tog, K 8 (= sleeve), K 2 tog, K 2 twisted tog, K 18 (= front), K 2 tog, K 2 twisted tog, K 8 (= sleeve), K 2 tog, K 2 twisted tog, K 8 and 1 edge st in garter st = 60 sts. ROW 4 (= WS): P but work edge sts in garter st. ROW 5 (= RS): Switch to light mint and work 1 edge st in garter st, K 7, K 2 tog, K 2 twisted tog, K 6 (= sleeve), K 2 tog, K 2 twisted tog, K 16 (= front), K 2 tog, K 2 twisted tog, K 6 (= sleeve), K 2 tog, K 2 twisted tog, K 7 and 1 edge st in garter st = 52 sts. ROW 6 (= WS): P but work edge sts in garter st. ROW 7 (= RS): 1 edge st in garter st, K 6, K 2 tog, K 2 twisted tog, K 4 (= sleeve), K 2 tog, K 2 twisted tog, K 14 (= front), K 2 tog, K 2 twisted tog, K 4 (= sleeve), K 2 tog, K 2 twisted tog, K 6 and 1 edge st in garter st = 44 sts. ROW 8 (= WS): P but work edge sts in garter st. Switch to off white and work next row as follows: 1 edge st in garter st, * K 1, K 2 tog *, repeat from *-* until 1 st remains and finish with 1 edge st in garter st = 30 sts. K 1 row from WS, K 1 row from RS and K 1 row from WS before binding off with K from RS. Fasten off. BOW: Cast on 5 sts on double pointed needles size 3 mm / US 2.5 with light yellow. Work in garter st back and forth for 8 cm / 3", bind off. Sew short sides tog in front loop of outermost st to form a ring. Fasten off. Find a new strand, wind it a couple of times around the middle of bow and fasten bow in the neck on jumper. Put the jumper on the bunny and fasten the button through both layers at the top of neck at the back. |
|
Have you finished this pattern?Tag your pictures with #dropspattern #dropsmrbunny or submit them to the #dropsfan gallery. Do you need help with this pattern?You'll find 28 tutorial videos, a Comments/Questions area and more by visiting the pattern on garnstudio.com. © 1982-2026 DROPS Design A/S. We reserve all rights. This document, including all its sub-sections, has copyrights. Read more about what you can do with our patterns at the bottom of each pattern on our site. |
|


With over 40 years in knitting and crochet design, DROPS Design offers one of the most extensive collections of free patterns on the internet - translated to 17 languages. As of today we count 325 catalogs and 12298 patterns - 12288 of which are translated into English (US/in).
We work hard to bring you the best knitting and crochet have to offer, inspiration and advice as well as great quality yarns at incredible prices! Would you like to use our patterns for other than personal use? You can read what you are allowed to do in the Copyright text at the bottom of all our patterns. Happy crafting!
Post a comment to pattern DROPS Baby 25-8
We would love to hear what you have to say about this pattern!
If you want to leave a question, please make sure you select the correct category in the form below, to speed up the answering process. Required fields are marked *.