
Popular categories
Looking for a yarn?


Comments / Questions (62)
![]() Karolina wrote:
Karolina wrote:
Hi, Please could u tell me, how many pairs of double pointed needles do I need? Do I need 2 pairs for each size? Sorry I have never used double pointed needles, except circular ones. Many thanks Karolina
18.09.2016 - 10:10DROPS Design answered:
Dear Karolina, for this pattern, you have to use a set of 5 double pointed needles. Happy knitting!
18.09.2016 - 23:34
![]() Ulrike wrote:
Ulrike wrote:
Frage zum Kragen: Wenn ich der Anleitung zum rechten Vorderteil folge, verschiebt sich der Farbwechsel von vorher innen zur Schulter hin. Der Kragen wird als "Rück-Seite" gestrickt und wird erst durch das spätere Umschlagen zur Vorderen. verstanden! Nur: wenn ich der Anleitung für das linke Vorderteil folge, sehe ich genau dies nicht: der Farbwechsel bleibt wo er war (innen) und somit ergibt sich für den Kragen dieselbe Vor- und Rückseite wie für den Rest des Strickteils. wie ist es richtig ?
29.07.2016 - 08:30DROPS Design answered:
Liebe Ulrike, ich bin nicht sicher, ob ich Ihre Frage richtig verstanden habe. Der Kragen ist beim rechten und linken Vorderteil gleich. Auf dem ersten Modellfoto sehen Sie, dass die Rückseite nach aussen umgeschlagen wird.
08.08.2016 - 09:52
![]() NLT wrote:
NLT wrote:
Hej. Vil sy min dejlige jakke (153-13) sammen, men jeg kan ikke finde ud af hvordan jeg skal sy kraven????
28.07.2015 - 20:41DROPS Design answered:
Hej, Sy sammen bagpå med små sting fra retsiden. Stingene ses ikke når du bukker kraven ned. Se også video med "Sjalskrave". God fornøjsele!
29.07.2015 - 12:36
![]() Gullvi Erlandsson wrote:
Gullvi Erlandsson wrote:
Hej! Har just avslutat höger framstycke. Med "spegelvänd" menas det då att vänster framstycke stickas lika som bakstycke men att oket stickas nerifrån så att säga? Då kommer väl framkanten på övre halvan att se lite annorlunda ut pga att trådbytet sker på annat ställe? Tacksam för svar! Vänlig hälsning Gullvi
02.06.2015 - 17:41DROPS Design answered:
Hej Gullvi, Sticka vänster framst som höger tills det har ökats antal m enligt beskrivningen, sedan följer du beskrivningen för att få nederkant och sidan som du skall på vänster framst. Lycka till!
10.08.2015 - 14:19
![]() Karoline Stumpen wrote:
Karoline Stumpen wrote:
Beim Vorderteil verstehe ich die zunahme nicht ich hab ständig einen knuppel bzw ich muß einen neuen Faden nehmen habt ihr da ein Video ich verzweifle
02.02.2015 - 20:10DROPS Design answered:
Ja, es gibt ein Video, schauen Sie mal oben im Kopf neben dem Foto unter "Videos", das Video (an fünfter Stelle) heißt "DROPS 153-13 Beginn des rechten Vorderteils". Ich hoffe, das hilft Ihnen weiter. Gutes Gelingen ohne Verzweifeln!
04.02.2015 - 16:25
![]() Nicole Isabelle wrote:
Nicole Isabelle wrote:
Rückenteil: Ab welcher RD wird dort zu Alpaca gewechselt? Wie bei den Vorderteilen?
16.03.2014 - 14:47DROPS Design answered:
Liebe Nicole Isabelle, Sie schlagen beim Rückenteil die M mit Delight an und stricken dann 1 Krausrippe mit Delight, d.h. die 1. und 2. Rd mit Delight, dann wechseln Sie zu Alpaca. Dann stricken Sie 2 Rd mit Alpaca und wechseln wie in Rd 5 beschrieben zu Delight. Gutes Gelingen!
17.03.2014 - 16:45
![]() Gabriele wrote:
Gabriele wrote:
Ich glaube,dass ich meine Frage vom 04.03. als Kommentar geschickt habe - deswegen die Berichtigung. Gabriele
04.03.2014 - 14:44
![]() Gabriele wrote:
Gabriele wrote:
Ich habe beim Rückenteil bis ca 360 Maschen gestrickt. Nun stelle ich fest,dass wie eine Naht beim Farbwechsel entstanden ist,was das Strickbild total stört da es von der ersten Runde so aussieht als wäre es ein Fünfeck. Habe euer Foto immer wieder betrachtet uund stelle bei Euch so etwas nicht fest. Bitte helft mir!!! Gabriele
04.03.2014 - 10:28DROPS Design answered:
Liebe Gabriele, haben Sie den Tipp in der 5. Rd beachtet? Dies soll eigentlich verhindern, dass sich ein unschöner Farbwechsel ergibt. Sie heben also immer in der R, in der Sie re stricken und die Farbe wechseln, die erste M auf die rechte Nadel und stricken diese M erst am Ende der R. Beachten Sie dabei aber, dass Sie weiter an den richtigen Stellen zunehmen, die markierten M ändern sich dadurch nicht.
08.03.2014 - 11:40
![]() Courtney-Coles wrote:
Courtney-Coles wrote:
Sorry to bother you again but what I meant was you only say sizing is S, M , L , XL etc but I can not find where it says what that relates to in inches or cms etc. Please help as do not know which size to knit.
19.02.2014 - 07:42DROPS Design answered:
Dear Mrs Coles, our chart measurements are in cm, only US-English patterns do have informations in inches. If you are on the UK-English pattern, you will find all informations in cm. Happy knitting!
19.02.2014 - 09:45
![]() Dawn Courtney-Coles wrote:
Dawn Courtney-Coles wrote:
Please tell me how the sizes correspond to measurements?
18.02.2014 - 15:27DROPS Design answered:
Dear Mrs Courtney-Coles, this jacket is quite baggy, measure a similar garment you have and like the shape, and compare these measurements to those in chart to find the matching size. Happy knitting!
18.02.2014 - 16:44
|
|
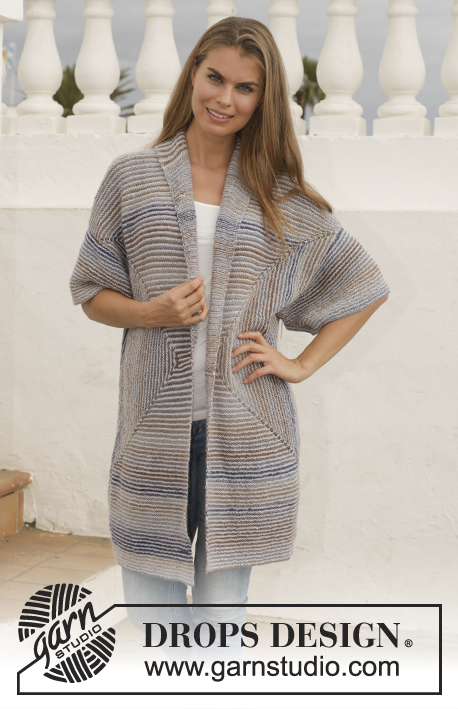
Blue Maze#bluemazejacket |
|
 |
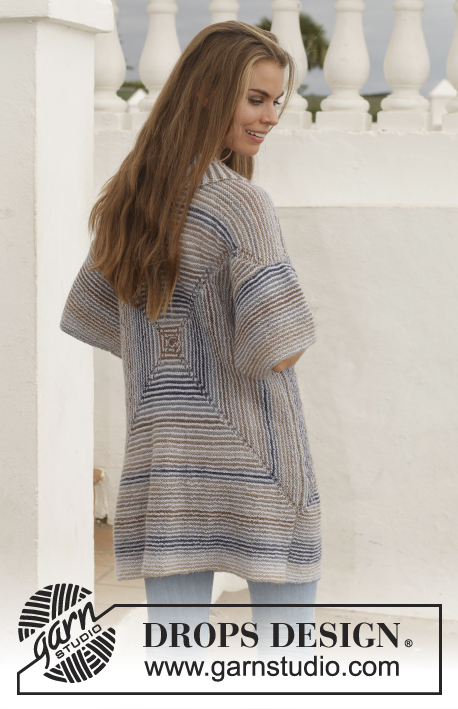 |
Knitted DROPS jacket in garter st with shawl collar in ”Delight” and "Alpaca". Size: S - XXXL.
DROPS 153-13 |
|
|
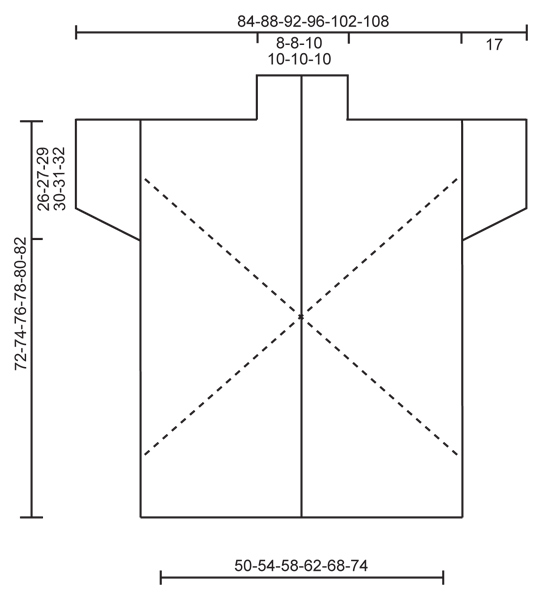
GARTER ST (back and forth on needle): K all rows. 1 ridge = K2 rows. GARTER ST (in the round): * K 1 round and P 1 round *, repeat from *-*. 1 ridge = 2 rounds. STRIPES: *1 ridge Delight, 1 ridge Alpaca *, repeat from *-* the entire piece. MEASURING TIP: Measure piece when held up. ---------------------------------------------------------- JACKET: Back piece is worked from mid back in a square. Then work at the top of yoke and at the bottom of back piece. Front piece is worked the same way but as half of back piece. I.e. half a square but with band and collar in addition. Work sleeves at the end. BACK PIECE: Cast on 8 sts with Delight and divide them on 4 double pointed needles size 3.5 mm / US 4 (= 2 sts on every needle). Work in the round in GARTER ST and STRIPES - see explanation above. ROUND 1: K all sts. ROUND 2: P and insert marker in the first, third, fifth and seventh st (= 4 markers). ROUND 3: K and inc with YOs on each side of every marker the entire round. ROUND 4: P all sts and YOs = 16 sts. ROUND 5: Now displace beg of round with 1 st to get the color change in one corner of piece so that it looks nice. Move first st on round on to right needle without working it, this st is now last st on round. Then K with YOs on each side of every marker the entire round. ROUND 6: P all sts and YOs = 24 sts. Then repeat 5th and 6th round, distribute sts on needle to make it easier to work and switch to circular needle when needed. Continue working like this until there are 456-496-536-568-624-680 sts on needle (= 56-61-66-70-77-84 inc and 114-124-134-142-156-170 sts along each side). On next round with P work as follows: P 114-124-134-142-156-170, bind off the next 114-124-134-142-156-170 sts (= side of jacket), work the next 114-124-134-142-156-170 sts and slip them on 1 stitch holder (= bottom edge on jacket) and bind off the next 114-124-134-142-156-170 sts (= side of jacket). Work in garter st and stripes back and forth over the 114-124-134-142-156-170 sts on needle for yoke. When piece measures 59-62-65-68-72-76 cm / 23¼"-24½"-25½"-26¾"-28½"-30" - READ MEASURING TIP ABOVE, bind off the middle 14-14-16-16-18-18 sts for neck and finish each shoulder separately. Then bind off at beg of every row from neck as follows: bind off 1 st 2 times = 48-53-57-61-67-74 sts remain on shoulder. Continue until piece measures 61-64-67-70-74-78 cm / 24"-25¼"-26"½-27½"-29"-30¾" and bind off. Insert 2 markers in the piece; insert a marker on each of the long sides 26-27-29-30-31-32 cm / 10¼"-10½"-11½"-11¾"-12¼"-12½" down from each shoulder, use markers for assembly. Slip the 114-124-134-142-156-170 sts from stitch holder in bottom edge back on circular needle size 3.5 mm / US 4 and work in garter st and stripes back and forth until piece measures 72-74-76-78-80-82 cm / 28⅜"-29⅛"-30"-30¾"-31½"-32¼" from shoulder, loosely bind off. RIGHT FRONT PIECE: Loosely cast on 12 sts with Delight on double pointed needles size 3.5 mm / US 4. Switch to Alpaca and work 1 ridge, switch to Delight and work 1 ridge. Switch to Alpaca and K 1 row, turn piece clockwise and pick up 4 sts along the side of ridges. Turn piece again and pick up 12 sts on the under side of cast-on edge = 28 sts on needle. K 1 row over all sts. Insert a marker in the 13th and 16th st. Then work in garter st and stripes AT THE SAME TIME inc with 1 YO on each side of 13th and 16th st on every row from RS (=4 sts inc), K YOs to make a small hole. Switch to circular needle when needed. Continue to inc this way until inc has been done 56-61-66-70-77-84 times in total and there are 252-272-292-308-336-364 sts on needle. On next row from WS K the first 69-74-79-83-90-97 and then slip them on 1 stitch holder (= bottom edge of jacket), bind off the next 114-124-134-142-156-170 sts (= side of jacket). Work in garter st and stripes back and forth over the last 69-74-79-83-90-97 sts on needle for yoke, work until piece measures 61-64-67-70-74-78 cm / 24"-25¼"-26"½-27½"-29"-30¾". On next row from WS bind off the first 48-53-57-61-67-74 sts. Insert 1 marker in the piece; insert a marker on the long side 26-27-29-30-31-32 cm / 10¼"-10½"-11½"-11¾"-12¼"-12½" down from shoulder, use marker when sewing in sleeve. 21-21-22-22-23-23 sts remain on needle for collar. Then continue in garter st and stripes back and forth over these sts AT THE SAME TIME work short rows as follows: Beg from WS towards shoulder. * K 1 row over all sts, work 1 ridge (2 rows) over only the outermost 12 sts from mid front, K 1 row over all sts, switch color *, repeat from *-* onwards. There is 1 ridge on the inside and 2 ridges at the edge in the same color consecutively on collar. Work until collar measures approx. 5-5-5.5-5.5-6-6 cm / 2"-2"-2¼"-2¼"-2½"-2½" on the inside on the most narrow part and bind off. Slip the 69-74-79-83-90-97 sts on stitch holder back on needle and work in garter st back and forth until piece measures 72-74-76-78-80-82 cm / 28⅜"-29⅛"-30"-30¾"-31½"-32¼" from shoulder, loosely bind off. LEFT FRONT PIECE: Work as right but reversed until inc has been done 56-61-66-70-77-84 times in total and there are 252-272-292-308-336-364 sts on needle. K the first 69-74-79-83-90-97 sts from RS and then slip them on 1 stitch holder (= bottom edge of jacket), bind off the next 114-124-134-142-156-170 sts (= side of jacket). Work in garter st back and forth over the last 69-74-79-83-90-97 sts on needle for yoke, work until piece measures 61-64-67-70-74-78 cm / 24"-25¼"-26"½-27½"-29"-30¾". On next row from RS bind off the first 48-53-57-61-67-74 sts, work the last 21-21-22-22-23-23 sts. Insert 1 marker in the piece; insert a marker on the long side 26-27-29-30-31-32 cm / 10¼"-10½"-11½"-11¾"-12¼"-12½" down from shoulder, use marker when sewing in sleeve. Then continue in garter st back and forth over these sts AT THE SAME TIME work short rows as follows: Turn piece and beg from WS towards mid front. * Work 1 ridge (2 rows) over the outermost 12 sts from mid front, work 1 ridge (2 rows) over all sts, switch color *, repeat from *-* onwards. There is 1 ridge on the inside and 2 ridges at the edge in the same color consecutively on collar. Work until collar measures approx. 5-5-5.5-5.5-6-6 cm / 2"-2"-2¼"-2¼"-2½"-2½" on the inside on the most narrow part and bind off. Slip the 69-74-79-83-90-97 sts on stitch holder back on needle and work in garter st back and forth until piece measures 72-74-76-78-80-82 cm / 28⅜"-29⅛"-30"-30¾"-31½"-32¼" from shoulder, loosely bind off. SLEEVE: Worked back and forth on circular needle from shoulder. Cast on 122-126-132-136-140-146 sts on circular needle size 3.5 mm / US 4 with Delight and work in garter st and stripes back and forth on needle as before until piece measures approx. 2 cm / ¾". Dec 1 st inside 1 edge st in each side by K 2 sts tog. Repeat approx. every cm / ½" 13 more times (= 14 times in total) = 94-98-104-108-112-118 sts. Work until piece measures 17 cm / 6¾" and loosely bind off. Make another sleeve the same way. ASSEMBLY: Sew in outer loops of edge sts to avoid a chunky seam. Sew the shoulder seams. Sew in sleeves between markers in the sides. Sew underarm and side seams in one. Sew collar tog mid back (seam should be out on RS so that when collar is folded, the edge will be under collar and be invisible). Sew collar to neckline in the back of neck. Fasten off. |
|
 |
|
Have you finished this pattern?Tag your pictures with #dropspattern #bluemazejacket or submit them to the #dropsfan gallery. Do you need help with this pattern?You'll find 24 tutorial videos, a Comments/Questions area and more by visiting the pattern on garnstudio.com. © 1982-2026 DROPS Design A/S. We reserve all rights. This document, including all its sub-sections, has copyrights. Read more about what you can do with our patterns at the bottom of each pattern on our site. |
|


With over 40 years in knitting and crochet design, DROPS Design offers one of the most extensive collections of free patterns on the internet - translated to 17 languages. As of today we count 325 catalogs and 12298 patterns - 12288 of which are translated into English (US/in).
We work hard to bring you the best knitting and crochet have to offer, inspiration and advice as well as great quality yarns at incredible prices! Would you like to use our patterns for other than personal use? You can read what you are allowed to do in the Copyright text at the bottom of all our patterns. Happy crafting!
Post a comment to pattern DROPS 153-13
We would love to hear what you have to say about this pattern!
If you want to leave a question, please make sure you select the correct category in the form below, to speed up the answering process. Required fields are marked *.