Comments / Questions (62)
![]() Lise Blomquist wrote:
Lise Blomquist wrote:
Jeg arbejder p.t. med ryggen på denne og nærmer mig stedet, hvor der skal lukkes masker af til sider. Jeg er i tvivl om, hvilken maske aflukningen skal begynde med. Er det midtermasken ved omslagene eller omslaget før eller efter, der skal være starten for at få hulrækken i siden? Jeg har kigget på forstykkerne og forstår det sådan, at de strikkes frem og tilbage og ikke rundt. Er det korrekt forstået? Tak på forhånd.
04.06.2018 - 21:08DROPS Design answered:
Hej Lise, det kommer helt af sig selv hvis du har det antal masker som står i opskriften. Hvis du strikker den mindste størrelse har du 456 masker på pinden, det vil sige 114 masker på hver side. Alle 114 masker lukkes af lang med siderne ifølge opskriften. Se videoen til venstre i opskriften, hvordan du starter på højre forstykke. God fornøjelse!
06.06.2018 - 15:51
![]() Donatella wrote:
Donatella wrote:
Grazie per la risposta. La cosa più difficile di questa giacca è la misurazione. Dal diagramma il bordo superiore ed inferiore, una volta finito il quadrato con le diagonali è esattamente della stessa lunghezza. Deve essere così? Perché dalle mie misurazioni il superiore (quello dello sprone per intenderci) è venuto più corto dell'inferiore, così mi sono venuti dei dubbi. Non vorrei sbagliare la giacca è così bella! Grazie e scusate il disturbo.
04.10.2017 - 16:26DROPS Design answered:
Buongiorno Donatella. Guardando la fotografia, sia del davanti che del dietro, la parte in basso è più lunga della parte in alto. Durante il lavoro, verifichi che la sua tensione non cambia. Terminato il primo davanti provi ad appoggiarlo al dietro per verificare che le misure combacino. Buon lavoro!
05.10.2017 - 09:46
![]() Donatella wrote:
Donatella wrote:
Buongiorno, sto iniziando la parte destra davanti e vedo scritto che i gettati devono essere lavorati a dir., mentre per il dietro io li ho lavorati tutti a rov. E' giusto così o ho sbagliato io ad interpretare? Grazie anticipatamente buona giornata.
03.10.2017 - 23:46DROPS Design answered:
Buongiorno Donatella. Sì è corretto. Buon lavoro!
04.10.2017 - 09:20
![]() Patrizia wrote:
Patrizia wrote:
Non ho avuto il piacere di un vostro chiarimento, ma non importa, facendo prove su prove ci sono arrivata da sola. Tengo comunque a precisare che le istruzioni riguardo il "ripetere il 5° e 6° giro" per me non sono molto chiare. Bastava scrivere: ripetere il 5° e 6° giro fino a quando ci sono 456 maglie. Io avevo inteso che ogni volta si doveva ripartire dal giro 1. Mi scuso, probabilmente non sono molto perspicace e per questo non ho meritato risposta. Buona giornata. Patrizia
26.09.2017 - 12:16DROPS Design answered:
Buongiorno Patrizia. Rispondiamo a tutti i quesiti e cerchiamo di farlo il prima possibile. Non sempre ci è possibile farlo in tempi rapidissimi e ci dispiace per l’inconveniente. La traduzione in italiano deve seguire le caratteristiche del testo originale. Ci riscriva se ci sono altri punti che non le sono chiari. Buon lavoro!
26.09.2017 - 14:24
![]() Patrizia wrote:
Patrizia wrote:
Grazie per la risposta innanzitutto. Un'altra cosa le chiederei cortesemente. Ho ben interpretato che il giro 5 e 6 lo devo fare due volte consecutive? Ovvero la serie completa non è di 6 giri ma di 8? Ho un po' di perplessità su questo punto. Grazie e buona giornata!
25.09.2017 - 17:07DROPS Design answered:
Buongiorno Patrizia. Deve ripetere i giri 5 e 6 finché sui ferri non ci sono le maglie indicate per la sua taglia. Buon lavoro!
26.09.2017 - 14:30
![]() Patrizia wrote:
Patrizia wrote:
Mi sto cimentando nella mia prima maglia modelli drops e sono molto soddisfatta. Una cosa vorrei chiederle gentilmente: al giro 5 spostando la maglia iniziale devo spostare tutti i segnapunti messi precedentemente (1°-3°-5°-7°)? Forse è una domanda sciocca ma praticamente il segnapunto messo alla maglia 1° come pure gli altri 3 restano sempre dove li avevo messi all'inizio??? Mi scusi per il disturbo buona giornata. Patrizia
24.09.2017 - 23:01DROPS Design answered:
Buongiorno Patrizia. Deve spostare solo la maglia iniziale, ma I segnapunti restano nelle stesse maglie. Buon lavoro!
25.09.2017 - 06:48
![]() Federica wrote:
Federica wrote:
OK però la mia maglia iniziale non è quella col segnapunti perché ho già fatto un aumento, quindi la maglia col segnapunti è diventata la 2°. Spostando la prima maglia a destra mi rimane come prima maglia quella col segnapunti iniziale. Quindi io inizio a fare i gettati da questa ma mi domando come venga la diagonale...... Scusi il disturbo e spero di essere stata chiara.
24.09.2017 - 15:52DROPS Design answered:
Buonasera Federica. Chiediamo scusa. Abbiamo fatto un piccolo campione. Le diagonali vengono da sole, per come è costruito il modello, aumentando prima e dopo le maglie con i segnapunti. La maglia va spostata la prima volta che lavora il ferro 5, così il cambio colore è nell'angolo. Chiederemo di modificare le istruzioni. Grazie e buon lavoro!
24.09.2017 - 17:29
![]() Federica wrote:
Federica wrote:
Spero di non disturbarla ancora, ma le chiedo un'ultima cosa. Ripetendo il 5° e 6° giro devo quindi spostare ancora una volta la maglia iniziale rifacendo il 5°giro, giusto?
24.09.2017 - 14:50DROPS Design answered:
Buongiorno Federica. Sì, ogni volta che ripete il giro 5 sposta la maglia iniziale. Buon lavoro!
24.09.2017 - 15:40
![]() Federica wrote:
Federica wrote:
OK grazie mille. Quindi ogni volta devo ripetere anche il 5° e 6° giro, giusto? Grazie per la cortese attenzione!!
24.09.2017 - 10:44DROPS Design answered:
Buongiorno Federica. Sì esatto, ripete i giri 5 e 6 finché non ha raggiunto il numero di maglie indicato per la sua taglia. Buon lavoro!
24.09.2017 - 11:37
![]() Federica wrote:
Federica wrote:
Buongiorno, non ho ancora iniziato ma sto leggendo le istruzioni. Mi domandavo: al 5° giro dove c'è da spostare una maglia è da fare solo all'inizio oppure ad ogni ripetizione? Non mi è molto chiaro. Grazie e cordiali saluti
23.09.2017 - 21:49DROPS Design answered:
Buongiorno Federica. La maglia va spostata ogni volta che si ripete il quinto giro. Buon lavoro!
24.09.2017 - 08:18
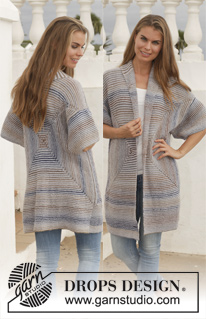
Blue Maze#bluemazejacket |
|
 |
 |
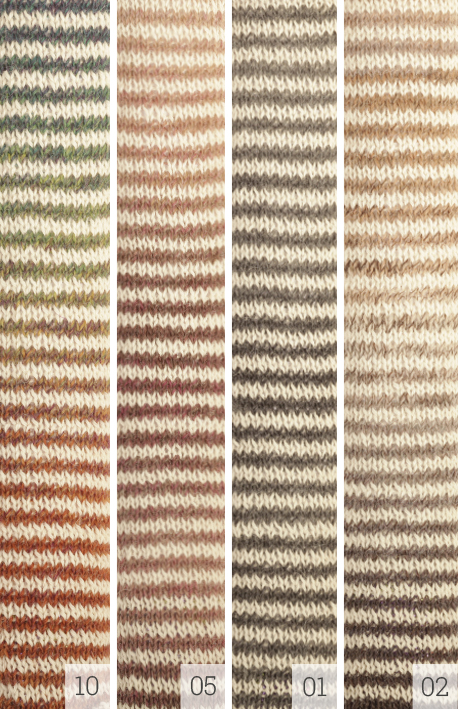
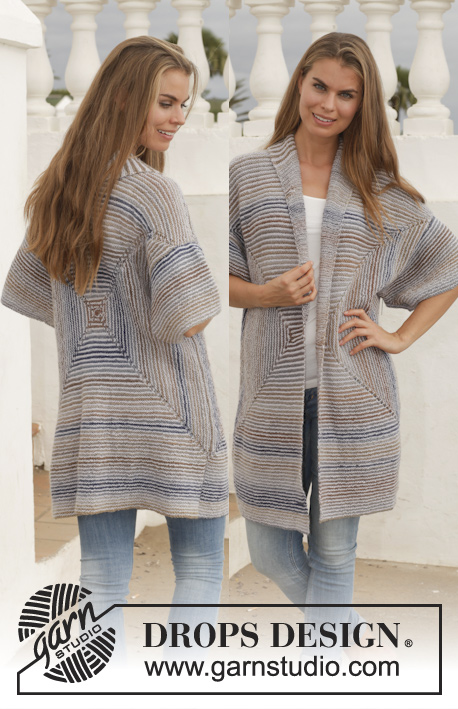
Knitted DROPS jacket in garter st with shawl collar in ”Delight” and "Alpaca". Size: S - XXXL.
DROPS 153-13 |
|
|
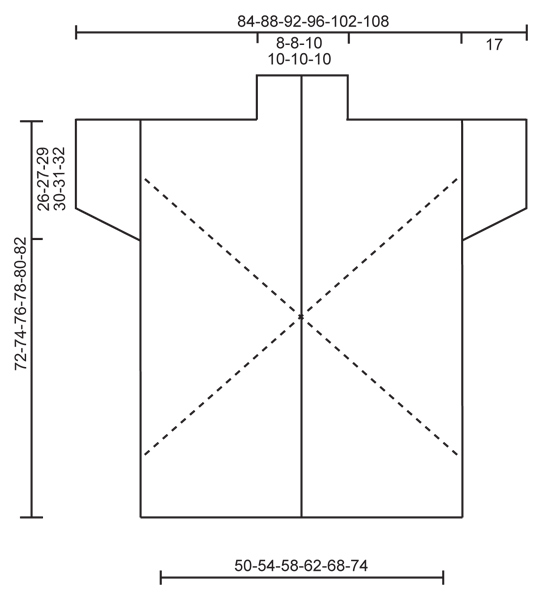
GARTER ST (back and forth on needle): K all rows. 1 ridge = K2 rows. GARTER ST (in the round): * K 1 round and P 1 round *, repeat from *-*. 1 ridge = 2 rounds. STRIPES: *1 ridge Delight, 1 ridge Alpaca *, repeat from *-* the entire piece. MEASURING TIP: Measure piece when held up. ---------------------------------------------------------- JACKET: Back piece is worked from mid back in a square. Then work at the top of yoke and at the bottom of back piece. Front piece is worked the same way but as half of back piece. I.e. half a square but with band and collar in addition. Work sleeves at the end. BACK PIECE: Cast on 8 sts with Delight and divide them on 4 double pointed needles size 3.5 mm / US 4 (= 2 sts on every needle). Work in the round in GARTER ST and STRIPES - see explanation above. ROUND 1: K all sts. ROUND 2: P and insert marker in the first, third, fifth and seventh st (= 4 markers). ROUND 3: K and inc with YOs on each side of every marker the entire round. ROUND 4: P all sts and YOs = 16 sts. ROUND 5: Now displace beg of round with 1 st to get the color change in one corner of piece so that it looks nice. Move first st on round on to right needle without working it, this st is now last st on round. Then K with YOs on each side of every marker the entire round. ROUND 6: P all sts and YOs = 24 sts. Then repeat 5th and 6th round, distribute sts on needle to make it easier to work and switch to circular needle when needed. Continue working like this until there are 456-496-536-568-624-680 sts on needle (= 56-61-66-70-77-84 inc and 114-124-134-142-156-170 sts along each side). On next round with P work as follows: P 114-124-134-142-156-170, bind off the next 114-124-134-142-156-170 sts (= side of jacket), work the next 114-124-134-142-156-170 sts and slip them on 1 stitch holder (= bottom edge on jacket) and bind off the next 114-124-134-142-156-170 sts (= side of jacket). Work in garter st and stripes back and forth over the 114-124-134-142-156-170 sts on needle for yoke. When piece measures 59-62-65-68-72-76 cm / 23¼"-24½"-25½"-26¾"-28½"-30" - READ MEASURING TIP ABOVE, bind off the middle 14-14-16-16-18-18 sts for neck and finish each shoulder separately. Then bind off at beg of every row from neck as follows: bind off 1 st 2 times = 48-53-57-61-67-74 sts remain on shoulder. Continue until piece measures 61-64-67-70-74-78 cm / 24"-25¼"-26"½-27½"-29"-30¾" and bind off. Insert 2 markers in the piece; insert a marker on each of the long sides 26-27-29-30-31-32 cm / 10¼"-10½"-11½"-11¾"-12¼"-12½" down from each shoulder, use markers for assembly. Slip the 114-124-134-142-156-170 sts from stitch holder in bottom edge back on circular needle size 3.5 mm / US 4 and work in garter st and stripes back and forth until piece measures 72-74-76-78-80-82 cm / 28⅜"-29⅛"-30"-30¾"-31½"-32¼" from shoulder, loosely bind off. RIGHT FRONT PIECE: Loosely cast on 12 sts with Delight on double pointed needles size 3.5 mm / US 4. Switch to Alpaca and work 1 ridge, switch to Delight and work 1 ridge. Switch to Alpaca and K 1 row, turn piece clockwise and pick up 4 sts along the side of ridges. Turn piece again and pick up 12 sts on the under side of cast-on edge = 28 sts on needle. K 1 row over all sts. Insert a marker in the 13th and 16th st. Then work in garter st and stripes AT THE SAME TIME inc with 1 YO on each side of 13th and 16th st on every row from RS (=4 sts inc), K YOs to make a small hole. Switch to circular needle when needed. Continue to inc this way until inc has been done 56-61-66-70-77-84 times in total and there are 252-272-292-308-336-364 sts on needle. On next row from WS K the first 69-74-79-83-90-97 and then slip them on 1 stitch holder (= bottom edge of jacket), bind off the next 114-124-134-142-156-170 sts (= side of jacket). Work in garter st and stripes back and forth over the last 69-74-79-83-90-97 sts on needle for yoke, work until piece measures 61-64-67-70-74-78 cm / 24"-25¼"-26"½-27½"-29"-30¾". On next row from WS bind off the first 48-53-57-61-67-74 sts. Insert 1 marker in the piece; insert a marker on the long side 26-27-29-30-31-32 cm / 10¼"-10½"-11½"-11¾"-12¼"-12½" down from shoulder, use marker when sewing in sleeve. 21-21-22-22-23-23 sts remain on needle for collar. Then continue in garter st and stripes back and forth over these sts AT THE SAME TIME work short rows as follows: Beg from WS towards shoulder. * K 1 row over all sts, work 1 ridge (2 rows) over only the outermost 12 sts from mid front, K 1 row over all sts, switch color *, repeat from *-* onwards. There is 1 ridge on the inside and 2 ridges at the edge in the same color consecutively on collar. Work until collar measures approx. 5-5-5.5-5.5-6-6 cm / 2"-2"-2¼"-2¼"-2½"-2½" on the inside on the most narrow part and bind off. Slip the 69-74-79-83-90-97 sts on stitch holder back on needle and work in garter st back and forth until piece measures 72-74-76-78-80-82 cm / 28⅜"-29⅛"-30"-30¾"-31½"-32¼" from shoulder, loosely bind off. LEFT FRONT PIECE: Work as right but reversed until inc has been done 56-61-66-70-77-84 times in total and there are 252-272-292-308-336-364 sts on needle. K the first 69-74-79-83-90-97 sts from RS and then slip them on 1 stitch holder (= bottom edge of jacket), bind off the next 114-124-134-142-156-170 sts (= side of jacket). Work in garter st back and forth over the last 69-74-79-83-90-97 sts on needle for yoke, work until piece measures 61-64-67-70-74-78 cm / 24"-25¼"-26"½-27½"-29"-30¾". On next row from RS bind off the first 48-53-57-61-67-74 sts, work the last 21-21-22-22-23-23 sts. Insert 1 marker in the piece; insert a marker on the long side 26-27-29-30-31-32 cm / 10¼"-10½"-11½"-11¾"-12¼"-12½" down from shoulder, use marker when sewing in sleeve. Then continue in garter st back and forth over these sts AT THE SAME TIME work short rows as follows: Turn piece and beg from WS towards mid front. * Work 1 ridge (2 rows) over the outermost 12 sts from mid front, work 1 ridge (2 rows) over all sts, switch color *, repeat from *-* onwards. There is 1 ridge on the inside and 2 ridges at the edge in the same color consecutively on collar. Work until collar measures approx. 5-5-5.5-5.5-6-6 cm / 2"-2"-2¼"-2¼"-2½"-2½" on the inside on the most narrow part and bind off. Slip the 69-74-79-83-90-97 sts on stitch holder back on needle and work in garter st back and forth until piece measures 72-74-76-78-80-82 cm / 28⅜"-29⅛"-30"-30¾"-31½"-32¼" from shoulder, loosely bind off. SLEEVE: Worked back and forth on circular needle from shoulder. Cast on 122-126-132-136-140-146 sts on circular needle size 3.5 mm / US 4 with Delight and work in garter st and stripes back and forth on needle as before until piece measures approx. 2 cm / ¾". Dec 1 st inside 1 edge st in each side by K 2 sts tog. Repeat approx. every cm / ½" 13 more times (= 14 times in total) = 94-98-104-108-112-118 sts. Work until piece measures 17 cm / 6¾" and loosely bind off. Make another sleeve the same way. ASSEMBLY: Sew in outer loops of edge sts to avoid a chunky seam. Sew the shoulder seams. Sew in sleeves between markers in the sides. Sew underarm and side seams in one. Sew collar tog mid back (seam should be out on RS so that when collar is folded, the edge will be under collar and be invisible). Sew collar to neckline in the back of neck. Fasten off. |
|
 |
|
Have you finished this pattern?Tag your pictures with #dropspattern #bluemazejacket or submit them to the #dropsfan gallery. Do you need help with this pattern?You'll find 24 tutorial videos, a Comments/Questions area and more by visiting the pattern on garnstudio.com. © 1982-2026 DROPS Design A/S. We reserve all rights. This document, including all its sub-sections, has copyrights. Read more about what you can do with our patterns at the bottom of each pattern on our site. |
|






Post a comment to pattern DROPS 153-13
We would love to hear what you have to say about this pattern!
If you want to leave a question, please make sure you select the correct category in the form below, to speed up the answering process. Required fields are marked *.