Comments / Questions (11)
![]() Lucia Battisti wrote:
Lucia Battisti wrote:
Buonasera mi trovo in difficoltà..... non riesco a capire quando nella spiegazione scrivete "Diminuire nel lato destro iniziando quando sono state fatte 2-3-4-4 diminuzioni nel lato sinistro." vi ringrazio in attesa di vostra gentile risposta
21.11.2020 - 18:29DROPS Design answered:
Buonasera Lucia, ad esempio per la taglia 35/37 deve iniziare a diminuire sul lato destro quando sono state lavorate 2 diminuzioni sul lato sinistro come indicato nel paragrafo sotto. Buon lavoro!
21.11.2020 - 21:04Ana wrote:
Hola, no consigo a entender que tengo que medir desde el marcapuntos y como hacer las disminuciones. podría hacer un video tutorial mostrándo eso? Muchas gracias
27.05.2017 - 22:43DROPS Design answered:
Hola Ana. El marcapuntos lo colocamos después de terminar la primera parte de la zapatilla (ver el patrón) en el centro de la planta del pie. A partir de aquí trabajamos en forma simétrica la 2ª parte, es decir, en lugar de aumentos, trabajamos los disminuciones. Si tienes dificultades para hacer el patrón, puedes acudir a la tienda Drops más cercana.
04.06.2017 - 16:11
![]() Tuuli Mäenpää wrote:
Tuuli Mäenpää wrote:
Hei! Yritin tehdä tällä ohjeella kuvan kaltaisia tossuja, mutta sain aikaan suippokärkiset kippuratohvelit. Voisitteko laittaa ohjeeseen kuvan siitä, miltä neuletyön pitäisi näyttää ja myös siitä, miten saan neulotun kappaleen taiteltua tossuksi? Kiitos ja aurinkoista kevättä!
02.05.2017 - 17:17DROPS Design answered:
Hei! Olen lähettänyt kysymyksesi eteenpäin suunnittelijoillemme.
17.05.2017 - 16:31
![]() Sophie wrote:
Sophie wrote:
Bonjour, Lorsque j'ai cousu le dessus du chausson, que dois je faire en arrivant à la lisière au tout devant du pied ? Dois-je continuer la couture le long de la maille lisière (comme pour le talon), ou bien deuxième option : j'applatie le "tube" du chausson que je suis en train de coudre au dessus du milieu du chausson (marqueur), et je couds le devant du pied pour faire une couture horizontale (un peu comme une palme !)
03.01.2017 - 20:07DROPS Design answered:
Bonjour Sophie, continuez la couture dans les mailles lisières (sans aplatir). Bon tricot!
04.01.2017 - 09:28
![]() Kim Dakin wrote:
Kim Dakin wrote:
Hi, please help, as I am casting on at the end of the 1st row, this makes this side of the work the right side of the slipper? as it says right side seen from rs (towards heel). So does this also mean I am knitting towards the heel? Do I then purl the row to keep in pattern but not increase stiches on the row? Therefore knitting all Right side increases first. When I finish these increases do I then purl the row but then how do I start the Left side increases?
01.12.2015 - 21:10DROPS Design answered:
Dear Mrs Dakin, inc are done on both sides at the same time, ie at the end of row from RS you inc towards the left of piece (seen from RS) = towards toe - at the end of row from WS you inc towards the right of piece (seen from RS) = towards heel. Happy knitting!
02.12.2015 - 09:36
![]() Lesley Josey wrote:
Lesley Josey wrote:
I find the pattern quite confusing, and would like to see a picture of the shape of the open piece I should end up with. I cannot get the right amount of stitches, if I follow the pattern for the largest size. I think it is lost in translation somewhere.
10.08.2015 - 15:19DROPS Design answered:
Dear Mrs Josey, cast on edge is on mid upper foot, then cast on on the right side (towards heel = from RS) 3 sts 3 times + 4 sts 3 times + 16 st 1 time (= 37 sts inc on the right side) + cast on on the left side (towards toe = from RS): 3 sts 9 times + 1 st 2 times (= 29 sts inc on the left side): 6 + 37 + 29 = 72 sts. Happy knitting!
10.08.2015 - 19:05
![]() Carolien wrote:
Carolien wrote:
Als ik bij de afwerking steken moet opnemen na het in elkaar naaien, dan moet ik toch die laatste twee pennen rondbreien? Dan heb ik toch een rondbreinaald of 4 pennen nodig? Of begrijp ik het verkeerd?
07.12.2014 - 10:42DROPS Design answered:
Hoi Carolien. Ja, ik ben met je eens. Je kan de rand breien met een kleine rondbreinaald of naalden zonder knoop. Wij zullen zsm zorgen voor een aanpassing van het patroon.
09.12.2014 - 16:53
![]() Alla wrote:
Alla wrote:
Buongiorno. Ho finito di fare a maglia una pantofola ma non riesco capire come devo cucirla giusto. Ho cucito parte sopra prima del boro, ma non so come cucire parte delle dita. Devo cucire questa parte in modo orizzontale o verticale?
30.11.2013 - 13:02DROPS Design answered:
Buonasera Alla, per confezionare la pantofola deve piegarla a metà al centro sotto, cucire la parte superiore, riprendere le m nell'apertura in cima, lavorare 2 f dir e intrecciare. Poi deve cucire al centro dietro. Buon lavoro!!
01.12.2013 - 21:19
![]() Alla wrote:
Alla wrote:
Buongiorno. Ho finito di fare a maglia una pantofola ma non riesco capire come devo cucirla giusto. Ho cucito parte sopra prima del boro, ma non so come cucire parte delle dita. Devo cucire questa parte in modo orizzontale o verticale?
30.11.2013 - 12:58DROPS Design answered:
Buonasera Alla, per confezionare la pantofola deve piegarla a metà al centro sotto, cucire la parte superiore, riprendere le m nell'apertura in cima, lavorare 2 f dir e intrecciare. Poi deve cucire al centro dietro. Buon lavoro!!
01.12.2013 - 21:19
![]() Monika Pitz wrote:
Monika Pitz wrote:
Stricke gerade diese Hausschuhe muss ich 20 cm ab Anschlag oder ab Aufnahmeende und wie nähe ich die Schuhe zusammen ich stehe irgendwie auf dem Schlauch Gruß Monika
07.04.2013 - 16:44
Cottage Trip |
|
|
|
|
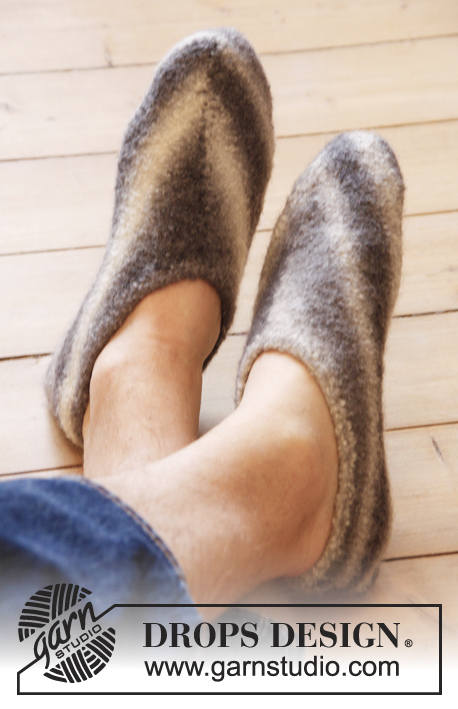
Felted DROPS men's slippers in ”Big Delight”.
DROPS Extra 0-900 |
|
|
SLIPPER: The slipper is worked in one and sewn tog mid front and mid back, beg at the top of instep. Cast on 4-5-4-6 sts on needles size 5 mm / US 8 with Big Delight. Work in stockinette st. Inc in each side by casting on new sts at the end of every row as follows: Right side seen from RS (towards heel): 3 sts 3 times, 4 sts 3 times, 10-12-14-16 sts 1 time. Left side seen from RS (towards toe): 3 sts 7-7-8-9 times, 1 st 2-3-3-2 times. After all inc are done there are 58-62-66-72 sts on needle. Continue in stockinette st. REMEMBER THE GAUGE! When piece measures 18-19-19-20 cm / 7"-7½"-7½"-8", insert a marker in piece = mid under foot. Now work the other side of slipper with dec instead of inc. Beg dec when as many cm / inches have been worked from marker as from last inc in each side and until marker. Note! Dec in right side beg when 2-3-4-4 dec have been done in left side. Dec at beg of every row as follows: Left side seen from RS (towards toe): 1 st 2-3-3-2 times, 3 sts 7-7-8-9 times. Right side seen from RS (towards heel): 10-12-14-16 sts 1 time, 4 sts 3 times, 3 sts 3 times = 4-5-4-6 sts remain. Bind off. ASSEMBLY: Fold the slipper mid under foot and sew seam mid on top of foot (incl cast-on and bind-off edge). Pick up approx. 55 to 60 sts around the opening at the top on needle size 5 mm / US 8 (it is important to pick up enough sts to avoid a tight edge). K 2 rows. Bind off. Sew seam mid back in front loop of outermost sts. Knit another slipper. FELTING: Place the slippers in the washing machine with a detergent without enzymes and optical bleach. Wash warm at 40C/104F with normal spin but no pre-wash. Put on the slippers and shape it to the correct size while it is still wet. At subsequent wash, wash the slippers at regular wool program. AFTER FELTING: If the piece is not felted enough and is too big: Wash the piece one more time in the washing machine while it is still wet add a terry towel that measures approx. 50 x 70 cm = 19¾" x 27½" - NOTE: Do not use a short program. If the piece has been felted too much and is too small: While the piece is still wet stretch it to the correct measurements, if the piece is dry, make sure to soak it first. Remember: All subsequent washes are as a normal wool garment. |
|
Have you finished this pattern?Tag your pictures with #dropspattern or submit them to the #dropsfan gallery. Do you need help with this pattern?You'll find 11 tutorial videos, a Comments/Questions area and more by visiting the pattern on garnstudio.com. © 1982-2026 DROPS Design A/S. We reserve all rights. This document, including all its sub-sections, has copyrights. Read more about what you can do with our patterns at the bottom of each pattern on our site. |


Post a comment to pattern DROPS Extra 0-900
We would love to hear what you have to say about this pattern!
If you want to leave a question, please make sure you select the correct category in the form below, to speed up the answering process. Required fields are marked *.