
Popular categories
Looking for a yarn?


Comments / Questions (194)
![]() Michaela wrote:
Michaela wrote:
Hallo, ich kapier einfach nicht, wie man jetzt die rücken- und seitenteile an die weste häkeln soll! Das ist in der anleitung gar nicht beschrieben! Ich habe das rückenteil jetzt zwischen den markierungen an die weste genäht und ein seitenteil mit der schulternaht am rückenteil festgemacht! Aber das ist viel zu lang! Mit den 64 cm ist das doch wie ein eigenes oberteil! Und das westenteil mit seinen 45cm hängt mir irgendwo an den kniekehlen! Was habe ich falsch gemacht?
01.01.2014 - 14:53DROPS Design answered:
Liebe Michaela, die Arbeit wird ja erst nach den Armlöchern getrennt, da wird nichts mehr aneinander gehäkelt. Nur die oberen Teile sind wegen des Armlochs separat.
01.01.2014 - 16:55Anita wrote:
Je crois que je ne suis pas très claire dans ma demande d'explications, ce que je voulais dire pour le col, c'est est-ce que je dois crocheter sur les 2 groupes de DB constitués par le rang à côté de l'épaule (marqueur) ou si je dois crocheter sur la bordure seulement, soit dans les 4 ml qui constituent le début de chaque rang ? C'est difficile de visualiser comment faire car on ne vois pas le col sur la photo. Encore merci pour votre aide. Anita Une fan de votre site du Canada.
29.09.2013 - 20:33DROPS Design answered:
Bonjour Anita, Quand vous avez crocheté votre rang de ms, en commençant à partir de l'épaule, vous avez laissé 2 groupes de DB côté encolure. Ce sont sur ces 2 groupes de DB que vous allez faire le col, à partir du milieu devant (=côté encolure). Bon crochet!
01.10.2013 - 08:53Anita wrote:
J'ai beaucoup de difficulté à comprendre les explications du col - "Crocheter maintenant des groupes de DB en allers et retours au-dessus du col ainsi" Est-ce à dire que je dois crocheter sur le même rang que l'épaule ou sur la bordure de l'encolure. Si ces la bordure de l'encolure, dois-je crocheter à partir des rangs qui forment l'encolure seulement ? Merci pour votre aide car j'aimerais beaucoup terminer cet ouvrage qui, en passant, magnifique.
29.09.2013 - 20:29DROPS Design answered:
Bonjour Anita, Quand vous commencez le col, la hauteur d'épaules est atteinte sur la gauche de l'ouvrage, vous continuez pour former le col sur lez 2 premiers groupes de DB seulement en répétant le rang indiqué pendant 10-8 cm (cf taille). Cette petite "bande" sera ensuite cousue le long de l'encolure dos (moitié encolure dos pour chaque devant).Bon crochet!
30.09.2013 - 09:08Aas wrote:
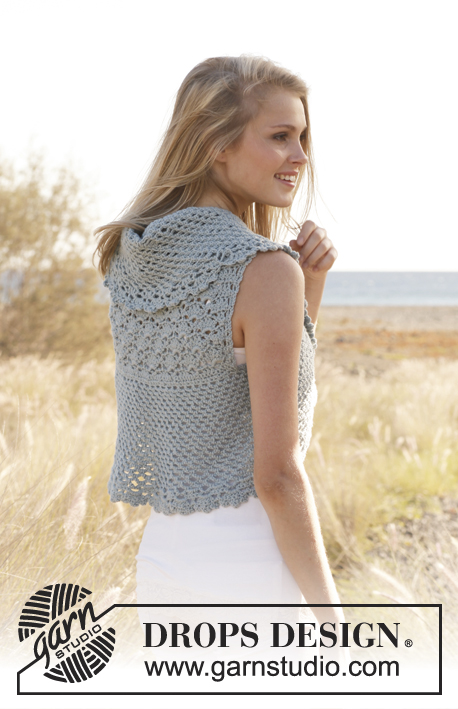
The collar is the most difficult part to understand how to crochet, and it's hidden behind her hair! Please avoid such mistakes in the future. The description should be more detailed on this part of the garment, and with a drawing to explain.
26.08.2013 - 20:05DROPS Design answered:
For collar you work two dtr-groups (UK) back and forth over two dtr-groups on neck edge for approx. 10-8-10-8-8-10 cm from marker on shoulder.
29.08.2013 - 16:26
![]() Karlien wrote:
Karlien wrote:
Is het mogelijk om een foto van de achterkant van het model online te plaatsen? Ik begrijp nog steeds niet hoe de kraag/achterkant er zouden moeten uit zien. Ik zit vast vanaf "Haak nu dstk-groepen heen en weer over kraag als volgt" in de voorpanden. Wordt hiermee bedoeld dat er op de twee binnenste dstk-groepen van het voorpand moet verder gehaakt worden? En achteraf, deze "flap" aan het middelste van het achterpand moet bevestigd worden of aan de "flap" van het andere voorpand? Bedankt!
06.08.2013 - 15:33DROPS Design answered:
Het is niet mogelijk extra foto's te plaatsen. U haakt inderdaad zoals aangeven staat de kraag over de 2 dstk-groepen. U heeft dan 2 kraagdelen, een aan elk voorpand. U naait de kraagdelen in het midden aan elkaar en dan naait u de hele kraag langs de hals op het achterpand.
06.08.2013 - 17:14
![]() Neli wrote:
Neli wrote:
Ja, darauf habe ich geachtet, auch habe ich nach der dritten Reihe dann bei Größe m 136 Maschen. Also das stimmt alles. Hm ich bin echt am verzweifeln :( Aber danke für Ihre schnellen Antworten.
19.07.2013 - 14:41DROPS Design answered:
Liebe Neli, bitte häkeln Sie doch noch ein paar Reihen. Auf dem Foto sieht der untere Teil sehr nach einem kleinen Volant aus, das kann die grosse Länge erklären. Laut Anleitung (nicht Schnittschema) haben Sie bis Reihe 3 123 cm Gesamtbreite in Grösse M, das wird später durch das Muster weniger. (11 M = 10 cm, also 0,91 (Breite einer M) x 136 M = 123 cm)
22.07.2013 - 13:25
![]() Neli wrote:
Neli wrote:
Ja, es ist viel mehr! Ich habe nochmal Größe s versucht aber selbst da ist es nach der zweiten Reihe insgesamt 131 cm breit!
19.07.2013 - 09:47DROPS Design answered:
Liebe Neli, bitte überprüfen Sie noch, ob die Maschenzahl stimmt. Es wird nicht in jede Lm des Anschlags gehäkelt. Haben Sie das beachtet?
19.07.2013 - 12:05
![]() Neli wrote:
Neli wrote:
Ich verstehe es nicht, ich habe Maschenprobe gemacht und die stimmte. Nun habe ich die ersten fünf Reihen gehäkelt und das Teil ist ultrabreit, ist das normal?
18.07.2013 - 21:35DROPS Design answered:
Liebe Neli, haben Sie die angegebene Anzahl Fächer? Und haben Sie Ihr Mass mit den Angaben in der Schnittzeichnung verglichen? Ist es mehr als dort angegeben?
19.07.2013 - 08:24
![]() Britta wrote:
Britta wrote:
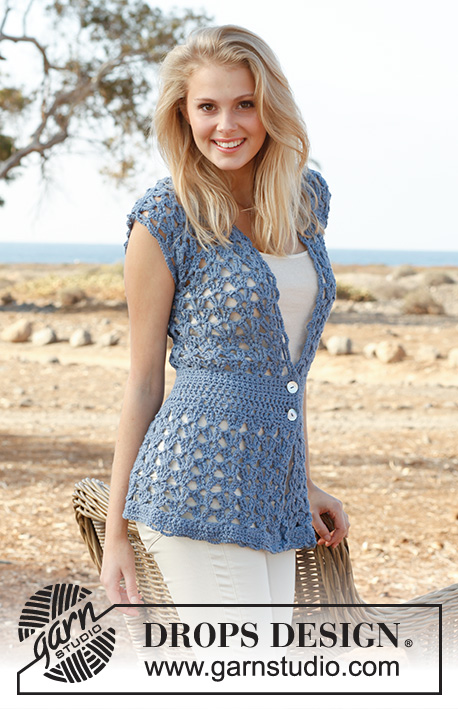
Eine wirklich wunderschönes Teil... Ich habe mich mit dieser Weste zum ersten Mal an ein Kleidungsstück gewagt, und bin wirklich sehr gut mit der Anleitung zurecht gekommen... Nur beim Zusammennähen bin ich teilweise verzweifelt... Ansonsten ist die Weste auch super für Nicht-Häkelprofis geeignet... Ich werde das Teil gleich heut Abend beim Grillabend Probe tragen... :)
18.07.2013 - 07:56
![]() Lynne Underkofler wrote:
Lynne Underkofler wrote:
Confused when working the tr-group work on the outermost 4 tr-groups on the back. States to start with a chain 5 and the 4 tr-groups, but how do I transition to the next row? Also, not clear on the collar instructions. Usually, I can figure it out looking at the vest, but the model's beautiful covers it up!!:) Any help would be greatly appreciated. Thanks.
10.07.2013 - 23:07DROPS Design answered:
Dear Mrs Underkofler, after the 4 tr-group on shoulder, you work 1 tr in last tr in same tr-group then work 1 row sc as stated : ch 1, 1 sc in same st, * 1 sc in each of the first 2 tr, 1 sc in ch-space in the middle of tr-group, 1 sc in each of the next 2 tr *, repeat from *-* 3-4-4-5-5-5 times in total, finish with 1 sc in last ch and 1 sc in 4th ch from beg of previous row = 18-23-23-28-28-28 sc on row. Happy crocheting!
11.07.2013 - 09:23
|
||||||||||||||||
Leona#leonavest |
||||||||||||||||
 |
 |
|||||||||||||||
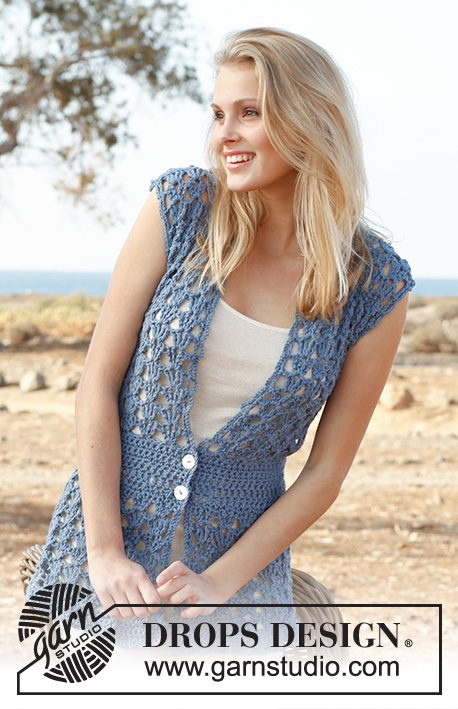
Crochet DROPS vest with fan pattern in ”Paris”. Size S-XXXL.
DROPS 145-4 |
||||||||||||||||
|
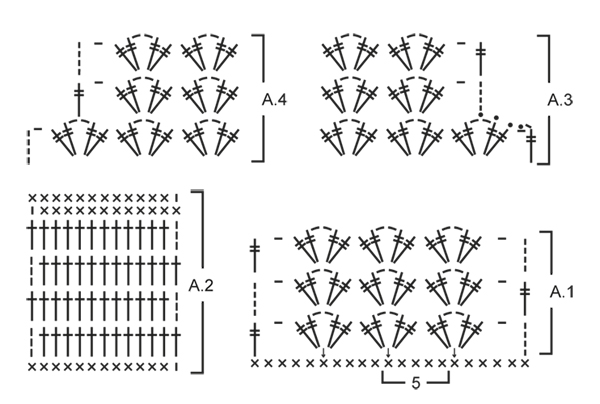
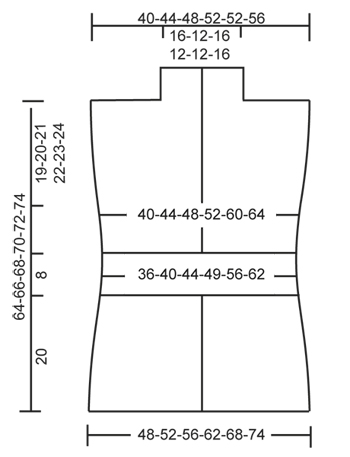
PATTERN: See diagrams A.1 and A.2 (diagrams A.3 and A.4 show dec for armhole in size XXL + XXXL). INCREASE TIP: Inc 1 sc by working 2 sc in same st. DECREASE TIP (dec 1 sc): Work 1 sc but wait with last pull through (= 2 sts on hook), then work next sc but on last pull through, pull yarn through all sts on hook = 1 sc dec. ---------------------------------------------------------- VEST: Read US/UK above! Worked back and forth from mid front. With Paris ch 189-204-219-242-264-287 on hook size 6 mm / J/10, turn. ROW 1: 1 sc in 2nd ch from hook, * skip ch 1, 1 sc in each of the next 2 ch *, repeat from *-* until 4-4-4-3-4-3 ch remain, skip next ch and finish with 1 sc in each of the last 3-3-3-2-3-2 ch = 126-136-146-161-176-191 sc on row, turn piece. ROW 2: ch 1, then work 1 sc in every sc from previous row = 126-136-146-161-176-191 sc, turn piece. ROW 3: Work as 2nd row. ROW 4: Then work pattern according to diagram A.1, i.e. ch 5 (= 1 tr + 1 ch), * skip 4 sc, in next sc work 2 tr + ch 2 + 2 tr *, repeat from *-* until 5 sc remain, skip 4 sc and finish with ch 1 and 1 tr in last sc = 24-26-28-31-34-37 tr-groups, turn piece. ROW 5: ch 5, in ch-space in every tr-group work 2 tr + ch 2 + 2 tr, finish row with 1 ch and 1 tr in 4th ch on beg of previous row = 24-26-28-31-34-37 tr-groups, turn piece. Repeat 5th row until piece measures approx. 16 cm / 6¼". Work next row as follows: ch 4 (= 1 tr), in ch-space in the middle of every tr-group work 2 tr + ch 1 (instead of 2 ch) + 2 tr, finish row with 1 tr in 4th ch from beg of previous row = 24-26-28-31-34-37 tr-groups, turn piece. Ch 1, 1 sc in same st, then work 1 sc in every tr the entire row, finish with 1 sc in 4th ch from beg of previous row, turn piece = 98-106-114-126-138-150 sc. Continue to work as follows: ROW 1: Work pattern according to diagram A.2, i.e. work ch 1, then work 1 sc in every sc the entire row AT THE SAME TIME dec 18-18-18-18-14-14 sc evenly – READ DECREASE TIP = 80-88-96-108-124-136 sc, turn piece. ROW 2: 3 ch (= 1 dc), then work 1 dc in every sc the entire row = 80-88-96-108-124-136 dc on row. ROW 3-5: Work as 2nd row = 80-88-96-108-124-136 dc. ROW 6: Work 1 sc in every dc AT THE SAME TIME adjust no of sts as follows: Size S + M + L + XL + XXL: Inc 5-9-5-5-5 sc evenly – READ INCREASE TIP. Size XXXL: Dec 3 sts evenly – READ DECREASE TIP = 85-97-101-113-129-133 sc, turn piece. ROW 7: ch 1, 1 sc in same st, then work 1 sc in every sc from previous row = 85-97-101-113-129-133 sc, turn piece. ROW 8: ch 5, * skip 3 sc, in next sc work 2 tr + ch 2 + 2 tr *, repeat from *-* until 4 sc remain on row, skip 3 sc and finish with 1 ch and 1 tr in last sc on row = 20-23-24-27-31-32 tr-groups on row, turn piece. ROW 9: Then work pattern according to diagram A.1 again, i.e. ch 5, in ch-space in the middle of every tr-group work 2 tr + ch 2 + 2 tr, finish row with ch 1 and 1 tr in 4th ch on beg of previous row = 20-23-24-27-31-32 tr-group. Repeat 9th row upwards. AT THE SAME TIME when piece measures 45-46-47-48-49-50 cm / 17¾"-18"-18½"-19"-19¼"-19¾", divide for markers as follows: Insert 1 marker after 5-6-6-7-8-8 tr-groups in from each side (= 10-11-12-13-15-16 tr-groups between markers on back piece). Finish each part separately. BACK PIECE: = 10-11-12-13-15-16 tr-groups. Continue back and forth with tr-groups as shown in A.1. AT THE SAME TIME on 1st row dec for armholes in each side in size XXL + XXXL as follows: Dec 1 tr-group on beg of row as shown in A.3, work as before until 1 tr-group remains on row, finish row as shown in A.4 (do not dec in the other sizes) = 10-11-12-13-13-14 tr-groups remain on row. Continue pattern back and forth until 1 row remains before piece measures 64-66-68-70-72-74 cm / 25¼"-26"-26¾"-27½"-28⅜"-29⅛". Now work 1 row with tr-groups only over the outermost 3-4-4-5-5-5 tr-groups in the one side of piece: ch 5, * in ch-space in the middle of next tr-group work 2 tr + ch 2 + 2 tr *, repeat from *-* 3-4-4-5-5-5 times in total, finish with 1 tr in last tr in same tr-group, turn piece. Now work 1 row sc as follows: ch 1, 1 sc in same st, * 1 sc in each of the first 2 tr, 1 sc in ch-space in the middle of tr-group, 1 sc in each of the next 2 tr *, repeat from *-* 3-4-4-5-5-5 times in total, finish with 1 sc in last ch and 1 sc in 4th ch from beg of previous row = 18-23-23-28-28-28 sc on row. Fasten off. Repeat on the other shoulder (i.e. do not work over the middle 4-3-4-3-3-4 tr-groups = neck.) RIGHT FRONT PIECE: = 5-6-6-7-8-8 tr-groups. Continue back and forth with tr-groups as on back piece. AT THE SAME TIME on 1st row dec for armhole in the side in size XXL + XXXL as shown in A.4 (do not dec in the other sizes) = 5-6-6-7-7-7 tr-groups. Continue pattern back and forth until piece measures approx. 64-66-68-70-72-74 cm / 25¼"-26"-26¾"-27½"-28⅜"-29⅛" - make sure that same no of rows with tr-groups has been worked as on back piece. Now work 1 row sc as on back piece only over the outermost 3-4-4-5-5-5 tr-groups on shoulder (i.e. do not work over the 2 tr-groups towards the neck = collar) = 18-23-23-28-28-28 sc. Fasten off. Insert 1 marker on the shoulder. Now work tr-groups back and forth over collar as follows: ch 5, in ch-space in first tr-group work 2 tr + ch 2 + 2 tr, in ch-space in next tr-group work 2 tr + ch 2 + 2 tr, ch 1 and finish with 1 tr in last tr in same tr-group. Continue back and forth like this until collar measures approx. 10-8-10-8-8-10 cm / 4"-3⅛"-4"-3⅛"-3⅛"-4" from marker on shoulder. Then work 1 row sc as follows: ch 1, 1 sc in same st, 1 sc in next ch, 1 sc in each of the first 2 tr, 1 sc in ch-space in the middle of tr-group, 1 sc in each of the next 2 tr *, repeat from *-* 2 times in total, finish with 1 sc in last ch and 1 sc in 4th ch from beg of previous row = 14 sc, cut the yarn. LEFT FRONT PIECE: Work as right front piece but reversed. When dec for armhole in size XXL + XXXL, dec 1 tr-group as shown in A.3. ASSEMBLY: Sew shoulder seams edge to edge to avoid a chunky seam. Sew collar tog mid back (sew edge to edge) and sew it on to neck line at the back of neck. Sew on buttons on right front piece – see picture. Button through the crochet edge explained below. CROCHET EDGE: Work a finishing edge around the entire opening on vest and around both armholes as follows: 1 sc in first st, * ch 5, skip approx. 2½ cm / ⅞", 1 sc in next st/ch-space *, repeat from *-* the entire round and finish with ch 5 and 1 sl st in sc from beg of round. |
||||||||||||||||
Diagram explanations |
||||||||||||||||
|
||||||||||||||||
 |
||||||||||||||||
 |
||||||||||||||||
Have you finished this pattern?Tag your pictures with #dropspattern #leonavest or submit them to the #dropsfan gallery. Do you need help with this pattern?You'll find 8 tutorial videos, a Comments/Questions area and more by visiting the pattern on garnstudio.com. © 1982-2026 DROPS Design A/S. We reserve all rights. This document, including all its sub-sections, has copyrights. Read more about what you can do with our patterns at the bottom of each pattern on our site. |
||||||||||||||||


With over 40 years in knitting and crochet design, DROPS Design offers one of the most extensive collections of free patterns on the internet - translated to 17 languages. As of today we count 324 catalogs and 12291 patterns - 12281 of which are translated into English (US/in).
We work hard to bring you the best knitting and crochet have to offer, inspiration and advice as well as great quality yarns at incredible prices! Would you like to use our patterns for other than personal use? You can read what you are allowed to do in the Copyright text at the bottom of all our patterns. Happy crafting!
Post a comment to pattern DROPS 145-4
We would love to hear what you have to say about this pattern!
If you want to leave a question, please make sure you select the correct category in the form below, to speed up the answering process. Required fields are marked *.