
Popular categories
Looking for a yarn?


|
||||||||||||||||
Leona |
||||||||||||||||
 |
 |
|||||||||||||||
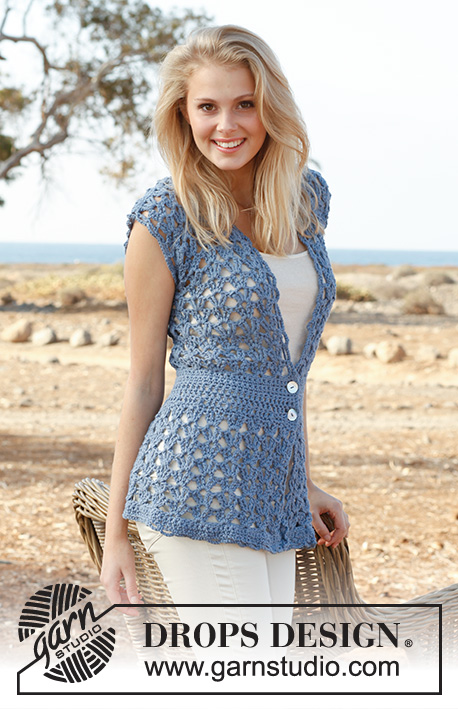
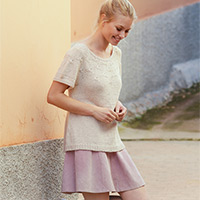
Crochet DROPS vest with fan pattern in ”Paris”. Size S-XXXL.
DROPS 145-4 |
||||||||||||||||
|
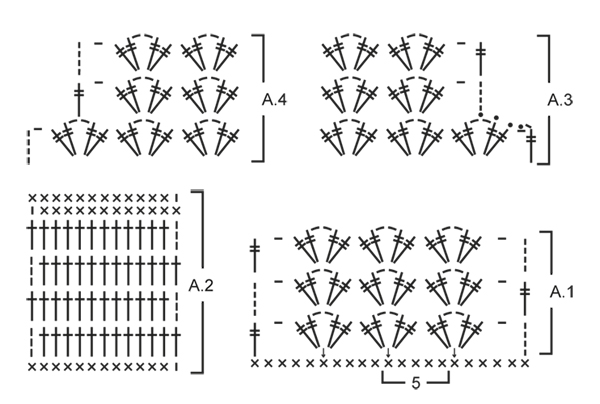
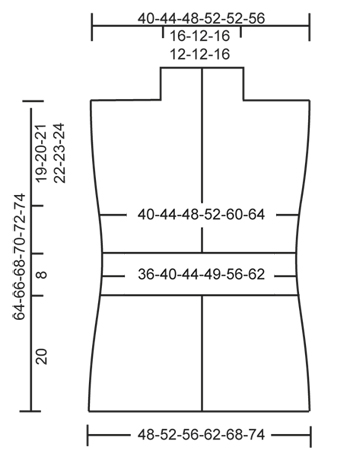
PATTERN: See diagrams A.1 and A.2 (diagrams A.3 and A.4 show dec for armhole in size XXL + XXXL). INCREASE TIP: Inc 1 dc by working 2 dc in same st. DECREASE TIP (dec 1 dc): Work 1 dc but wait with last pull through (= 2 sts on hook), then work next dc but on last pull through, pull thread through all sts on hook = 1 dc dec. ---------------------------------------------------------- VEST: Worked back and forth from mid front. Work 189-204-219-242-264-287 ch on hook size 6 mm with Paris, turn. ROW 1: 1 dc in 2nd ch from hook, * skip 1 ch, 1 dc in each of the next 2 ch *, repeat from *-* until 4-4-4-3-4-3 ch remain, skip next ch and finish with 1 dc in each of the last 3-3-3-2-3-2 ch = 126-136-146-161-176-191 dc on row, turn piece. ROW 2: 1 ch, then work 1 dc in every dc from previous row = 126-136-146-161-176-191 dc, turn piece. ROW 3: Work as 2nd row. ROW 4: Then work pattern according to diagram A.1, i.e. work 5 ch (= 1 dtr + 1 ch), * skip 4 dc, in next dc work 2 dtr + 2 ch + 2 dtr *, repeat from *-* until 5 dc remain, skip 4 dc and finish with 1 ch and 1 dtr in last dc = 24-26-28-31-34-37 dtr-groups, turn piece. ROW 5: 5 ch, in ch-loop in every dtr-group work 2 dtr + 2 ch + 2 dtr, finish row with 1 ch and 1 dtr in 4th ch on beg of previous row = 24-26-28-31-34-37 dtr-groups, turn piece. Repeat 5th row until piece measures approx. 16 cm. Work next row as follows: 4 ch (= 1 dtr), in ch-loop in the middle of every dtr-group work 2 dtr + 1 ch (instead of 2 ch) + 2 dtr, finish row with 1 dtr in 4th ch from beg of previous row = 24-26-28-31-34-37 dtr-groups, turn piece. Work 1 ch, 1 dc in same st, then work 1 dc in every dtr the entire row, finish with 1 dc in 4th ch from beg of previous row, turn piece = 98-106-114-126-138-150 dc. Continue to work as follows: ROW 1: Work pattern according to diagram A.2, i.e. work 1 ch, then work 1 dc in every dc the entire row AT THE SAME TIME dec 18-18-18-18-14-14 dc evenly – READ DECREASE TIP = 80-88-96-108-124-136 dc, turn piece. ROW 2: 3 ch (= 1 tr), then work 1 tr in every dc the entire row = 80-88-96-108-124-136 tr on row. ROW 3-5: Work as 2nd row = 80-88-96-108-124-136 tr. ROW 6: Work 1 dc in every tr AT THE SAME TIME adjust no of sts as follows: Size S + M + L + XL + XXL: Inc 5-9-5-5-5 dc evenly – READ INCREASE TIP. Size XXXL: Dec 3 sts evenly – READ DECREASE TIP = 85-97-101-113-129-133 dc, turn piece. ROW 7: 1 ch, 1 dc in same st, then work 1 dc in every dc from previous row = 85-97-101-113-129-133 dc, turn piece. ROW 8: 5 ch, * skip 3 dc, in next dc work 2 dtr + 2 ch + 2 dtr *, repeat from *-* until 4 dc remain on row, skip 3 dc and finish with 1 ch and 1 dtr in last dc on row = 20-23-24-27-31-32 dtr-groups on row, turn piece. ROW 9: Then work pattern according to diagram A.1 again, i.e. work 5 ch, in ch-loop in the middle of every dtr-group work 2 dtr + 2 ch + 2 dtr, finish row with 1 ch and 1 dtr in 4th ch on beg of previous row = 20-23-24-27-31-32 dtr-group. Repeat 9th row upwards. AT THE SAME TIME when piece measures 45-46-47-48-49-50 cm, divide for markers as follows: Insert 1 marker after 5-6-6-7-8-8 dtr-groups in from each side (= 10-11-12-13-15-16 dtr-groups between markers on back piece). Finish each part separately. BACK PIECE: = 10-11-12-13-15-16 dtr-groups. Continue back and forth with dtr-groups as shown in A.1. AT THE SAME TIME on 1st row dec for armholes in each side in size XXL + XXXL as follows: Dec 1 dtr-group on beg of row as shown in A.3, work as before until 1 dtr-group remains on row, finish row as shown in A.4 (do not dec in the other sizes) = 10-11-12-13-13-14 dtr-groups remain on row. Continue pattern back and forth until 1 row remains before piece measures 64-66-68-70-72-74 cm. Now work 1 row with dtr-groups only over the outermost 3-4-4-5-5-5 dtr-groups in the one side of piece: 5 ch, * in ch-loop in the middle of next dtr-group work 2 dtr + 2 ch + 2 dtr *, repeat from *-* 3-4-4-5-5-5 times in total, finish with 1 dtr in last dtr in same dtr-group, turn piece. Now work 1 row dc as follows: 1 ch, 1 dc in same st, * 1 dc in each of the first 2 dtr, 1 dc in ch-loop in the middle of dtr-group, 1 dc in each of the next 2 dtr *, repeat from *-* 3-4-4-5-5-5 times in total, finish with 1 dc in last ch and 1 dc in 4th ch from beg of previous row = 18-23-23-28-28-28 dc on row. Cut and fasten the thread. Repeat on the other shoulder (i.e. do not work over the middle 4-3-4-3-3-4 dtr-groups = neck.) RIGHT FRONT PIECE: = 5-6-6-7-8-8 dtr-groups. Continue back and forth with dtr-groups as on back piece. AT THE SAME TIME on 1st row dec for armhole in the side in size XXL + XXXL as shown in A.4 (do not dec in the other sizes) = 5-6-6-7-7-7 dtr-groups. Continue pattern back and forth until piece measures approx. 64-66-68-70-72-74 cm – adjust so that same no of rows with dtr-groups has been worked as on back piece. Now work 1 row dc as on back piece only over the outermost 3-4-4-5-5-5 dtr-groups on shoulder (i.e. do not work over the 2 dtr-groups towards the neck = collar) = 18-23-23-28-28-28 dc. Cut and fasten the thread. Insert 1 marker on the shoulder. Now work dtr-groups back and forth over collar as follows: 5 ch, in ch-loop in first dtr-group work 2 dtr + 2 ch + 2 dtr, in ch-loop in next dtr-group work 2 dtr + 2 ch + 2 dtr, work 1 ch and finish with 1 dtr in last dtr in same dtr-group. Continue back and forth like this until collar measures approx. 10-8-10-8-8-10 cm from marker on shoulder. Then work 1 row dc as follows: 1 ch, 1 dc in same st, 1 dc in next ch, 1 dc in each of the first 2 dtr, 1 dc in ch-loop in the middle of dtr-group, 1 dc in each of the next 2 dtr *, repeat from *-* 2 times in total, finish with 1 dc in last ch and 1 dc in 4th ch from beg of previous row = 14 dc, cut the thread. LEFT FRONT PIECE: Work as right front piece but reversed. When dec for armhole in size XXL + XXXL, dec 1 dtr-group as shown in A.3. ASSEMBLY: Sew shoulder seams edge to edge to avoid a chunky seam. Sew collar tog mid back (sew edge to edge) and sew it on to neck line at the back of neck. Sew on buttons on right front piece – see picture. Button through the crochet edge explained below. CROCHET EDGE: Work a finishing edge around the entire opening on vest and around both armholes as follows: 1 dc in first st, * 5 ch, skip approx. 2½ cm, 1 dc in next st/loop *, repeat from *-* the entire round and finish with 5 ch and 1 sl st in dc from beg of round. |
||||||||||||||||
Diagram explanations |
||||||||||||||||
|
||||||||||||||||
|
||||||||||||||||
|
||||||||||||||||
|
Have you made this or any other of our designs? Tag your pictures in social media with #dropsdesign so we can see them! Do you need help with this pattern?You'll find tutorial videos, a Comments/Questions area and more by visiting the pattern on garnstudio.com. © 1982-2024 DROPS Design A/S. We reserve all rights. This document, including all its sub-sections, has copyrights. Read more about what you can do with our patterns at the bottom of each pattern on our site. |
||||||||||||||||


With over 40 years in knitting and crochet design, DROPS Design offers one of the most extensive collections of free patterns on the internet - translated to 17 languages. As of today we count 304 catalogues and 11422 patterns - 11422 of which are translated into English (UK/cm).
We work hard to bring you the best knitting and crochet have to offer, inspiration and advice as well as great quality yarns at incredible prices! Would you like to use our patterns for other than personal use? You can read what you are allowed to do in the Copyright text at the bottom of all our patterns. Happy crafting!
Comments / Questions (189)
Die Anleitung ist generell nicht sehr einfach, aber die Beschreibung zum Kragen ist absolut unverständlich, weil es nicht mal kein Bild dazu gibt.
26.08.2023 - 17:50DROPS Design answered:
Liebe Sonja, für den Kragen häkeln Sie nur die ersten Doppelstäbchen-Gruppen bis dieses Teil 8 oder 10 cm misst, dieses Bändchen häkeln Sie genauso bei beiden Vorderteilen, dann sind sie beide zusammen angenäht (letzte Reihe zusammen), und dann am Halsausschnitt bei dem Rückenteil nähen. In diesem Video zeigen wir, wie so ein Schalkragen gestrickt wird, vielleicht kann es Ihnen helfen. Viel Spaß beim häkeln!
28.08.2023 - 14:00Weiß nicht wieviel Luftmaschen ich für das rechte Westentasche anschauen soll. Danke
18.04.2023 - 18:49DROPS Design answered:
Liebe Frau Berndt, die Weste wird von unten nach oben in einem Stück bis Armlöcher gehäkelt, je nach der Größe häkeln Sie 189 bis 287 Luftmaschen (= 126 bis 191 fM nach der 1. Reihe) dann häkeln Sie die Diagramme wie erklärt bis die Arbeit für die Armlöcher geteilt wird, und jedes Teil wird dann bis zur Schulter separat fertig gehäkelt. Viel Spaß beim häkeln!
19.04.2023 - 07:48Komme mit der Anleitung der Weste für linkes und rechtes Vorderteil nicht klar. Weil keine Maschenanzahl zur Aufnahme da bei steht. Soll ich die Hälfte vom Rückenteil aufnehmen ? Oder Danke Mfg. Angelika
18.04.2023 - 16:32DROPS Design answered:
Liebe Frau Berndt, Rückenteil wird über die mittleren 10-11-12-13-15-16 D-Stb-Gruppen gehäkelt, und jedes Vorderteil über die beidseitigen 5-6-6-7-8-8 D-Stb-Gruppen. In die 2 grösseren Größe wird man für Armausschnitt abnehmen, aber nicht in die anderen Größen; dh häkeln Sie wie erklärt unter RÜCKENTEIL, dann RECHTES VORDERTEIL:; und LINKES VORDERTEIL: . Sollte ich Ihre Frage misverstehen, können Sie vielleicht dann mehr sagen, was Sie hier meinen? Danke im voraus für Ihr Verständnis. Viel Spaß beim häkeln!
18.04.2023 - 16:49Hej, Jag har gjort bakstycket men förstår inte var, och hur, jag ska börja med höger framstycke. Ska jag virka det direkt på bakstycket? I så fall, var och hur börjar jag? Eller ska det virkas helt fristående och sys på bakstycket i efterhand?
29.01.2022 - 19:10DROPS Design answered:
Hej Karin, de første 45-46-47-48-49-50 cm er hæklet som forstykker og bagstykke i et, når du nu deler til ærmegab hækler du først sidste del af bagstykket og så forstykkerne for sig. God fornøjelse!
03.02.2022 - 14:25Hej, jag undrar om framstycket på västen leona. Det står , =5 6 6 7 8 dst -grupper. Var börjar jag med framstycket? Ska de göras separat eller? Jag avslutade ju alla styckerna med 5 dst. Önskar snabbt svar. Mvh Rådvill.
31.05.2021 - 13:58DROPS Design answered:
Hej Seija, du avslutade när arb mäter 45-46-47-48-49-50 cm, som du delade det för ärmhål så här: sätt 1 markör efter 5-6-6-7-8-8 dst-grupper in från varje sida (= 10-11-12-13-15-16 dst-grupper mellan markörerna på bakst). Varje del virkas sedan för sig. Det är de 5-6-6-7-8-8 dst-grupper du börjar med under HÖGER FRAMST. :)
02.06.2021 - 11:54Buenos dias. Me encanta el chaleco. me puede hacer el favor de decirme con cuantas cadenetas se empieza.? este se comienza por abajo o por el hombro
11.05.2021 - 19:01DROPS Design answered:
Hola Lilia, se empieza con 189-204-219-242-264-287 cadenetas (el numero depende de tu talla). El chaleco se comienza por abajo. Buen trabajo!
13.05.2021 - 17:02Can you plz give me some pictures of the neckline. I cant understand how the collar and the back neckline should be. In the given picture the neckline is coverd by the girl's hair. I am having a hard time imagining it.
12.01.2021 - 16:03DROPS Design answered:
Dear Humera, we do not have more fotos sorry. Just work the collar over the first stitches towards mid front as explained. These stitches should be worked until this small piece measures 8 or 10 cm depending on the size, then work the last row with double crochets (UK-English crochet terms). Work same band at the end of 2nd front piece; Sew the last row on both bands together (mid back) and then sew these band along neck on back piece. Happy crocheting!
12.01.2021 - 16:58Hey Thank you so much for your quick help. One more doubt- so the right collar and left collar will be stitched together and then the whole collar will be stitched to neckline? Thank you. Have a nice day.
15.09.2020 - 17:16DROPS Design answered:
Dear Aishwarya, correct, this video shows a knitted collar that is worked the same way as here, ie a small extention of both front pieces sewn together then along neckline on back piece. Happy crocheting!
16.09.2020 - 08:25Hey Thank you for such a beautiful pattern. Back shoulder pattern length will be- 1row less to 68cm and 4tr groups above. And front pattern length will be 68cm except collar. So the length of both won't be same? Then how to join this two pieces? Please help me with this. Thank you.
15.09.2020 - 16:52DROPS Design answered:
Dear Mrs Gunjan, you have to adjust to the same row as on back piece, so that shoulders are the same. Happy crocheting!
15.09.2020 - 17:11Hi Can you advise for left piece will it be innermost 4tr and outermost 2tr for collar? Also can you advise how to stitch all parts together in detail. Thank you for your help.
15.09.2020 - 15:38DROPS Design answered:
Dear Aishwarya , on left front piece you will crochet the 4 tr-groups towards shoulder for the shoulder (= on the left side of piece, seen from RS) and over the 2-tr-groups towards mid front (on the left side of piece, seen from RS) - all same way as on right front piece, just reversed = mirrored. Happy crocheting!
15.09.2020 - 15:49