
Popular categories
Looking for a yarn?


Comments / Questions (194)
![]() Elouise wrote:
Elouise wrote:
I'm trying to follow the pattern but I'm confused about the treble, do I put yarn round hook twice or once?
26.07.2020 - 03:11DROPS Design answered:
Dear Elouise, if you are following UK-English pattern, a treble is worked with 1 yarn over (see video) but if you are following the pattern in US-English, a treble should be worked with 2 yarn overs (see video). Make sure to select the appropriate language! Happy crocheting!
29.07.2020 - 10:49
![]() Tatjana wrote:
Tatjana wrote:
Hallo und einem schönen guten Abend. Ich hab da mal eine frage, wieviel Wolle Drops Paris brauche ich bei XL?? Liebe Grüße Tatjana 🙃
31.05.2019 - 21:34DROPS Design answered:
Liebe Tatjana, im Kopfteil finden Sie die Garnmenge für jede Größe - mehr über die Garnmenge hier lesen. Viel Spaß beim häkeln!
03.06.2019 - 08:24
![]() Barbara Sell wrote:
Barbara Sell wrote:
I don't understand what you mean by until 4-4-4-3-4-3 then 1 sc until 3-3-3-2-3-2 ch remain.
25.10.2018 - 19:26DROPS Design answered:
Hi Barbara, The numbers correspond to the sizes S - M - L - XL - XXL - XXXL, so if (for example) you are working Size S you use the first number in all the series. Happy crocheting!
26.10.2018 - 08:15
![]() Debbie wrote:
Debbie wrote:
I love this pattern. But I don't understand it.. after row 5 Im lost. Can you help me understand it.
09.05.2018 - 02:38DROPS Design answered:
Dear Debbie, after you have worked row 5, repeat this row until piece measures approx. 16 cm / 6 1/4'' then work next row as explained and continue following A.2 as described. For any individual assistance reading diagrams and/or pattern please contact the store where you bought your yarn (even per mail, telephone or via social medias). Happy crocheting!
09.05.2018 - 08:53
![]() Patricia Liefeld wrote:
Patricia Liefeld wrote:
The measurements for a small states 31 1/2 for the bust but the diagram shows 36 at the waist. Am i reading that correctly? If I want a smaller waist, can I start with 174 chain and adjust accordingly?
21.04.2018 - 04:49DROPS Design answered:
Dear Mrs Liefeld, in the smallest size piece measures 40 cm (see chart) ie 80 cm around = 31½", at the waist, it will measure 36 cm as in chart, ie 72 cm around = 28.35" - read more about measurements and convert into inches here. Happy crocheting!
23.04.2018 - 08:30Chantelle wrote:
Hi there I am up to contraction of the vest but don't understand how to do the collar. Is there a photo of the back of the vest or a diagram that I can follow ?
13.09.2017 - 06:20DROPS Design answered:
Dear Chantelle, you are working here an simple shawl collar, working on the first sts on front piece only until they are long enough to reach the middle of neck on back piece; this video shows the technique on a knitted piece, just work as explained in pattern to get the same. Happy crocheting!
13.09.2017 - 09:03
![]() Emese Benedek-Kováts wrote:
Emese Benedek-Kováts wrote:
Sziasztok! A horgoláspróba nekem 7es tűvel lett, jó, de "élesben" elég volt a javasolt 6os tű, a méret úgy volt jó.
24.08.2017 - 11:43DROPS Design answered:
Kedves Emese! Köszönjük a megjegyzést. Mindenki kicsit másképp köt / horgol, ezért a kötés/horgolás-próba is eltérhet. Pontosan ez az oka, hogy mindig azt javasoljuk, először készítsen próbadarabot, és annak megfelelően változtassa a használt tű méretét. Örömteli kézimunkázást!
30.08.2017 - 08:10
![]() Ellen wrote:
Ellen wrote:
Ik gebruik paris recycled denim en heb 600 gram. Met naald 6 ben ik maat L aan het haken en heb minder steken opgezet omdat het anders veel te groot werd. Maar nu heb ik 2 rijen dubbele stokjes af en het eerste bolletje is al op. Klopt het aantal bolletjes en grammen wel?
15.07.2017 - 23:52DROPS Design answered:
Hallo Ellen, Het aangegeven garen in het patroon klopt. Heb je de stekenverhouding gecontroleerd? En nagemeten hoe je uitkomt met de maten, nu je de eerste rijen dubbele stokjes hebt gemaakt? Als dit allemaal klopt kun je gewoon verder haken. Het lijkt nu alsof het garen snel op gaat, maar straks bij het open patroon heb je minder garen nodig.
16.07.2017 - 13:18Sarah Davies wrote:
When starting the back do I cut the wool then start with five chains before continuing with the pattern as in a1? Thanks
25.02.2017 - 15:12DROPS Design answered:
Dear Mrs Davis, that's right. Happy crocheting!
27.02.2017 - 09:49
![]() Maxima wrote:
Maxima wrote:
Liebes Drops-Team, ich liebe eure Anleitungen und Garne und bedanke mich herzlich für die kostenlos zu Verfügung gestellten Anleitungen der Designer! Leider musste ich auf crazypatterns. net (Häkelanleitung für eine taillierte Weste, Cardigan in Gr. 36-46) feststellen, dass man dort offensichtlich ihre kostenlose Anleitung verkauft, was ich nicht in Ordnung finde! Grüße aus Deutschland
28.12.2016 - 18:27
|
||||||||||||||||
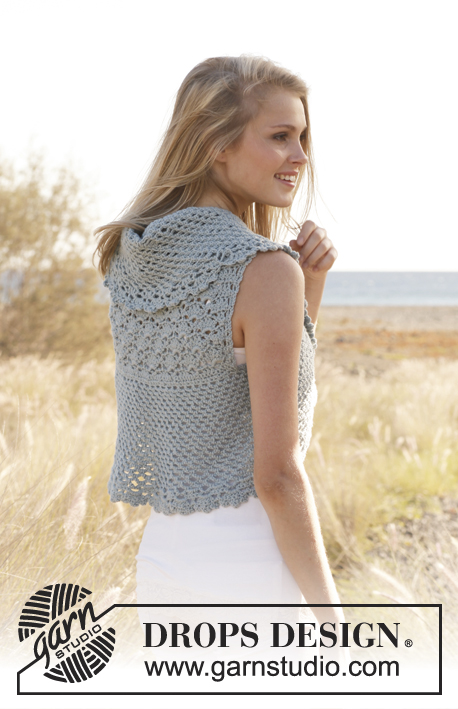
Leona#leonavest |
||||||||||||||||
 |
 |
|||||||||||||||
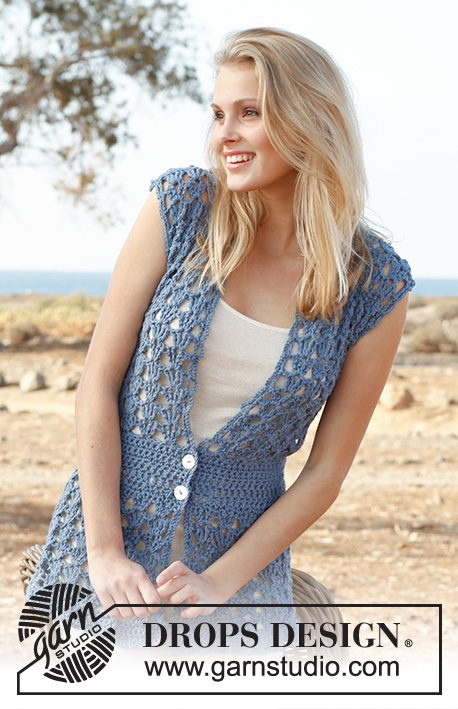
Crochet DROPS vest with fan pattern in ”Paris”. Size S-XXXL.
DROPS 145-4 |
||||||||||||||||
|
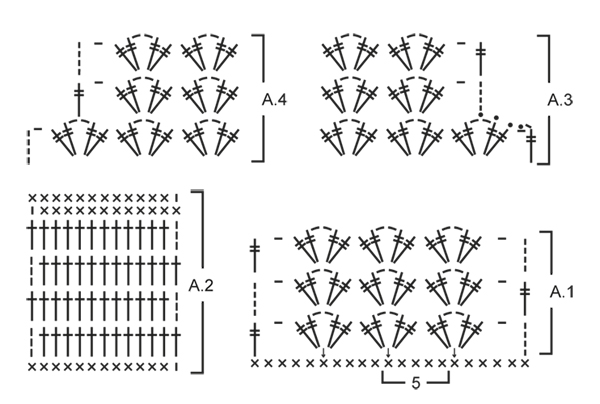
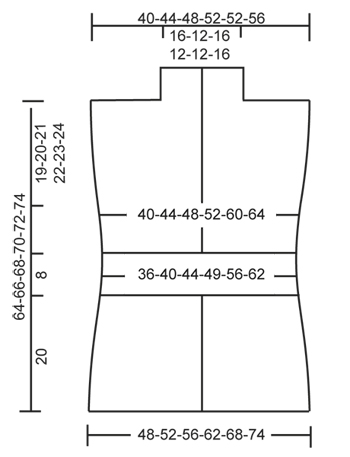
PATTERN: See diagrams A.1 and A.2 (diagrams A.3 and A.4 show dec for armhole in size XXL + XXXL). INCREASE TIP: Inc 1 sc by working 2 sc in same st. DECREASE TIP (dec 1 sc): Work 1 sc but wait with last pull through (= 2 sts on hook), then work next sc but on last pull through, pull yarn through all sts on hook = 1 sc dec. ---------------------------------------------------------- VEST: Read US/UK above! Worked back and forth from mid front. With Paris ch 189-204-219-242-264-287 on hook size 6 mm / J/10, turn. ROW 1: 1 sc in 2nd ch from hook, * skip ch 1, 1 sc in each of the next 2 ch *, repeat from *-* until 4-4-4-3-4-3 ch remain, skip next ch and finish with 1 sc in each of the last 3-3-3-2-3-2 ch = 126-136-146-161-176-191 sc on row, turn piece. ROW 2: ch 1, then work 1 sc in every sc from previous row = 126-136-146-161-176-191 sc, turn piece. ROW 3: Work as 2nd row. ROW 4: Then work pattern according to diagram A.1, i.e. ch 5 (= 1 tr + 1 ch), * skip 4 sc, in next sc work 2 tr + ch 2 + 2 tr *, repeat from *-* until 5 sc remain, skip 4 sc and finish with ch 1 and 1 tr in last sc = 24-26-28-31-34-37 tr-groups, turn piece. ROW 5: ch 5, in ch-space in every tr-group work 2 tr + ch 2 + 2 tr, finish row with 1 ch and 1 tr in 4th ch on beg of previous row = 24-26-28-31-34-37 tr-groups, turn piece. Repeat 5th row until piece measures approx. 16 cm / 6¼". Work next row as follows: ch 4 (= 1 tr), in ch-space in the middle of every tr-group work 2 tr + ch 1 (instead of 2 ch) + 2 tr, finish row with 1 tr in 4th ch from beg of previous row = 24-26-28-31-34-37 tr-groups, turn piece. Ch 1, 1 sc in same st, then work 1 sc in every tr the entire row, finish with 1 sc in 4th ch from beg of previous row, turn piece = 98-106-114-126-138-150 sc. Continue to work as follows: ROW 1: Work pattern according to diagram A.2, i.e. work ch 1, then work 1 sc in every sc the entire row AT THE SAME TIME dec 18-18-18-18-14-14 sc evenly – READ DECREASE TIP = 80-88-96-108-124-136 sc, turn piece. ROW 2: 3 ch (= 1 dc), then work 1 dc in every sc the entire row = 80-88-96-108-124-136 dc on row. ROW 3-5: Work as 2nd row = 80-88-96-108-124-136 dc. ROW 6: Work 1 sc in every dc AT THE SAME TIME adjust no of sts as follows: Size S + M + L + XL + XXL: Inc 5-9-5-5-5 sc evenly – READ INCREASE TIP. Size XXXL: Dec 3 sts evenly – READ DECREASE TIP = 85-97-101-113-129-133 sc, turn piece. ROW 7: ch 1, 1 sc in same st, then work 1 sc in every sc from previous row = 85-97-101-113-129-133 sc, turn piece. ROW 8: ch 5, * skip 3 sc, in next sc work 2 tr + ch 2 + 2 tr *, repeat from *-* until 4 sc remain on row, skip 3 sc and finish with 1 ch and 1 tr in last sc on row = 20-23-24-27-31-32 tr-groups on row, turn piece. ROW 9: Then work pattern according to diagram A.1 again, i.e. ch 5, in ch-space in the middle of every tr-group work 2 tr + ch 2 + 2 tr, finish row with ch 1 and 1 tr in 4th ch on beg of previous row = 20-23-24-27-31-32 tr-group. Repeat 9th row upwards. AT THE SAME TIME when piece measures 45-46-47-48-49-50 cm / 17¾"-18"-18½"-19"-19¼"-19¾", divide for markers as follows: Insert 1 marker after 5-6-6-7-8-8 tr-groups in from each side (= 10-11-12-13-15-16 tr-groups between markers on back piece). Finish each part separately. BACK PIECE: = 10-11-12-13-15-16 tr-groups. Continue back and forth with tr-groups as shown in A.1. AT THE SAME TIME on 1st row dec for armholes in each side in size XXL + XXXL as follows: Dec 1 tr-group on beg of row as shown in A.3, work as before until 1 tr-group remains on row, finish row as shown in A.4 (do not dec in the other sizes) = 10-11-12-13-13-14 tr-groups remain on row. Continue pattern back and forth until 1 row remains before piece measures 64-66-68-70-72-74 cm / 25¼"-26"-26¾"-27½"-28⅜"-29⅛". Now work 1 row with tr-groups only over the outermost 3-4-4-5-5-5 tr-groups in the one side of piece: ch 5, * in ch-space in the middle of next tr-group work 2 tr + ch 2 + 2 tr *, repeat from *-* 3-4-4-5-5-5 times in total, finish with 1 tr in last tr in same tr-group, turn piece. Now work 1 row sc as follows: ch 1, 1 sc in same st, * 1 sc in each of the first 2 tr, 1 sc in ch-space in the middle of tr-group, 1 sc in each of the next 2 tr *, repeat from *-* 3-4-4-5-5-5 times in total, finish with 1 sc in last ch and 1 sc in 4th ch from beg of previous row = 18-23-23-28-28-28 sc on row. Fasten off. Repeat on the other shoulder (i.e. do not work over the middle 4-3-4-3-3-4 tr-groups = neck.) RIGHT FRONT PIECE: = 5-6-6-7-8-8 tr-groups. Continue back and forth with tr-groups as on back piece. AT THE SAME TIME on 1st row dec for armhole in the side in size XXL + XXXL as shown in A.4 (do not dec in the other sizes) = 5-6-6-7-7-7 tr-groups. Continue pattern back and forth until piece measures approx. 64-66-68-70-72-74 cm / 25¼"-26"-26¾"-27½"-28⅜"-29⅛" - make sure that same no of rows with tr-groups has been worked as on back piece. Now work 1 row sc as on back piece only over the outermost 3-4-4-5-5-5 tr-groups on shoulder (i.e. do not work over the 2 tr-groups towards the neck = collar) = 18-23-23-28-28-28 sc. Fasten off. Insert 1 marker on the shoulder. Now work tr-groups back and forth over collar as follows: ch 5, in ch-space in first tr-group work 2 tr + ch 2 + 2 tr, in ch-space in next tr-group work 2 tr + ch 2 + 2 tr, ch 1 and finish with 1 tr in last tr in same tr-group. Continue back and forth like this until collar measures approx. 10-8-10-8-8-10 cm / 4"-3⅛"-4"-3⅛"-3⅛"-4" from marker on shoulder. Then work 1 row sc as follows: ch 1, 1 sc in same st, 1 sc in next ch, 1 sc in each of the first 2 tr, 1 sc in ch-space in the middle of tr-group, 1 sc in each of the next 2 tr *, repeat from *-* 2 times in total, finish with 1 sc in last ch and 1 sc in 4th ch from beg of previous row = 14 sc, cut the yarn. LEFT FRONT PIECE: Work as right front piece but reversed. When dec for armhole in size XXL + XXXL, dec 1 tr-group as shown in A.3. ASSEMBLY: Sew shoulder seams edge to edge to avoid a chunky seam. Sew collar tog mid back (sew edge to edge) and sew it on to neck line at the back of neck. Sew on buttons on right front piece – see picture. Button through the crochet edge explained below. CROCHET EDGE: Work a finishing edge around the entire opening on vest and around both armholes as follows: 1 sc in first st, * ch 5, skip approx. 2½ cm / ⅞", 1 sc in next st/ch-space *, repeat from *-* the entire round and finish with ch 5 and 1 sl st in sc from beg of round. |
||||||||||||||||
Diagram explanations |
||||||||||||||||
|
||||||||||||||||
 |
||||||||||||||||
 |
||||||||||||||||
Have you finished this pattern?Tag your pictures with #dropspattern #leonavest or submit them to the #dropsfan gallery. Do you need help with this pattern?You'll find 8 tutorial videos, a Comments/Questions area and more by visiting the pattern on garnstudio.com. © 1982-2026 DROPS Design A/S. We reserve all rights. This document, including all its sub-sections, has copyrights. Read more about what you can do with our patterns at the bottom of each pattern on our site. |
||||||||||||||||


With over 40 years in knitting and crochet design, DROPS Design offers one of the most extensive collections of free patterns on the internet - translated to 17 languages. As of today we count 324 catalogs and 12291 patterns - 12281 of which are translated into English (US/in).
We work hard to bring you the best knitting and crochet have to offer, inspiration and advice as well as great quality yarns at incredible prices! Would you like to use our patterns for other than personal use? You can read what you are allowed to do in the Copyright text at the bottom of all our patterns. Happy crafting!
Post a comment to pattern DROPS 145-4
We would love to hear what you have to say about this pattern!
If you want to leave a question, please make sure you select the correct category in the form below, to speed up the answering process. Required fields are marked *.