
Popular categories
Looking for a yarn?


Comments / Questions (289)
![]() Liisa wrote:
Liisa wrote:
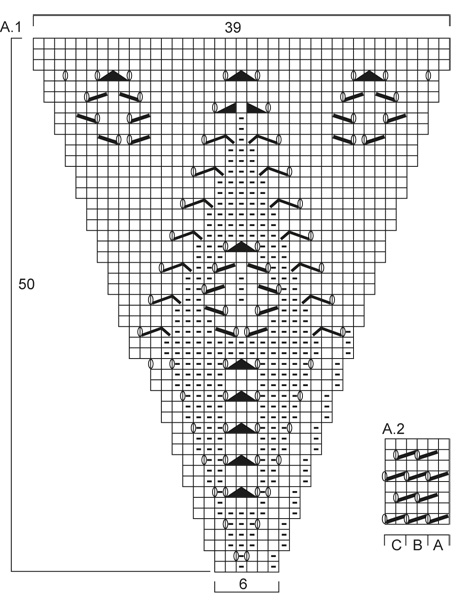
Mallikaava A2 ABC, toistuuko tämä koko kerroksella, niin että AS A ja C tulevat vain kerroksen alussa ja lopussa, vai sektoreittain? Minä ymmärrän sen sektoreittain, olenko oikeassa?
23.07.2013 - 15:06DROPS Design answered:
Neulot ensin A.2A kerran, sitten toistat piirrosta A.2B tarpeen mukaan ja lopuksi neulot A.2C kerran.
24.07.2013 - 11:42Sara wrote:
Jag har teststickat v. 18-22 med perfekt resultat. Inga konstigheter där, m. ökas från 108 till 126.
11.07.2013 - 20:04
![]() Sara wrote:
Sara wrote:
V. 20: 5 omslag och 2 minskningar ger väl 3 fler maskor, eller?
10.07.2013 - 19:19
![]() Marianne wrote:
Marianne wrote:
Fejlen ligger i pind 20. Der mangler ganske enkelt et omslag lige efter den førset vrangmaske i rapporten. Dette giver så heller ikke det rigtige maskeantal til slut. Dette har jeg kompenseret med en omgang med kun 6 udtagninger.
10.07.2013 - 15:08DROPS Design answered:
Hej Marianne. Efter pind 19 har du 18 m per gentagelse = 108 masker i alt. I pind 20 er der 5 omslag men du tager 2 m ind i midten af diagrammet per gentagelse (tag 1 m løs af p som om den skulle strikkes ret, 2 ret sammen, løft den løse m over), dvs + 3 m per gentagelse = 21 m per gentagelse som ogsaa er korrekt i diagrammet = i alt 126 m efter pind 20. Det passer da at du ender med 39 m per gentagelse slut diagram A.1 = 234 m paa p
16.07.2013 - 15:20
![]() Marianne wrote:
Marianne wrote:
Har fundet fejlen og som også giver fejl i maskeantallet længere oppe. Der mangler et omslag lige efter den første vrangmaske på pind 20. Ellers bliver mønsteret ikke symmetrisk.
10.07.2013 - 15:05
![]() Hanne wrote:
Hanne wrote:
Så har jeg fundet forskellen på de to diagrammer, men mener stadig, at den midterste maske på pind 21 og 22 skal være ret?
07.07.2013 - 13:37DROPS Design answered:
Hej Hanne. Vi har set paa modellen og det er altsaa korrekt at de midterste masker paa pind 21 og 22 er vrang paa denne. Men synes du selv det bliver paenere med ret, saa maa du jo göre det.
10.07.2013 - 15:54
![]() Hanne wrote:
Hanne wrote:
Det diagram der ligger på nettet er magen til det i hæftet, dvs ikke rettet. Er der ikke en maske for meget i fra pind 21 og op? Skal den midterste maske på pind 21 og 22 ikke være en ret-maske?
07.07.2013 - 00:13DROPS Design answered:
Hej Hanne. Godt at höre. Jeg er ikke sikker, men mener at diagrammet nu er korrekt (svaert at se paa billedet). Jeg har spurgt en kollega som kan se paa modellen og saa vender jeg tilbage til dig ;-)
09.07.2013 - 16:32Zsuzsa wrote:
I have a question about how much yarn to I need exactly. Why do you list to colors at the materials sections. It is not clear to me. Thanks.
02.07.2013 - 10:03DROPS Design answered:
Dear Zsuzsa, required materials are give in the order of size, ie for example you need 300 g Alpaca and 125 g Kid-Silk in size S/M. Should you like to change color, click on link see deals and shadecard for Drops Alpaca/Kid-Silk. Happy knitting!
02.07.2013 - 14:11
![]() Liisa Salonen wrote:
Liisa Salonen wrote:
Was für eine Nadelgrösse haben alle benutzt, bei mir stimmen die Masse nicht mit Nadelgrösse 6?
25.06.2013 - 08:20
![]() Mina wrote:
Mina wrote:
"I alt 4 gange"
24.06.2013 - 15:14
|
|||||||||||||||||||||||||||||||
Daybreak#daybreakjacket |
|||||||||||||||||||||||||||||||
 |
 |
||||||||||||||||||||||||||||||
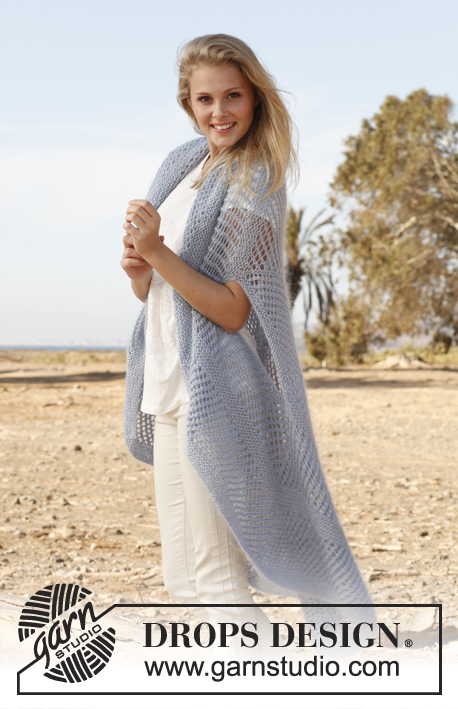
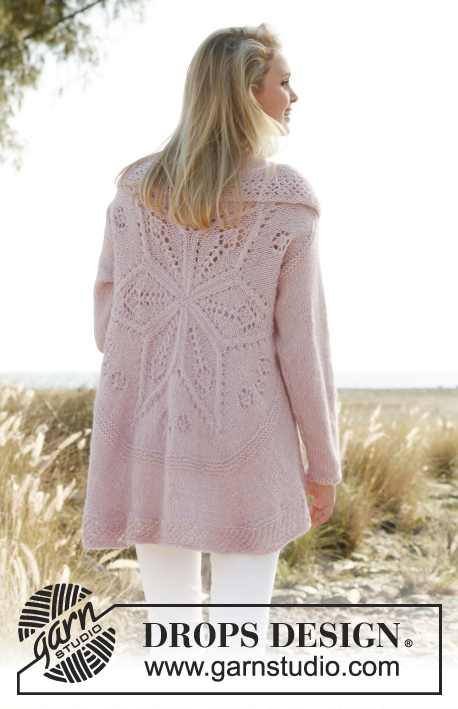
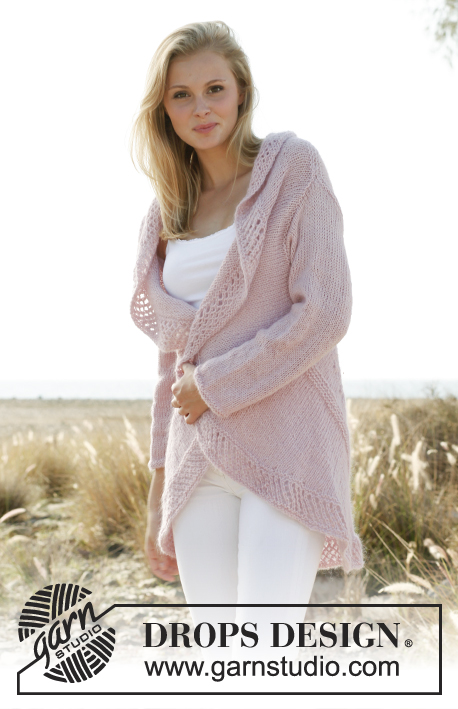
Knitted DROPS jacket worked in a circle with lace pattern in "Alpaca" and "Kid-Silk". Size: S - XXXL.
DROPS 148-1 |
|||||||||||||||||||||||||||||||
|
GARTER ST (in the round on circular needle): * K 1 round and P 1 round *, repeat from *-*. 1 ridge = 2 rounds. PATTERN: See diagram A.1. Diagram shows all rows in pattern seen from RS. ---------------------------------------------------------- JACKET WORKED IN A CIRCLE: Worked in the round in a circle from mid back. First work on double pointed needles, then switch to circular needle when needed. Cast on 12 sts with 1 strand of each yarn and distribute them on 4 double pointed needles size 6 mm / US 10. K 1 round while AT THE SAME TIME working 2 sts in all sts = 24 sts. K 1 round without inc. On next round, work as follows: * K 1, K 2 in next st *, repeat from *-* = 36 sts. Then work according to diagram A.1 (= 6 repetitions in the round). REMEMBER THE GAUGE! Switch to circular needle when needed. When A.1 has been worked, there are 234 sts on needle. Insert 1 marker in each of the tips on the star (in the middle st in every repetition) = 6 markers in total. Work in stockinette st AT THE SAME TIME inc 1 st on each side of markers. Inc with 1 YO on each side of sts with marker – on next round K yo twisted to avoid holes = 12 inc sts per round. Repeat inc every other round 1-2-3 more times (24-36-48 inc sts in total) = 258-270-282 sts (42-44-46 sts between every st with marker). Then work 2 ridges in GARTER ST – see explanation above - over all sts, without inc. On next round K while AT THE SAME TIME bind off all sts between 1st and 2nd marker, bind off the middle 32-34-36 sts between 2nd and 3rd marker and the middle 32-34-36 sts between 6th and 1st marker for armhole. P next round, AT THE SAME TIME pick up 1 new st in every bound off st between 1st and 2nd marker, and cast on 32-34-36 new sts over the bind off sts between 2nd and 3rd marker and 6th and 1st marker. (Sts between 1st and 2nd marker is equivalent to the shoulder width at the top. To avoid the shoulder width being to wide, bind off these sts and pick them up again on next row. This will stop the piece from being to long over the shoulder.) When all sts have been cast on/knitted up, there are 258-270-282 sts on needle. Work 1 ridge. Piece measures approx. 31-32-33 cm / 12¼"-12½"-13" from the middle. Then work in stockinette st, AT THE SAME TIME inc 1 st each side of sts with markers (= 12 inc). Inc with YO (work twisted on next round to avoid holes). Repeat inc every other round 9-11-13 more times (10-12-14 inc in total) = 378-414-450 sts. Keep sts between 2nd and 4th marker on needle, slip the other sts on a stitch holder = 125-137-149 sts on needle. Then work in stockinette st back and forth over sts on needle, AT THE SAME TIME at the end of every row slip the last 4 sts on stitch holder (do not work them, turn), continue until 37-49-61 sts remain on row. Slip the last 37-49-61 sts on stitch holder. Slip sts between 5th and 1st marker on circular needle size 6 mm / US 10, work the same way as in the other side. Then K all sts from RS back on to circular needle size 6 mm / US 10 - between every time sts where slipped on stitch holders in each side, get the yarn and twist it before slipping it on needle (i.e. between every 4th st, to avoid holes in the transitions), in addition inc evenly so that there are 452-496-540 sts in total on needle. Work 2 ridges. Then work according to A.2. Work A.2 A, repeat A.2 B until 2 sts remain and end with A.2 C. Work A.2 for 6 cm / 2⅜", work 1 ridge and bind off. SLEEVE: Worked in the round on double pointed needles. Cast on 36-38-40 sts on double pointed needles size 6 mm / US 10 with 1 strand of each yarn. Insert 1 marker at beg of round = mid under sleeve. Work 2 ridges. Continue in stockinette st. When piece measures 8 cm / 3⅛", inc 1 st on each side of marker mid under. Repeat inc every 4-3½-3 cm / 1½"-1¼"-1⅛" 10-11-13 more times (11-12-14 inc in total) = 58-62-68 sts. When piece measures 53-54-56 cm / 21"-21¼"-22", bind off 6 sts mid under sleeve and work back and forth until finished measurements. Then bind off for sleeve cap at beg of every row in each side: 3 sts 3 times = 34-38-44 sts. Bind off the remaining sts, sleeve measures approx. 56-57-59 cm / 22"-22½"-23¼". Sew in sleeves. |
|||||||||||||||||||||||||||||||
Diagram explanations |
|||||||||||||||||||||||||||||||
|
|||||||||||||||||||||||||||||||
 |
|||||||||||||||||||||||||||||||
 |
|||||||||||||||||||||||||||||||
Have you finished this pattern?Tag your pictures with #dropspattern #daybreakjacket or submit them to the #dropsfan gallery. Do you need help with this pattern?You'll find 23 tutorial videos, a Comments/Questions area and more by visiting the pattern on garnstudio.com. © 1982-2026 DROPS Design A/S. We reserve all rights. This document, including all its sub-sections, has copyrights. Read more about what you can do with our patterns at the bottom of each pattern on our site. |
|||||||||||||||||||||||||||||||


With over 40 years in knitting and crochet design, DROPS Design offers one of the most extensive collections of free patterns on the internet - translated to 17 languages. As of today we count 324 catalogs and 12239 patterns - 12229 of which are translated into English (US/in).
We work hard to bring you the best knitting and crochet have to offer, inspiration and advice as well as great quality yarns at incredible prices! Would you like to use our patterns for other than personal use? You can read what you are allowed to do in the Copyright text at the bottom of all our patterns. Happy crafting!
Post a comment to pattern DROPS 148-1
We would love to hear what you have to say about this pattern!
If you want to leave a question, please make sure you select the correct category in the form below, to speed up the answering process. Required fields are marked *.