
Popular categories
Looking for a yarn?


Comments / Questions (293)
![]() DOLFIN wrote:
DOLFIN wrote:
Bonjour, *à la fin de chaque rang, glisser les 4 dernières mailles en attente... reprendre ensuite les mailles, à chaque transition relever le fil et le placer torse pour éviter les trous aux transitions* J'ai essayé mais mon travail est vilain, il y a quand même des trous. Je ne dois pas comprendre ce qu'il faut faire, pouvez-vous m'expliquer d'une autre façon ou m'indiquer une autre méthode pour éviter les trous entre des mailles en attente ? Merci
30.09.2024 - 20:33DROPS Design answered:
Bonjour Mme Dolfin, dans cette vidéo, au time code 4:04 environ, vous verrez comment procéder pour relever ce fil entre 2 mailles des rangs raccourcis et comment le tricoter avec la maille suivante. Vous pouvez également choisir une autre technique de rangs raccourcis, vous en trouverez plusieurs ici. Bon tricot!
01.10.2024 - 09:12
![]() Laurence wrote:
Laurence wrote:
Bonjour, je ne comprends pas au niveau des rangs raccourcis : on prends les mailles entre 2e et 4e marqueur puis entre 5e et 1er. Que fait-on des mailles entre le 4e et 5e svp ? Merci
14.06.2024 - 20:59DROPS Design answered:
Bonjour Laurence, les mailles entre le 4ème et le 5ème marqueur ainsi que celles entre le 1er et le 2ème marqueur (haut et bas de la veste) restent aussi en attente le temps que l'on tricote les rangs raccourcis des devants, puis on reprend toutes les mailles pour tricoter la bordure, de nouveau en rond. Bon tricot!
17.06.2024 - 07:52
![]() Rau Nadine wrote:
Rau Nadine wrote:
Ich glaube da hat sich ein Fehler eingeschlichen, nach dem Abstricken der Ärmel und 34 neue maschen aufnehmen sind 44 maschen zwischen jedem Markierer. Es sollen aber 45 sein, 270/6. Können Sie das bitte prüfen oder ist mir ein Fehler unterlaufen?
20.04.2024 - 11:46
![]() Brigitte wrote:
Brigitte wrote:
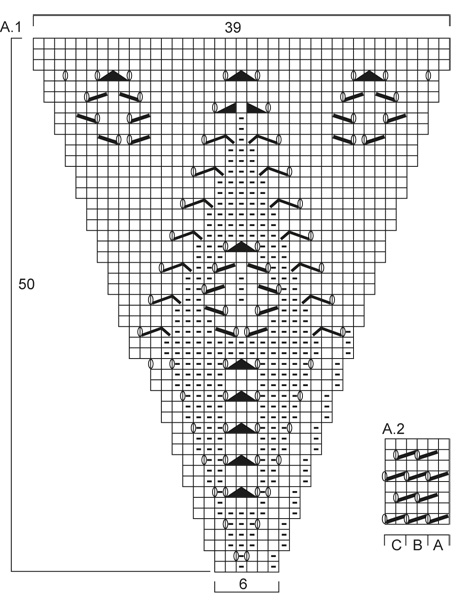
Bonjour pourriez vous m expliquer pas a pas le diagramme A2 en vous remerciant
23.08.2023 - 21:27DROPS Design answered:
Bonjour Brigitte, le diagramme A.2 est un point ajouré qui commence par la partie A, puis on répète la partie B jusqu'à ce qu'il reste 2 m (rang 1 et 5) ou 1 m (rang 3 et 7) et on termine par la partie C. Bon tricot!
24.08.2023 - 09:04
![]() Lotraine wrote:
Lotraine wrote:
Finally figured out why I was off on the ovals between 2 and 4 and 5 and 1 in pattern 148-1. My number 1 marker was in the wrong place. All good now. Thanks
26.04.2023 - 20:17
![]() Lorraine wrote:
Lorraine wrote:
If I do the extensions on pattern 148-1 daybreak between markers 2 and 4 and then 5 and 1 it will come out lopsided unless I am misunderstanding something
26.04.2023 - 16:06DROPS Design answered:
Dear Lorraine, it shouldn't become loopy, you are now working short rows, leaving 4 sts unworked at the end of each row (= on each side,: towards top of jacket as well as towards bottom of piece). Happy knitting!
27.04.2023 - 08:03
![]() Jessica wrote:
Jessica wrote:
Hallo, ich lerne erst zu stricken und habe daher einige Fragen zur Garnbestellung. Ich möchte eine sehr einfache, lange Jacke (Ähnlich wie Ihr Modell Daybreak Modell Nr. z-642 nur einfacher) in Gr. L und nur in glatt rechts mit großem Lochbild (soll hauchzart, leicht und Großmaschig aussehen) aus Ihrer Kid-Silk stricken. Wieviel Wolle benötige ich ca.? Und welche Nadeln kann ich zu diesem Garn bestellen? Also welche Nadeln eignen sich am besten?
12.01.2023 - 14:10DROPS Design answered:
Liebe Jessica, leider können wir nicht jede Anleitung nach jeder Anfrage anpassen - die Garnmenge wird je nach Maschenprobe, Schnitt, usw verschieden sein. Hier finden Sie alle unsere gestrickte Kreisjacken, vielleicht finden Sie davon Inspiration; Gerne kann Ihnen noch damit Ihr DROPS Händler (auch per Telefon oder per E-Mail) weiterhelfen. Viel Spaß beim stricken!
12.01.2023 - 16:29
![]() Nahed Nashed wrote:
Nahed Nashed wrote:
In the oval section: keep sts bet 2nd & 4th marker on needle = 125-137-149 sts on needle. However, the number of sts between 2nd & 4th will be 199 sts . Any help?
13.08.2022 - 11:01DROPS Design answered:
Dear Mrs Nashed, after you have increased 10-12-14 times on each side of each marker there are 62-68-74 sts between each stitch with a marker, you will then get between 2nd and 4th marker: 62-68-74 sts + 3rd marker + 62-68-74 sts = 125-137-149 sts. Happy knitting!
15.08.2022 - 08:18
![]() Nikoline Pahl wrote:
Nikoline Pahl wrote:
Hej Drops Hvordan skal jeg forstå diagrammet A2? Skal jeg strikke A2 diagrammet først og derefter tage A2A, bagefter A2B og A2 C Eller skal de strikkes samtidig..? Vil i give en tilbagemelding? På forhånd tak
11.08.2022 - 14:05
![]() Nikoline Pahl wrote:
Nikoline Pahl wrote:
"Behold m mellem 2. og 4 mærketråd på p, de resterende m sættes på en tråd = 125-137-149 m på p. Fortsæt med glatstrik frem og tilbage over m på p," I skriver behold m mellem 2. og 4 mærketråde, betyder det at m mellem 2. og 4. mærketråd = 125 m? Eller hvor fra og til tæller i 125 m , mellem hvilke mærketråde? og hvor mange m skal der strikkes over mellem 2. og 4 mærketråd?
30.05.2022 - 17:35DROPS Design answered:
Hej Nikoline, Maskerne mellem mærketråd 1 og 2 er bag i nakken. De midterste masker mellem mærketråd 2 og 3 er til ærmet. Det er 125 masker mellem mærke 2 og 4 (= den ene side), som nu strikkes frem og tilbage
02.06.2022 - 10:33
|
|||||||||||||||||||||||||||||||
Daybreak#daybreakjacket |
|||||||||||||||||||||||||||||||
 |
 |
||||||||||||||||||||||||||||||
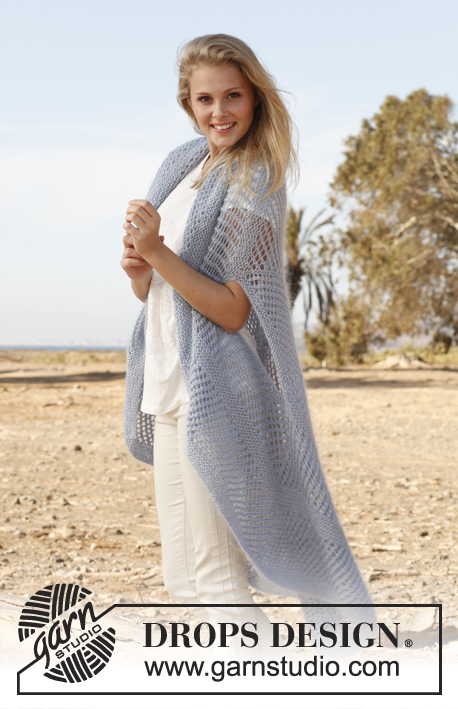
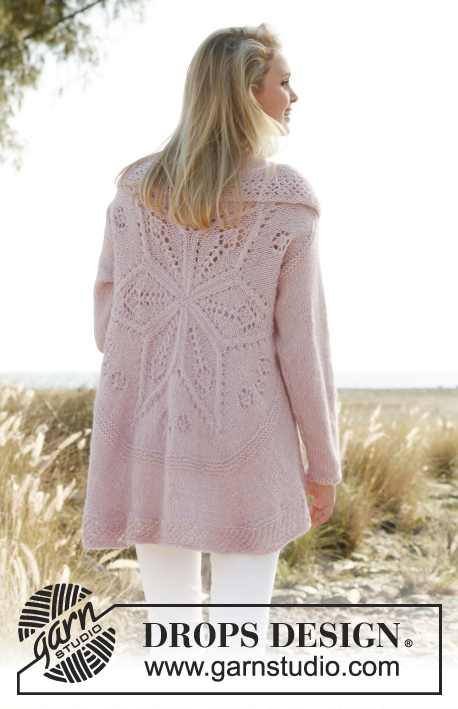
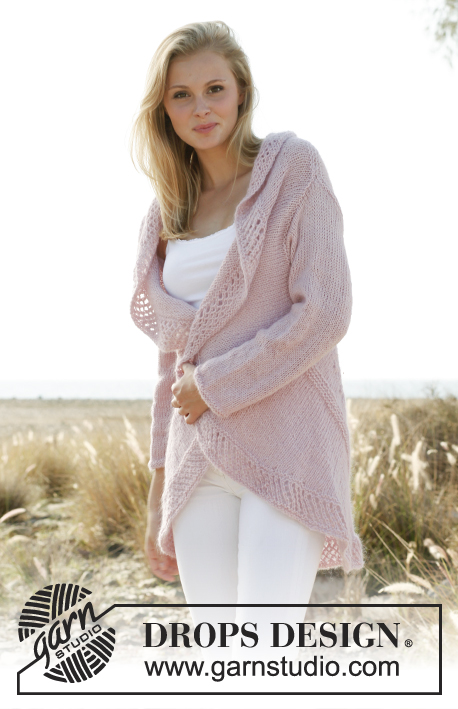
Knitted DROPS jacket worked in a circle with lace pattern in "Alpaca" and "Kid-Silk". Size: S - XXXL.
DROPS 148-1 |
|||||||||||||||||||||||||||||||
|
GARTER ST (in the round on circular needle): * K 1 round and P 1 round *, repeat from *-*. 1 ridge = 2 rounds. PATTERN: See diagram A.1. Diagram shows all rows in pattern seen from RS. ---------------------------------------------------------- JACKET WORKED IN A CIRCLE: Worked in the round in a circle from mid back. First work on double pointed needles, then switch to circular needle when needed. Cast on 12 sts with 1 strand of each yarn and distribute them on 4 double pointed needles size 6 mm / US 10. K 1 round while AT THE SAME TIME working 2 sts in all sts = 24 sts. K 1 round without inc. On next round, work as follows: * K 1, K 2 in next st *, repeat from *-* = 36 sts. Then work according to diagram A.1 (= 6 repetitions in the round). REMEMBER THE GAUGE! Switch to circular needle when needed. When A.1 has been worked, there are 234 sts on needle. Insert 1 marker in each of the tips on the star (in the middle st in every repetition) = 6 markers in total. Work in stockinette st AT THE SAME TIME inc 1 st on each side of markers. Inc with 1 YO on each side of sts with marker – on next round K yo twisted to avoid holes = 12 inc sts per round. Repeat inc every other round 1-2-3 more times (24-36-48 inc sts in total) = 258-270-282 sts (42-44-46 sts between every st with marker). Then work 2 ridges in GARTER ST – see explanation above - over all sts, without inc. On next round K while AT THE SAME TIME bind off all sts between 1st and 2nd marker, bind off the middle 32-34-36 sts between 2nd and 3rd marker and the middle 32-34-36 sts between 6th and 1st marker for armhole. P next round, AT THE SAME TIME pick up 1 new st in every bound off st between 1st and 2nd marker, and cast on 32-34-36 new sts over the bind off sts between 2nd and 3rd marker and 6th and 1st marker. (Sts between 1st and 2nd marker is equivalent to the shoulder width at the top. To avoid the shoulder width being to wide, bind off these sts and pick them up again on next row. This will stop the piece from being to long over the shoulder.) When all sts have been cast on/knitted up, there are 258-270-282 sts on needle. Work 1 ridge. Piece measures approx. 31-32-33 cm / 12 1/4"-12½"-13" from the middle. Then work in stockinette st, AT THE SAME TIME inc 1 st each side of sts with markers (= 12 inc). Inc with YO (work twisted on next round to avoid holes). Repeat inc every other round 9-11-13 more times (10-12-14 inc in total) = 378-414-450 sts. Keep sts between 2nd and 4th marker on needle, slip the other sts on a stitch holder = 125-137-149 sts on needle. Then work in stockinette st back and forth over sts on needle, AT THE SAME TIME at the end of every row slip the last 4 sts on stitch holder (do not work them, turn), continue until 37-49-61 sts remain on row. Slip the last 37-49-61 sts on stitch holder. Slip sts between 5th and 1st marker on circular needle size 6 mm / US 10, work the same way as in the other side. Then K all sts from RS back on to circular needle size 6 mm / US 10 - between every time sts where slipped on stitch holders in each side, get the yarn and twist it before slipping it on needle (i.e. between every 4th st, to avoid holes in the transitions), in addition inc evenly so that there are 452-496-540 sts in total on needle. Work 2 ridges. Then work according to A.2. Work A.2 A, repeat A.2 B until 2 sts remain and end with A.2 C. Work A.2 for 6 cm / 2 3/8'', work 1 ridge and bind off. SLEEVE: Worked in the round on double pointed needles. Cast on 36-38-40 sts on double pointed needles size 6 mm / US 10 with 1 strand of each yarn. Insert 1 marker at beg of round = mid under sleeve. Work 2 ridges. Continue in stockinette st. When piece measures 8 cm / 3 1/8'', inc 1 st on each side of marker mid under. Repeat inc every 4-3½-3 cm / 1½"-1 1/4"-1 1/8" 10-11-13 more times (11-12-14 inc in total) = 58-62-68 sts. When piece measures 53-54-56 cm / 21"-21 1/4"-22", bind off 6 sts mid under sleeve and work back and forth until finished measurements. Then bind off for sleeve cap at beg of every row in each side: 3 sts 3 times = 34-38-44 sts. Bind off the remaining sts, sleeve measures approx. 56-57-59 cm / 22"-22½"-23 1/4". Sew in sleeves. |
|||||||||||||||||||||||||||||||
Diagram explanations |
|||||||||||||||||||||||||||||||
|
|||||||||||||||||||||||||||||||
|
|||||||||||||||||||||||||||||||

|
|||||||||||||||||||||||||||||||
Have you finished this pattern?Tag your pictures with #dropspattern #daybreakjacket or submit them to the #dropsfan gallery. Do you need help with this pattern?You'll find 24 tutorial videos, a Comments/Questions area and more by visiting the pattern on garnstudio.com. © 1982-2025 DROPS Design A/S. We reserve all rights. This document, including all its sub-sections, has copyrights. Read more about what you can do with our patterns at the bottom of each pattern on our site. |
|||||||||||||||||||||||||||||||


With over 40 years in knitting and crochet design, DROPS Design offers one of the most extensive collections of free patterns on the internet - translated to 17 languages. As of today we count 314 catalogs and 11822 patterns - 11812 of which are translated into English (US/in).
We work hard to bring you the best knitting and crochet have to offer, inspiration and advice as well as great quality yarns at incredible prices! Would you like to use our patterns for other than personal use? You can read what you are allowed to do in the Copyright text at the bottom of all our patterns. Happy crafting!
Post a comment to pattern DROPS 148-1
We would love to hear what you have to say about this pattern!
If you want to leave a question, please make sure you select the correct category in the form below, to speed up the answering process. Required fields are marked *.