
Popular categories
Looking for a yarn?


Comments / Questions (289)
![]() JUNCKER wrote:
JUNCKER wrote:
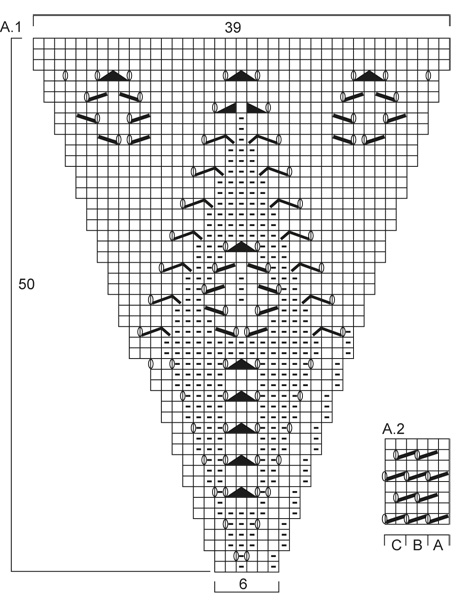
Pour le diagramme A2 comment dois je tricote le troisieme rang en commencant paA2A mais comment je fais pour A2B? peux pas tricoter 2 mailles ensembles puisque A2B commence entre ces 2 mailles. Merci pour votre réponse
26.01.2014 - 15:09DROPS Design answered:
Bonjour Mme Juncker, la dernière m de A.2A se tricote avec la 1ère m de A.2B et la dernière m de A.2B se tricote avec la 1ère m du motif suivant de A.2B ou, à la fin, avec la 1ère m de A.2C, soit: 1 m end, *2 m ens à l'end, 1 jeté*, répétez de *-* jusqu'à ce qu'il reste 1 m, 1 m end. Bon tricot!
27.01.2014 - 08:56
![]() Valeria Di Stasio wrote:
Valeria Di Stasio wrote:
ALLO STESSO TEMPO, aumentare 1 m da ciascun lato di ogni m con il segno (= 12 aumenti). Aumentare facendo 1 m gettata . Ripetere questi aumenti ogni 2 giri altre 9-11-13 volte (10-12-14 aumenti in tutto) = 378-414-450 m.Non mi trovo con il conteggio.Dove sbaglio?
19.12.2013 - 20:19DROPS Design answered:
Buonasera Valeria, partendo da 258-270-282 m, deve aumentare 1 m (1 gettato) a ogni lato della m con il segnapunti, quindi 6x2 = 12 aumenti, e ripetere gli aumenti altre 9-11-13 volte (10-12-14 aumenti in tutto). Ad esempio per la taglia S/M, partendo da 258 m, 12 m aumentate x 10 volte = 120 aumenti = 378 m. Ci riscriva se ha ancora dubbi. Buon lavoro!!
19.12.2013 - 21:20
![]() Gabriele wrote:
Gabriele wrote:
2 Krausrippen (= 4 Rd kraus re) stricken, dann 6 cm im Muster A.2 stricken (die Rd beginnen mit A.2 A, A.2 B stricken bis noch 2 M übrig sind, enden mit A.2 C), 1 Krausrippe (= 2 Rd kraus re) stricken und abketten. Ich komme mit dieser Erklaerung nicht zurecht.
04.11.2013 - 14:26DROPS Design answered:
Liebe Gabriele, was genau verstehen Sie nicht? Es ist die Reihenfolge beschrieben, in der die Mustersätze gestrickt werden.
05.11.2013 - 09:08Gabriele wrote:
2 Krausrippen (= 4 Rd kraus re) stricken, dann 6 cm im Muster A.2 stricken (die Rd beginnen mit A.2 A, A.2 B stricken bis noch 2 M übrig sind, enden mit A.2 C), 1 Krausrippe (= 2 Rd kraus re) stricken und abketten. Ich komme mit dieser Erklaerung nicht zurecht.
04.11.2013 - 10:22DROPS Design answered:
Liebe Gabriele, bitte schreiben Sie uns noch, was genau Sie daran nicht verstehen.
25.11.2013 - 08:44
![]() Dominik wrote:
Dominik wrote:
Bonjour, j'ai commencé ce modèle j'ai fini les augmentations et je dois garder les mailles entre les 2ème et 4éme curseur et laisser les autres en attente par contre je ne comprends pas bien parce que entre le 2ème et le 4ème curseur, j'ai 2 séries de mailles dont une emmanchure, je ne vois pas comment le tricot peut être symétrique merci pour votre réponse
02.11.2013 - 18:36DROPS Design answered:
Bonjour Dominik, on rabat les mailles entre le 1er et le 2ème marqueur (encolure dos), puis les 32-34-36 m (cf taille) centrales placées entre le 2ème et le 3ème marqueur (emmanchure), on continue jusqu'au 6ème marqueur et on rabat les 32-34-36 m centrales placées entre le 6ème et le 1er marqueur (2ème emmanchure) et on termine le tour. Bon tricot!
04.11.2013 - 08:50
![]() Anna wrote:
Anna wrote:
Die M zwischen dem 2. und 4. Markierer auf der Nadel behalten und in Hin- und Rück-R glatt re stricken ... Diese letzten 37-49-61 M stilllegen. Die M zwischen dem 5. und 1. Markierer auf die Rundnadel Nr. 6 legen und wie die M an der anderen Seite stricken. - Wie soll man die Maschen zwischen 5. und 1. Markierer stricken, wenn den Faden doch auf der gegenüberliegenden Seite bei den 37 stillgelegten Maschen ist??
21.10.2013 - 23:07DROPS Design answered:
Liebe Anna, Sie schneiden den Faden ab und stricken dann an der angegebenen Stelle weiter.
23.10.2013 - 07:47
![]() Maria wrote:
Maria wrote:
How proceed using chart A2? Directions say to work A.2A .- does that mean to work all 8 rounds of chart A2 by beginning each round in position A? Then it says repeat A2B - does that mean do the 8 rounds of chart A2 by beginning each round in the B position and then do the last 2 sts as A2C? So does that mean 16 rounds completed at that point?Then it says work A.2 for 6cm. Do some part of chart A2 again? What does that mean - by starting in what position?
21.10.2013 - 14:47DROPS Design answered:
Dear Maria, When you work A.2, you will start with A.2A (2 sts), then repeat A.2B on the next sts until 2 sts remain, and work A.2C on the last 2 sts. Repeat the 8 rows diag. A.2 for 6 cm. Happy knitting!
21.10.2013 - 16:00
![]() Liisa wrote:
Liisa wrote:
Kiinnitänkö hihat neuleeseen oikealta vaiko nurjalta puolelta? Mikä ommel on paras, en löytänyt ohjevideota hihojen kiinnitykseen. Takki on ollut valmiina jo kauan, mutta en ole uskaltanut kiinnittää hihoja, koska on ensimmäinen kertani.
05.09.2013 - 08:58
![]() Kathrin wrote:
Kathrin wrote:
Könnt ihr mir mal bitte sagen wie ich die Ärmel annähen soll??? Hab zwar schon Ärmel in Jacken eingenäht aber die waren immer mit Naht und nicht wie hier rundgestrickt.
11.08.2013 - 08:17DROPS Design answered:
Liebe Kathrin, es gibt keinen Unterschied. Bei einem offen gestrickten Ärmel schliessen Sie ja meistens auch erst die Unterarmnaht vor dem Einnähen.
12.08.2013 - 10:44
![]() Inger Andersson wrote:
Inger Andersson wrote:
Har stickat denna fantastiska kofta. Jag stickade ärmen med en ärmkulle, för det tycker jag är snyggare. Om jag skulle sticka den igen, skulle jag fortsätta sticka de 12 ökningarna, i tredje stycket,ända ut till kantmönstret A2. Allt för att slippa bubblan som blir när ökningarna upphör. De syns inte på bilden för hon har armen över. mvh Inger
25.07.2013 - 00:00
|
|||||||||||||||||||||||||||||||
Daybreak#daybreakjacket |
|||||||||||||||||||||||||||||||
 |
 |
||||||||||||||||||||||||||||||
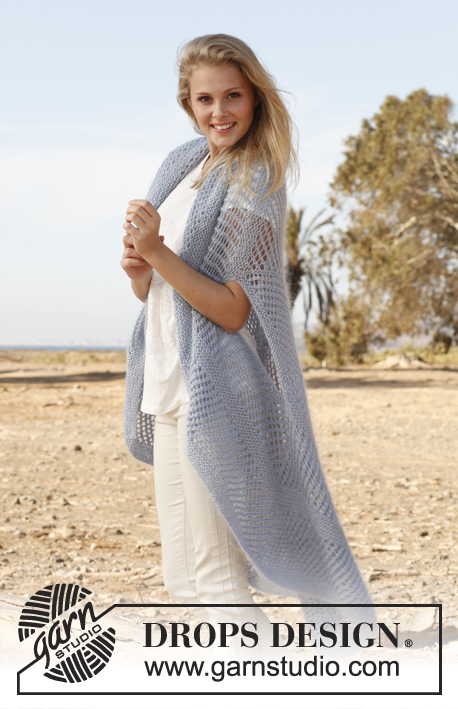
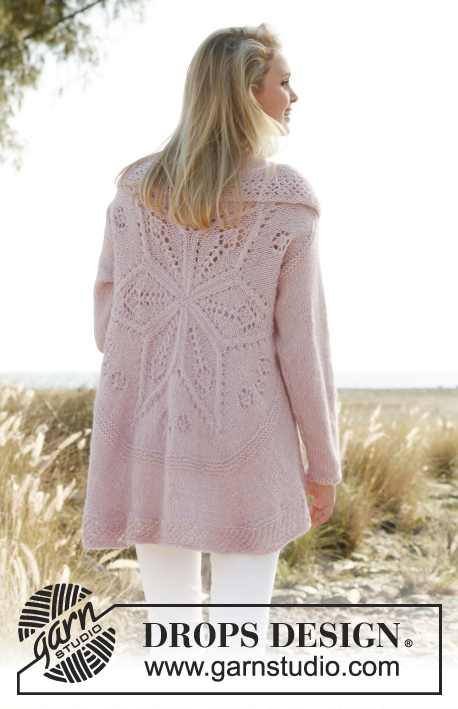
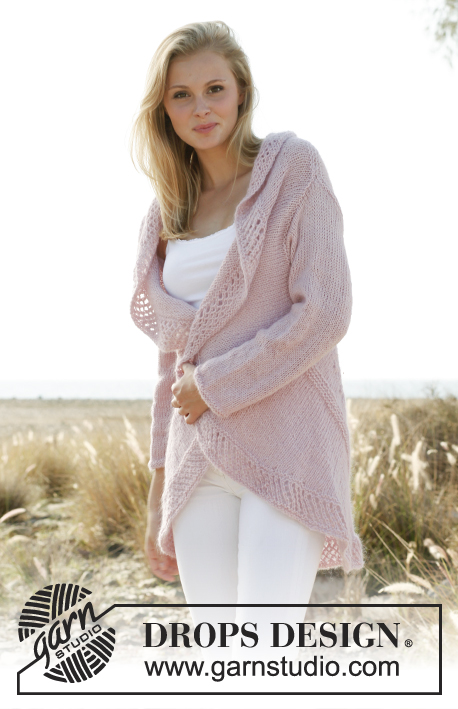
Knitted DROPS jacket worked in a circle with lace pattern in "Alpaca" and "Kid-Silk". Size: S - XXXL.
DROPS 148-1 |
|||||||||||||||||||||||||||||||
|
GARTER ST (in the round on circular needle): * K 1 round and P 1 round *, repeat from *-*. 1 ridge = 2 rounds. PATTERN: See diagram A.1. Diagram shows all rows in pattern seen from RS. ---------------------------------------------------------- JACKET WORKED IN A CIRCLE: Worked in the round in a circle from mid back. First work on double pointed needles, then switch to circular needle when needed. Cast on 12 sts with 1 strand of each yarn and distribute them on 4 double pointed needles size 6 mm / US 10. K 1 round while AT THE SAME TIME working 2 sts in all sts = 24 sts. K 1 round without inc. On next round, work as follows: * K 1, K 2 in next st *, repeat from *-* = 36 sts. Then work according to diagram A.1 (= 6 repetitions in the round). REMEMBER THE GAUGE! Switch to circular needle when needed. When A.1 has been worked, there are 234 sts on needle. Insert 1 marker in each of the tips on the star (in the middle st in every repetition) = 6 markers in total. Work in stockinette st AT THE SAME TIME inc 1 st on each side of markers. Inc with 1 YO on each side of sts with marker – on next round K yo twisted to avoid holes = 12 inc sts per round. Repeat inc every other round 1-2-3 more times (24-36-48 inc sts in total) = 258-270-282 sts (42-44-46 sts between every st with marker). Then work 2 ridges in GARTER ST – see explanation above - over all sts, without inc. On next round K while AT THE SAME TIME bind off all sts between 1st and 2nd marker, bind off the middle 32-34-36 sts between 2nd and 3rd marker and the middle 32-34-36 sts between 6th and 1st marker for armhole. P next round, AT THE SAME TIME pick up 1 new st in every bound off st between 1st and 2nd marker, and cast on 32-34-36 new sts over the bind off sts between 2nd and 3rd marker and 6th and 1st marker. (Sts between 1st and 2nd marker is equivalent to the shoulder width at the top. To avoid the shoulder width being to wide, bind off these sts and pick them up again on next row. This will stop the piece from being to long over the shoulder.) When all sts have been cast on/knitted up, there are 258-270-282 sts on needle. Work 1 ridge. Piece measures approx. 31-32-33 cm / 12¼"-12½"-13" from the middle. Then work in stockinette st, AT THE SAME TIME inc 1 st each side of sts with markers (= 12 inc). Inc with YO (work twisted on next round to avoid holes). Repeat inc every other round 9-11-13 more times (10-12-14 inc in total) = 378-414-450 sts. Keep sts between 2nd and 4th marker on needle, slip the other sts on a stitch holder = 125-137-149 sts on needle. Then work in stockinette st back and forth over sts on needle, AT THE SAME TIME at the end of every row slip the last 4 sts on stitch holder (do not work them, turn), continue until 37-49-61 sts remain on row. Slip the last 37-49-61 sts on stitch holder. Slip sts between 5th and 1st marker on circular needle size 6 mm / US 10, work the same way as in the other side. Then K all sts from RS back on to circular needle size 6 mm / US 10 - between every time sts where slipped on stitch holders in each side, get the yarn and twist it before slipping it on needle (i.e. between every 4th st, to avoid holes in the transitions), in addition inc evenly so that there are 452-496-540 sts in total on needle. Work 2 ridges. Then work according to A.2. Work A.2 A, repeat A.2 B until 2 sts remain and end with A.2 C. Work A.2 for 6 cm / 2⅜", work 1 ridge and bind off. SLEEVE: Worked in the round on double pointed needles. Cast on 36-38-40 sts on double pointed needles size 6 mm / US 10 with 1 strand of each yarn. Insert 1 marker at beg of round = mid under sleeve. Work 2 ridges. Continue in stockinette st. When piece measures 8 cm / 3⅛", inc 1 st on each side of marker mid under. Repeat inc every 4-3½-3 cm / 1½"-1¼"-1⅛" 10-11-13 more times (11-12-14 inc in total) = 58-62-68 sts. When piece measures 53-54-56 cm / 21"-21¼"-22", bind off 6 sts mid under sleeve and work back and forth until finished measurements. Then bind off for sleeve cap at beg of every row in each side: 3 sts 3 times = 34-38-44 sts. Bind off the remaining sts, sleeve measures approx. 56-57-59 cm / 22"-22½"-23¼". Sew in sleeves. |
|||||||||||||||||||||||||||||||
Diagram explanations |
|||||||||||||||||||||||||||||||
|
|||||||||||||||||||||||||||||||
 |
|||||||||||||||||||||||||||||||
 |
|||||||||||||||||||||||||||||||
Have you finished this pattern?Tag your pictures with #dropspattern #daybreakjacket or submit them to the #dropsfan gallery. Do you need help with this pattern?You'll find 23 tutorial videos, a Comments/Questions area and more by visiting the pattern on garnstudio.com. © 1982-2026 DROPS Design A/S. We reserve all rights. This document, including all its sub-sections, has copyrights. Read more about what you can do with our patterns at the bottom of each pattern on our site. |
|||||||||||||||||||||||||||||||


With over 40 years in knitting and crochet design, DROPS Design offers one of the most extensive collections of free patterns on the internet - translated to 17 languages. As of today we count 324 catalogs and 12239 patterns - 12229 of which are translated into English (US/in).
We work hard to bring you the best knitting and crochet have to offer, inspiration and advice as well as great quality yarns at incredible prices! Would you like to use our patterns for other than personal use? You can read what you are allowed to do in the Copyright text at the bottom of all our patterns. Happy crafting!
Post a comment to pattern DROPS 148-1
We would love to hear what you have to say about this pattern!
If you want to leave a question, please make sure you select the correct category in the form below, to speed up the answering process. Required fields are marked *.