
Popular categories
Looking for a yarn?


Comments / Questions (289)
![]() Berit R Grettve wrote:
Berit R Grettve wrote:
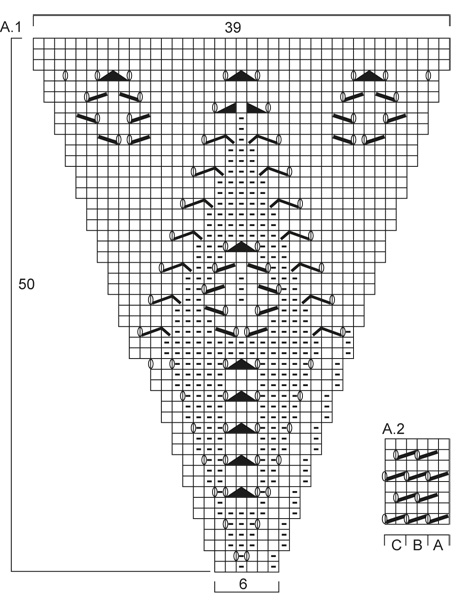
Bokstäverna A B C i diagram A2 är förvirrande. de har ingen funktion Den kommentaren på norska från 13/2 utelämnar A B C och då blir det genast lättare :)
10.03.2014 - 19:30Vigdis K wrote:
Hei.Hva med krave og kant?Det står der ikke noe om i oppskriften og hva gjør jeg for å få til hele stjernen?Jeg syns det er en uklar oppskrift.
17.02.2014 - 13:57DROPS Design answered:
Hei Vigdis. Jakken strikkes rundt fra midten af stjernen. Naar du har strikket A.1 i höjden har du strikket hele stjernen i midten. Kragen/kanten strikker du til slut iflg tegning A.2
18.02.2014 - 15:34
![]() Karin wrote:
Karin wrote:
Ja vielen dank. gut wäre Ihr würdet die Buchstaben in A2 entfernen. Das verwirrt nur. nächste Frage. Für die Achsel nehme ich in einer Ärmelhöhe von 53cm ab. Danach 3 x 3 M jede Rh abnehmen. Dann in einer Höhe von 56cm abketten. Also habe ich von der Achsel bis zur Schulter eine Distanz von 3 cm ?
15.02.2014 - 18:30DROPS Design answered:
Liebe Karin, bei diesem Modell sind die Schultern leicht überschnitten, sodass Sie keine längere Armkugel benötigen. Die Länge, die diese flache Armkugel fürs Einnähen in den Armausschnitt hat, passt wie beschrieben. Weiterhin viel Spaß beim Stricken!
16.02.2014 - 11:10
![]() Grethe Farberg-Roterud wrote:
Grethe Farberg-Roterud wrote:
Jeg skjønner ikke hva dere mener med A2a og a2b osv
13.02.2014 - 21:35DROPS Design answered:
Hei Grethe, det er namn på diagrammen som du finner nederst i oppskriften. På 1.omg strikker du: *2 m rett sammen, kast, gjenta fra * runt om. 2.omg: rett. 3.omg: 1 ret, *2 m rett sammen, kast, gjenta fra * runt om, og strik 1 ret i siste m. 4.omg: ret. Gjentag 1.-4.omg til kanten måler 6 cm, strik 1 omg ret, 1 omg vrang o så fell av.
13.02.2014 - 21:47
![]() Karin wrote:
Karin wrote:
Ebenfalls scheint mir ein fehler in der strickschrift im vorletzten absatzt bevor strickschrift A2 beginnt. hin und rückreihen re stricken sieht auf dem bild nach glatt rechts stricken aus und dann beginnt A2 ?!
08.02.2014 - 20:08DROPS Design answered:
Liebe Karin, A.2 stricken Sie wie folgt (in Rd): 1. Rd: 2 M re zusammen, 1 Umschlag, * 2 M re zusammen, 1 Umschlag *, von *-* wdh, enden mit 2 M re zusammen, 1 Umschlag. (A.2A, A.2B und A.2C sind also alle gleich) 2. Rd: re M. 3. Rd: 1 M re, * 2 M re zusammen, 1 Umschlag *, von *-* wdh, enden mit 1 M re. Diese Rd beginnt/endet also jeweils mit 1 M re. 4. Rd: re M. Vor A.2 stricken Sie 4 Runden kraus rechts.
14.02.2014 - 13:28
![]() Karin wrote:
Karin wrote:
Herzlichen dank das hilft mir jetzt wirkl. weiter!!! die strickschrift ist auf Euerer HP schon beim Anschlag 12 M und aus JEDER M.2 M herausstricken gergibt 24M stimmt nicht! ich bin wirkl eine erfahrene strickerin und kann strickschriften lesen, aber auch von rechts nach links gelesen einfach unverständlich. vll gehören die buchstaben A B C dann seitl an die strickschrift und selbst dann verstehe ich sie nicht.
08.02.2014 - 20:03DROPS Design answered:
Liebe Karin, wenn Sie 12 M anschlagen und jede M verdoppeln, erhalten Sie 24 M. Sie stechen also in jede M 2x ein - einmal normal von vorne und dann nochmal in dieselbe M in das hintere M-Glied.
14.02.2014 - 13:23
![]() Karin wrote:
Karin wrote:
Tut mir leid Strickschrift A2 verstehe ich nicht.Wie wird das gelesen A2.B, oder A2 C senkrecht/waagrecht ? Ich weiss weder wo Anfang noch Ende ist?
07.02.2014 - 17:52DROPS Design answered:
Liebe Karin, die Strickschrift liest man immer von der unteren rechten Ecke aus waagerecht. Wenn Sie weitere Unterstützung zur Umsetzung brauchen, wenden Sie sich gerne an den Laden, in dem Sie die Wolle gekauft haben, dort hilft man Ihnen gerne weiter.
08.02.2014 - 14:14
![]() Emelie wrote:
Emelie wrote:
Hej. Ska jag använda två rundstickor NR 6, 60 cm och 80 cm? Och strumpsticka NR6?
31.01.2014 - 11:13DROPS Design answered:
Hej Emelie, du startar med strumpst mitt bak när du bara har 12 m, sedan efter du ökat ett par ggr så går du över på en 6 cm rundst, när det ökats ytterligare o det inte längre är plats till alla m så går du över på en 80 cm lång rundst.
06.02.2014 - 00:02
![]() Tania Regina M. Simião wrote:
Tania Regina M. Simião wrote:
Gostei muito esse modelo! Vou fazer! Obrigada
29.01.2014 - 23:31Tania Regina M. Simião wrote:
Gosto muito das receitas! Tirei várias receitas, casaco catavento, pantufas, agora quero fazer esse modelo DROPS 148-1, Pena que aqui no Brasil Eu não acho as lâs DROPS. Obrigada por proporcionar as receitas, Bjus
29.01.2014 - 22:24
|
|||||||||||||||||||||||||||||||
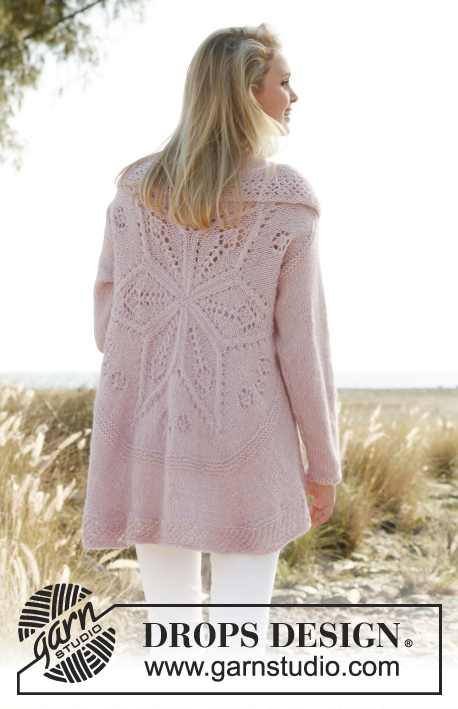
Daybreak#daybreakjacket |
|||||||||||||||||||||||||||||||
 |
 |
||||||||||||||||||||||||||||||
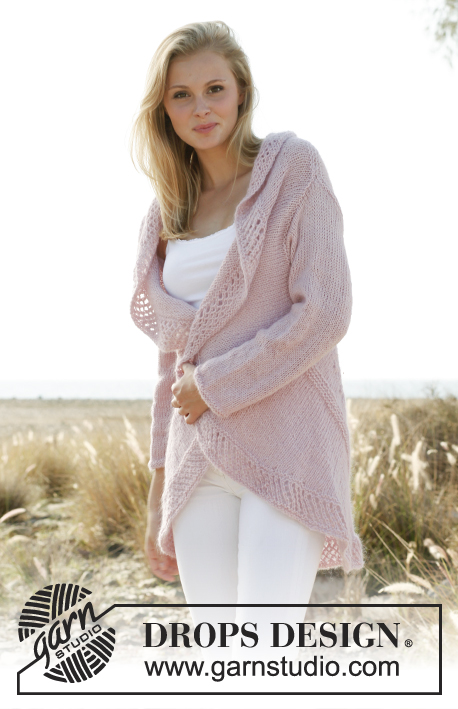
Knitted DROPS jacket worked in a circle with lace pattern in "Alpaca" and "Kid-Silk". Size: S - XXXL.
DROPS 148-1 |
|||||||||||||||||||||||||||||||
|
GARTER ST (in the round on circular needle): * K 1 round and P 1 round *, repeat from *-*. 1 ridge = 2 rounds. PATTERN: See diagram A.1. Diagram shows all rows in pattern seen from RS. ---------------------------------------------------------- JACKET WORKED IN A CIRCLE: Worked in the round in a circle from mid back. First work on double pointed needles, then switch to circular needle when needed. Cast on 12 sts with 1 strand of each yarn and distribute them on 4 double pointed needles size 6 mm / US 10. K 1 round while AT THE SAME TIME working 2 sts in all sts = 24 sts. K 1 round without inc. On next round, work as follows: * K 1, K 2 in next st *, repeat from *-* = 36 sts. Then work according to diagram A.1 (= 6 repetitions in the round). REMEMBER THE GAUGE! Switch to circular needle when needed. When A.1 has been worked, there are 234 sts on needle. Insert 1 marker in each of the tips on the star (in the middle st in every repetition) = 6 markers in total. Work in stockinette st AT THE SAME TIME inc 1 st on each side of markers. Inc with 1 YO on each side of sts with marker – on next round K yo twisted to avoid holes = 12 inc sts per round. Repeat inc every other round 1-2-3 more times (24-36-48 inc sts in total) = 258-270-282 sts (42-44-46 sts between every st with marker). Then work 2 ridges in GARTER ST – see explanation above - over all sts, without inc. On next round K while AT THE SAME TIME bind off all sts between 1st and 2nd marker, bind off the middle 32-34-36 sts between 2nd and 3rd marker and the middle 32-34-36 sts between 6th and 1st marker for armhole. P next round, AT THE SAME TIME pick up 1 new st in every bound off st between 1st and 2nd marker, and cast on 32-34-36 new sts over the bind off sts between 2nd and 3rd marker and 6th and 1st marker. (Sts between 1st and 2nd marker is equivalent to the shoulder width at the top. To avoid the shoulder width being to wide, bind off these sts and pick them up again on next row. This will stop the piece from being to long over the shoulder.) When all sts have been cast on/knitted up, there are 258-270-282 sts on needle. Work 1 ridge. Piece measures approx. 31-32-33 cm / 12¼"-12½"-13" from the middle. Then work in stockinette st, AT THE SAME TIME inc 1 st each side of sts with markers (= 12 inc). Inc with YO (work twisted on next round to avoid holes). Repeat inc every other round 9-11-13 more times (10-12-14 inc in total) = 378-414-450 sts. Keep sts between 2nd and 4th marker on needle, slip the other sts on a stitch holder = 125-137-149 sts on needle. Then work in stockinette st back and forth over sts on needle, AT THE SAME TIME at the end of every row slip the last 4 sts on stitch holder (do not work them, turn), continue until 37-49-61 sts remain on row. Slip the last 37-49-61 sts on stitch holder. Slip sts between 5th and 1st marker on circular needle size 6 mm / US 10, work the same way as in the other side. Then K all sts from RS back on to circular needle size 6 mm / US 10 - between every time sts where slipped on stitch holders in each side, get the yarn and twist it before slipping it on needle (i.e. between every 4th st, to avoid holes in the transitions), in addition inc evenly so that there are 452-496-540 sts in total on needle. Work 2 ridges. Then work according to A.2. Work A.2 A, repeat A.2 B until 2 sts remain and end with A.2 C. Work A.2 for 6 cm / 2⅜", work 1 ridge and bind off. SLEEVE: Worked in the round on double pointed needles. Cast on 36-38-40 sts on double pointed needles size 6 mm / US 10 with 1 strand of each yarn. Insert 1 marker at beg of round = mid under sleeve. Work 2 ridges. Continue in stockinette st. When piece measures 8 cm / 3⅛", inc 1 st on each side of marker mid under. Repeat inc every 4-3½-3 cm / 1½"-1¼"-1⅛" 10-11-13 more times (11-12-14 inc in total) = 58-62-68 sts. When piece measures 53-54-56 cm / 21"-21¼"-22", bind off 6 sts mid under sleeve and work back and forth until finished measurements. Then bind off for sleeve cap at beg of every row in each side: 3 sts 3 times = 34-38-44 sts. Bind off the remaining sts, sleeve measures approx. 56-57-59 cm / 22"-22½"-23¼". Sew in sleeves. |
|||||||||||||||||||||||||||||||
Diagram explanations |
|||||||||||||||||||||||||||||||
|
|||||||||||||||||||||||||||||||
 |
|||||||||||||||||||||||||||||||
 |
|||||||||||||||||||||||||||||||
Have you finished this pattern?Tag your pictures with #dropspattern #daybreakjacket or submit them to the #dropsfan gallery. Do you need help with this pattern?You'll find 23 tutorial videos, a Comments/Questions area and more by visiting the pattern on garnstudio.com. © 1982-2026 DROPS Design A/S. We reserve all rights. This document, including all its sub-sections, has copyrights. Read more about what you can do with our patterns at the bottom of each pattern on our site. |
|||||||||||||||||||||||||||||||


With over 40 years in knitting and crochet design, DROPS Design offers one of the most extensive collections of free patterns on the internet - translated to 17 languages. As of today we count 324 catalogs and 12290 patterns - 12280 of which are translated into English (US/in).
We work hard to bring you the best knitting and crochet have to offer, inspiration and advice as well as great quality yarns at incredible prices! Would you like to use our patterns for other than personal use? You can read what you are allowed to do in the Copyright text at the bottom of all our patterns. Happy crafting!
Post a comment to pattern DROPS 148-1
We would love to hear what you have to say about this pattern!
If you want to leave a question, please make sure you select the correct category in the form below, to speed up the answering process. Required fields are marked *.