
Popular categories
Looking for a yarn?


Comments / Questions (52)
![]() NaNa wrote:
NaNa wrote:
Vielen Dank, die letzte Antwort hatte mich etwas verwirrt. Aber die Rückreihe wird einfach schlicht links gestrickt! Jetzt sieht es wieder so aus, wie es soll. Danke für die schnelle Rückmeldung!
06.05.2022 - 20:21
![]() NaNa wrote:
NaNa wrote:
Hallo, Ich hatte den Bolero in der Mitte des Musters unterbrochen und jetzt klappt das Muster nicht mehr. Ist es möglich, die Hin und Rückreihe nochmal Masche für Masche zu notieren? Ich verstehe es leider einfach nicht mehr. Vielen Dank!
01.05.2022 - 20:13DROPS Design answered:
Liebe NaNa, bei den Hinreihen haben Sie 1 Randmasche kraus rechts, A.1 (= 1 M re, 1 Umschlag, 1 M re abheben, 2 M re zusammenstricken, die abgehobene M überziehen, 1 Umschlag) von (bis) wiederholen bis 2 M übrig sind, 1 M re (=1. Masche A.1) und 1 Randmasche rechts. Bei den Rückreihen stricken Sie: 1 Randmasche rechts, links bis 1 M übrig ist, 1 Randmasche rechts. Viel Spaß beim stricken!
02.05.2022 - 10:23
![]() Dorothea Egger wrote:
Dorothea Egger wrote:
Bitte wie wird in den Rückseiten gestrickt finde es leider nicht heraus danke
26.04.2022 - 11:32DROPS Design answered:
Liebe Frau Egger, das Diagram zeigt alle Reihen: Hinreihen lesen Sie rechts nach links (= 1. Reihe in A.1), Rückreihe lesen Sie links nach rechts (= 2. Reihe in A.1 = alle Maschen werden links gestrickt). Viel Spaß beim stricken!
26.04.2022 - 13:17
![]() Edyta wrote:
Edyta wrote:
Witam. Chcę zrobić to bolerko na osobę XXXL konkretnie w tym kolorze jaki jest na zdjęciu Włóczkę chcę zakupić u Państwa. Proszę wyliczyć mi ile potrzebuję włóczki i jakie koszta będę ponosić. Będę potrzebowała porady też innego bolerka, czy można w jednej przesyłce dostać te 2 włóczki? To bolerko ma nr 94-11 i chodzi mi konkretnie o biały kolor. Ale napiszę wiadomość pod tym konkretnym bolerko. Pozdrawiam Edyta
07.02.2020 - 12:15DROPS Design answered:
Witaj Edyto, w przypadku bolerka 145-20, na rozmiar XXXL musisz kupić 200 g (4 motki) włóczki DROPS COTTON LIGHT. Włóczka jest po ok. 6 zł za motek (w zależności od sklepu). Koszt włóczki na całe bolerko to 24 zł. Pozdrawiamy!
10.02.2020 - 17:41
![]() Maria Strand wrote:
Maria Strand wrote:
Til A1 : Du skal bare gjenta de to øverste radene.. altså IKKE rad nr.1
08.07.2017 - 01:03
![]() Nyn wrote:
Nyn wrote:
Kan ni skriva i text hur A1 ska göras på rätsidan resp. Avigsidan maska för maska. Är det någon skillnad hur man gör på de båda sidorna för att det ska bli rätt mönster? Vad heter detta mer än hålmönster?
28.05.2016 - 07:12DROPS Design answered:
Hej. Diagram A.1 visar varven sett från rätsidan. I förklaringen till symbolerna ser du hur du ska sticka. Dvs på v 2 (som ju stickas från avigsidan) stickas maskorna aviga. Lycka till!
30.05.2016 - 09:45
![]() Schwetta wrote:
Schwetta wrote:
Bonjour Je n'ai pas compris une chose dans la partie tricot : Pour le diagramme A1. Je fais le premier rang sur l'endroit avec 1m end puis un jeté puis glisser 1 m à l'end , 2m ens à l'end, passer la m glissée par dessus puis un jeté. Le rang 2 je suis donc à l'envers, est-ce que je fais toutes les mailles à l'envers ? Merci pour ces précisions. Blandine
19.02.2016 - 12:40DROPS Design answered:
Bonjour Mme Schwetta, tout à fait, au rang 2, on tricote toutes les mailles à l'envers. Bon tricot!
19.02.2016 - 15:03
![]() Katarína Lapínová wrote:
Katarína Lapínová wrote:
Hallo, how does it look the reverse side, please?? Thanks for the answer
12.08.2015 - 15:12DROPS Design answered:
Dear Mrs Lapínová, do you mean from wrong side ? in A.1 every row from WS is purled, so that you will have the holes and the sts in st st seen from RS and from WS, holes and P. Happy knitting!
12.08.2015 - 15:20
![]() Margaret wrote:
Margaret wrote:
With 55 stiches the pattern repeats more than 13 times. Please explain what I could be doing wrong. What do I do in the next row with stiches now reduced to about 34?
17.12.2014 - 18:08DROPS Design answered:
Dear Margaret, work the 55 sts as follows: 1 edge st, repeat A.1 (= 4 sts) a total of 13 times over the next 52 sts, 2 sts remain, work 1st st in A.1 (= 1 st st), and finish with 1 edge st. Click here to read more about diagrams (in Italian). Happy knitting!
18.12.2014 - 08:45
![]() Christina Hansel wrote:
Christina Hansel wrote:
Hallo. Ich habe den ersten Teil fertig gestrickt und wollte den Bolero jetzt zusammennähen und umhäkeln. Jetzt meine Frage: ich häkel an der Kante eine Runde feste Maschen und danach das Muster? Oder? Was bedeutet es, dass ich feste Maschen um die Öffnung zw. den Ärmeln machen soll und 4 fM über 6 R ??? Vielleicht habe ich auch nur einen Knoten im Kopf! Vielen Dank schon mal für die Hilfe!! LG Christina
20.11.2014 - 14:19DROPS Design answered:
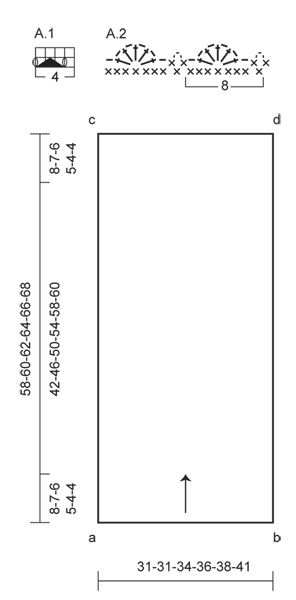
Den lösen wir. ;-) Sie nähen erst die Ärmel wie beschrieben zusammen, legen also die Punkte a+b und c+d zusammen und schließen die Nähte über die angegebene cm-Zahl. Dann häkeln Sie um den restlichen Rand, an den gestrickten R entlang, zuerst eine Rd feste M. Und zwar etwa 4 feste M über eine Länge von 6 gestrickten R - wenn Sie in jede gestrickte R 1 fM häkeln würden, würde sich der Rand wellen. Danach häkeln Sie dann die Spitzenkante wie beschrieben.
20.11.2014 - 14:28
|
|||||||||||||||||||||||||
Sea Shrug#seashrugbolero |
|||||||||||||||||||||||||
 |
 |
||||||||||||||||||||||||
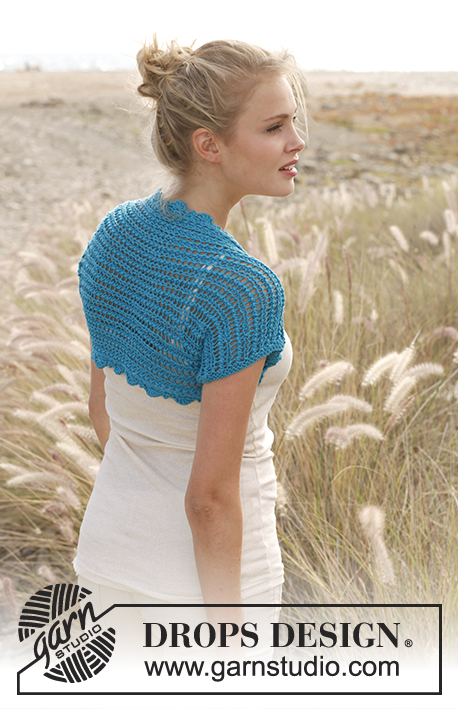
Knitted DROPS bolero with lace pattern in ”Cotton Light”. Size: S - XXXL.
DROPS 145-20 |
|||||||||||||||||||||||||
|
GARTER ST: K back and forth on all rows. 1 ridge = 2 K rows. PATTERN: See diagrams A.1 and A.2. Diagram A.1 shows all rows in 1 pattern repetition seen from RS. -------------------------------------------------------- BOLERO: Worked back and forth on needle. Cast on 55-55-59-63-67-71 sts on needle size 4.5 mm / US 7 with Cotton Light. Work 6 rows in GARTER ST - read explanation above. Work next row from RS as follows: 1 edge st in garter st, work diagram A.1 (13-13-14-15-16-17 times in total) until 2 sts remain on row, finish with 1st st in A.1 and 1 edge st in garter st. Continue like this with pattern and 1 edge st in garter st in each side. REMEMBER THE GAUGE! When piece measures approx. 57-59-61-63-65-67 cm / 22½"-23¼"-24"-24¾"-25½"-26½" (finish with 2nd row in A.1), work in garter st over all sts. When 3 ridges have been worked, loosely bind off all sts (piece measures approx. 58-60-62-64-66-68 cm / 22¾"-23½"-24½"-25¼"-26"-26¾"). ASSEMBLY: Sew tog for sleeves as follows (see chart): Place point a against point b, sew inside 1 edge st 8-7-6-5-4-4 cm / 3"-2¾"-2½"-2"-1½"-1½" from cast on edge in towards the middle. Repeat with point c against point d on the other side. CROCHET EDGE: Worked in the round. With hook size 4.5 mm/US 7 and beg mid under a sleeve, work sc around the entire opening between sleeves (work approx. 4 sc over 6 rows) - no of sc should be divisible by 8. NOTE! Work enough sc to avoid a tight edge. On next round, work as follows: ch 1, * 1 sc in next sc, ch 3, 1 sc in same sc, ch 1, skip 3 sc, in next sc work 5 dc with 1 ch between every dc, ch 1, skip 3 sc *, repeat from *-* the entire round - see diagram A.2, finish with 1 sl st in 1st sc from beg of round, fasten off. |
|||||||||||||||||||||||||
Diagram explanations |
|||||||||||||||||||||||||
|
|||||||||||||||||||||||||
 |
|||||||||||||||||||||||||
Have you finished this pattern?Tag your pictures with #dropspattern #seashrugbolero or submit them to the #dropsfan gallery. Do you need help with this pattern?You'll find 13 tutorial videos, a Comments/Questions area and more by visiting the pattern on garnstudio.com. © 1982-2026 DROPS Design A/S. We reserve all rights. This document, including all its sub-sections, has copyrights. Read more about what you can do with our patterns at the bottom of each pattern on our site. |
|||||||||||||||||||||||||


With over 40 years in knitting and crochet design, DROPS Design offers one of the most extensive collections of free patterns on the internet - translated to 17 languages. As of today we count 324 catalogs and 12290 patterns - 12280 of which are translated into English (US/in).
We work hard to bring you the best knitting and crochet have to offer, inspiration and advice as well as great quality yarns at incredible prices! Would you like to use our patterns for other than personal use? You can read what you are allowed to do in the Copyright text at the bottom of all our patterns. Happy crafting!
Post a comment to pattern DROPS 145-20
We would love to hear what you have to say about this pattern!
If you want to leave a question, please make sure you select the correct category in the form below, to speed up the answering process. Required fields are marked *.