
Popular categories
Looking for a yarn?


Comments / Questions (105)
![]() Benedetta wrote:
Benedetta wrote:
Buonasera,ho bisogno del vs aiuto!Sono arrivata a questo punto del lavoro"diminuire 2 m al centro dietro altre 31 volte,poi ogni 4 ferri 10 volte in totale..Ma 32x2 maglie quindi 64 diminuzioni? E 10 volte in totale quindi 20 diminuzioni
22.04.2014 - 21:21DROPS Design answered:
Buonasera Benedetta. Le diminuz sul dietro sono 2 m x 32 volte e 2 m x 10 v. In tutto 84 m. Si ricordi di finire di aumentare per lo scollo a V (4 m su ogni davanti = 8 m in tutto). Terminati i diag A.1 avrà 40 m in più. Dopo A.2, 56 m in più e dopo A.3, 72 m in più. In tutto 228 m. Ci riscriva se ancora in difficoltà. Buon lavoro!
22.04.2014 - 23:26
![]() Sandy wrote:
Sandy wrote:
Love it !
20.03.2014 - 23:36
![]() Anne Grethe wrote:
Anne Grethe wrote:
Hei😄 kanskje et litt dumt spørsmål men.... Skal den strikkes med enkel eller dobbel tråd? Nydelig vest forresten😉
07.03.2014 - 21:00DROPS Design answered:
Hei Anne Grethe. Denne vest strikkes med enkel traad.
10.03.2014 - 12:56Berit wrote:
Mangler inte alls, står längst ner på sidan som vanligt!
02.05.2013 - 18:10
![]() Daniela wrote:
Daniela wrote:
Hi. I bought muskat to do this tunic. My gauge is quite perfect with 5mm needles (19stitches in garther stitch, and 34 rows), but after wash the gauge changes enough: 17stitches, and 32 rows: it's larger and shorter!!! Do you think it's better I change needles, perhaps with 4mm or 4,5mm? Thank for your answer.
02.05.2013 - 14:19DROPS Design answered:
Dear Daniela, after washing your stample, did you block it at the correct measurements ? You can also work different gauge and wash them until you find the correct tension. Happy knitting!
02.05.2013 - 16:57
![]() Eva wrote:
Eva wrote:
Forklaringen til diagrammet er der til denne vesten som jeg holder på med, men diagrammet mangler. :)
02.05.2013 - 00:25DROPS Design answered:
Forklaringen står nederst på mønstret - lige over diagrammerne selv
03.05.2013 - 10:03
![]() Angelika Grebenstein wrote:
Angelika Grebenstein wrote:
Hallo Janette, habe die Weste nach Strickmuster für meine größe gestrickt. Vorne bekomme ich sie nicht zu, im Rückteil-Mitte hat sich mit der Abnahme eine Beule gebildet. Das seitliche Lochmuster sitzt im Rückteil. Meiner Meinung nach müßte im Rückteil garnicht abgenommen werden?! Habe einige Bilder gemacht, kann sie leider nicht anhängen. Würde die Weste gerne noch einmal stricken. Gruß Angelika
28.04.2013 - 12:36DROPS Design answered:
Liebe Angelika, haben Sie die Antwort auf Katjas Frage vom 24.02.2013 gelesen? ich denke, Ihre Frage geht in die gleiche Richtung. Vielleicht sollten Sie auch am Rückenteil weniger abnehmen, wenn es Ihnen nicht gefällt, dass die Weste nach hinten zieht.
29.04.2013 - 08:13
![]() Paula wrote:
Paula wrote:
Ook bij mij werd het gilet heel anders dan op het plaatje. Dezelfde problemen als Afra en Marjo en als ik de beschrijving volg wordt hij veel te lang. Ik heb zelfs vanuit het noors en zweeds vertaald om te kijken of er ee fout in het patroon zat. Het rugpand is echt veel te smal en toen hij llaar was leek het echt niet op de foto. Zonde, ik heb het uitgehaald nadat hij klaar was en ben een ander patroon nu aan het breien.
15.04.2013 - 07:47
![]() Rosa wrote:
Rosa wrote:
Por favor me gustaria saber si colgais el patrón o no porque estoy esperando para hacerlo. gracias
24.03.2013 - 13:40
![]() Afra wrote:
Afra wrote:
Ik heb hetzelfde probleem als Marjo hieronder. De maat van het gilet is goed maar het patroon aan de zijkant loopt naar achteren weg omdat middenachter te veel minderingen zijn gemaakt. Maar ik heb me precies aan het aantal minderingen van het patroon gehouden. Kijk aub nogmaals naar het patroon.
17.03.2013 - 15:36DROPS Design answered:
We hebben uitgebreid naar het patroon gekeken en het klopt. De bedoeling is dat er vrij veel st moeten worden verminderd aan het achterpand zodat het motief een beetje naar achteren gaat en opent middenvoor (hoop dat het goed te begrijpen is wat ik bedoel ;o)). Wil je graag een beetje anders, dan kan je eventueel minderen in elke 4e nld over het hele patroon en eindigen met meer st op het achterpand. Succes.
28.03.2013 - 12:28
|
|||||||||||||
Nadine#nadinevest |
|||||||||||||
 |
 |
||||||||||||
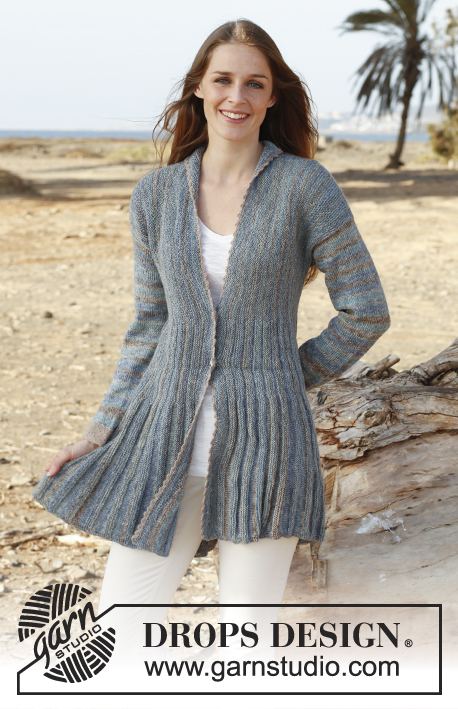
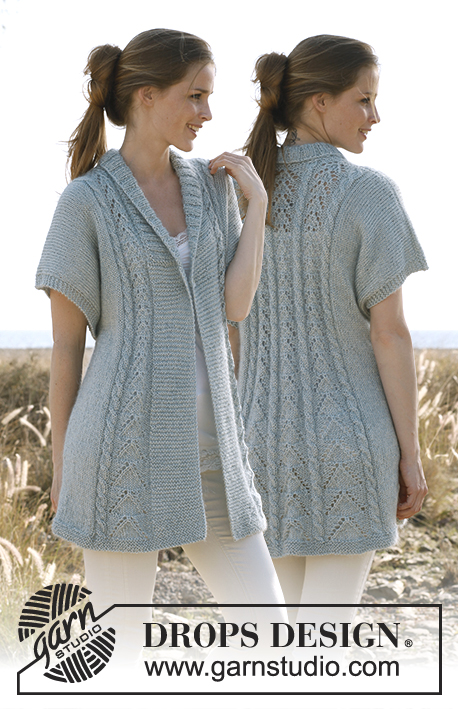
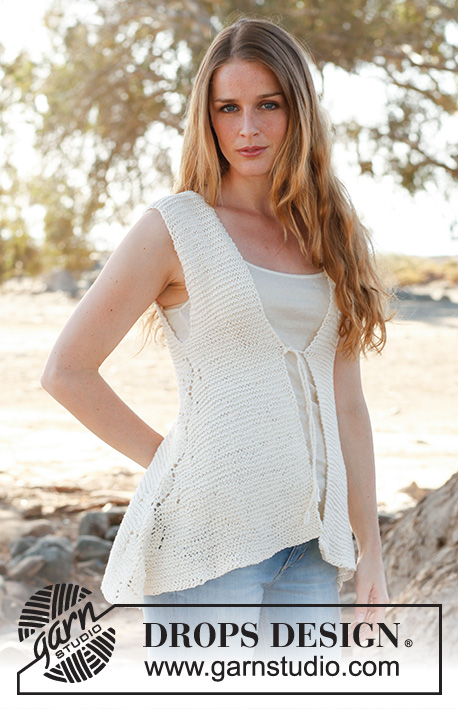
Knitted DROPS asymmetrical vest worked top down with lace pattern in the sides in ”Muskat”. Size: S - XXXL.
DROPS 145-2 |
|||||||||||||
|
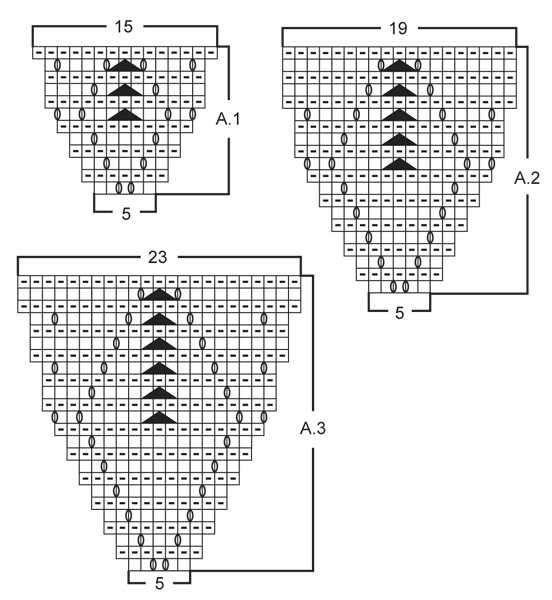
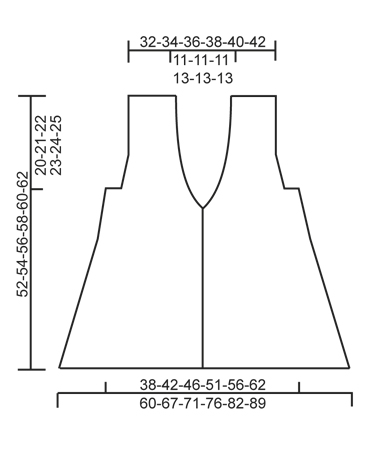
GARTER ST (back and forth on needle): K all rows. 1 ridge = 2 K rows. PATTERN: See diagrams A.1 to A.3. Diagrams show all rows in pattern seen from RS. DECREASE TIP (applies to mid back): All dec are done from RS. Beg 2 sts before marker, K 2 tog, slip 1 st as if to K, K 1, psso (= 2 sts dec mid back). MEASURING TIP: All length measurements should be done when piece is flat. -------------------------------------------------------- VEST: The piece is worked top down. Front and back piece is worked back and forth on needle separately down to and with armhole. Then all sts are slipped on the same circular needle. Then the piece is worked back and forth from mid front. LEFT FRONT PIECE: Worked back and forth on circular needle. Cast on 20-22-24-24-26-28 sts on circular needle size 5 mm / US 8 with Muskat. Work in GARTER ST - see explanation above. REMEMBER THE GAUGE! When piece measures 6-8-10-6-8-10 cm / 2½"-3"-4"-2½"-3"-4" – READ MEASURING TIP, inc 1 st for v-neck towards mid front by working 2 sts in first st at beg of row (seen from RS). Repeat inc every 2½ cm / ⅞" (i.e. every 5th ridge), 9-9-9-11-11-11 more times (= 10-10-10-12-12-12 inc in total). AT THE SAME TIME when piece measures 11-9-8-8-8-11 cm / 4½"-3½"-3"-3"-3"-4½" – READ MEASURING TIP, inc 1 st towards armhole side by working 2 sts in last st on row (seen from RS). Repeat inc every 3-2½-2-2-1½-1 cm / 1⅛"-⅞"-¾"-¾"-½"-⅜", 2-4-6-7-10-13 more times (= 3-5-7-8-11-14 inc in total). When piece measures 20-21-22-23-24-25 cm / 8"-8¼"-8¾"-9"-9½"-9¾" (inc towards armhole should now be done), cast on 3-3-3-4-4-5 new sts at the end of row towards the side (not towards mid front). Armhole is now done and 6-6-5-7-7-7 sts have been inc for v-neck towards mid front (i.e. 4-4-5-5-5-5 inc remain for v-neck towards mid front). Piece measures approx. 20-21-22-23-24-25 cm / 8"-8¼"-8¾"-9"-9½"-9¾" and there are 32-36-39-43-48-54 sts. Slip the sts on 1 stitch holder. RIGHT FRONT PIECE: Work as left front piece but inc for v-neck at the end of row (seen from RS) and inc for armhole at beg of row (seen from RS). BACK PIECE: Left shoulder: Cast on 20-22-24-24-26-28 sts on circular needle size 5 mm / US 8 with Muskat. Work 3 ridges in garter st, beg from RS. Cut the yarn and put piece aside. Right shoulder: Cast on 20-22-24-24-26-28 sts on circular needle size 5 mm / US 8 with Muskat. Work 3 ridges, beg from RS, then cast on 20-20-20-24-24-24 sts at the end of next row from WS = 40-42-44-48-50-52 sts. Work sts from left shoulder on to same circular needle = 60-64-68-72-76-80 sts. Continue to work in garter st back and forth on needle. AT THE SAME TIME when piece measures 11-9-8-8-8-11 cm / 4½"-3½"-3"-3"-3"-4½" from shoulder, inc 1 st in first and last st on row. Repeat inc in each side every 3-2½-2-2-1½-1 cm / 1⅛"-⅞"-¾"-¾"-½"-⅜", 2-4-6-7-10-13 more times (= 3-5-7-8-11-14 inc in total in each side). When piece measures 20-21-22-23-24-25 cm / 8"-8¼"-8¾"-9"-9½"-9¾" (inc in each side should now be done), cast on 3-3-3-4-4-5 new sts at the end of the next 2 rows. Armholes are now done, piece measures approx. 20-21-22-23-24-25 cm / 8"-8¼"-8¾"-9"-9½"-9¾" and there are 72-80-88-96-106-118 sts on needle. Cut the yarn. BODY: Slip sts from right and left front piece on to same circular needle as back piece = 136-152-166-182-202-226 sts. NOW MEASURE PIECE FROM HERE! Insert 2 markers in the piece; in the 32nd-36th-39th-43rd-48th-54th st from each side (= 72-80-88-96-106-118 sts between sts with markers on back piece). AT THE SAME TIME insert 1 marker mid back (i.e. in the middle of the 2 markers in the sides so that there are 36-40-44-48-53-59 sts on each side of this marker). Beg mid front and continue in garter st back and forth for 4-2-3-2-3-3 cm / 1½"-¾"-1⅛"-¾"-1⅛"-1⅛" AT THE SAME TIME continue inc for v-neck in each side towards mid front as before. READ ALL OF THE FOLLOWING SECTION BEFORE CONTINUING! Work next row from RS as follows (continue inc for v-neck as before): Work in garter st until 2 sts remain before first st with marker (= in the side), work A.1 (= 5 sts), work in garter st until 2 sts remain before next marker (= mid back), dec 1 st on each side of marker – READ DECREASE TIP (= 2 sts dec), work in garter st until 2 sts remain before next marker (= in the side), work A.1 (= 5 sts) and then work in garter st the rest of row. Continue pattern like this (note the inc in A.1 – see diagram and continue the inc for v-neck until 10-10-10-12-12-12 inc in total have been done in each side towards mid front), AT THE SAME TIME dec 2 sts mid back every other row (i.e. every row from RS), 31-36-36-36-36-38 more times (= 32-37-37-37-37-39 dec in total mid back) and then every 4th row (i.e. every other row from RS) 10-10-10-12-12-12 times in total. When A.1 has been worked 2-3-3-2-2-2 times in total vertically, work A.2 in each side (instead of A.1, continue the other sts as before). When A.2 has been worked 2-2-2-3-3-2 times in total vertically, work A.3 in each side (instead of A.2). When A.3 has been worked 2-2-2-2-2-3 times in total vertically and after last dec mid back, there are 228-254-270-290-310-338 sts on needle and piece measures approx. 32-33-34-35-36-37 cm / 12½"-13½"-13⅜"-13¾"-14¼"-14½" from where all sts were put tog. K 1 row from RS while AT THE SAME TIME working 1st row in A.3 in each side so that the pattern is finished nicely, then LOOSELY bind off with K from WS. Now piece measures approx. 52-54-56-58-60-62 cm / 20½"-21¼"-22"-22¾"-23⅝"-24⅜" measured straight down from shoulder (the sides are longer because of inc to give extra width and length). ASSEMBLY: Sew shoulder seams. TIES: Cut 2 strands Muskat of approx. 100-120 cm / 39½"-47" each. Hold the 2 strands tog, pull them through next to last st on one front piece (in the transition where inc for v-neck ends). Make a knot in one end of the 2 strands. Twine the strands tog until they resist, fold them double so that they twine. Make a knot at the end. Repeat on the other front piece. Tie the vest tog mid front. |
|||||||||||||
Diagram explanations |
|||||||||||||
|
|||||||||||||
 |
|||||||||||||
 |
|||||||||||||
Have you finished this pattern?Tag your pictures with #dropspattern #nadinevest or submit them to the #dropsfan gallery. Do you need help with this pattern?You'll find 5 tutorial videos, a Comments/Questions area and more by visiting the pattern on garnstudio.com. © 1982-2026 DROPS Design A/S. We reserve all rights. This document, including all its sub-sections, has copyrights. Read more about what you can do with our patterns at the bottom of each pattern on our site. |
|||||||||||||


With over 40 years in knitting and crochet design, DROPS Design offers one of the most extensive collections of free patterns on the internet - translated to 17 languages. As of today we count 325 catalogs and 12298 patterns - 12288 of which are translated into English (US/in).
We work hard to bring you the best knitting and crochet have to offer, inspiration and advice as well as great quality yarns at incredible prices! Would you like to use our patterns for other than personal use? You can read what you are allowed to do in the Copyright text at the bottom of all our patterns. Happy crafting!
Post a comment to pattern DROPS 145-2
We would love to hear what you have to say about this pattern!
If you want to leave a question, please make sure you select the correct category in the form below, to speed up the answering process. Required fields are marked *.