
Popular categories
Looking for a yarn?


Comments / Questions (89)
![]() Audrey wrote:
Audrey wrote:
Bonsoir excuser moi pour le dérangement mais je n’arrive pas à voir le nombre de pelotes quil faut pour la taille 3/4. Merci
20.11.2018 - 19:54DROPS Design answered:
Bonjour Audrey, il vous faut 300 g, cela veut dire 6 pelotes de DROPS MERINO EXTRA FINE. Bon tricot!
20.11.2018 - 20:25
![]() Suzanne Boudreau wrote:
Suzanne Boudreau wrote:
Rendue au (dos et devant), quand vous dites placer un marqueur au milieu de 8 mailles sur les côtés Est-ce que ce sont les 8 mailles que nous avons mises sur un arrêt rt les manches Est-ce qu'il faut les tricoter avant de les placer sur l'aiguille? Quand faut-il les mettre sur l'aiguille? merci à l'avance vous nous êtes d'un grand secours
15.10.2018 - 18:31DROPS Design answered:
Bonjour Mme Boudreau, ces 8 m sont celles que vous avez montées au tour précédent, et qui remplacent les mailles des manches. Le dos et le devant se termine en rond sur toutes les mailles du dos, du devant et les 2 x 8 m montées sous les manches. Cette vidéo montre comment tricoter un pull de haut en bas et vous permettra de visualiser cette partie. Bon tricot!
16.10.2018 - 09:01
![]() Sa' wrote:
Sa' wrote:
Buongiorno, riguardo gli aumenti dello sprone: \"...ripetete gli aumenti ogni giro altre n. volte e poi OGNI 2 GIRI N. VOLTE\": \"ogni 2 giri\" significa che gli aumenti vanno fatti un giro si e uno no oppure 2 giri senza aumenti ed il terzo con gli aumenti? Grazie mille!
05.10.2018 - 14:14DROPS Design answered:
Buongiorno Sa'. Ogni 2 giri indica un giro sì e uno no. Buon lavoro!
05.10.2018 - 14:24
![]() Suzanne Boudreau wrote:
Suzanne Boudreau wrote:
Il est mentionné comment faire les augmentations avant le marqueur, mais après le marqueur comment fait-on?
13.09.2018 - 15:24DROPS Design answered:
Bonjour Mme Boudreau, on commence à augmenter quand il reste 1 m avant le marqueur: vous faites 1 jeté (= 1 augmentation), puis vous tricotez 2 m end (= le marqueur est entre ces 2 mailles), et vous faites 1 jeté (= 1 augmentation). Vous avez ainsi augmenté 1 maille avant et 1 maille après le marqueur. Bon tricot!
13.09.2018 - 15:30
![]() Maria wrote:
Maria wrote:
Sto facendo la taglia 5/6 e ho difficoltà per gli aumenti del raglan. Partendo da 88 (84+4) ed aumentando prima e dopo i segnapunti come indicato nei suggerimenti, non riesco ad avere il segnapunti tra due maglie al diritto. Dove sbaglio? Grazie mille.
08.04.2018 - 00:50
![]() Christina Frederiksen wrote:
Christina Frederiksen wrote:
Hej Jeg kommer til at bruge 550g garn ialt til trøjen i str. 11/12 år. 3 nøgler mere en forventet og har fulgt opskriften korrekt
11.02.2018 - 23:00
![]() Cathrine wrote:
Cathrine wrote:
Hei igjen. Har dere en video som viser hvordan øke før og etter maske på denne genseren for eksempel? Skal øke en maske før og en maske etter.
14.09.2017 - 23:08DROPS Design answered:
Hei Cathrine. Vi har ingen video på hvordan det økes på akkurat denne modellen, men vi har video på hvordan gjøre et generell kast (økning). (Se video: Hvordan øke med et kast). På denne modellen har du 4 merker og gjør 1 kast før hvert merke og 1 kast etter hvert merke, altså 8 kast (8 økte masker) på hver omgang det økes. God Fornøyelse!
18.09.2017 - 07:23
![]() Cathrine wrote:
Cathrine wrote:
Hei, hvis jeg vil strikke denne i 3/4 år, hvor mange nøster trenger jeg? Klarer ikke se hvor det står her ..
13.09.2017 - 10:40DROPS Design answered:
Hei Cathrine, Du trenger 300g. Det står under materialer på toppen av sida. God fornøyelse!
13.09.2017 - 10:58
![]() Stephanie Bevis wrote:
Stephanie Bevis wrote:
Knitting the first size, I would suggest an extra ball of wool is needed if, like me, you use a stretchy bind off. I was 1 metre short of wool! Good pattern though, enjoyed knitting it - I used Japanese short rows for elevation in the back of the neck - much neater than as written.
21.06.2017 - 13:53
![]() PITSCHON Martine wrote:
PITSCHON Martine wrote:
Bonjour, je viens de commencer le modèle enfant 23-7 : pour l'empiècement, il est précisé d'augmenter tous les tours ? je tricote un tour avec augmentations (jeté) et je refais à nouveau un jeté juste après avoir tricoté le jeté du tour précédent ?? ou je tricote un rang + augmentations puis un tour en prenant les mailles comme elles se présentent - et reprend ces deux rangs jusqu'aux nouvelles instructions qui sont : augmentations ts les 2 rgs (ou 4 ?) ?? Merci ! Martine
15.06.2017 - 18:35DROPS Design answered:
Bonjour Martine, quand vous augmentez tous les tours (7-11 fois, cf taille), vous faites 1 jeté avant et après chaque marqueur tous les tours en tricotant le jeté du tour précédent (= l'augmentation précédente) torse pour éviter les trous. Puis tous les 2 tours: 1 tour avec jetés, 1 tour sans jetés. Bon tricot!
16.06.2017 - 08:34
|
|||||||
Paulina#paulinasweater |
|||||||
|
|
|||||||
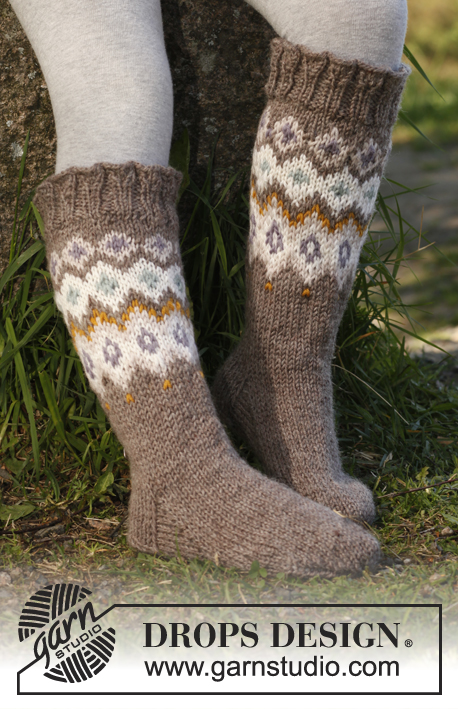
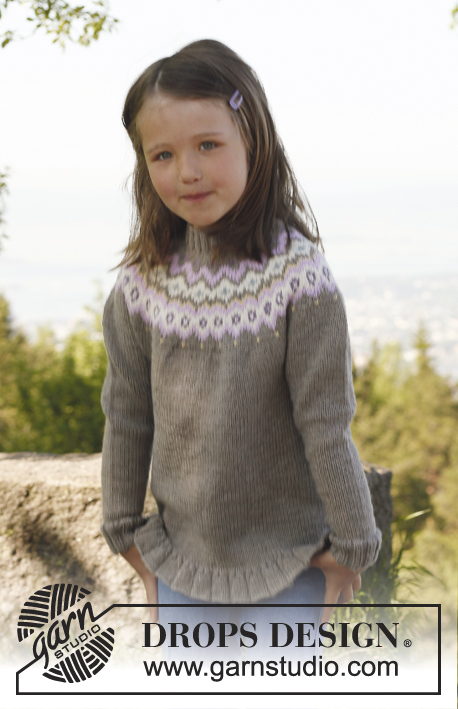
Knitted sweater with raglan, worked top down in DROPS Merino Extra Fine. Size children 3 to 12 years.
DROPS Children 23-7 |
|||||||
|
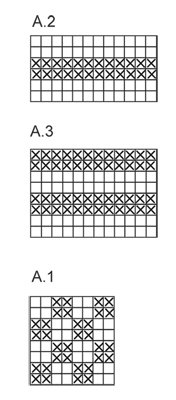
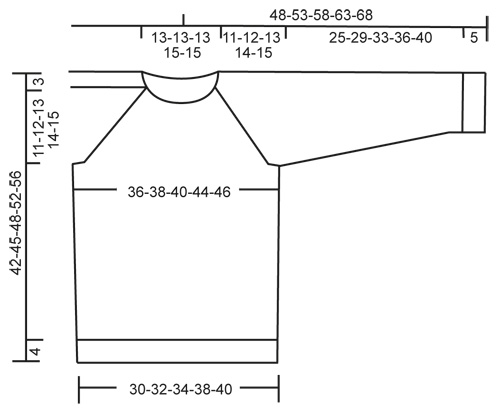
INCREASE TIP (applies to raglan): Work until 1 st remain before marker: Make 1 YO, K 2 sts (marker is in the middle of these sts), make 1 YO. On next round K YOs twisted (i.e. work in back loop of st instead of front) to avoid holes. Work the inc sts in the pattern. PATTERN: See diagrams A.1, A.2 and A.3. Diagrams show all rows in pattern seen from RS. DECREASE TIP (applies to body and sleeves): Work until 2 sts remain before marker, K 2 tog, marker, and K 2 twisted tog (i.e. work in back loop of st instead of front). -------------------------------------------------------- JUMPER: Worked in the round, top down. YOKE: Cast on 84-84-84-92-92 sts on a short circular needle size 3 mm / US 2.5 with Merino Extra Fine. Insert a marker at beg of round (= mid back). K 1 round. Then work rib = K 2/P 2 for 3 cm / 1⅛". Then work an elevation in back of neck as follows (continue in rib): Work 8 sts past marker, turn, tighten thread and work 16 sts back, turn, tighten thread and work 24 sts, turn, continue by working 8 sts more on every turn until a total of 64 sts have been worked, turn and work 1 round until marker mid back again. READ ALL OF THE FOLLOWING SECTION BEFORE CONTINUING! Switch to circular needle size 4 mm / US 6 and work 1 round in stockinette st while at the same time inc 4 sts evenly = 88-88-88-96-96 sts. Now insert 4 new markers (for raglan) as follows: Work 15-15-15-17-17 sts from marker mid back, insert 1st marker here (at the same time remove marker mid back), work 14 sts more (= sleeve), insert 2nd marker, work 30-30-30-34-34 sts (= front piece) and insert 3rd marker, work 14 sts (= sleeve), insert 4th marker and work until 1st marker again (there are 30-30-30-34-34 sts between markers on back piece). Work A-1, AT THE SAME TIME on 1st round, inc 1 st on each side of the 4 markers for raglan (= 8 inc) - SEE INCREASE TIP! Repeat inc every round 7-7-9-10-11 more times and then every other round 11-13-13-14-15 times = 240-256-272-296-312 sts on needle. AT THE SAME TIME when piece measures 8-8-8-9-9 cm / 3⅛"-3⅛"-3⅛"-3½"-3½" from mid front, work A.2 1 time vertically, then work A.1 again. After all inc, work next round as follows: Work until 1st marker. Slip the 52-56-60-64-68 sts between 1st and 2nd marker on a stitch holder, cast on 8 new sts over stitch holder, work until 3rd marker, slip the 52-56-60-64-68 sts between 3rd and 4th marker on a stitch holder, cast on 8 new sts over stitch holder, work until 1st marker again = 152-160-168-184-192 sts on needle. BODY: Continue in A.1 – AT THE SAME TIME insert a marker in the middle of the 8 new sts in each side. When piece measures 3 cm / 1⅛" from where sleeve sts were put on a stitch holder, work A-3 1 time vertically, then continue in stockinette st. AT THE SAME TIME when 4 cm / 1½" have been worked from where sleeve sts were slipped on a stitch holder, dec 1 st on each side of the markers in the sides – SEE DECREASE TIP! Repeat dec every 3-4-4-5-5 cm / 1⅛"-1½"-1½"-2"-2", 4 more times = 132-140-148-164-172 sts. Continue to work until piece measures 38-41-44-48-52 cm / 15"-16⅛"-17¼"-19"-20½" from shoulder. Work 1 round while AT THE SAME TIME inc 4 sts evenly = 136-144-152-168-176 sts. Switch to circular needle size 3 mm / US 2.5 and work rib = K 2/P 2 for 4 cm / 1½". LOOSELY bind off with K over K and P over P. Piece measures approx. 42-45-48-52-56 cm / 16½"-17¾"-19"-20½"-22" from shoulder. SLEEVE: Slip sts from one stitch holder on double pointed needles size 4 mm / US 6 and in addition cast on 8 new sts under sleeve = 60-64-68-72-76 sts. Insert a marker mid under sleeve (i.e. in the middle of the 8 new sts). NOW MEASURE PIECE FROM HERE! Continue with A.1 until piece measures 3 cm / 1⅛" from marker, now work A.3 1 time vertically, then work in stockinette st. AT THE SAME TIME when 1 cm / ⅜" of A.3 has been worked, dec 1 st on each side of marker – SEE DECREASE TIP! Repeat dec every 4-3-4-4-3½ cm / 1½"-1⅛"-1½"-1½"-1¼", 5-7-7-7-9 more times = 48-48-52-56-56 sts. Continue to work until sleeve measures 25-29-33-36-40 cm / 9¾"-11⅜"-13"-14¼"-15¾". Switch to double pointed needles size 3 mm / US 2.5 and work rib = K 2/P 2 for 5 cm / 2". Then LOOSELY bind off with K over K and P over P. Work the other sleeve the same way. ASSEMBLY: Sew the openings under the sleeves. |
|||||||
Diagram explanations |
|||||||
|
|||||||
 |
|||||||
 |
|||||||
Have you finished this pattern?Tag your pictures with #dropspattern #paulinasweater or submit them to the #dropsfan gallery. Do you need help with this pattern?You'll find 12 tutorial videos, a Comments/Questions area and more by visiting the pattern on garnstudio.com. © 1982-2026 DROPS Design A/S. We reserve all rights. This document, including all its sub-sections, has copyrights. Read more about what you can do with our patterns at the bottom of each pattern on our site. |
|||||||


With over 40 years in knitting and crochet design, DROPS Design offers one of the most extensive collections of free patterns on the internet - translated to 17 languages. As of today we count 325 catalogs and 12298 patterns - 12288 of which are translated into English (US/in).
We work hard to bring you the best knitting and crochet have to offer, inspiration and advice as well as great quality yarns at incredible prices! Would you like to use our patterns for other than personal use? You can read what you are allowed to do in the Copyright text at the bottom of all our patterns. Happy crafting!
Post a comment to pattern DROPS Children 23-7
We would love to hear what you have to say about this pattern!
If you want to leave a question, please make sure you select the correct category in the form below, to speed up the answering process. Required fields are marked *.