
Popular categories
Looking for a yarn?


Comments / Questions (89)
![]() REINE MARIE wrote:
REINE MARIE wrote:
BONSOIR JE FAIS CE JOLI PULL.ALORS VOILA POUR MESURER A9CM FAUT IL A PARTIR DU COL DEVANT OU A PARTIR DU DESSIN FANTAISIE? ET AUSSI ES T IL NORMAL QU IL Y AI DES JOURS SUR UN COTE DES AUGMENTATIONS DU RAGLAN POURTANT JE FAIS LA MAILLE TORSE A L ENDROIT SUR UN COTE C EST NORMAL MAIS SUR UN COTE IL Y A UN JOUR.MERCI DE VOTRE REPONSE
14.12.2019 - 20:51DROPS Design answered:
Bonjour Reine Marie, mesurez à partir du rang de montage, mais bien au milieu devant (surtout pas au milieu dos, la hauteur serait différente à cause de la réhausse). Essayez de ne pas faire vos jetés trop lâches pour éviter qu'ils ne forment de trop gros trous. Bon tricot!
16.12.2019 - 08:13
![]() Sara wrote:
Sara wrote:
Thanx for responding ☺ there is another trick I can't get it . When the pattern says work A2 VERTICALY And i did so . And it didnt look like the photo at all. So did you meant HORIZONTAL which woud be six rounds starting with 2 knitting rounds followe up with 2 purl rounds then 2 knitting rounds again?!!
31.10.2019 - 06:23DROPS Design answered:
Dear Sara,to work A.2 vertically, you have to work the 6 rows in A.2 - as you described them - over all stitches. Happy knitting!
04.11.2019 - 13:59
![]() Sara wrote:
Sara wrote:
In the yoke part when we should do the inc and work A-1 at the same time. How is that suppose to work?!! I'm totally lost and dont know if i should knit or purl before the inc and maintain theA-1 pattern at the same time. Please help me!!
26.10.2019 - 09:38DROPS Design answered:
Hello Sara! Please look at INCREASE TIP for raglan: make 1 YO, K 2 sts (marker is in the middle of these sts), make 1 YO; work the inc sts in the pattern. Don't worry if the pattern doesn't fit on one row, it will on next row. Happy knitting!
30.10.2019 - 14:19
![]() Malgotzata wrote:
Malgotzata wrote:
Pytalam co to znaczy miedzy 1 i 2 markerem nabrac 8 o ponad drut pomocniczy
26.08.2019 - 14:11DROPS Design answered:
Witaj Małgosiu! Jak to zrobić znajdziesz na video TUTAJ. Patrz między 7 a 9 minutą, a oczka na nitce (na rękaw) potraktuj jak oczka między 1 i 2 markerem. Powodzenia!
27.08.2019 - 09:29
![]() Malgorzata wrote:
Malgorzata wrote:
Miedzy 1 i2 markerem nabrac 8 o ponad drutem pomocniczym
24.08.2019 - 17:00DROPS Design answered:
Witaj Małgosiu, dokładnie tak. Powodzenia!
26.08.2019 - 08:33
![]() Sylvaine wrote:
Sylvaine wrote:
Bonjour je suis en train de faire ce pull en 11/12 ans j’ai fini le corps et il me reste les manches à tricoter hors sur 400g il me reste une peloteet demi combien pensez vous vais je devoir recommander de pelotes pour terminer . Combien depelotes par manche dans cette taille ? Meerci pour votre aide
08.02.2019 - 11:10DROPS Design answered:
Bonjour Sylvaine, suite à quelques retours de clientes, nous avons modifié la quantité des 2 grandes tailles, soit 500 g pour la taille 11/12 ans. Pensez toutefois à bien vérifier et conserver votre tension. Bon tricot!
08.02.2019 - 13:39
![]() Cathy wrote:
Cathy wrote:
Merci pour votre reponse mais avec la motif A1 je n arrive pas a faire correspondre les augmentations et le motif Pouvez vous me guider Merci
04.02.2019 - 16:25DROPS Design answered:
Bonjour Cathy, quand vous tricotez A.1, vous devez toujours avoir 2 m end, 2 m env en alternance tout le tour sur 2 tours, au tour suivant, vous aurez 2 m env, 2 m end, suivez simplement ce point sur les nouvelles mailles pour que le point fantaisie continue sur les nouvelles mailles comme sur les "anciennes". Bon tricot!
04.02.2019 - 17:13
![]() Bonjour wrote:
Bonjour wrote:
J en suis aux augmentation du raglan vous dites augmenter à tous les tour ne serait ce pas tous les 2 tours car avec les jetées tous kesvtours je ne voit pas comment faire merci
04.02.2019 - 14:34DROPS Design answered:
Bonjour, on augmente d'abord tous les tours puis tous les 2 tours. Au tour suivant les augmentations, tricotez le jeté du tour précédent torse, quand vous augmentez tous les tours, tricotez le jeté torse, faites 1 jeté, les 2 m end avec le marqueur, 1 jeté, et tricotez le jeté torse. Bon tricot!
04.02.2019 - 15:05
![]() Gail Walraven wrote:
Gail Walraven wrote:
On the yoke, the pattern calls for A-1 until 8 cm. is reached on front, then a switch to A-2 Is the 8 cm from the beginning of the ribbing or from the beginning of the A-1 and increase rows?
23.01.2019 - 22:14DROPS Design answered:
Dear Mrs Walraven, measure the 8 cm from the cast on edge on mid front (not on back piece because of elevation). Happy knitting!
24.01.2019 - 09:54
![]() CHRIS wrote:
CHRIS wrote:
Bonjour, je ne comprend pas la ré hausse : cotes 3 cm ensuite ré hausse (continuer en cote), augmentations en A1. A 8 cm A2. J'ai 6 cm de cotes ??? donc je doit avoir 2 cm A1 avant A2. Est ce correcte ? Je ne comprends pas.Merci
16.01.2019 - 08:46DROPS Design answered:
Bonjour Chris, on mesure le long du devant pour ne pas prendre la réhausse de l'encolure dos en compte, donc, on va commencer A.2 à 8-9 cm en mesurant sur le devant et non sur le dos. Bon tricot!
16.01.2019 - 08:54
|
|||||||
Paulina#paulinasweater |
|||||||
|
|
|||||||
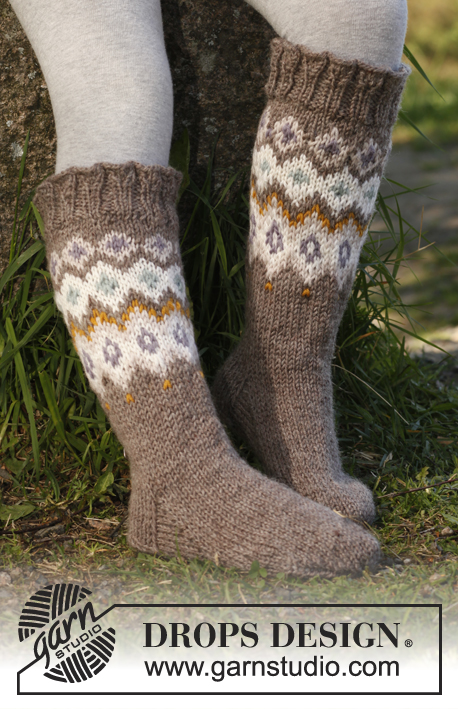
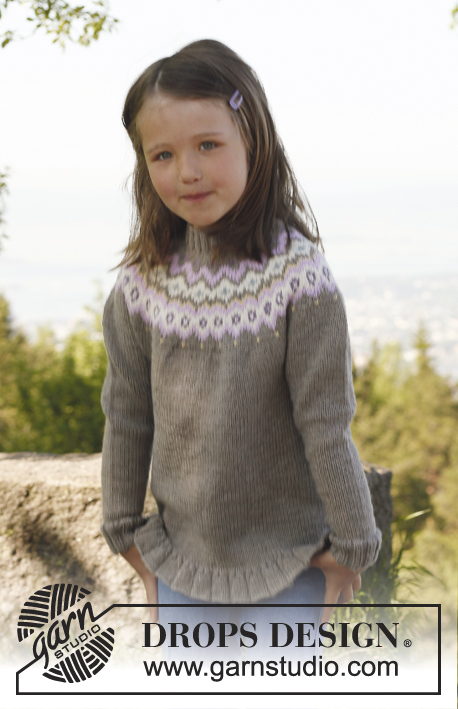
Knitted sweater with raglan, worked top down in DROPS Merino Extra Fine. Size children 3 to 12 years.
DROPS Children 23-7 |
|||||||
|
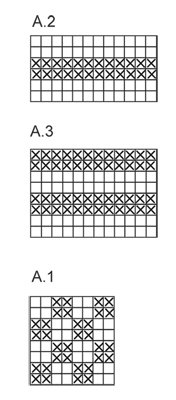
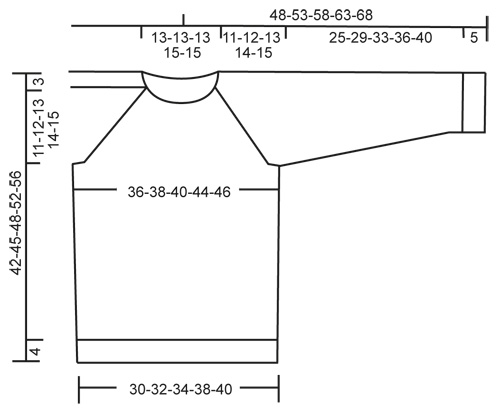
INCREASE TIP (applies to raglan): Work until 1 st remain before marker: Make 1 YO, K 2 sts (marker is in the middle of these sts), make 1 YO. On next round K YOs twisted (i.e. work in back loop of st instead of front) to avoid holes. Work the inc sts in the pattern. PATTERN: See diagrams A.1, A.2 and A.3. Diagrams show all rows in pattern seen from RS. DECREASE TIP (applies to body and sleeves): Work until 2 sts remain before marker, K 2 tog, marker, and K 2 twisted tog (i.e. work in back loop of st instead of front). -------------------------------------------------------- JUMPER: Worked in the round, top down. YOKE: Cast on 84-84-84-92-92 sts on a short circular needle size 3 mm / US 2.5 with Merino Extra Fine. Insert a marker at beg of round (= mid back). K 1 round. Then work rib = K 2/P 2 for 3 cm / 1⅛". Then work an elevation in back of neck as follows (continue in rib): Work 8 sts past marker, turn, tighten thread and work 16 sts back, turn, tighten thread and work 24 sts, turn, continue by working 8 sts more on every turn until a total of 64 sts have been worked, turn and work 1 round until marker mid back again. READ ALL OF THE FOLLOWING SECTION BEFORE CONTINUING! Switch to circular needle size 4 mm / US 6 and work 1 round in stockinette st while at the same time inc 4 sts evenly = 88-88-88-96-96 sts. Now insert 4 new markers (for raglan) as follows: Work 15-15-15-17-17 sts from marker mid back, insert 1st marker here (at the same time remove marker mid back), work 14 sts more (= sleeve), insert 2nd marker, work 30-30-30-34-34 sts (= front piece) and insert 3rd marker, work 14 sts (= sleeve), insert 4th marker and work until 1st marker again (there are 30-30-30-34-34 sts between markers on back piece). Work A-1, AT THE SAME TIME on 1st round, inc 1 st on each side of the 4 markers for raglan (= 8 inc) - SEE INCREASE TIP! Repeat inc every round 7-7-9-10-11 more times and then every other round 11-13-13-14-15 times = 240-256-272-296-312 sts on needle. AT THE SAME TIME when piece measures 8-8-8-9-9 cm / 3⅛"-3⅛"-3⅛"-3½"-3½" from mid front, work A.2 1 time vertically, then work A.1 again. After all inc, work next round as follows: Work until 1st marker. Slip the 52-56-60-64-68 sts between 1st and 2nd marker on a stitch holder, cast on 8 new sts over stitch holder, work until 3rd marker, slip the 52-56-60-64-68 sts between 3rd and 4th marker on a stitch holder, cast on 8 new sts over stitch holder, work until 1st marker again = 152-160-168-184-192 sts on needle. BODY: Continue in A.1 – AT THE SAME TIME insert a marker in the middle of the 8 new sts in each side. When piece measures 3 cm / 1⅛" from where sleeve sts were put on a stitch holder, work A-3 1 time vertically, then continue in stockinette st. AT THE SAME TIME when 4 cm / 1½" have been worked from where sleeve sts were slipped on a stitch holder, dec 1 st on each side of the markers in the sides – SEE DECREASE TIP! Repeat dec every 3-4-4-5-5 cm / 1⅛"-1½"-1½"-2"-2", 4 more times = 132-140-148-164-172 sts. Continue to work until piece measures 38-41-44-48-52 cm / 15"-16⅛"-17¼"-19"-20½" from shoulder. Work 1 round while AT THE SAME TIME inc 4 sts evenly = 136-144-152-168-176 sts. Switch to circular needle size 3 mm / US 2.5 and work rib = K 2/P 2 for 4 cm / 1½". LOOSELY bind off with K over K and P over P. Piece measures approx. 42-45-48-52-56 cm / 16½"-17¾"-19"-20½"-22" from shoulder. SLEEVE: Slip sts from one stitch holder on double pointed needles size 4 mm / US 6 and in addition cast on 8 new sts under sleeve = 60-64-68-72-76 sts. Insert a marker mid under sleeve (i.e. in the middle of the 8 new sts). NOW MEASURE PIECE FROM HERE! Continue with A.1 until piece measures 3 cm / 1⅛" from marker, now work A.3 1 time vertically, then work in stockinette st. AT THE SAME TIME when 1 cm / ⅜" of A.3 has been worked, dec 1 st on each side of marker – SEE DECREASE TIP! Repeat dec every 4-3-4-4-3½ cm / 1½"-1⅛"-1½"-1½"-1¼", 5-7-7-7-9 more times = 48-48-52-56-56 sts. Continue to work until sleeve measures 25-29-33-36-40 cm / 9¾"-11⅜"-13"-14¼"-15¾". Switch to double pointed needles size 3 mm / US 2.5 and work rib = K 2/P 2 for 5 cm / 2". Then LOOSELY bind off with K over K and P over P. Work the other sleeve the same way. ASSEMBLY: Sew the openings under the sleeves. |
|||||||
Diagram explanations |
|||||||
|
|||||||
 |
|||||||
 |
|||||||
Have you finished this pattern?Tag your pictures with #dropspattern #paulinasweater or submit them to the #dropsfan gallery. Do you need help with this pattern?You'll find 12 tutorial videos, a Comments/Questions area and more by visiting the pattern on garnstudio.com. © 1982-2026 DROPS Design A/S. We reserve all rights. This document, including all its sub-sections, has copyrights. Read more about what you can do with our patterns at the bottom of each pattern on our site. |
|||||||


With over 40 years in knitting and crochet design, DROPS Design offers one of the most extensive collections of free patterns on the internet - translated to 17 languages. As of today we count 325 catalogs and 12298 patterns - 12288 of which are translated into English (US/in).
We work hard to bring you the best knitting and crochet have to offer, inspiration and advice as well as great quality yarns at incredible prices! Would you like to use our patterns for other than personal use? You can read what you are allowed to do in the Copyright text at the bottom of all our patterns. Happy crafting!
Post a comment to pattern DROPS Children 23-7
We would love to hear what you have to say about this pattern!
If you want to leave a question, please make sure you select the correct category in the form below, to speed up the answering process. Required fields are marked *.