
Popular categories
Looking for a yarn?


Comments / Questions (58)
![]() Jolanda wrote:
Jolanda wrote:
Hoi Rita, dankjewel voor je reactie, maarre... Wordt het dan echt 2x zo breed? Lijkt mij sterk?
07.08.2014 - 19:16
![]() Rita wrote:
Rita wrote:
Je moet de laatse lijnen eens lezen,opspannen;zo krijgt je breiwerk de gewenste breedte
07.08.2014 - 16:31
![]() Jolanda wrote:
Jolanda wrote:
Hallo, Bij de beschrijving staat dat de sjaal als hij klaar is 50 cm breed is; al breiend(heb nu 30 cm) denk ik dat het er hooguit 30 zijn. Ik heb nooit eerder kantbreiwerk gemaakt en weet daarom niet of dit correct is?
07.08.2014 - 16:21DROPS Design answered:
Hoi Jolanda. Na het breien moet je de sjaal wassen en rekken. Controleer ook dat je stekenverhouding correct is.
08.08.2014 - 14:14
![]() Josephine Bas wrote:
Josephine Bas wrote:
Mc als je dit doet verschuift het hele patroon omdat MC geen st erbij maakt.
29.03.2014 - 17:26
![]() Ophelia wrote:
Ophelia wrote:
Wenn ich eine etwa doppelt so dicke Wolle nehme, wie ändert sich dann die Maschenzahl?
10.01.2014 - 21:48DROPS Design answered:
Liebe Ophelia, leider können wir keine Anleitungen individuell umrechnen, aber bei einem Schal können Sie selbst die Maschenzahl je nach neuer Maschenprobe anpassen, beachten Sie dabei die Rapporte.
13.01.2014 - 09:37
![]() Josien wrote:
Josien wrote:
Hallo, Ik vroeg me af wat er bedoelt wordt met 1 naald recht aan de verkeerde kant? Is de eerste naald de verkeerde kant? Hopelijk kunt u mij helpen.
31.08.2013 - 23:54DROPS Design answered:
Hoi Josien. Ja, de eerste nld wordt op de verkeerde kant gebreid. In de volgende nld (= goede kant) begin je met het breien van het telpatroon. Veel breiplezier
03.09.2013 - 13:27
![]() Kirsti Eidsmo, Tromsø wrote:
Kirsti Eidsmo, Tromsø wrote:
Hei! Har strikket sjalet, men det er helt unødvendig å strikke det i 2 deler. Jeg strikket sjalet i ett stykke. Det blir jo spisser i sjalet på slutten også når du slutter med det "første" mønsteret.
23.06.2013 - 14:02
![]() Dorothea wrote:
Dorothea wrote:
Hallo, liebes Drops Team, ich versuche mich an dem Lance "Grace" und habe immer beim Muster M.1A 2 Maschen zu viel, wenn ich die Anleitung befolge. Habe schon ihre Videos geschaut und mache alles richtig. ?:-) Umschläge werden doch auf der RR links gestrickt?LG, D.
20.06.2013 - 23:05DROPS Design answered:
Liebe Dorothea, beim Mustersatz M1 A gibt es in jeder R 1 M mehr (2 Umschläge, aber 1 Abnahme), diese wird aber bei M1 C wieder abgenommen (1 Abnahme, kein Umschlag) – daher bleibt die Maschenzahl pro Reihe insgesamt gleich. Die Umschläge werden in der Rückreihe li gestrickt.
24.06.2013 - 10:39
![]() Loredana wrote:
Loredana wrote:
Il modello e' realizzato in due pezzi per il bordo iniziale,così viene simmetrico. Se lo fai in un unico pezzo dovresti cambiare bordo.
15.01.2013 - 18:54
![]() Stefania wrote:
Stefania wrote:
VORREI REALIZZARE QUESTO MODELLO, MA NON MI PIACE LA CUCITURA CHE UNISCE I DUE PEZZI. e' POSSIBILE REALIZZARLO IN UN UNICO PEZZO?
15.01.2013 - 07:44
|
||||||||||||||||
Grace#grace |
||||||||||||||||
 |
 |
|||||||||||||||
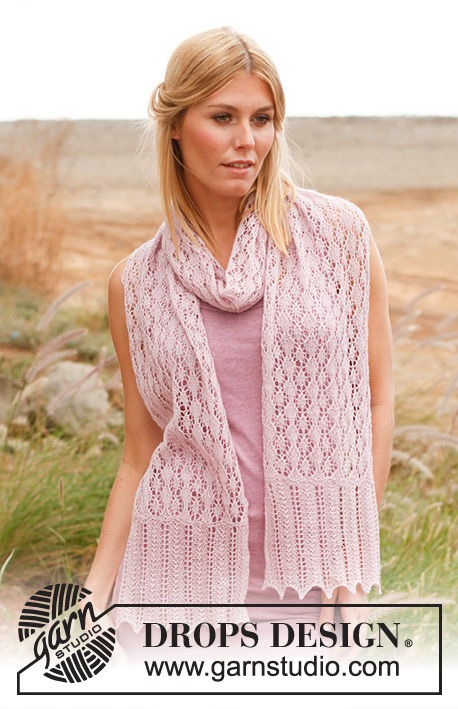
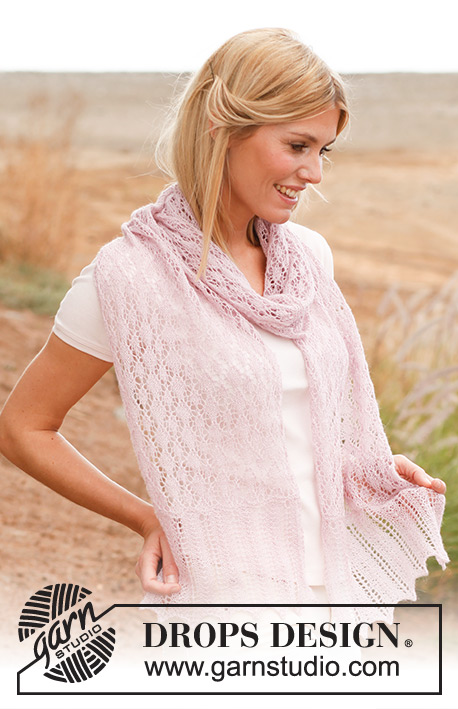
Knitted DROPS scarf with lace pattern in "Lace".
DROPS 137-5 |
||||||||||||||||
|
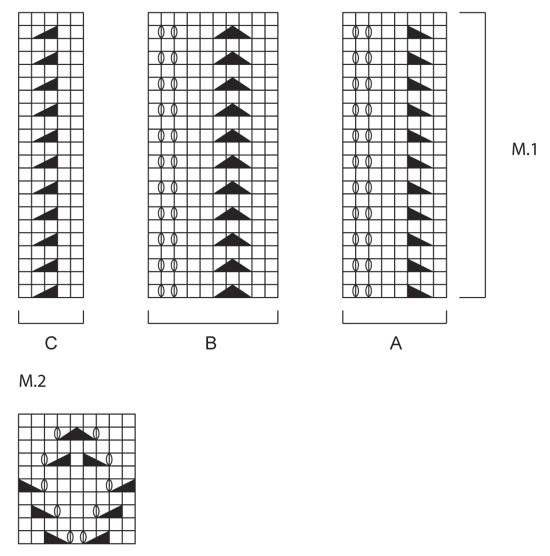
KNITTING GAUGE: This garment is to be soaked and blocked/stretched to size afterwards so the knitting gauge is not that important. But to get a sense of whether you are working too loose/tight, work a test on needle size 3.5 mm / US 4 in stockinette st and get approx. 23 sts x 30 rows = 10 x 10 cm / 4" x 4". GARTER ST (back and forth on needle): K all rows. PATTERN: See diagrams M.1 and M.2. Diagrams show all rows in the pattern seen from RS. 1st row = RS. --------------------------------------------------------- SCARF: Cast on 69 sts on needle size 3.5 mm / US 4 with Lace. K 1 row from WS. Work next row as follows: 3 sts in GARTER ST, diagram M.1A 1 time, diagram M.1B 5 times, diagram M.1C 1 time, 3 sts in garter st. Continue like this until M.1 has been worked 2 times vertically. K 4 rows, on last row dec 9 sts evenly = 60 sts. Work next row as follows from RS: 3 sts in garter st, diagram M.2 6 times, 3 sts in garter st. Continue with pattern and 3 sts in garter st in the sides until piece measures approx. 80 cm / 31½" with a light pull, make sure that one full repetition of diagram M.2 has been finished. Now K 4 rows over all sts. Put all sts on a stitch holder. Knit another part the same way. ASSEMBLY: Graft/sew the 2 parts tog st by st. BLOCKING: Place the scarf in lukewarm water until it is soaking wet. Carefully squeeze the water out of the scarf - do not twist the scarf - then roll the scarf in a towel and squeeze to remove more water - the scarf will now only be moist. Place the scarf on a carpet or mattress - carefully stretch it out to size and fasten it with pins. Leave to dry. Repeat the process when the garment has been washed. |
||||||||||||||||
Diagram explanations |
||||||||||||||||
|
||||||||||||||||
 |
||||||||||||||||
Have you finished this pattern?Tag your pictures with #dropspattern #grace or submit them to the #dropsfan gallery. Do you need help with this pattern?You'll find 5 tutorial videos, a Comments/Questions area and more by visiting the pattern on garnstudio.com. © 1982-2026 DROPS Design A/S. We reserve all rights. This document, including all its sub-sections, has copyrights. Read more about what you can do with our patterns at the bottom of each pattern on our site. |
||||||||||||||||


With over 40 years in knitting and crochet design, DROPS Design offers one of the most extensive collections of free patterns on the internet - translated to 17 languages. As of today we count 324 catalogs and 12290 patterns - 12280 of which are translated into English (US/in).
We work hard to bring you the best knitting and crochet have to offer, inspiration and advice as well as great quality yarns at incredible prices! Would you like to use our patterns for other than personal use? You can read what you are allowed to do in the Copyright text at the bottom of all our patterns. Happy crafting!
Post a comment to pattern DROPS 137-5
We would love to hear what you have to say about this pattern!
If you want to leave a question, please make sure you select the correct category in the form below, to speed up the answering process. Required fields are marked *.