
Popular categories
Looking for a yarn?


Comments / Questions (37)
![]() Gisele wrote:
Gisele wrote:
Is there a tutorial on how to start knitting this shawl collar?
11.01.2019 - 04:47DROPS Design answered:
Dear Gisele, there is no tutorial to this shawl, start picking the sts on the right side of front piece (beg on the bottom of neckline, just after the last st cast off for neck mid on front piece), then pick up the sts along neck on back piece and down along the left side of front piece to the first st cast off for neck on mid front. Work then back and forth in rib, increasing in the P- sections (see previous answers). Happy knitting!
11.01.2019 - 09:40
![]() Gisele wrote:
Gisele wrote:
Am I increasing 12 sts in each of the back 12 sts at the back of the neck?
10.01.2019 - 18:31DROPS Design answered:
Dear Gisele, you are increasing a total of 12 sts = 1 stitch in each of the middle 12 purl-sections on mid back of the neck. Happy knitting!
11.01.2019 - 09:11
![]() Gisele wrote:
Gisele wrote:
I am confused about where to start picking up the stitches for the shawl collar. Is there a tutorial to show that or easier explanation that what is listed in the instructions.
09.01.2019 - 22:50DROPS Design answered:
Dear Gisele, start picking up the stitches for collar from the right side of piece, beginning on the left side of cast off sts for neck, pjck up the sts along the right side of neck (when garment is worn), then along neckline on back piece and down along the left side of neck to the first st cast off for neck. Happy knitting!
10.01.2019 - 09:44
![]() Pamela Burdick wrote:
Pamela Burdick wrote:
After working diagram M1 instructions are confusing, please help clarify.
14.09.2018 - 23:17DROPS Design answered:
Dear Mrs Burdick, after you have worked M.1 you will continue pattern working first M.2 then 3 rounds with light brown, then 23 rounds in M.1 then work M.3 and finish with light brown. At the same time, work the armholes and finish each piece separately as explained for your size. Happy knitting!
17.09.2018 - 08:05
![]() Miriam wrote:
Miriam wrote:
Seríais tan amables de incluir un video-tutorial (con método inglés- americano) que mostrara cómo hacer y colocar un cuello tipo chal en un sweater? thanks in advance :)
16.07.2018 - 11:35DROPS Design answered:
Hola Miriam. Pasaré tu sugerencia al departamento de vídeos.
18.07.2018 - 21:36
![]() Katia wrote:
Katia wrote:
Au secours ! Je fais ce modèle pour un anniversaire. Et je suis bloquée par un "décalage" du motif M2 de part le travail du tricot en spirale. J'aurais donc certainement ensuite le même soucis pour le motif M3. Au secours ! Please, please, please.... que dois je faire ??? j'espère avoir une réponse rapide... il ne me reste pas beaucoup de temps.
18.11.2017 - 07:38DROPS Design answered:
Bonjour Katia, vous pouvez utiliser la techniques des rayures tricotées en rond pour éviter un décalage - le début des tours étant sur le côté, il ne sera pas très visible. Bon tricot!
20.11.2017 - 08:35
![]() Yu Bagger wrote:
Yu Bagger wrote:
Jeg kan ikke forstå hvordan man kan strikke kraven når man skal tage 1m ud således tages der 1 m ud i hver af de midterste 12 ret-partier, set fra retsiden (= bag i nakken) = 135-141-150-156-162 m. Hvordan kan man fortsætte med at strikke 1r, 2vr.?
03.04.2017 - 17:19DROPS Design answered:
Hej Yu, når du har taget ud i ret-partierne, så strikker du de nye masker i ret, så det bliver 2r,2vr. God fornøjelse!
04.04.2017 - 11:44
![]() Sytske Jongsma wrote:
Sytske Jongsma wrote:
Neem ik de inbrei kleur gedurende het hele werk aan de achterkant mee of hecht ik af wanneer er een stukje effen gebreid wordt?
02.02.2017 - 13:06DROPS Design answered:
Hoi Sytske. Ik neem de draad mee naar boven in de effen stukken (dus even meedraaien aan het begin van de nld), ik brei alleen de draad mee aan de achterkant (fair-isle) in de naalden met patroon). Werkt voor mij goed - en hoef ik geen draden af te hechten :)
02.02.2017 - 13:51Ella wrote:
Hello, on the sleeves it says to place a marker at the beginning of the round and the mid under arm, I understand this to mean between stitches. When it comes to cast off for the under arm, it says to cast off the stitch with the marker and three either side. I am confused! There are an odd number of stitches (73) and the mid top of the sleeve it's a marked stitch. If I cast off 7 stitches it will be uneven. I wonder if there is a mistake in the pattern? Thank you.
27.12.2016 - 14:56DROPS Design answered:
Dear Ella, you insert 1st marker at mid under arm, ie in the 1st st, and then cast off the st with marker + 3 sts on each side of this st = 7 sts cast off. Happy knitting!
29.12.2016 - 14:39
![]() Monica wrote:
Monica wrote:
I vostri consigli sono sempre perle di saggezza! Grazie ancora
05.11.2016 - 09:43
|
|||||||
Seaman#seamansweater |
|||||||
 |
 |
||||||
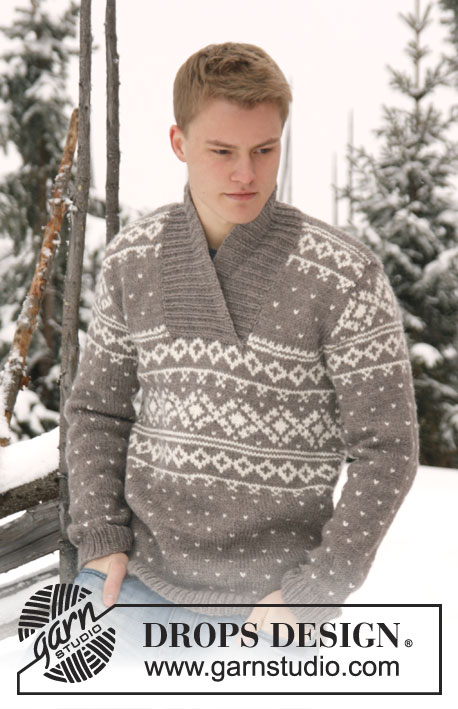
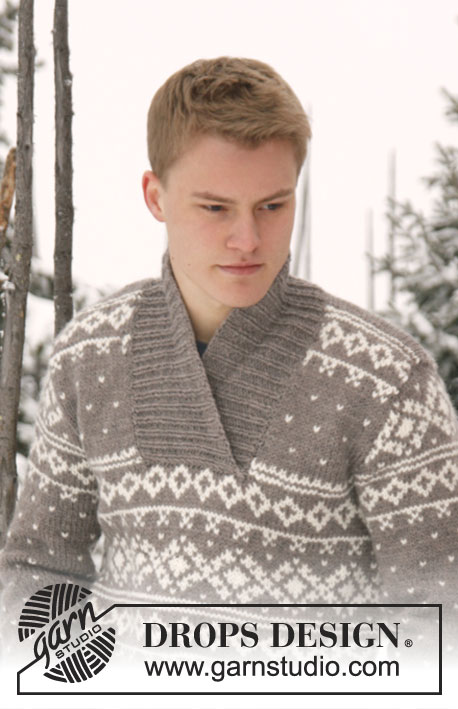
Knitted men's sweater in DROPS Alaska or DROPS Big Merino with pattern and shawl collar. Size: S - XXXL.
DROPS Extra 0-812 |
|||||||
|
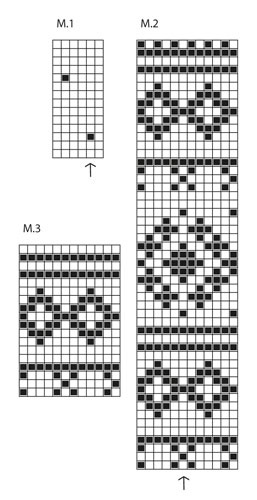
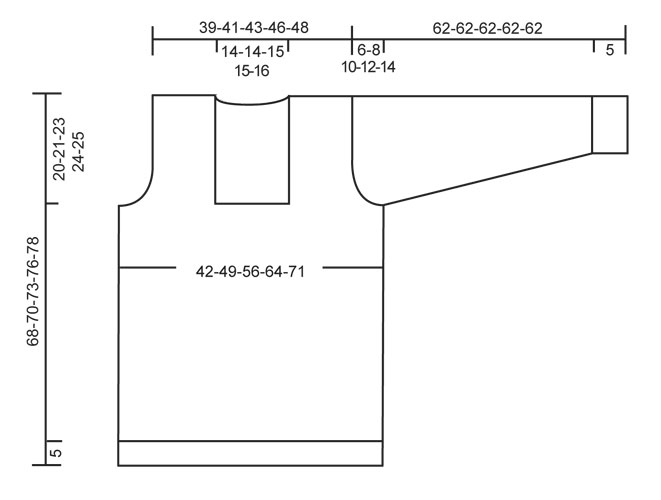
GARTER ST (back and forth on needle): K all rows. PATTERN: See diagrams M.1 to M.3 – diagrams are worked in stockinette st. -------------------------------------------------------- BODY: Worked in the round on circular needle. Cast on 171-201-231-258-288 sts on circular needle size 4 mm / US 6 with light brown Alaska. Work rib = K 1/P 2 for 5 cm / 2". Switch to circular needle size 5 mm / US 8 and K 1 round while AT THE SAME TIME dec 27-33-39-42-48 sts evenly = 144-168-192-216-240 sts. Then work diagram M.1. REMEMBER THE GAUGE! When piece measures approx. 25-27-30-33-35 cm / 9¾"-10½"-11¾"-13"-13¾" - adjust so that at least 2 rounds have been worked after 1 round with dots - work diagram M.2. After diagram M.2, work 3 rounds with light brown before working 23 rounds with diagram M.1. After diagram M.1, work diagram M.3, then work with light brown until finished measurements. AT THE SAME TIME when piece measures 48-49-50-52-53 cm / 19"-19¼"-19¾"-20½"-21", work next round as follows: bind off 3-4-4-5-5 sts for armhole, work 22-27-32-37-42 sts, bind off 23-23-25-25-27 sts for neck, work 22-27-32-37-42 sts, bind off 5-7-7-9-9 sts for armhole, work 67-77-89-99-111 sts (= back piece), bind off the last 2-3-3-4-4 sts for armhole. Finish each part separately. BACK PIECE: = 67-77-89-99-111 sts. Continue pattern as explained above. AT THE SAME TIME bind off for armholes at beg of every row in each side: 3 sts 0-0-1-1-2 times, 2 sts 0-1-1-2-3 times and 1 st 0-2-3-3-3 times = 67-69-73-79-81 sts remain on needle. When piece measures 66-68-71-74-76 cm / 26"-26¾"-28"-29⅛"-30", bind off the middle 21-21-23-23-25 sts for neck. Now finish each shoulder separately. Continue to bind off 1 st on next row from neck = 22-23-24-27-27 sts remain on the shoulder. Bind off when piece measures 68-70-73-76-78 cm / 26¾"-27½"-28¾"-30"-30¾". RIGHT FRONT PIECE: = 22-27-32-37-42 sts. Bind off for armhole in the side as on back piece = 22-23-24-27-27 sts. Bind off when piece measures approx. 68-70-73-76-78 cm / 26¾"-27½"-28¾"-30"-30¾" - NOTE: bind off on same row in pattern as on back piece. LEFT FRONT PIECE: Work as right front piece but reversed. SLEEVE: Worked in the round on double pointed needles, switch to circular needle when needed. READ ALL OF THE FOLLOWING SECTION BEFORE CONTINUING! Cast on 51-54-57-57-57 sts on circular needle size 4 mm / US 6 with light brown. Work rib = K 1/P 2 for 5 cm / 2". Switch to double pointed needles size 5 mm / US 8 and K 1 round while AT THE SAME TIME dec 10-11-12-12-12 sts evenly = 41-43-45-45-45 sts. Insert a marker at beg of round (= mid under sleeve) and a marker in the middle st on round (= mid on top of sleeve). Then work diagram M.1 – st marked with arrow in diagram should be st with marker mid on top of sleeve - count out towards the side. AT THE SAME TIME when piece measures 7-7-9-9-10 cm / 2¾"-2¾"-3½"-3½"-4", inc 1 st on each side of marker mid under sleeve. Repeat inc every 5-4½-3-2½-2 cm / 2"-1¾"-1⅛"-⅞"-¾" a total of 10-11-14-16-18 times = 61-65-73-77-81 sts – work the inc sts in pattern. AT THE SAME TIME when piece measures approx. 47 cm / 18½" in all sizes – adjust so that at least 2 rounds have been worked after 1 round with dots - work diagram M.2 until finished measurements (st marked with arrow in diagram should be st with marker mid on top of sleeve - count out towards the side). When piece measures 56-54-52-50-48 cm / 22"-21¼"-20½"-19¾"-19" (shorter measurements in the larger sizes because of longer sleeve cap and broader shoulder width), bind off 5-7-7-9-9 sts mid under sleeve (i.e. st with marker and 2-3-3-4-4 sts on each side of this st). Then continue back and forth on needle until finished measurements - AT THE SAME TIME bind off for sleeve cap at the beg of every row in each side: 2 sts 2-3-3-3-4 times and 1 st 1-2-3-4-5 times. Then bind off 2 sts in each side until piece measures 61 cm / 24", then bind off 3 sts 1 time in each side. Bind off the remaining sts, the piece measures approx. 62 cm / 24½" in all sizes. ASSEMBLY: Sew the shoulder seams. SHAWL COLLAR: Start mid front on the left side of sts bind off for neck. Pick up on circular needle size 4 mm / US 6 with light brown: 34 to 42 sts up to shoulder, then pick up 24 to 28 sts in back of neck and finally 34 to 42 sts down along left side of neck dec = 92 to 112 sts. (Do not pick up sts at the front of neck where sts were bind off.) K 1 row from WS while AT THE SAME TIME inc evenly to 123-129-138-144-150 sts. Then work rib as follows (from RS): 1 edge st which should be K on all rows, * K 1, P 2 *, repeat from *-* until 2 sts remain, finish with K 1 and 1 edge st which should be K on all rows. Continue rib like this until collar measures approx. 6 cm / 2⅜". Now inc 1 st in each of the middle 12 K-sections, seen from RS (= back of neck) = 135-141-150-156-162 sts. Continue to work until collar measures approx. 11-11-13-13-15 cm / 4½"-4½"-5"-5"-6", bind off with K over K and P over P. Place the collar double (right side over left side) at the bottom of neck opening and sew it to the neck line through both layers. Sew in sleeves. |
|||||||
Diagram explanations |
|||||||
|
|||||||
 |
|||||||
 |
|||||||
Have you finished this pattern?Tag your pictures with #dropspattern #seamansweater or submit them to the #dropsfan gallery. Do you need help with this pattern?You'll find 22 tutorial videos, a Comments/Questions area and more by visiting the pattern on garnstudio.com. © 1982-2026 DROPS Design A/S. We reserve all rights. This document, including all its sub-sections, has copyrights. Read more about what you can do with our patterns at the bottom of each pattern on our site. |
|||||||


With over 40 years in knitting and crochet design, DROPS Design offers one of the most extensive collections of free patterns on the internet - translated to 17 languages. As of today we count 324 catalogs and 12245 patterns - 12235 of which are translated into English (US/in).
We work hard to bring you the best knitting and crochet have to offer, inspiration and advice as well as great quality yarns at incredible prices! Would you like to use our patterns for other than personal use? You can read what you are allowed to do in the Copyright text at the bottom of all our patterns. Happy crafting!
Post a comment to pattern DROPS Extra 0-812
We would love to hear what you have to say about this pattern!
If you want to leave a question, please make sure you select the correct category in the form below, to speed up the answering process. Required fields are marked *.