
Popular categories
Looking for a yarn?


Comments / Questions (132)
Maira Sandoval wrote:
En la parte que dice: "TODAS LAS TALLAS: Ahora rem 1-2-2-3-4-5 pts en cada lado para las sisas (es decir, rem al inicio de las 2 vtas sig) = 96-106-118-128-138-148 pts" ¿Cuáles son las sisas? y ¿cómo las hago? ¿las vueltas son una corrida en derecho + una en revés?
09.04.2015 - 04:38DROPS Design answered:
hola Maira, las sisas son la parte del cuerpo donde se van a coser las mangas. Cuando tenemos varios números separados por un guión cada número corresponde a una talla (de la más pequeña a la más grande). Tenemos que rematar pts al inicio de cada fila, tanto al inicio de la fila del lado derecho como al inicio de la fila del lado revés (en un caso para la sisa derecha y en el otro para la sisa izquierda)
12.04.2015 - 09:31Maira Sandoval wrote:
Hola, no entiendo como debo leer los patrones o diagramas de este tejido. Por que lado del diagrama comienzo la primera vuelta? y cómo continuo a la segunda?
09.04.2015 - 04:32DROPS Design answered:
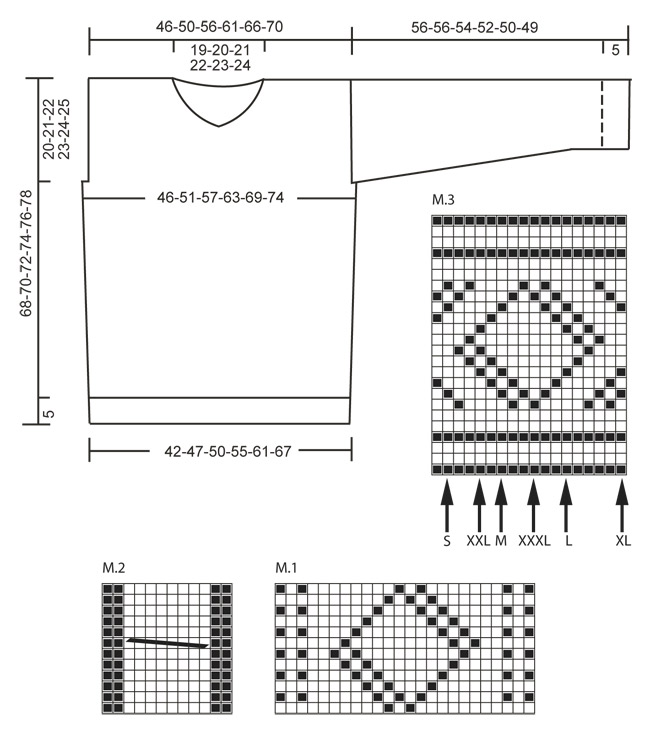
Hola Maira, todos los patrones se leen de derecha a izq y de abajo arriba en las filas impares (la primera, 3ª...) y de izquierda a derecha las pares. En este patrón dependiendo de la talla el dibujo se comienza donde marca la flecha correspondiente para ajustar el nº de pts con el dibujo. La segunda fila se trabaja con los pts que corresponden en el dibujo encima de los pts de la primera fila.
12.04.2015 - 09:24
![]() Torry Johnson wrote:
Torry Johnson wrote:
I am working on the front and can't get M3 to look anything like the M3 on the back. Help!
11.12.2014 - 19:38DROPS Design answered:
Dear Mrs Johnson, when working M.3 start at the arrow for your size in diagram and mark last st worked in diagram (at the end of row), on return row, start with this st reading from left to the right (WS row). Happy knitting!
12.12.2014 - 09:24
![]() Alice Nørgaard Andersen wrote:
Alice Nørgaard Andersen wrote:
Jeg strikker str. M og kan ikke få M3 til at passe? Jeg starter ved pilen og strikke så mod venstre fra retsiden og mod højre fra vrangsiden men synes ikke maskerne passer. Hvad gør jeg forkert?
06.11.2014 - 22:05DROPS Design answered:
Hej Alice, Du starter ved pilen og strikker mod venstre, når du har strikket maskerne på første pind i diarammet, starter du forfra i diagrammet, det gør du pinden ud. God fornøjelse!
17.11.2014 - 15:27
![]() Margarete Wenzel wrote:
Margarete Wenzel wrote:
Liebes Drops-Team, Ich habe eine Frage zu dem Kragen des Pullovers. Nähe ich erst Vorder- und Rückenteil aneinander und stricke dann den Kragen direkt an die beiden Teile an? oder Stricke ich den Kragen wie die anderen Teile auch separat? Ich würde mich sehr über eine Antwort freuen! Liebe Grüße Und schon mal ein großes Dankeschön im Voraus!
31.10.2014 - 00:58DROPS Design answered:
Liebe Margarete, Sie nähen erst Vorderteil und Rückenteil an den Schulternähten zusammen, dann fassen Sie wie beschrieben aus dem ganzen Halsausschnitt wie beschrieben M auf. Sie stricken den Kragen in Hin- und Rück-R und nähen am Ende vorne die beiden überlappenden Teile übereinander. Viel Spaß beim Stricken!
31.10.2014 - 11:17
![]() W.Steenbeek wrote:
W.Steenbeek wrote:
Hallo, Ik brei nu M3 van het achterpand (maat xxl )ik ben bij de pijl begonnen en brei van links naar rechts, waar begin ik in het patroon op de tweede naald aan de verkeerde kant?
10.09.2014 - 22:15DROPS Design answered:
Hoi W. Steenbeck. Je leest de rijen voor de verkeerde kant van links naar rechts. Dus je begint boven de laatste st die je hebt gebreid van de teltekening en leest dan van links naar rechts, herhaal en zo voort.
11.09.2014 - 17:28
![]() Guro Flemmen wrote:
Guro Flemmen wrote:
Ser flere har kommentert på dette, og henger meg på: oppgitt garnmengde er for lite! Strikker størrelse M og er nesten ferdig med erme nr 2. Går da tom. Regner med jeg behøver 50 g ekstra for å fullføre erme, sy sammen og strikke krage. Dere burde oppdatere oppskriften. (Jeg har selvfølgelig brukt drops karisma-garn, riktig pinnestørrelse og fått riktig strikkefasthet). Håper nå forhandleren har igjen et nøste av samme dyelot.
07.09.2014 - 13:38
![]() Tanja wrote:
Tanja wrote:
Zunächst muß ich mich vielmals bei Ihnen entschuldigen. Ich habe M1 und M2 verwechselt. Nach langem probieren, habe ich den Fehler entdeckt. Aber vielen, lieben Dank für Ihre schnelle und freundliche Hilfe. Machen Sie alle weiter so. Danke
24.08.2014 - 19:41
![]() Tanja wrote:
Tanja wrote:
Bitte prüfen Sie Musterfolge für die Größen S und M. Sie ist nicht korrekt. Für einen Anfänger könnte es sehr verwirrend sein. Danke und Gruß
23.08.2014 - 18:29DROPS Design answered:
Liebe Tanja, geht es um Vorder- und Rückenteil? Rein rechnerisch passt die Musterfolge von M.1 und M.2, und M.3 wird bis zur letzten Rand-M wiederholt, auch wenn der Rapport dann noch nicht zu Ende ist, denn das Muster ist so abgezählt, dass es an beiden Seiten symmetrisch wird. Bitte präzisieren Sie doch, wo genau Sie einen Fehler gefunden haben.
23.08.2014 - 21:50
![]() Sabrina wrote:
Sabrina wrote:
Ich wollte mal fragen, ob ich die Maschen in der Rückreihe von M 1 stricke, wie sie erscheinen oder alle links?
07.08.2014 - 14:27DROPS Design answered:
Liebe Sabrina, die Diagramme zeigen ALLE Muster-R, also auch die Rück-R. Sie müssen sich also für die Rück-R auch an die Diagramme halten.
11.08.2014 - 09:52
|
||||||||||
Sir Lancelot#sirlancelotsweater |
||||||||||
|
|
||||||||||
Men's knitted sweater with textured pattern and v-neck, in DROPS Karisma. Sizes S to XXXL
DROPS 135-36 |
||||||||||
|
GARTER ST (back and forth on needle): K all rows. PATTERN: See diagrams M.1 to M.3 – diagrams show pattern from RS. M.1 = 24 sts in width, M.2 = 12 sts in width and M.3 = 18 sts in width. -------------------------------------------------------- BACK PIECE: Worked back and forth on needle. Cast on 110-122-134-146-158-170 sts (includes 1 edge st in each side) on needle size 3 mm / US 2or3 with Karisma. Work rib as follows (seen from from RS): 1 edge st in GARTER ST - see explanation above, * K 1, P 3 *, repeat from *-*, finish with 1 edge st in garter st. When rib measures approx. 5 cm / 2" (adjust so that next row is worked from WS), switch to needle size 4 mm / US 6. P 1 row from WS while at the same time dec 12 sts evenly = 98-110-122-134-146-158 sts. Work next row as follows (from RS): SIZE S: 1 edge st in garter st, diagram M.1, M.2, M.1, M.2, M.1 and 1 edge st in garter st. SIZE M: 1 edge st in garter st, 6 sts in stockinette st, diagram M.1, M.2, M.1, M.2, M.1, 6 sts in stockinette st and 1 edge st in garter st. SIZE L: 1 edge st in garter st, diagram M.2, M.1, M.2, M.1, M.2, M.1, M.2 and 1 edge st in garter st. SIZE XL: 1 edge st in garter st, 6 sts in stockinette st, diagram M.2, M.1, M.2, M.1, M.2, M.1, M.2, 6 sts in stockinette st and 1 edge st in garter st. SIZE XXL: 1 edge st in garter st, 12 sts of diagram M.1 – start in the 13th st from the right side in diagram, diagram M.2, M.1, M.2, M.1, M.2, M.1, M.2 and 12 sts of diagram M.1 – start in first st in diagram - and 1 edge st in garter st. SIZE XXXL: 1 edge st in garter st, 18 sts of diagram M.1 – start in the 7th st from the right side in diagram, diagram M.2, M.1, M.2, M.1, M.2, M.1, M.2 and 18 sts of diagram M.1 – start in first st in diagram - and 1 edge st in garter st. ALL SIZES: Continue to work the same way until piece measures 48-49-50-51-52-53 cm / 19"-19¼"-19¾"-20"-20½"-21". REMEMBER THE GAUGE! Now bind off 1-2-2-3-4-5 sts in each side for armholes (i.e. Bind off at the beg of the next 2 rows) = 96-106-118-128-138-148 sts. Continue the pattern as before with 1 edge st in garter st in each side. When piece measures approx. 58-60-62-64-66-68 cm / 22¾"-23⅝"-24⅜"-25¼"-26"-26¾" (adjust after 1 half repetition or 1 whole repetition of diagram M.1 and M.2 vertically), work 2 rows in stockinette st, then continue with diagram M.3 over all sts (except edge st) – see arrow for your size; this marks the stitch in witch to begin in the diagram. AT THE SAME TIME when 4 rows remain of diagram M.3, bind off the middle 36-38-40-42-44-46 sts for neck and finish each shoulder separately. Continue to bind off 2 sts on next row from neck = 28-32-37-41-45-49 sts remain on the shoulder. When diagram M.3 has been worked, work approx. 1 cm / ⅜" in stockinette st, then bind off. Piece measures approx. 68-70-72-74-76-78 cm / 26¾"-27½"-28⅜"-29⅛"-30"-30¾". FRONT PIECE: Cast on and work as back piece. Bind off for armhole each side as on back piece and continue until piece measures approx. 58-60-62-64-66-68 cm / 22¾"-23⅝"-24⅜"-25¼"-26"-26¾". On next row from RS K1 row over all sts and on this row bind off the middle 4 sts for neck. Now finish each shoulder separately. From WS P back and then work pattern as on back piece (make sure that diagram M.3 is worked the same way on each side of neck) – AT THE SAME TIME bind off on every row starting from neck: 2 sts 5-6-7-8-9-10 times and then 1 st 8-7-6-5-4-3 times = 28-32-37-41-45-49 sts remain on shoulder. Bind off when same no of rows has been worked as on back piece. SLEEVE: Worked back and forth on needle. Cast on 62 sts for all sizes (includes 1 edge st in each side) on needle size 3 mm / US 2or3 with Karisma. Work rib as follows (seen from from RS): 1 edge st in garter st, * K 1, P 3 *, repeat from *-*, finish with 1 edge st in garter st. When piece measures approx. 5 cm / 2" (adjust so that next row is worked from WS), switch to needle size 4 mm / US 6. P 1 row from WS. Work next row as follows: 1 edge st in garter st, diagram M.1, M.2, M.1 and 1 edge st in garter st, continue like this. When piece measures 9 cm / 3½", inc 1 st in each side. Repeat inc every 9th-8th-6th-5th-4th-4th row a total of 12-14-16-18-20-21 times - work the inc sts in stockinette st = 86-90-94-98-102-104 sts. When piece measures approx. 46-46-44-42-40-39 cm / 18"-18"-17¼"-16½"-15¾"-15¼" (adjust after 1 half or 1 whole repetition of diagram M.1 and M.2 vertically, inc should be finished), work 2 rows in stockinette st, then continue with diagram M.3 – start in first st on right side of diagram (the pattern will not fit at the end of row). After diagram M.3 work (if there is room) in stockinette st until piece measures 56-56-54-52-50-49 cm / 22"-22"-21¼"-20½"-19¾"-19¼" (shorter measurements in the larger sizes because of broader shoulder width), bind off. ASSEMBLY: Sew the shoulder seams. NECK: Pick up approx. 119 to 139 sts (divisible by 4 + 3) around the neck on circular needle size 3 mm / US 2or3 with Karisma – beg mid front. Then the piece is worked back and forth from mid front. First row from WS is worked as follows: 1 edge st in garter st, * P 1, K 3 *, repeat from *-* and finish with P 1 and 1 edge st in garter st. Continue with K over K and P over P and edge st in garter st until neck edge measures approx. 6 cm / 2½". Bind off with K over K and P over P. Place the neck on top of each other mid front, left side over right, fasten with neat stitches from both WS and RS. Sew the sleeves inside 1 edge st. Sew sleeve and side seams in one inside 1 edge st. |
||||||||||
Diagram explanations |
||||||||||
|
||||||||||
 |
||||||||||
Have you finished this pattern?Tag your pictures with #dropspattern #sirlancelotsweater or submit them to the #dropsfan gallery. Do you need help with this pattern?You'll find 18 tutorial videos, a Comments/Questions area and more by visiting the pattern on garnstudio.com. © 1982-2026 DROPS Design A/S. We reserve all rights. This document, including all its sub-sections, has copyrights. Read more about what you can do with our patterns at the bottom of each pattern on our site. |
||||||||||


With over 40 years in knitting and crochet design, DROPS Design offers one of the most extensive collections of free patterns on the internet - translated to 17 languages. As of today we count 324 catalogs and 12290 patterns - 12280 of which are translated into English (US/in).
We work hard to bring you the best knitting and crochet have to offer, inspiration and advice as well as great quality yarns at incredible prices! Would you like to use our patterns for other than personal use? You can read what you are allowed to do in the Copyright text at the bottom of all our patterns. Happy crafting!
Post a comment to pattern DROPS 135-36
We would love to hear what you have to say about this pattern!
If you want to leave a question, please make sure you select the correct category in the form below, to speed up the answering process. Required fields are marked *.