
Popular categories
Looking for a yarn?


Comments / Questions (61)
![]() Anja V Gent wrote:
Anja V Gent wrote:
Ik wil dit patroon graag “ plat” breien Dus op 2 naalden Heeft u daar ook een patroon van? Zo niet, kunt u mij dan vertellen hoe ik dat bijvoorbeeld moet doen ivm het aantal steken wat ik moet opzetten Alvast bedankt Gr Anja
17.03.2026 - 13:49DROPS Design answered:
Dag Anja,
Om een patroon aan te passen om op rechte naalden te breien hebben we een instructie gemaakt. Deze vind je hier.
17.03.2026 - 20:41
![]() Josselyne wrote:
Josselyne wrote:
Bonjour, je ne comprends pas les explications des rangs raccourcis. Tricoter sur les 20 premières mailles, sur 9cm, et ensuite rabattre les 30 mailles ???. Comment coudre au col dos, sur 10 mailles ou sur 20 mailles. Merci
29.01.2026 - 23:37DROPS Design answered:
Bonjour Josselyne, les rangs raccourcis du col permettent à la partie extérieure du col d'être plus longue et ainsi de mieux retomber; en commençant sur l'endroit pour le col droit (sur l'envers pour le col gauche), tricotez toutes les mailles du col, tournez et tricotez toutes ces mailles, tournez et tricotez les 20 premières mailles seulement, tournez et tricotez ces 20 m. Répétez ces 4 rangs jusqu'à ce que l col mesure 8 à 11 cm (cf taille) du côté le plus court. Découvrez ici, en vidéo comment on assemble ce type de col (sans rangs raccourcis dans la vidéo, mais la technique est la même). Bon tricot!
30.01.2026 - 08:47
![]() Sandra wrote:
Sandra wrote:
Liebes Drops-Team, der Pullover ist toll und recht einfach zum Stricken. Ich scheitere nur etwas am Kragen. "10-10-11 cm misst (von der Markierung an der kurzen Seite gemessen" Was ist mit kurzer Seite gemeint? Die Seite an der ich die verkürzten Reihen stricke oder die die andere? Danke für eure Hilfe.
26.12.2025 - 21:06
![]() Shirley wrote:
Shirley wrote:
Are there more details on sizing anywhere? Bust, waist , Hips, length?
10.10.2025 - 16:54DROPS Design answered:
Dear Shirley, you can find the size chart with the measurements of the finished garment at the bottom of the page; these measurements are in cm. You can read more on how to interpret our size charts here. Happy knitting!
12.10.2025 - 14:59
![]() Veronika wrote:
Veronika wrote:
Hur många maskor ska det vara på ärmen när man avmaskar?
25.06.2024 - 18:54DROPS Design answered:
Hej Veronika, det kommer an på hvilken størrelse du strikker og hvor mange pinde du kan nå at strikke fra du lukker de første masker af til ærmegab og til du lukker de sidste masker af.... men du fortsætter bare med at lukke 2 masker af i hver side til du har det rigtige mål :)
26.06.2024 - 12:01
![]() Mirjam De Nooij wrote:
Mirjam De Nooij wrote:
Ik heb een vraag over de kraag: Neem aan de verkeerde kant st op in de st op de hulpdraad middenvoor (laat de st op de hulpdraad staan voor de linker kraag) = 26-28-30-32-34-36 st. Hoe doe ik dit ? Daar na verder breien en vervolgens bij de linker kraag: Zet de middelste st van de hulpdraad aan de verkeerde kant achter de rechter kraag terug op de nld = linker kraag achter de rechter kraag. Hoe doe ik dit ? Ik hier een filmpje van?
11.04.2024 - 14:26DROPS Design answered:
Dag Mirjam,
Je neemt steken op van de hulpdraad, maar je laat de hulpdraad erin zitten zodat je later op precies dezelfde plek ook steken op kunt nemen voor de rechter kraag. Op deze manier krijg je 2 lagen over elkaar heen. Voor zover ik weet is er helaas geen filmpje van.
11.04.2024 - 20:28
![]() Asta Johannsen wrote:
Asta Johannsen wrote:
Hallo liebes Drops-team, das ist wirklich ein schöner Pullover, jedoch zum Ende benötige ich doch einmal Hilfe. Ich bin nicht besonders begabt im Nähen und verstehe somit die Beschreibung für die Knöpfe. Es fängt schon an, dass ich w Schlaufen machen soll und für jeden Knopf 2 Schlaufen? Und wo kommt der Knopf zum Einsatz? Und wie soll ich den festnähen? Das mit den Angaben der Zentimeter habe ich, glaube ich, verstanden. Danke schön mal im Voraus.
17.09.2023 - 17:56DROPS Design answered:
Liebe Frau Johannsen, machen Sie 2 Schlaufen (siehe Video - jede wird dann doppelt gefaltet um eine Schleife zu bilden und so angenäht, die 1. ca 4 cm von der untere Kante und die 2. ca 11 cm von der untere Kante (von den abgekettenen Maschen an der vorderen Mitte gemessen). Die Knöpfe werden ca ab 2 und 4 cm am anderen Teilen vom Kragen genäht - am besten legen Sie den Pullover flach und finden Sie die beste passende Höhe. Viel Spaß beim fertigstellen!
18.09.2023 - 15:53
![]() TATINCLAUX wrote:
TATINCLAUX wrote:
Bonjour, Pourriez vous m'expliquer comment faire pour tricoter les mailles sur l'arrêt de maille et les laisser sur l'arrêt de mailles. Merci pour votre retour. Cordialement
17.08.2023 - 18:58DROPS Design answered:
Bonjour Mme Tatinclaux, lorsque vous glissez les mailles de l'encolure devant en attente, vous n'avez pas besoin de les tricoter, vous pouvez les glisser sur un fil (ou un arrêt de mailles) comme dans cette vidéo et les reprendre ensuite pour le col comme dans cette autre vidéo. Bon tricot!
18.08.2023 - 08:13
![]() Claudia wrote:
Claudia wrote:
Guten Morgen, Ich meinte, dass ich den Text/Anweisungen Rechter Kragen und linken Kragen leider nicht verstehe. Liebe Grüße
17.03.2023 - 07:11DROPS Design answered:
Liebe Claudia, sollte Ihnen die vorrige Antwort nicht helfen können, können Sie uns bitte mehr sagen, welches Teil vom Kragen, Sie nicht verstehen? So kann man Ihnen am besten helfen. Danke für Ihr Verständnis.
17.03.2023 - 08:56
![]() Claudia wrote:
Claudia wrote:
Guten Tag, das mit dem Kragen verstehe ich leider überhaupt nicht?? Liebe Grüße
12.03.2023 - 15:06DROPS Design answered:
Liebe Claudia, die stillgelegten Maschen stricken Sie zuerst von der Rückseite aber diese stillgelegten Maschen sollen Sie still lassen (sie werden gestrickt aber sie sollen auf einem Faden/einer extra Nadel bleiben, da sie für den linke Kragen später noch mal gestrickt werden). Dann stricken Sie zuerst im Muster-1, dann krausrechts mit verkürzten Reihen (für den Schlalkragen). Viel Spaß beim stricken!
13.03.2023 - 09:52
|
|
Anna#annasweater |
|
|
|
|
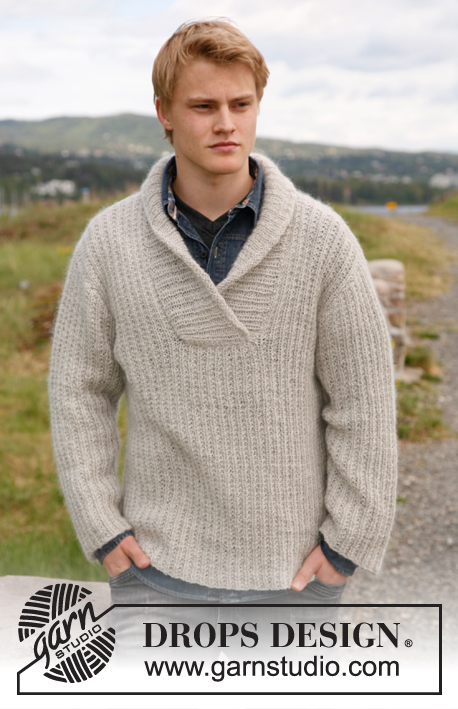
Knitted sweater with shawl collar, stripes and seed stitch in DROPS Karisma. Sizes S to XXXL.
DROPS 135-25 |
|
|
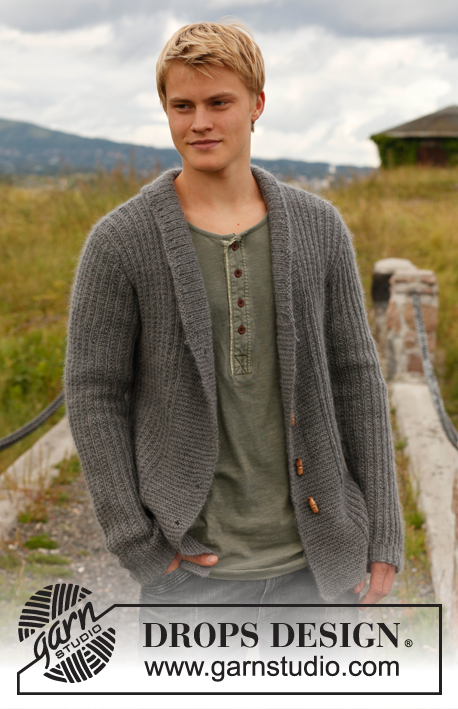
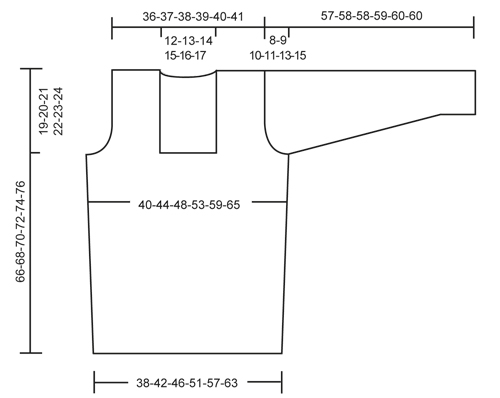
DOUBLE SEED ST: 1st round: * K 1, P 1 *, repeat from *-*. 2nd round: K over K and P over P. 3rd round: * P 1, K 1 *, repeat from *-*. 4th round: P over P and K over K. Repeat rounds 1-4. STRIPES 1 (applies to body): Work medium gray and light gray alternately every 11-11-11½-12-12-12½ cm / 4⅜"-4⅜"-4½"-4¾"-4¾"-4⅞". NOTE: Measure first stripe from cast on edge. Work medium gray in the last stripe until finished measurements. STRIPES 2 (applies to sleeve): Work medium gray and light gray alternately every 10 cm / 4". NOTE: Measure first stripe from cast on edge. Work medium gray in the last stripe until finished measurements. INCREASE TIP: Inc 1 st by making 1 YO, on next round K YO twisted (i.e. work in back loop of st instead front) to avoid holes. PATTERN 1: Row 1 (= from RS): K all sts. Row 2 (= from WS): * K 1, P 1 *, repeat from *-*. Repeat 1st and 2nd row. GARTER ST (back and forth on needle): K all rows. -------------------------------------------------------- BODY: Worked in the round on circular needle. Cast on 213-234-255-288-318-351 sts on circular needle size 3.5 mm / US 4 with light gray. Work rib as follows: * K 1, P 2 *, repeat from *-*. When piece measures 4 cm / 1½", K 1 round while AT THE SAME TIME dec 53-58-63-72-78-87 sts evenly (dec by K tog approx. every 3rd and 4th st) = 160-176-192-216-240-264 sts. Then switch to circular needle size 4 mm / US 6 and continue in the round with DOUBLE SEED ST and STRIPES 1 - See explanation above. REMEMBER THE GAUGE! When piece measures 15-15-16-16-17-17 cm / 6"-6"-6¼"-6¼"-6¾"-6¾", insert 2 markers in the piece; 1 at beg of round and 1 after 80-88-96-108-120-132 sts (marks the sides). On next round, inc 1 st on each side of every marker - Read INCREASE TIP above = 4 new sts on round. NOTE: Work the new sts in double seed st. Repeat inc one more time when piece measures 30-30-32-32-34-34 cm / 11¾"-11¾"-12½"-12½"-13½"-13½" = 168-184-200-224-248-272 sts. Continue until piece measures 47-48-49-50-51-52 cm / 18½"-19"-19¼"-19¾"-20"-20½" (adjust so that last round is 2nd or 4th round in seed st). Then divide the piece at the markers and finish each part separately. BACK PIECE: = 84-92-100-112-124-136 sts (1st row = WS). Continue with STRIPES 1 and DOUBLE SEED ST - while AT THE SAME TIME casting/binding off for armholes in each side on every other row as follows: bind off 3 sts 1 time, 2 sts 0-1-2-4-6-8 times and 1 st 1-2-3-4-5-6 times = 76-78-80-82-84-86 sts. When piece measures 64-66-68-70-72-74 cm / 25¼"-26"-26¾"-27½"-28⅜"-29⅛", bind off the middle 24-26-28-30-32-34 sts for neck and finish each shoulder separately. Then dec 1 st on next row from neck (dec by working the outermost 2 sts towards the neck tog) = 25 sts remain on shoulder in all sizes. Loosely bind off all sts when piece measures 66-68-70-72-74-76 cm / 26"-26¾"-27½"-28⅜"-29⅛"-30". FRONT PIECE: = 84-92-100-112-124-136 sts. Continue with STRIPES 1 and DOUBLE SEED ST. Start bind offs for armholes as on back piece on 1st row (= RS) - AT THE SAME TIME slip the middle 26-28-30-32-34-36 sts on a stitch holder for neck at the front, now finish each part separately. Bind off for armholes in each side as on back piece. When all bind offs are done, 25 sts remain on each shoulder. Continue with STRIPES 1 and DOUBLE SEED ST. When piece measures 66-68-70-72-74-76 cm / 26"-26¾"-27½"-28⅜"-29⅛"-30", loosely bind off all sts. SLEEVE: Worked in the round on double pointed needles. Cast on 63-66-69-72-75-78 sts on double pointed needles size 3.5 mm / US 4 with light gray. Work rib as follows: * K 1, P 2 *, repeat from *-*. When piece measures 4 cm / 1½", K 1 round while AT THE SAME TIME dec 15-16-17-18-19-20 sts evenly (dec by K tog approx. every 3rd and 4th st) = 48-50-52-54-56-58 sts. Switch to double pointed needles size 4 mm / US 6 and insert a marker at beg of round. Then continue in the round with DOUBLE SEED ST and STRIPES 2 - See explanation above. When piece measures 8-8-7-7-8-7 cm / 3⅛"-3⅛"-2¾"-2¾"-3⅛"-2¾", inc 1 st on each side of marker = 2 new sts. Repeat inc every 4-3½-3-2½-2-2 cm / 1½"-1¼"-1⅛"-⅞"-¾"-¾" a total of 10-11-13-15-17-18 times = 68-72-78-84-90-94 sts. When piece measures 49-49-48-48-47-45 cm / 19¼"-19¼"-19"-19"-18½"-17¾" (shorter measurements in the larger sizes because of longer sleeve cap and broader shoulder width) bind off 3 sts on each side of marker (= 6 sts mid under sleeve). Then work back and forth on circular needle. Continue to bind off for sleeve cap in each side on every other row as follows: bind off 2 sts 2-2-3-3-5-5 times, and then 1 st 3-4-4-5-5-6 times. Then bind off 2 sts in each side until piece measures 56-57-57-58-59-59 cm / 22"-22½"-22½"-22¾"-23¼"-23¼", then bind off 3 sts 1 time in each side. Loosely bind off all sts. Piece measures approx. 57-58-58-59-60-60 cm / 22½"-22¾"-22¾"-23¼"-23⅝"-23⅝". ASSEMBLY: Sew the shoulder seams tog. Sew in the sleeves. RIGHT COLLAR: Worked back and forth on circular needle size 4 mm / US 6 with medium gray. Knit up from WS sts from stitch holder mid front (leave sts on the stitch holder for left collar) = 26-28-30-32-34-36 sts. Then work PATTERN 1 - See explanation above, beg from next row (= RS). NOTE: Insert a marker at the end of 1st row from RS. When collar measures 19-20-21-22-23-24 cm / 7½"-8"-8¼"-8¾"-9"-9½", continue in GARTER ST - See explanation above - until finished measurements - while at the same time working short rows (beg from next row from RS) as follows: * Work 2 rows over all sts, work 2 rows over the outermost 20 sts towards mid front *, repeat from *-* until piece measures 8-9-9-10-10-11 cm / 3⅛"-3½"-3½"-4"-4"-4⅜" from marker (in the shorter side). Bind off. LEFT COLLAR: Pick up the sts from stitch holder from WS behind right collar = left collar is underneath right collar. Work the same way as on right collar but reversed (work short rows over the outermost 20 sts towards mid front). ASSEMBLY: Sew right collar to right front piece and left collar to left front piece in outermost sts. Sew collar tog mid back and sew the neck on back piece. STRAP: Make 1 strap as follows: Twine 2 strands of 40 cm / 16" medium gray and fold them double. Make another strap the same way. Fasten the straps approx. 4 and 11 cm / 1½" and 4½" up from bottom edge on right collar (approx. 1 cm / ½" from edge mid front). Pull the yarn ends through the collar and fasten the ends on the back. Sew button on left collar approx. 2 and 4 cm / ¾" and 1½" in from seam for left front piece. |
|
 |
|
Have you finished this pattern?Tag your pictures with #dropspattern #annasweater or submit them to the #dropsfan gallery. Do you need help with this pattern?You'll find 14 tutorial videos, a Comments/Questions area and more by visiting the pattern on garnstudio.com. © 1982-2026 DROPS Design A/S. We reserve all rights. This document, including all its sub-sections, has copyrights. Read more about what you can do with our patterns at the bottom of each pattern on our site. |


With over 40 years in knitting and crochet design, DROPS Design offers one of the most extensive collections of free patterns on the internet - translated to 17 languages. As of today we count 324 catalogs and 12284 patterns - 12274 of which are translated into English (US/in).
We work hard to bring you the best knitting and crochet have to offer, inspiration and advice as well as great quality yarns at incredible prices! Would you like to use our patterns for other than personal use? You can read what you are allowed to do in the Copyright text at the bottom of all our patterns. Happy crafting!
Post a comment to pattern DROPS 135-25
We would love to hear what you have to say about this pattern!
If you want to leave a question, please make sure you select the correct category in the form below, to speed up the answering process. Required fields are marked *.