DROPS Children 49 · Lots of new kid designs!
Product image DROPS Alpaca yarn
DROPS Alpaca
100% Alpaca
from 6.45 CAD /50g
Product image DROPS Fabel yarn
DROPS Fabel
75% Wool, 25% Polyamide
from 4.05 CAD /50g
Get the yarn to make this pattern from 65.40CAD.

The yarn cost is calculated from the pattern’s smallest size and the yarn’s cheapest product type. Looking for an even better price? You might find it on the DROPS Deals!

DROPS Super Sale

Firenze

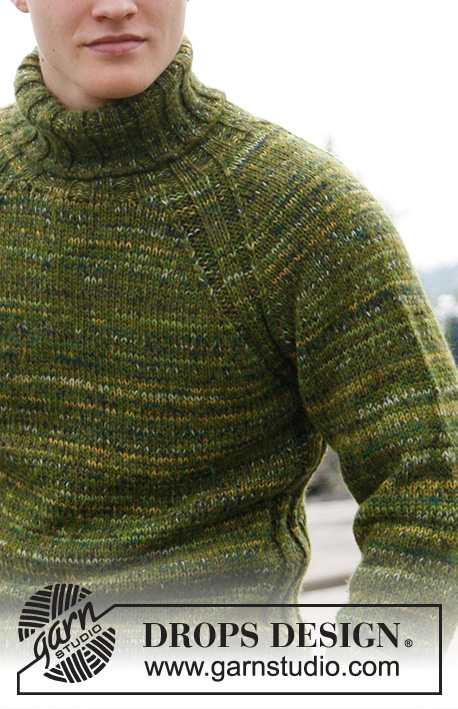
Knitted men's jumper with raglan and high neck, in DROPS Alpaca and DROPS Fabel. Size: S to XXXL.

Highlight Size:
DROPS 135-13

#firenzesweater

DROPS design: Pattern no FA-170
Yarn group A
--------------------------------------------------------
Size: S - M - L - XL - XXL - XXXL
Finished measurements:
Bust: 98-104-110-116-128-138 cm /
38½"-41"-43½"-45¾"-50½"-54¼"
Full length: 68-70-72-74-76-78 cm /
26¾"-27½"-28⅜"-29⅛"-30"-30¾"

Materials: DROPS ALPACA from Garnstudio
Color no 7238m, dark olive mix:
300-350-400-450-500-550 g
And use: DROPS FABEL from Garnstudio
Color no 542p, green mix:
250-300-350-400-450-500 g

DROPS DOUBLE POINTED NEEDLES and CIRCULAR NEEDLE (80 cm / 32") SIZE 5 mm/US 8 - or size needed to get 17 sts x 22 rows in stockinette st with 2 strands = 10 x 10 cm / 4" x 4".

DROPS DOUBLE POINTED NEEDLES and CIRCULAR NEEDLE (40 cm / 16" and 80 cm / 32") SIZE 4 mm/US 6 - for rib

-------------------------------------------------------

Alternative Yarn – See how to change yarns here
Yarn Groups A to F – Use the same pattern and change the yarn here
Yarn usage using an alternative yarn – Use our yarn converter here

-------------------------------------------------------

You might also like...

Product image DROPS Alpaca
DROPS Alpaca
100% Alpaca
from 6.45 CAD /50g
Product image DROPS Fabel yarn
DROPS Fabel
75% Wool, 25% Polyamide
from 4.05 CAD /50g
Get the yarn to make this pattern from 65.40CAD.

The yarn cost is calculated from the pattern’s smallest size and the yarn’s cheapest product type. Looking for an even better price? You might find it on the DROPS Deals!

Pattern instructions

NOTE: This pattern is written in American English. All measurements in charts are in cm. Convert from inches to cm here. There are different terms for crocheting in American and British English. If this pattern includes crochet, convert "crochet terms" here. See this pattern in British English here.
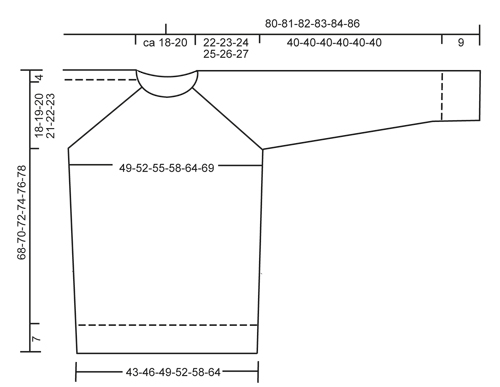
RAGLAN:

Dec on each side of the 9 sts in rib in every transition between body and sleeves.

Dec as follows from RS:
BEFORE the 9 sts: K 2 tog.
AFTER the 9 sts: Slip 1 st as if to K, K 1, psso.

Dec as follows from WS:
BEFORE the 9 sts: P 2 twisted tog (i.e. work in back loop of st instead of front).
AFTER the 9 sts: P 2 tog

--------------------------------------------------------

BODY:

Worked in the round on circular needle.

Cast on 168-180-192-204-228-252 sts on circular needle size 4 mm / US 6 with 1 strand Alpaca and 1 strand Fabel. Work rib = K 3/P 3 for 7 cm / 2¾". Switch to circular needle size 5 mm / US 8, work next round as follows: * K 4, K 2 tog *, repeat from *-* a total of 11-12-13-14-16-18 times, K 3, continue rib as before over the next 15 sts (= mid in the side), repeat from *-* a total of 11-12-13-14-16-18 times, K 3, then work rib over the last 15 sts as before (= mid in the other side) = 146-156-166-176-196-216 sts.
Continue with rib over the 15 sts in each side and in stockinette st over the remaining sts. REMEMBER THE KNITTING GAUGE!
When piece measures 18 cm / 7", inc 1 st on each side of the 15 sts in rib in each side. Repeat inc every 6 cm / 2⅜" a total of 5 times – work the inc sts in stockinette st = 166-176-186-196-216-236 sts.
When piece measures 46-47-48-49-50-51 cm / 18"-18½"-19"-19¼"-19¾"-20", bind off the middle 7 sts in rib in each side = 152-162-172-182-202-222 sts remain on needle.
Put piece aside and work the sleeves.

SLEEVE:
Worked in the round on double pointed needles.
Cast on 48-48-54-54-60-60 sts on double pointed needles size 4 mm / US 6 with 1 strand Alpaca and 1 strand Fabel. Work rib = K 3/P 3 for 9 cm / 3½". Switch to double pointed needles size 5 mm / US 8.
Work next round as follows: Work in stockinette st over the first 33-33-39-39-45-45 sts and rib as before over the last 15 sts (= mid under sleeve).
When piece measures 11 cm / 4½", inc 1 st on each side of the 15 sts in rib. Repeat inc every 4-3-3½-3-3-3 cm / 1½"-1⅛"-1¼"-1⅛"-1⅛"-1⅛" a total of 10-12-11-13-12-13 times = 68-72-76-80-84-86 sts – work the inc sts in stockinette st.
When piece measures 49 cm / 19¼"" in all sizes, bind off the 7 mid sts in rib = 61-65-69-73-77-79 sts remain on needle.
Put piece aside and knit another sleeve.

YOKE:
Slip sleeves on to same circular needle as body where armholes were bound off = 274-292-310-328-356-380 sts. Work 1 round with K over K and P over P – AT THE SAME TIME inc 1 st in all transitions between body and sleeves (K this st) = 278-296-314-332-360-384 sts. In all transitions between body and sleeve there are now: P 3, K 3 and P 3 = 9 sts in rib. Continue to work K over K and P over P while at the same time dec for RAGLAN – see explanation above!
Repeat dec on every other round a total of 17-18-18-18-18-19 times and then on every round a total of 5-6-8-10-12-12 times. AT THE SAME TIME when 5 dec remain, slip the middle 18-19-20-23-25-27 sts mid front on a stitch holder for neck.
Work back and forth on needle until finished measurements. AT THE SAME TIME bind off 1 st at the beg of every row 2 times in each side (= towards the neck).
After all dec for raglan and bind offs for neck, 80-81-82-81-91-105 sts remain on needle.

NECK:
Switch to circular needle size 4 mm / US 6. Pick up approx. 22 to 31 sts at the front of neck (includes sts on stitch holder) = 102 to 136 sts. Work 1 round with K over K and P over P while at the same time adjusting no of sts to 102-102-102-114-114-114 (there are now 21-21-21-27-27-27 sts in stockinette st over back piece, 27-27-27-33-33-33 sts in stockinette st over front piece and 9 sts in stockinette st over each sleeve). Continue in rib = K 3, P 3 over all sts - this should work out so that all the raglan sts can be worked as before. When neck measures approx. 20 cm / 8", bind off with K over K and P over P. Fold the neck double towards RS.

ASSEMBLY:
Sew tog the openings under the sleeves.

This pattern has been corrected.

Updated online: 21.03.2023
New yarn amount in DROPS Fabel: Color no 542p, green mix: 250-300-350-400-450-500 g

Diagram

Diagram measurements for DROPS 135-13
Do you have a question? See a list of frequently asked questions (FAQ)

Knitting tension is what determines the final measurements of your work, and is usually measured per 10 x 10 cm. It is provided like so: number of stitches in width x number of rows in height - eg: 19 stitches x 26 rows = 10 x 10 cm.

The knitting tension is very individual; some people knit/crochet loosely while others work tightly. You adjust the knitting tension with the needle size, which is why the suggested needle size only serve as a guide! You need to adjust this (up or down) to ensure that YOUR knitting tension matches the knitting tension provided in the pattern. If you work with a different knitting tension than provided you will have a different yarn consumption, and your work will have different measurements than what the pattern suggests.

The knitting tension also determines which yarns can replace each other. As long as you achieve the same knitting tension you can replace one yarn with another.

See DROPS lesson: How to measure your tension/gauge

See DROPS video: How to make a gauge tension swatch

The required amount of yarn is provided in grams, eg: 450 g. To calculate how many balls you’ll need you first need to know how many grams are in 1 ball (25g, 50g or 100g). This information is available if you click on the individual yarn quality on our pages. Divide the amount required with the amount of each ball. For example, if each ball is 50g (the most common amount), the calculation will be as follows: 450 / 50 = 9 balls.

The important thing when changing from one yarn to another is that the knitting/crochet tension remains the same. This is so that the measurements of the finished piece will be the same as on the sketch provided. It is easier to achieve the same knitting tension using yarns from the same yarn group. It is also possible to work with multiple strands of a thinner yarn to achieve the knitting tension of a thicker one. Please try our yarn converter. We recommend you to always work a test swatch.

Please NOTE: when changing yarn the garment might have a different look and feel to the garment in the photo, due to individual properties and qualities of each yarn.

See DROPS lesson: Can I use a different yarn than the one mentioned in the pattern?

All our yarns are categorised into yarn groups (from A to F) according to thickness and knitting tension – group A contains the thinnest yarns and group F the thickest. This makes it easier for you to find alternative yarns to our patterns, should you wish to switch yarn. All yarns within the same group have a similar knitting tension and can easily replace each other. However, different yarn qualities have different structures and properties which will give the finished work a unique look and feel.

Click here for an overview of the yarns in each yarn group

At the top of all our patterns you’ll find a link to our yarn converter, which is a helpful tool should you wish to use a different yarn than suggested. By filling in the yarn quality you wish to replace, the amount (in your size) and number of strands, the converter will present good alternative yarns with the same knitting tension. Additionally it will tell you how much you’ll require in the new qualities and whether you’ll need to work with multiple strands. Most skeins are 50g (some are 25g or 100g).

If the pattern is worked with multiple colours, every colour will have to be converted separately. Similarly, if the pattern is worked with several strands of different yarns (for example 1 strand Alpaca and 1 strand Kid-Silk) you will have to find alternatives for each, individually.

Click here to see our yarn converter

Since different yarns have different qualities and textures we have chosen to keep the original yarn in our patterns. However, you can easily find options among our available qualities by using our yarn converter, or simply pick a yarn from the same yarn group.

It is possible that some retailers still have discontinued yarns in stock, or that someone has a few skeins at home that they would like to find patterns for.  

The yarn converter will provide both alternative yarn as well as required amount in the new quality.

If you think it's hard to decide what size to make, it can be a good idea to measure a garment you own already and like the size of. Then you can pick the size by comparing those measures with the ones available in the pattern's size chart.

You'll find the size chart at the bottom of the pattern.

See DROPS lesson: How to read size chart

The needle size provided in the pattern serves only as a guide, the important thing is to follow the knitting tension. And since knitting tension is very individual, you will have to adjust the needle size to ensure that YOUR tension is the same as in the pattern – maybe you’ll have to adjust 1, or even 2 needle sizes, up or down to achieve the correct tension. For this, we recommend that you work test swatches.

Should you work with a different knitting tension than the one provided, the measurements of the finished garment might deviate from the measurement sketch.

See DROPS lesson: How to measure your tension/gauge

See DROPS video: How to make a gauge tension swatch

Working a garment top-down provides more flexibility and room for personal adjustment. For example it is easier to try the garment on while working, as well as making adjustments to length of yoke and shoulder caps.

The instructions are carefully explaining every step, in the correct order. Diagrams are adjusted to the knitting direction and are worked as usual.

The diagram depicts all rows/rounds, and every stitch seen from the right side. It is read from bottom to top, from right to left. 1 square = 1 stitch.

When working back and forth, every other row is worked from the right side and every other row is worked from the wrong side. When working from the wrong side, the diagram will have to be worked reversed: from left to right, knit stitches are purled, purl stitches are knit etc.

When working in the round every round is worked from the right side and the diagram are worked from right to left on all rounds.

See DROPS lesson: How to read knitting diagrams

The diagram depicts all rows/rounds, and every stitch seen from the right side. It is worked from bottom to top, from right to left.

When working back and forth every other row is worked from the right side: from right to left and every other row is worked from the wrong side: from left to right.

When working in the round, every row in the diagram are worked from the right side, from right to left.

When working a circular diagram you start in the middle and work your way outwards, counter clockwise, row by row.

The rows usually start with a given number of chain stitches (equivalent to the height of the following stitch), this will either be depicted in the diagram or explained in the pattern.

See DROPS lesson: How to read crochet diagrams

Instructions for working several diagrams after each other on the same row/round, will often be written like so: “work A.1, A.2, A.3 a total of 0-0-2-3-4 times". This means you work A.1 once, then A.2 is worked once, and A.3 is repeated (in width) the number of times provided for your size – in this case like so: S = 0 times, M = 0 times, L=2 times, XL= 3 times and XXL = 4 times.

The diagrams are worked as usual: begin with the first row in A.1, then work the first row in A.2 etc.

See DROPS lesson: How to read knitting diagrams

See DROPS lesson: How to read crochet diagrams

The total width of the garment (from wrist-to-wrist) will be larger in the larger sizes, despite the actual sleeves being shorter. The larger sizes have longer sleeve caps and wider shoulders, so there will be a good fit in all sizes.

The measurement sketch/schematic drawing provides information regarding the full length of the garment. If it’s a jumper or a jacket the length is measured from the highest point on the shoulder (usually closest to the neckline), and straight down to the bottom of the garment. It is NOT measured from the tip of shoulder. Similarly, the length of yoke is measured from the highest point on the shoulder and down to where yoke is split into body and sleeves.

See DROPS lesson: How to read a schematic drawing

Diagrams are often repeated on the round or in height. 1 repeat is the diagram the way it appears in the pattern. If it says to work 5 repeats of A.1 in the round, then you work A.1 a total of 5 times after/next to each other in the round. If it says to work 2 repeats of A.1 vertically/in height you work the entire diagram once, then begin again at the start and work the entire diagram one more time.

Chain stitches are slightly narrower than other stitches and to avoid working the cast-on edge too tight, we simply chain more stitches to begin with. The stitch count will be adjusted on the following row to fit the pattern and measurement sketch.

The rib edge is more elastic and will contract slightly compared to, for example, stocking stitch. By increasing before the rib edge, you avoid a visible difference in width between the rib edge and the rest of the body.

It’s very easy to cast off too tightly, and by making yarn overs while casting off (and simultaneously casting these off) you avoid a too tight cast off edge.

See DROPS video: How to bind off with yarn overs (yo)

To achieve an even increase (or decrease) you can increase on, for example: every 3rd and 4th row alternately, like so: work 2 rows and increase on the 3rd row, work 3 rows and increase on the 4th. Repeat this until the increase is complete.

See DROPS lesson: Increase or decrease 1 st on every 3rd and 4th row alternately

Should you prefer to work in the round instead of back and forth, you may of course adjust the pattern. You’ll need to add steeks mid-front (usually 5 stitches), and follow the instructions. When you would normally turn and work from the wrong side, simply work across the steek and continue in the round. At the end you’ll cut the piece open, pick up stitches to work bands, and cover the cut edges.

See DROPS video: How to knit steeks and cut open

Should you prefer to work back and forth instead of in the round, you may of course adjust the pattern so you work the pieces separately and then assemble them at the end. Divide the stitches for the body in 2, add 1 edge stitch in each side (for sewing) and work the front and back pieces separately.

See DROPS lesson: Can I adapt a pattern for circular needles into straight needles?

Pattern repeats can vary slightly in the different sizes, in order to get the correct proportions. If you’re not working the exact same size as the garment in the photo, yours might deviate slightly. This has been carefully developed and adjusted so that the complete impression of the garment is the same in all sizes.

Make sure to follow instructions and diagrams for your size!

If you have found a pattern you like which is available in women’s size it’s not very difficult to convert it to men’s size. The biggest difference will be the length of sleeves and body. Start working on the women size that you think would fit across the chest. The additional length will be worked right before you cast off for the armhole/sleeve cap. If the pattern is worked top-down you can add the length right after the armhole or before the first decrease on sleeve.

Regarding additional yarn amount, this will depend on how much length you add, but it is better with a skein too many than too few.

All yarns will have excess fibres (from production) that might come off as lint or shedding. Brushed yarns (ie hairier yarns) have more of these loose, excess fibres, causing more shedding.

Shedding also depends on what is worn under or over the garment, and whether this pulls at the yarn fibres. It’s therefore not possible to guarantee that there will be no shedding

Below are some tips on how to get the best result when working with hairier yarns:

1. When the garment is finished (before you wash it) shake it vigorously so the looser hairs come off. NOTE: do NOT use a lint roller, brush or any method that pulls at the yarn.

2. Place the garment in a plastic bag and put it in your freezer - the temperature will cause the fibres to become less attached to each other, and excess fibres will come off easier.

3. Leave in the freezer for a few hours before taking it out and shaking it again.

4. Wash the garment according to the instructions on the yarn label.

Pilling is a natural process that happens to even the most exclusive of fibers. It's a natural sign of wear and tear that is hard to avoid, and that is most visible in high friction areas of your garment like a sweater's arms and cuffs.

You can make your garment look as new by removing the pilling, using a fabric comb or a pill/lint remover.

Still can't find the answer you need? Then scroll down and leave your question so one of our experts can try to help you. This will be done normally within 5 to 10 working days.
In the meantime, you can read the questions and answers that others have left to this pattern or join the DROPS Workshop on Facebook to get help from fellow knitters/crocheters!

Post a comment to pattern DROPS 135-13

We would love to hear what you have to say about this pattern!

If you want to leave a question, please make sure you select the correct category in the form below, to speed up the answering process. Required fields are marked *.

Comments / Questions (180)

country flag Gilles wrote:

Bonjour, c'est la première fois que je tricote un pull, et j'ai un petit questionnement : Je tricote l'empiècement et je viens juste de placer mes 18 mailles centrales en attente. Comment faire pour tricoter maintenant en allers et retours ? ça me parait impossible avec l'aiguille circulaire, avec le nombre de maille qui diminue. Dois-je changer pour les aiguilles double pointe ? Merci d'avance pour votre aide ! Bien Cordialement, Gilles

01.02.2015 - 21:54

DROPS Design answered:

Bonjour Gilles, effectivement, quand votre nombre de mailles diminue, il faut adapter en tricotant soit avec une aiguille circulaire plus courte, soit avec les aiguilles doubles pointes, voire en magic-loop (cf vidéo ci-dessous). Bon tricot!

02.02.2015 - 13:04

Maria wrote:

Ich bin jetzt beim kragen und habe dazu eine frage weil ich das irgendwie nicht kapier. 1 runde rechts ueber rechts links ueber rechts versteh ich ja noch aber wie ist das gemeint " gleichzeitig die maschenzahl auf 114 maschen anpassen. danke fuer ihre rasche antwort

05.12.2014 - 23:14

DROPS Design answered:

Sie haben ja für den Halsausschnitt eine Anzahl M aufgefasst und zurück auf die Nadel gelegt. Diese Anzahl M muss nun in der nächsten Rd durch Zunahmen oder Abnahmen so angepasst werden, dass Sie 114 M auf der Nadel haben, achten Sie dabei darauf, dass Sie die entsprechende, genannte Anzahl glatt-re-M am Vorderteil, Rückenteil und an den Ärmeln haben. Wenn Sie dann 3 M re, 3 M li im Wechsel stricken, geht das Muster der Raglanschrägung genau darin auf.

07.12.2014 - 10:58

Ourania wrote:

Great thanks for your immediate replies to each of us. Your assistance is really precious

25.11.2014 - 16:18

Ourania wrote:

So, the point is that the 204sts of the rib is equal to 176sts of the body piece in order to have a steady width across the body front and back pieces. Is this correct?

24.11.2014 - 17:51

DROPS Design answered:

Dear Ourania, it is correct, but in the 176 sts, you will have 15 sts in rib on each side, and stocking st in between. Happy knitting!

25.11.2014 - 09:39

Ourania wrote:

Good evening from Greece. I need some help for pattern 135-13. First of all I need to understand the purpose of K2 TOG to *K4-K2 TOG* procedure. Secondly, when I try the round *K4-K2 TOG* and rib *K3-P3* until the 176sts of total for XL, you say to knit rib of 15sts on each side(30sts total) for the remaining sts. The problem for me is that 28sts remain from 176sts to the total of 204sts and the pattern says to knit ribs of 30sts(2x15sts) on the remaining sts. What do I miss?

24.11.2014 - 15:35

DROPS Design answered:

Dear Ourania, to get the correct width, you will have to dec number of sts worked in st st, so that you will work K4/K2 tog over front and back pieces - at the same time, you keep 15 sts in rib K3/P3 on each side as follows: *(K4, K2 tog) a total of 14 times (= 84 sts), K3, P3/K3 over the next 15 sts*, repeat from *-* one more time = 204 sts dec to 176. Happy knitting!

24.11.2014 - 16:38

country flag Gudrun wrote:

Danke für die Antwort!!! hat geholfen. und schon weiß ich wieder nicht weiter. Raglan -Abnahme: Meine Reihen beginnen jetzt immer mit dem linken Ärmel. die 1. Abnahme wäre dann: Rückseite nach den 9M. die 2. Abnahme: Rückseite vor den 9M, die 3. Abnahme: Vordeseite nach den 9M und die 4. Abnahme: Voderseite vor den 9M. Stimmt das? Ich hoffe auf Hilfe, Grüße Gudrun

19.11.2014 - 15:04

DROPS Design answered:

Liebe Gudrun, Sie sind jetzt also an der Stelle nach dem Halsausschnitt? Sie müssen die Abnahmen entsprechend so weiterarbeiten, dass es zu den Raglanabnahmen, die Sie vorher in Runden gemacht haben, passt, d.h. Sie müssen im richtigen Rhythmus bleiben.

24.11.2014 - 23:20

country flag Gudrun wrote:

Bin bei der Rundpasse angekommen und weiß nicht wie ich die 3 Teile zusammen setzen soll. Die Ärmel haben ja ein "Bündchen" welches sich über den gesamten Ärmel nach oben zieht. Dieses soll nach Fertigstellung des Pullis in einer Linie mit dem Bündchen des Vorder/Rückteils sein, welches sich an beiden Seiten über die gesamte Länge des Pullis erstreckt. Wenn ich den ersten Ärmel einstricke, muss ich mit dem Bündchen anfangen, oder nach dem Bündchen oder in der Mitte?

17.11.2014 - 15:10

DROPS Design answered:

Die Stelle, an der Sie die Ärmel auf die Rundnadel zu dem restlichen Pullover legen, ist ja genau festgelegt. Sie haben ja die 7 mittleren dieser "Bündchen"-M abgekettet, das ist die untere Ärmelmitte, es bleiben rechts und links davon je 4 M im Bündchenmuster, diese gehen dann in die Raglanschrägung über. Sie legen also einfach die verbleibenden Ärmel-M in die Armausschnitt-"Lücke" am Rumpfteil. Die jeweils abgeketteten 7 M vom Ärmel und Rumpf werden am Ende aneinandergenäht.

18.11.2014 - 09:17

country flag Mara Ferraris wrote:

Buonasera mi riferisco al modello 135-13 TgS. Sto lavorando lo sprone. Ho fatto le 17 diminuzioni ogni 2 ferri. Mi rimangono da fare le ultime 5 ma non capisco cosa significa che allo stesso tempo devo chiudere allinizio di ciascun ferro 1 m x 2 volte... significa che devo diminuire 2 m per 5 ferri? Scusate ma sono inesperta. Grazie mille e complimentiti

05.11.2014 - 23:26

DROPS Design answered:

Buongiorno Mara. Le m a cui fa riferimento, vanno intrecciate vicino al collo. Quando le rimangono le 5 diminuzioni, deve mettere in attesa le 18 m centrali per il collo. Continua poi con le 5 diminuzioni per il raglan ad ogni ferro, come fatto fino ad adesso. Contemporaneamente, all’ inizio del ferro, vicino al collo, deve intrecciare 1 m per 2 volte, da ciascun lato del collo. Buon lavoro!

06.11.2014 - 09:45

country flag Stephan wrote:

Hallo, ik ben nogal nieuw in breien en ik vraag mij af hoe dat gaat met die twee soorten wol. Brei ik die samen, of gaat dat rij om rij?

02.10.2014 - 22:29

DROPS Design answered:

Hoi Stephan. Voor deze trui brei je de twee garens samen = een dubbele draad. Veel plezier mee!

03.10.2014 - 11:23

Pepii wrote:

OK, bedankt voor de reactie. De voorwaarden liggen voor de hand, dus ja daar houd ik me graag aan!

05.09.2014 - 09:24