
Popular categories
Looking for a yarn?


Comments / Questions (427)
![]() Nicole wrote:
Nicole wrote:
Ich finde diese Weste auch wunderschön!!! Ich habe bisher immer nur gestrickt, kaum gehäkelt, deswegen stehe ich schon bei der 3. Runde an: -> Muss ich die 1fm+1Lm+1fm+1Lm quasi so wie die Lm bei den Stb häkeln, oder muss ich in die M der vorherigen Runde einstechen. Und welche 1.Lm ist gemeint?? Danke für Ihre Hilfe!
15.05.2012 - 08:10
![]() Furryfairy wrote:
Furryfairy wrote:
Beste drops, in het patroon staat bij LIJF, regel 16 tot 20 dat er 6 dstk TEGELIJKERTIJD gelijkmatig moeten worden gemeerderd. Wat wordt hiermee bedoeld? Over de hele toer gelijkmatig meerderen, of 6 dstk tegelijk meerderen? Ik twijfel aan wat juist is, ook omdat het volgens mij de bedoeling is dat de onderzijde van het rugpand vooral plooien heeft. Dank voor uw antwoord.
04.05.2012 - 12:10DROPS Design answered:
Je moet gelijkmatig meerderen, dat betekent over de hele toer 6 dstk gelijkmatig meerderen(dus met ongeveer hetzelfde aantal dstk tussen elke meerdering). Herhaal dit in elke toer tot je in toer 20 240 dstk hebt op de toer.
05.05.2012 - 15:36Trini Macrae wrote:
Hey I'm loving making this jacket, but I'm stuck now I've started working on the front piece instructions. I can't figure out the instructions about increasing and decreasing at the ends. Does anyone know of a video that demonstrates this, or can make one for me? Any help would be much appreciated! Trini
18.04.2012 - 06:08DROPS Design answered:
Place 2 markers in piece. On every row inc 1 st at each marker, first time before markers, next time after, next before, next after and so on. At the same time dec at the end of every row like this. When 3 sts remain on row * work last 3 tr as this: 1dc, 1hdc, 1 sc, turn, ch 1, now in the first 6 sts work like this: skip 1st st, 1 sl st in 2nd, 1 sl st in 3rd, 1 sc in 4th, 1 hdc in 5th, 1 dc in 6th, and then tr with inc at both markers until 3 tr remain on row*. Repeat *-*.
18.04.2012 - 21:41
![]() Anna wrote:
Anna wrote:
Hallo, ik wil graag met het patroon beginnen maar begrijp de tekening van bovenaf niet helemaal. Welke maat kan ik het beste nemen voor een borstomvang/bovenwijdte van 118? Graag hulp. Vr.gr.
22.03.2012 - 12:41DROPS Design answered:
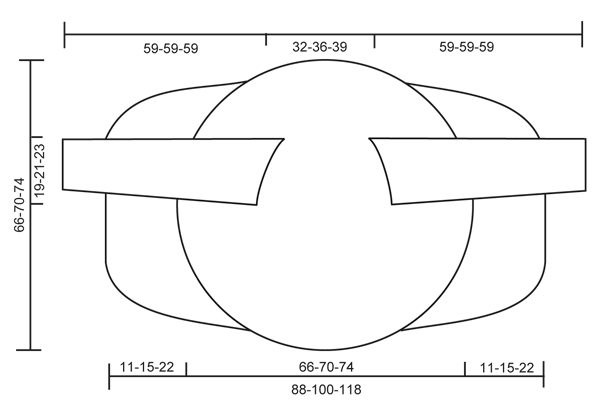
Ik zou u maat XXL aanraden. Het model is een cirkelvest, dus kijkt u op de maattekening, dan ziet u dat de cirkel een doorsnede heeft van 88 tot 118 cm. dus voor maat XXL: 22 cm voorpand, 74 cm achterpand en 22 cm voorpand. U kunt eventueel vergelijken met een ander DROPS patroon (vest), de maten zijn vergelijkbaar.
26.03.2012 - 12:28
![]() Petra wrote:
Petra wrote:
Hallo Experten, ich brauche bitte nochmal Hilfe bei der Armkugel. Verstehe ich das richtig: 5 Reihen häkeln - am Anfang der Reihe Kettmaschen (1.R 3,2.-3.R 2, 5.R 3) und am Ende die Anzahl Maschen einfach so lassen und wenden? Das wird bei mir so stufig - ist das richtig? Danke im Voraus.
19.03.2012 - 13:24DROPS Design answered:
Ja, genau.
20.03.2012 - 08:54
![]() Fanny wrote:
Fanny wrote:
Bonjour, je suis en train de réaliser ce modèle et je bloque au niveau des diminutions des manches : je suis arrivé à 49cm de hauteur totale, pour le rang suivant, il faut que je crochète 3 mc dans les 3 premières DB en début de rang et que je m’arrête a 3 DB de la fin du rang? Est ce bien cela? Merci d'avance :)
13.03.2012 - 14:20DROPS Design answered:
Oui Fanny, tout à fait, il faut procéder ainsi pour diminuer 3 DB de chaque côté - cf diminutions 2 au début des explications. Bon crochet :)
13.03.2012 - 17:30
![]() Sarah wrote:
Sarah wrote:
Und die Markierungsfäden ziehe ich in jeder Runde neu ein? Wenn ja, wo fange ich denn an zu zählen? Ab dem ersten festen Stäbchen vom Anfang der Runde?
13.03.2012 - 10:28DROPS Design answered:
Ja, die Markierungen foldern der Arb nahc oben. Es wird vom ersten Stäbchen in der Mitte gezählt.
14.03.2012 - 09:35
![]() Sarah wrote:
Sarah wrote:
Hallo, ich hänge grad ein wenig bei den Seitenteilen fest. Dort steht man soll gleichzeitig bei jeder Runde am Anfang und am Ende abk. Wie das am Ende gemacht wird ist ja in dem Tipp ganz oben beschrieben, aber wie nehme ich denn am Anfang der Reihe ab?
11.03.2012 - 19:44DROPS Design answered:
Am Anfang der Reihe häkelt man Kettenmaschen in die gewünschten Maschen.
12.03.2012 - 10:08NELIDA GONZÁLEZ wrote:
Me gusto mucho poder encontrar esta pagina lastima que no pueda comprar estas lana, vivo en Argentina, Tierra del Fuego
10.03.2012 - 18:33
![]() Petra wrote:
Petra wrote:
Vielen Dank für die schnelle Antwort, leider verstehe ich es immer noch nicht: Ich starte in R 14 mit 50 M (gg. den Hals), Zunahme von je 3 DStb in R 15 - 20 = 18 DStb + 50 DStb vom Anfang = 68 DStb ges. - 39 DStb über die ich nicht weiter häkeln soll = verbleibende 29 DStb = pro Seite 14,5 DStb. Würde mich über eine weitere Antwort sehr freuen, vielen Dank im Voraus.
09.03.2012 - 10:56DROPS Design answered:
Die 39 Maschen für den Nacken werden in der Mitte der Maschen für den Nacken platziert und nicht am Anfang der Runde.
12.03.2012 - 10:54
|
|
Wild Flower#wildflowercardigan |
|
 |
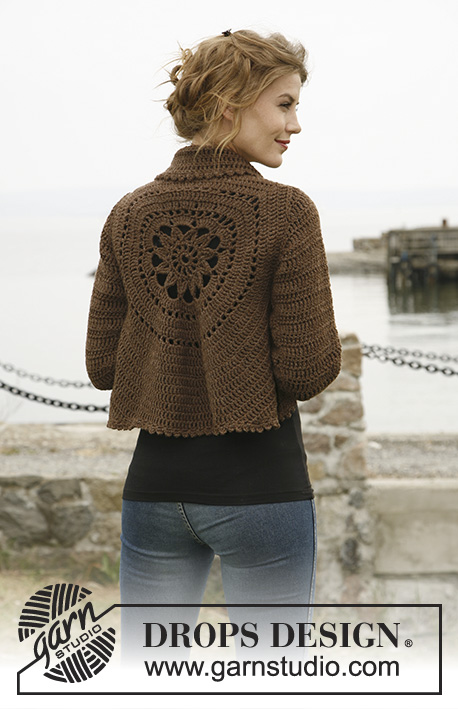 |
Crochet DROPS jacket worked in a circle in ”Nepal”. Size: S to XXXL
DROPS 132-2 |
|
|
CROCHET TIP: Replace first tr on every round/row with ch 4. DECREASE TIP 1 (applies to the body): Dec as follows: Work tr until 3 tr remain, * in the first of these work 1 dc, in the next 1 hdc and in the last 1 sc, turn with ch 1, skip sc, work 1 sl st in hdc and 1 sl st in dc, then 1 sc in first tr, 1 hdc in next tr and 1 dc in next tr, work tr until 3 tr remain at end of row *, repeat from *-* until a total of 6-8-12 rows have been worked. DECREASE TIP 2 (applies to sleeve cap): Dec at beg of row by working sl st over the no of tr to be dec. Dec at end of row by working until same no of sts to be dec remains, turn piece. -------------------------------------------------------- -------------------------------------------------------- BODY: Worked in the round in a circle from mid back. Ch 8 on hook size 5 mm / H/8 with Nepal and form a ring with 1 sl st in first ch. ROUND 1: Work 12 sc in ch-ring, finish with 1 sl st in first sc. ROUND 2: ch 5 (= 1 dc + 2 ch), * 1 dc in next sc, ch 2 *, repeat from *-* the entire round and finish with 1 sl st in 3rd ch from beg of round = 12 dc with 2 ch between each. ROUND 3: 1 ch, continue to crochet as follows in every ch-space the entire round: 1 sc + ch 1 + 1 sc + ch 1, finish round with 1 sl st in first ch = 24 sc with 1 ch between each. ROUND 4: 1 sl st in first sc, 1 sl st in first ch, ch 5, 1 dtr in same ch, * ch 7, then work 4 dtr tog as follows: Work 2 dtr in same ch as last dtr but wait with last YO and pull through on both dtr, skip 1 sc + 1 ch + 1 sc, work 1 dtr in next ch but wait with last YO and pull through, then work last dtr in same ch and pull last YO through all 5 sts on hook *, repeat from *-* a total of 11 times, ch 7, work 2 dtr tog in same ch (but wait with last YO and pull through on both), work 1 sl st in 5th ch from beg of round and pull thread through all 3 sts on hook. ROUND 5: 1 sl st in first ch-space, ch 4 (= 1 tr), 7 tr in same ch-space, then work 8 tr in every ch-space, finish with 1 sl st in 4th ch from beg of round = a total of 96 tr. ROUND 6: ch 5 (= 1 dc + 2 ch), * skip 1 tr, 1 dc in next tr, ch 2 *, repeat from *-* the entire round and finish with 1 sl st in 3rd ch from beg of round = 48 ch-spaces. ROUND 7 – READ CROCHET TIP: Work 1 tr in every dc and work 1 and 2 tr alternately in every ch-space the entire round = 120 tr. ROUND 8: Work 1 tr in every tr but work 2 tr in every 10th tr = 132 tr. ROUND 9: ch 5 (= 1 dc + 2 ch), * skip 1 tr, 1 dc in next tr, ch 2 *, repeat from *-* the entire round and finish with 1 sl st in 3rd ch from beg of round = 66 ch-spaces. ROUND 10: Work 1 tr in every dc and work 1 and 2 tr alternately in every ch-space the entire round = 165 tr. ROUND 11: Work 1 tr in every tr but work 2 tr in every 15th tr = 176 tr. ROUND 12: Work 1 tr in every tr but work 2 tr in every 16th tr = 187 tr. Piece measures approx. 20 cm / 8" from center and outwards. SIZE S/M: ROUND 13: ch 1, then work 1 sc in each of the first 45 tr (= up towards neck), ch 30 loosely, skip the next 27 tr (= armhole), then work 1 sc in each of the next 88 tr (= down towards back), ch 30 loosely, skip the next 27 tr (= armhole) and fasten with 1 sl st in first sc on round. ROUND 14: Work 1 tr in every sc - but inc 2 tr evenly over the first 45 sc (= 47 tr), then work 30 tr in ch-row over armhole, work 1 tr in every sc – but inc 3 tr evenly over the bottom 88 sc (= 91 tr), and work 30 tr in ch-row over armhole = 198 tr. ROUND 15 to 19: Continue with tr – while at the same time inc 6 tr evenly on every round. After 19th round there are 228 tr on the round and piece measures approx. 33 cm / 13" from center and outwards. Continue working only over 79 tr in each side – i.e. do not work over 35 tr at top by neck or 35 tr at bottom of back. Continue with explanation under FRONT PIECE. SIZE L/XL: ROUND 13: Work 1 tr in every tr but work 2 tr in every 17th tr = 198 tr. ROUND 14: ch 1, then work 1 sc in each of the first 50 tr (= up towards neck), ch 32 loosely, skip the next 29 tr (= armhole), then work 1 sc in each of the next 90 tr (= down towards back), ch 32 loosely, skip the next 29 tr (= armhole) and fasten with 1 sl st in first sc on round. ROUND 15: Work 1 tr in every sc - but inc 3 tr evenly over the first 50 sc (= 53 tr), then work 32 tr in ch-row over armhole, work 1 tr in every sc – but inc 3 tr evenly over the bottom 90 sc (= 93 tr), and work 32 tr in ch-row over armhole = 210 tr. ROUND 16 to 20: Continue with tr – while at the same time inc 6 tr evenly on every round. After 20th round there are 240 tr on the round and piece measures approx. 35 cm / 13¾" from center and outwards. Continue working only over 81 tr in each side – i.e. do not work over 39 tr at top by neck or 39 tr at bottom of back. Continue with explanation under FRONT PIECE. SIZE XXL and XXXL: ROUND 13: Work 1 tr in every tr but work 2 tr in every 17th tr = 198 tr. ROUND 14: Work 1 tr in every tr but work 2 tr in every 18th tr = 209 tr. ROUND 15: ch 1, then work 1 sc in each of the first 54 tr (= up towards neck), ch 36 loosely, skip the next 32 tr (= armhole), then work 1 sc in each of the next 91 tr (= down towards back), ch 36 loosely, skip the next 32 tr (= armhole) and fasten with 1 sl st in first sc on round. ROUND 16: Work 1 tr in every sc - but inc 2 tr evenly over the first 54 sc (= 56 tr), then work 36 tr in ch-row over armhole, work 1 tr in every sc – but inc 3 tr evenly over the bottom 91 sc (= 94 tr), and work 36 tr in ch-row over armhole = 222 tr. ROUND 17 to 22: Continue with tr – while at the same time inc 6 tr evenly on every round. After 22nd round there are 258 tr on the round and piece measures approx. 37 cm / 14½" from center and outwards. Continue working only over 89 tr in each side – i.e. do not work over 40 tr at top by neck or 40 tr at bottom of back. Continue with explanation under FRONT PIECE. LEFT FRONT PIECE - ALL SIZES: = 79-81-89 tr. Insert a marker after 23-24-27 sts in from each side (= 33-33-35 sts between markers). Then work tr back and forth over these sts while at the same time inc 1 st at every marker on every row (i.e. inc 2 sts on row, inc alternately before and after marker) and dec 3 sts at beg and end of every row in each side – SEE DECREASE TIP 1 until a total of 6-8-12 rows back and forth have been worked. RIGHT FRONT PIECE: Work same way as on left piece over 79-81-89 tr in right side. SLEEVE (worked back and forth): Ch 46-48-53 loosely (includes 4 ch to turn with) on hook size 5 mm / H/8 with Nepal. ROW 1: 1 tr in 5th ch from hook, 1 tr in each of the next 2-4-2 ch, * skip ch 1, 1 tr in each of the next 6 ch *, repeat from *-* until 4 ch remain, skip 1 ch and work 1 tr in each of the last 3 ch = 37-39-43 tr. ROW 2: 1 tr in every tr – READ CROCHET TIP! ROW 3: ch 6 (= 1 tr + 2 ch), skip 1 tr, 1 tr in next tr, * ch 2, skip 1 tr, 1 tr in next tr *, repeat from *-* the entire row = 18-19-21 ch-spaces. ROW 4: Work 1 tr in every tr and 1 tr in every ch-space = 37-39-43 tr. Repeat row 2-4 a total of 3 times. Piece measures approx. 18 cm / 7". Then work tr on all rows until finished measurements, while at the same time inc as follows: SIZE S/M: * Inc 1 tr in one side by working 2 tr in next to last tr. On next row inc 1 tr in the other side the same way. Inc 1 more time the same way in each side, then work 1 row without inc *, repeat from *-* a total of 3 times = 12 inc = 49 tr. SIZE L/XL + XXL/XXXL: * Inc 1 tr in one side by working 2 tr in next to last tr. On next row inc 1 tr in the other side the same way *, repeat from *-* a total of 8 times = 16 inc = 55-59 tr. ALL SIZES: Continue to work until piece measures 49 cm / 19¼" in all sizes. Now dec on every row in each side for sleeve cap – SEE DECREASE TIP 2: 3 tr 1 time, 2 tr 3 times and 3 tr 1 time = 25-31-35 tr remain at the top. Fasten off. ASSEMBLY: Sew sleeve seams tog edge to edge to avoid a chunky seam. Work 1 round around the entire body and at bottom of sleeves as follows: * ch 5, 1 dc in first ch, skip 1 st, fasten with 1 sc in next st *, repeat from *-* the entire round and finish with 1 sl st in first ch. Sew in the sleeves. If desired, close the jacket with a pin or sew on a button on to left front piece (try the jacket on to see where button should be) and button it in crochet edge. |
|
 |
|
Have you finished this pattern?Tag your pictures with #dropspattern #wildflowercardigan or submit them to the #dropsfan gallery. Do you need help with this pattern?You'll find 9 tutorial videos, a Comments/Questions area and more by visiting the pattern on garnstudio.com. © 1982-2026 DROPS Design A/S. We reserve all rights. This document, including all its sub-sections, has copyrights. Read more about what you can do with our patterns at the bottom of each pattern on our site. |
|


With over 40 years in knitting and crochet design, DROPS Design offers one of the most extensive collections of free patterns on the internet - translated to 17 languages. As of today we count 324 catalogs and 12252 patterns - 12242 of which are translated into English (US/in).
We work hard to bring you the best knitting and crochet have to offer, inspiration and advice as well as great quality yarns at incredible prices! Would you like to use our patterns for other than personal use? You can read what you are allowed to do in the Copyright text at the bottom of all our patterns. Happy crafting!
Post a comment to pattern DROPS 132-2
We would love to hear what you have to say about this pattern!
If you want to leave a question, please make sure you select the correct category in the form below, to speed up the answering process. Required fields are marked *.