
Popular categories
Looking for a yarn?


Comments / Questions (427)
![]() Angela McHardy wrote:
Angela McHardy wrote:
Hi, I love this pattern, BUT, How do I increase and decrease at the same time on front sections. I am an accomplished crocheter,but this has me confused, please Help Angela
24.06.2014 - 07:37DROPS Design answered:
Dear Mrs McHardy, inc for front pieces are done at markers, dec are done at beg/end of rows as explained under "Decrease Tip1" at the beg of pattern. Happy crocheting!
24.06.2014 - 17:21
![]() Lesley wrote:
Lesley wrote:
Lesley 25.04.2014 kl. 01:15: Am having a big problem sewing in the sleeves, especially the section where the decrease is.....it looks very untidy. Any help would be appreciated
28.04.2014 - 09:55DROPS Design answered:
Dear Lesley, you can first pin the sleeve starting from the top of sleeve and each side down to check that everything is fine placed, then sew together with small sts. Happy crocheting!
29.04.2014 - 09:18
![]() Lesley wrote:
Lesley wrote:
Am having a big problem sewing in the sleeves, especially the section where the decrease is.....it looks very untidy. Any help would be appreciated
25.04.2014 - 01:15
![]() Marga wrote:
Marga wrote:
Een vraagje over het voorpand. Ik begrijp dat je 81 steken moet gebruiken voor het voorpand en 39 dstk voor de bovenkant en de onderkant moet overhouden is nu de beste manier om eerst het midden te vinden en dan voor elk voorpand aan de bovenkant en onderkant 19 steken naar boven en naar beneden te tellen zodat je 81 steken overhoud voor de voorpanden. Groetjes van Marga
24.04.2014 - 11:27DROPS Design answered:
Hoi Marga. Als het begin van de toer het midden van de bovenkant (= midden hals) is, dan tel je hier vanuit = 20 st aan ieder kant van het midden van de hals enzovoort. Veel haakplezier verder.
25.04.2014 - 12:38
![]() Terri Fedorco wrote:
Terri Fedorco wrote:
Sleeve, 1st row (*skip ch 1, 1 tr in each of the next 6 ch*). Does this mean to skip one ch and just go on with the tr's for 6 till the next time to skip one or should you skip a chain and ch one? Thanks
10.04.2014 - 00:45DROPS Design answered:
Dear Mrs Fedorco, you repeat from *-* ie you will skip every 7th ch, that way your 1st row will not be too tight. Happy crocheting!
10.04.2014 - 09:21
![]() Chelly wrote:
Chelly wrote:
I'm about to start row 16. Do I tr over the armholes, or skip them from this row onward? Or do I start ignoring the arm holes after row 20?
26.02.2014 - 02:37DROPS Design answered:
Dear Chelly, on next round after ch and skip sts for armholes, work in tr over the ch for armhole, at the same time, continue as stated for your size. Happy crocheting!
26.02.2014 - 09:39
![]() Chantal wrote:
Chantal wrote:
Devant:Pourriez vous expliquer clairement comment augmenter de 2 m av et ap marqueur( a quoi sert le marqueur)et diminuerez 3 m x 2. Illogique comme explications. Merci .
23.02.2014 - 21:19DROPS Design answered:
Bonjour Chantal, pour les devants, pour obtenir l'arrondi souhaité, on augmente 1 m alternativement avant/après chaque marqueur et en même temps, on diminue au début et à la fin de chaque rang comme indiqué sous "Diminutions 1". Bon crochet!
24.02.2014 - 10:40
![]() Mireille wrote:
Mireille wrote:
Hallo, Ik heb een vraag. Vanaf toer 14 staat er niet meer bij sluit af met een halve vaste in de zoveelste van de vorige toer. Betekend dit dat ik nu gewoon door haak? Alvast vriendelijk bedankt voor het antwoord!
22.02.2014 - 22:46DROPS Design answered:
Hoi Mireille. Je moet hier doorhaken met dstk zoals eerder, dan eindig je weer met 1 hv in de 4e l van het begin van de toer.
06.03.2014 - 17:18
![]() Ingvor wrote:
Ingvor wrote:
Vilket av garnförslagen ger bäst passform? Vill inte att den ska bli "hängig"
29.01.2014 - 09:02DROPS Design answered:
Hej Ingvor. Bomuld har tendens til at hänge mere, da det er "tungere" end uld, saa jeg ville nok raade dig til at tage et uld alternativ. Men tag en snak med din DROPS butik, saa du kan vaelge det garn som passer dig bedst.
29.01.2014 - 14:25
![]() AURORA wrote:
AURORA wrote:
Buon giorno. Un dubbio! Ho terminato il giro num 19 e dovrei continuare lavorando solo le 79 maglie sui lati ( taglia s/m). Come faccio se per continuare devo lavorare verso sinistra e quindi incontro le maglie (35) da saltare perché corrispondono al collo? spero di essere stata chiara!
13.01.2014 - 16:41DROPS Design answered:
Buongiorno Aurora, da questo punto in poi i davanti vanno lavorati in modo separato, quindi prosegua lavorando sulle 79 m seguendo le istruzioni per il davanti sx e poi dx. Buon lavoro!!
16.01.2014 - 16:51
|
|
Wild Flower#wildflowercardigan |
|
 |
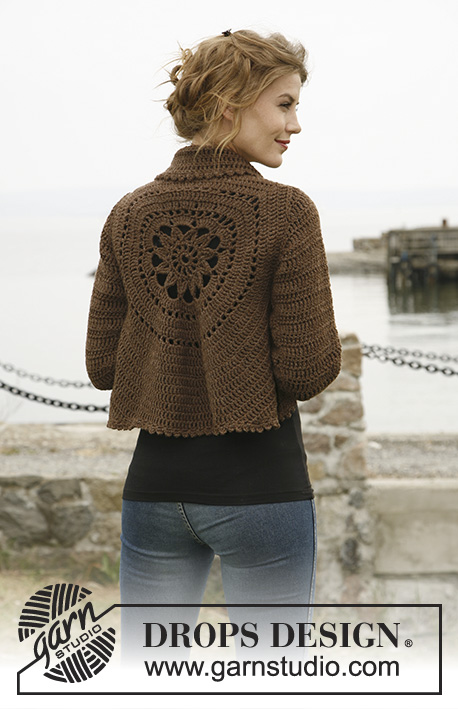 |
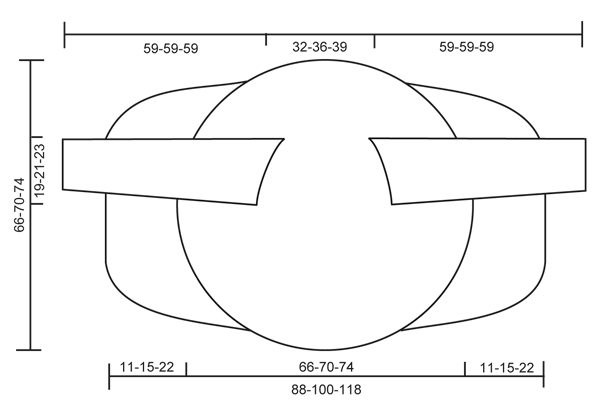
Crochet DROPS jacket worked in a circle in ”Nepal”. Size: S to XXXL
DROPS 132-2 |
|
|
CROCHET TIP: Replace first tr on every round/row with ch 4. DECREASE TIP 1 (applies to the body): Dec as follows: Work tr until 3 tr remain, * in the first of these work 1 dc, in the next 1 hdc and in the last 1 sc, turn with ch 1, skip sc, work 1 sl st in hdc and 1 sl st in dc, then 1 sc in first tr, 1 hdc in next tr and 1 dc in next tr, work tr until 3 tr remain at end of row *, repeat from *-* until a total of 6-8-12 rows have been worked. DECREASE TIP 2 (applies to sleeve cap): Dec at beg of row by working sl st over the no of tr to be dec. Dec at end of row by working until same no of sts to be dec remains, turn piece. -------------------------------------------------------- -------------------------------------------------------- BODY: Worked in the round in a circle from mid back. Ch 8 on hook size 5 mm / H/8 with Nepal and form a ring with 1 sl st in first ch. ROUND 1: Work 12 sc in ch-ring, finish with 1 sl st in first sc. ROUND 2: ch 5 (= 1 dc + 2 ch), * 1 dc in next sc, ch 2 *, repeat from *-* the entire round and finish with 1 sl st in 3rd ch from beg of round = 12 dc with 2 ch between each. ROUND 3: 1 ch, continue to crochet as follows in every ch-space the entire round: 1 sc + ch 1 + 1 sc + ch 1, finish round with 1 sl st in first ch = 24 sc with 1 ch between each. ROUND 4: 1 sl st in first sc, 1 sl st in first ch, ch 5, 1 dtr in same ch, * ch 7, then work 4 dtr tog as follows: Work 2 dtr in same ch as last dtr but wait with last YO and pull through on both dtr, skip 1 sc + 1 ch + 1 sc, work 1 dtr in next ch but wait with last YO and pull through, then work last dtr in same ch and pull last YO through all 5 sts on hook *, repeat from *-* a total of 11 times, ch 7, work 2 dtr tog in same ch (but wait with last YO and pull through on both), work 1 sl st in 5th ch from beg of round and pull thread through all 3 sts on hook. ROUND 5: 1 sl st in first ch-space, ch 4 (= 1 tr), 7 tr in same ch-space, then work 8 tr in every ch-space, finish with 1 sl st in 4th ch from beg of round = a total of 96 tr. ROUND 6: ch 5 (= 1 dc + 2 ch), * skip 1 tr, 1 dc in next tr, ch 2 *, repeat from *-* the entire round and finish with 1 sl st in 3rd ch from beg of round = 48 ch-spaces. ROUND 7 – READ CROCHET TIP: Work 1 tr in every dc and work 1 and 2 tr alternately in every ch-space the entire round = 120 tr. ROUND 8: Work 1 tr in every tr but work 2 tr in every 10th tr = 132 tr. ROUND 9: ch 5 (= 1 dc + 2 ch), * skip 1 tr, 1 dc in next tr, ch 2 *, repeat from *-* the entire round and finish with 1 sl st in 3rd ch from beg of round = 66 ch-spaces. ROUND 10: Work 1 tr in every dc and work 1 and 2 tr alternately in every ch-space the entire round = 165 tr. ROUND 11: Work 1 tr in every tr but work 2 tr in every 15th tr = 176 tr. ROUND 12: Work 1 tr in every tr but work 2 tr in every 16th tr = 187 tr. Piece measures approx. 20 cm / 8" from center and outwards. SIZE S/M: ROUND 13: ch 1, then work 1 sc in each of the first 45 tr (= up towards neck), ch 30 loosely, skip the next 27 tr (= armhole), then work 1 sc in each of the next 88 tr (= down towards back), ch 30 loosely, skip the next 27 tr (= armhole) and fasten with 1 sl st in first sc on round. ROUND 14: Work 1 tr in every sc - but inc 2 tr evenly over the first 45 sc (= 47 tr), then work 30 tr in ch-row over armhole, work 1 tr in every sc – but inc 3 tr evenly over the bottom 88 sc (= 91 tr), and work 30 tr in ch-row over armhole = 198 tr. ROUND 15 to 19: Continue with tr – while at the same time inc 6 tr evenly on every round. After 19th round there are 228 tr on the round and piece measures approx. 33 cm / 13" from center and outwards. Continue working only over 79 tr in each side – i.e. do not work over 35 tr at top by neck or 35 tr at bottom of back. Continue with explanation under FRONT PIECE. SIZE L/XL: ROUND 13: Work 1 tr in every tr but work 2 tr in every 17th tr = 198 tr. ROUND 14: ch 1, then work 1 sc in each of the first 50 tr (= up towards neck), ch 32 loosely, skip the next 29 tr (= armhole), then work 1 sc in each of the next 90 tr (= down towards back), ch 32 loosely, skip the next 29 tr (= armhole) and fasten with 1 sl st in first sc on round. ROUND 15: Work 1 tr in every sc - but inc 3 tr evenly over the first 50 sc (= 53 tr), then work 32 tr in ch-row over armhole, work 1 tr in every sc – but inc 3 tr evenly over the bottom 90 sc (= 93 tr), and work 32 tr in ch-row over armhole = 210 tr. ROUND 16 to 20: Continue with tr – while at the same time inc 6 tr evenly on every round. After 20th round there are 240 tr on the round and piece measures approx. 35 cm / 13¾" from center and outwards. Continue working only over 81 tr in each side – i.e. do not work over 39 tr at top by neck or 39 tr at bottom of back. Continue with explanation under FRONT PIECE. SIZE XXL and XXXL: ROUND 13: Work 1 tr in every tr but work 2 tr in every 17th tr = 198 tr. ROUND 14: Work 1 tr in every tr but work 2 tr in every 18th tr = 209 tr. ROUND 15: ch 1, then work 1 sc in each of the first 54 tr (= up towards neck), ch 36 loosely, skip the next 32 tr (= armhole), then work 1 sc in each of the next 91 tr (= down towards back), ch 36 loosely, skip the next 32 tr (= armhole) and fasten with 1 sl st in first sc on round. ROUND 16: Work 1 tr in every sc - but inc 2 tr evenly over the first 54 sc (= 56 tr), then work 36 tr in ch-row over armhole, work 1 tr in every sc – but inc 3 tr evenly over the bottom 91 sc (= 94 tr), and work 36 tr in ch-row over armhole = 222 tr. ROUND 17 to 22: Continue with tr – while at the same time inc 6 tr evenly on every round. After 22nd round there are 258 tr on the round and piece measures approx. 37 cm / 14½" from center and outwards. Continue working only over 89 tr in each side – i.e. do not work over 40 tr at top by neck or 40 tr at bottom of back. Continue with explanation under FRONT PIECE. LEFT FRONT PIECE - ALL SIZES: = 79-81-89 tr. Insert a marker after 23-24-27 sts in from each side (= 33-33-35 sts between markers). Then work tr back and forth over these sts while at the same time inc 1 st at every marker on every row (i.e. inc 2 sts on row, inc alternately before and after marker) and dec 3 sts at beg and end of every row in each side – SEE DECREASE TIP 1 until a total of 6-8-12 rows back and forth have been worked. RIGHT FRONT PIECE: Work same way as on left piece over 79-81-89 tr in right side. SLEEVE (worked back and forth): Ch 46-48-53 loosely (includes 4 ch to turn with) on hook size 5 mm / H/8 with Nepal. ROW 1: 1 tr in 5th ch from hook, 1 tr in each of the next 2-4-2 ch, * skip ch 1, 1 tr in each of the next 6 ch *, repeat from *-* until 4 ch remain, skip 1 ch and work 1 tr in each of the last 3 ch = 37-39-43 tr. ROW 2: 1 tr in every tr – READ CROCHET TIP! ROW 3: ch 6 (= 1 tr + 2 ch), skip 1 tr, 1 tr in next tr, * ch 2, skip 1 tr, 1 tr in next tr *, repeat from *-* the entire row = 18-19-21 ch-spaces. ROW 4: Work 1 tr in every tr and 1 tr in every ch-space = 37-39-43 tr. Repeat row 2-4 a total of 3 times. Piece measures approx. 18 cm / 7". Then work tr on all rows until finished measurements, while at the same time inc as follows: SIZE S/M: * Inc 1 tr in one side by working 2 tr in next to last tr. On next row inc 1 tr in the other side the same way. Inc 1 more time the same way in each side, then work 1 row without inc *, repeat from *-* a total of 3 times = 12 inc = 49 tr. SIZE L/XL + XXL/XXXL: * Inc 1 tr in one side by working 2 tr in next to last tr. On next row inc 1 tr in the other side the same way *, repeat from *-* a total of 8 times = 16 inc = 55-59 tr. ALL SIZES: Continue to work until piece measures 49 cm / 19¼" in all sizes. Now dec on every row in each side for sleeve cap – SEE DECREASE TIP 2: 3 tr 1 time, 2 tr 3 times and 3 tr 1 time = 25-31-35 tr remain at the top. Fasten off. ASSEMBLY: Sew sleeve seams tog edge to edge to avoid a chunky seam. Work 1 round around the entire body and at bottom of sleeves as follows: * ch 5, 1 dc in first ch, skip 1 st, fasten with 1 sc in next st *, repeat from *-* the entire round and finish with 1 sl st in first ch. Sew in the sleeves. If desired, close the jacket with a pin or sew on a button on to left front piece (try the jacket on to see where button should be) and button it in crochet edge. |
|
 |
|
Have you finished this pattern?Tag your pictures with #dropspattern #wildflowercardigan or submit them to the #dropsfan gallery. Do you need help with this pattern?You'll find 9 tutorial videos, a Comments/Questions area and more by visiting the pattern on garnstudio.com. © 1982-2026 DROPS Design A/S. We reserve all rights. This document, including all its sub-sections, has copyrights. Read more about what you can do with our patterns at the bottom of each pattern on our site. |
|


With over 40 years in knitting and crochet design, DROPS Design offers one of the most extensive collections of free patterns on the internet - translated to 17 languages. As of today we count 324 catalogs and 12252 patterns - 12242 of which are translated into English (US/in).
We work hard to bring you the best knitting and crochet have to offer, inspiration and advice as well as great quality yarns at incredible prices! Would you like to use our patterns for other than personal use? You can read what you are allowed to do in the Copyright text at the bottom of all our patterns. Happy crafting!
Post a comment to pattern DROPS 132-2
We would love to hear what you have to say about this pattern!
If you want to leave a question, please make sure you select the correct category in the form below, to speed up the answering process. Required fields are marked *.