
Popular categories
Looking for a yarn?


Comments / Questions (147)
![]() Sandra wrote:
Sandra wrote:
Hello, Could you please confirm that I’ve understood the chart properly? Once assembled, the skirt’s hem circumference in size L is 330cm? Many thanks for your help:)
13.05.2026 - 11:04DROPS Design answered:
Dear Sandra, correct, piece is 165 cm at the bottom, folded double and measured flat, so a total of (165 x2) = 330 cm along the longest side (and 45 cm at the top = 90 cm along the shortest side). Happy knitting!
13.05.2026 - 13:53
![]() Carolina wrote:
Carolina wrote:
1 fila en punto musgo en plano se tejer 1 vuelta de derecho por el lado derecho y 1 vuelta del derecho por el lado revés?
12.03.2026 - 19:16DROPS Design answered:
Hi Carolina, si. Punto musgo en plano: se teje 1 vuelta de derecho por el lado derecho y 1 vuelta del derecho por el lado revés. Saludos!
08.04.2026 - 14:19
![]() Belgin wrote:
Belgin wrote:
Hallo, De naturel draad wordt die iedere keer na 2 naalden breien geknipt of wordt die meegenomen bij de volgende naalden tot aan de volgende 2 naalden naturel draad. Alvast bedankt.
23.07.2025 - 10:15DROPS Design answered:
Dag Belgin,
Je kunt hem beter niet de hele tijd meenemen, omdat het werk dan te dik wordt. Dus afknippen of aan de zijkant meenemen omhoog, waar mogelijk.
23.07.2025 - 19:46
![]() Edith wrote:
Edith wrote:
Van de taille tot onder de arm moet volgens het patroon 13 cm. zijn. Dat is toch veel te kort? Toen ik dat deed zat de taille onder mijn borst. Zie ik iets over het hoofd? Alvast bedankt.
05.07.2025 - 21:56DROPS Design answered:
Dag Edith,
Het punt waar de rok aan het lijf vast zit hoeft niet per se ter hoogte van de taille te zijn. Je kunt eventueel een stukje door breien, maar zorg er wel voor dat dit punt niet te laag zit, het werk kan nog ietwat uitzakken door het gewicht.
07.07.2025 - 19:05
![]() Chris wrote:
Chris wrote:
I would like to make the dress with longer sleeves, any advice? Can I just make a longer tube?
22.10.2024 - 21:07DROPS Design answered:
Dear Chris, you can take inspiration from a pattern with long sleeves and same tension (so that you can add increases for example). Happy knitting!
23.10.2024 - 08:17
![]() Lillie wrote:
Lillie wrote:
Bonjour ! sur plusieurs de vos patrons je vois le terme "tricoter en vue sur la mer" et je ne comprends pas ce que cela veut dire... Pouvez-vous m'expliquer ? Merci d'avance
19.09.2024 - 22:41DROPS Design answered:
Bonjour Lillie, "vue sur la mer" est le nom de la couleur DROPS Fabel 604 utilisée ici. Bon tricot!
20.09.2024 - 08:46
![]() Stéphanie wrote:
Stéphanie wrote:
Bonjour, à la fin du tricot de la jupe, au moment de la mesurer vous écrivez: "arrondir si nécessaire pour que la jupe ne soit pas trop large". Que signifie arrondir? Comment réalise-t-on cela? Merci pour votre réponse.
31.08.2024 - 14:50DROPS Design answered:
Bonjour Stéphanie, on se base ici sur la longueur en haut de la jupe, côté taille, il faut donc atteindre cette longueur mais il peut vous falloir quelques rangs supplémentaires à tricoter pour l'atteindre, continuez les rangs raccourcis et ajustez ce nombre si besoin pour éviter que la jupe ne soit trop large en bas, vous pouvez vous baser sur le schéma du bas de page (mesurez à plat le long du côté le plus long = bas de la jupe et à partir du rang de montage). Bon tricot!
02.09.2024 - 07:54
![]() Stéphanie wrote:
Stéphanie wrote:
Bonjour après la première série de rangs raccourcis il faut tricoter 2 rangs en écru et ensuite repartir à l'envers. Faut il faire un rang en vue sur mer sur toutes les mailles avant de reprendre la série à l'envers? Merci pour votre réponse.
22.08.2024 - 13:38DROPS Design answered:
Bonjour Stéphanie, lorsque vous reprenez les rangs raccourcis, vous continuez directement comme vous avez fait la 1ère fois soit 2 rangs écru sur toutes les mailles, puis tricotez 10 à 12 rangs en coloris vue sur la mer sur toutes les mailles, puis tricotez les rangs raccourcis; autrement dit, répétez toute la partie de * (qui commence par 2 rangs écru sur toutes les mailles) jusqu'à * (=tricotez les 10 à 12 rangs en vue sur la mer, puis les rangs raccourcis, puis 2 rangs écru sur toutes les mailles, puis les rangs raccourcis en terminant par 10 à 12 rangs en coloris vue sur la mer). Bon tricot!
22.08.2024 - 16:00
![]() Katalin wrote:
Katalin wrote:
Jó napot! A testrészen le kell láncolni 12 szemet és az ujján is le kell láncolni 12 szemet. De erről későbbiekben nincs szó, hogy össze kellene varrni. Kérdezném hogy ez azt jelenti hogy a leláncolt szemek mentén nyílás lesz a hónalj alatt? Előre is köszönöm a választ. Katalin
27.03.2024 - 13:32DROPS Design answered:
Kedves Katalin, köszönjük, hogy felhívta a figyelmet erre a hiányosságra. Bár a leírásban nem szerepel, az ujjak alatti nyílásokat természetesen össze kell varrni az összeállításkor. Sikeres kézimunkázást!
27.03.2024 - 14:14
![]() Angel wrote:
Angel wrote:
Bonjour, Le tuto ne dit pas de faire la couture sous les manches (12 mailles rabattues). Je suis sûre qu'il faut le faire. Mais dans quel sens ? : dans le sens de la largeur (donc dans le sens des mailles rabattues), ou dans le sens de la longueur des manches ? Merci pour vos réponses et passer de belles journées. Angel
21.07.2023 - 10:53DROPS Design answered:
Bonjour Angel, comment coudre les ouvertures sous les manches vous trouverez ICI (vois a partir de 19 min.). Bon tricot!
21.07.2023 - 11:30
|
|
Dance With Me#dancewithmedress |
|
 |
 |
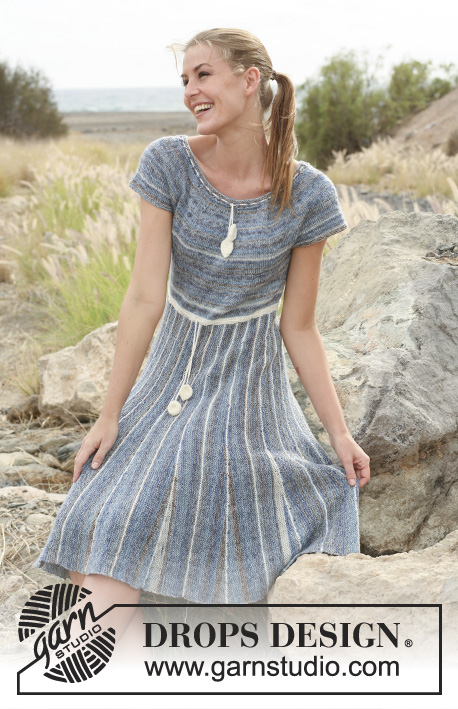
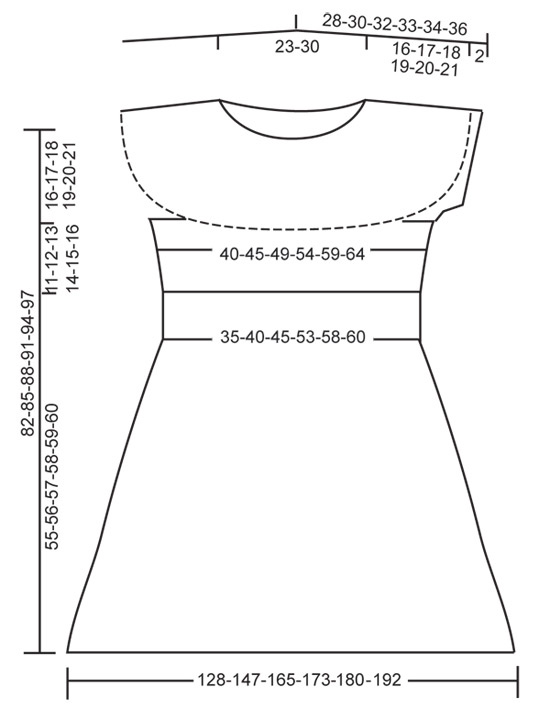
Knitted DROPS dress with skirt worked from side to side with short rows and stripes, and knitted top in stockinette st with round yoke in "Fabel". Size: S - XXXL
DROPS 128-1 |
|
|
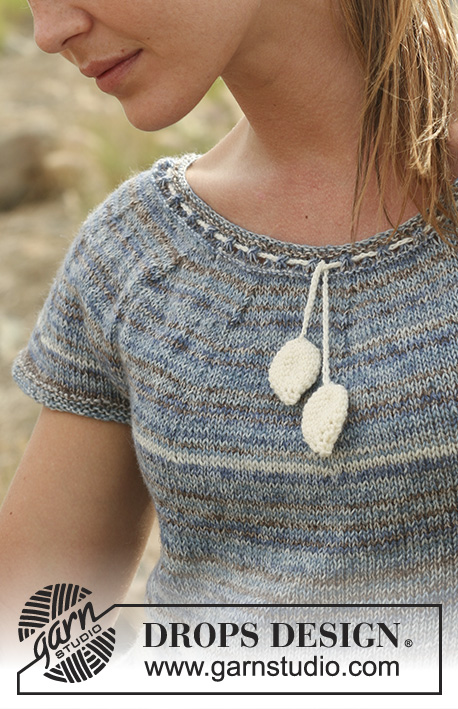
GARTER ST (in the round): *K 1 round and P 1 round*, repeat from *-*. INCREASE TIP: Inc 1 st by making 1 YO, on next row knit YO twisted (i.e. work in the back loop of st instead front) to avoid holes. DECREASE TIP: Dec by K 2 sts tog. -------------------------------------------------------- DRESS: Beg by working a skirt back and forth on circular needle from side to side. To give the skirt width at the bottom work with short rows. Then work round yoke. LOOSELY cast on 132-134-136-140-142-144 sts on 2 circular needles size 3 mm / US 2or3 with 604, ocean view (to avoid a tight cast on edge). Pull out one of the needles and work as explained below. The entire skirt is worked in Garter st, i.e. K all rows. Work first row as follows (from waist down = WS): Work 8-10-12-14-16-18 sts, insert MARKER 1, work 14-14-14-16-16-16 sts, insert MARKER 2, work 18 sts, insert MARKER 3, work 10 sts, insert MARKER 4, work 10 sts, insert MARKER 5, work 6 sts, insert MARKER 6, work 6 sts, insert MARKER 7, work 6 sts, insert MARKER 8, work 6 sts, insert MARKER 9, work 6 sts, insert MARKER 10, work 6 sts, insert MARKER 11, work 6 sts, insert MARKER 12, work 6 sts, insert MARKER 13, work 6 sts, insert MARKER 14, work 6 sts, insert MARKER 15, work 6 sts, insert MARKER 16, work the remaining 6 sts. Move the markers upwards when working. Continue to work with short rows (NOTE! Tighten the thread on every turn in mid of piece before continuing, to avoid holes) as follows: * Work 2 rows with 100, off white back and forth over all sts (1st row = RS), work 10-10-10-12-12-14 rows with 604, ocean view back and forth over all sts (= a total of 12-12-12-14-14-16 rows in garter st over all sts). Then work until MARKER 1, turn and work back. Work until MARKER 2, turn and work back. Work until MARKER 3, turn and work back. Work until MARKER 4, turn and work back. Work until MARKER 5, turn and work back. Work until MARKER 6, turn and work back. Work until MARKER 7, turn and work back. Work until MARKER 8, turn and work back. Work until MARKER 9, turn and work back. Work until MARKER 10, turn and work back. Work until MARKER 11, turn and work back. Work until MARKER 12, turn and work back. Work until MARKER 13, turn and work back. Work until MARKER 14, turn and work back. Work until MARKER 15, turn and work back. Work until MARKER 16, turn and work back over the remaining 6 sts. Switch to off white and work 2 rows back and forth over all sts. Switch back to ocean view and work until MARKER 16, turn piece and work back. Then work until MARKER 15, turn and work back. Work until MARKER 14, turn and work back. Work until MARKER 13, turn and work back. Work until MARKER 12, turn and work back. Work until MARKER 11, turn and work back. Work until MARKER 10, turn and work back. Work until MARKER 9, turn and work back. Work until MARKER 8, turn and work back. Work until MARKER 7, turn and work back. Work until MARKER 6, turn and work back. Work until MARKER 5, turn and work back. Work until MARKER 4, turn and work back. Work until MARKER 3, turn and work back. Work until MARKER 2, turn and work back. Work until MARKER 1, turn and work back. Work 10-10-10-12-12-14 rows back and forth over all sts with ocean view *. Repeat from *-* until piece measures approx. 35-40-45-53-58-60 cm / 13¾"-15¾"-17¾"-21"-22¾"-23⅝" vertically (measured at the shortest when piece is flat on the table) - adjust after one whole repetition, but possibly round down to avoid longer measurements. Insert a marker (= side of dress). Repeat from *-* until piece measures approx. 35-40-45-53-58-60 cm / 13¾"-15¾"-17¾"-21"-22¾"-23⅝" from marker (i.e. front and back piece are the same length) then VERY LOOSELY bind off. ASSEMBLY: Sew skirt tog in the side - sew edge to edge in front loop of outermost st so that the seam is flat. BODY: Beg from RS at side seam and pick up 1 st in every ridge (i.e in every 2nd row in garter st) around the entire opening of the skirt on circular needle size 2.5 mm / US 1or2 with off white. P 1 round. K 2 rounds while AT THE SAME TIME adjusting the no of sts to 168-192-216-240-264-288 on 1st round. Then work an eyelet round as follows: * 1 YO, K 2 tog *, repeat from *-* the entire round. Then K 2 rounds. Then P 1 round and K 1 round. Now insert a marker in each side, i.e. at beg of round and after 84-96-108-120-132-144 sts - move the markers upwards when working. Switch to circular needle size 3 mm / US 2or3 and ocean view and work in stockinette st. AT THE SAME TIME on 2nd round, inc 1 st on each side each marker - READ INCREASE TIP! (= 4 sts inc). Repeat inc every 1½-1½-2½-2½-3-3 cm / ½"-½"-⅞"-⅞"-1⅛"-1⅛" a total of 6-6-5-5-5-5 times = 192-216-236-260-284-308 sts. When piece measures 11-12-13-14-15-16 cm / 4⅜"-4¾"-5⅛"-5½"-6"-6¼" from where sts were picked up for body, bind off 12 sts in each side (i.e. 6 sts on each side of both markers) = 84-96-106-118-130-142 sts remain for front and back piece. Put piece aside and knit the sleeves. SLEEVE: Worked in the round on double pointed needles. Cast on 74-79-84-89-94-99 sts on double pointed needles size 2.5 mm / US 1or2 with ocean view. Insert a marker at beg of round (= mid under sleeve). Work 6 rounds in GARTER ST - see explanation above. Switch to double pointed needles size 3 mm / US 2or3 and K 1 round while AT THE SAME TIME bind off 12 sts mid under sleeve (i.e. 6 sts each side of marker) = 62-67-72-77-82-87 sts. Put piece aside and knit another sleeve. YOKE: Slip sleeves on to same circular needle as body where armholes were bound off = 292-326-356-390-424-458 sts. Work in stockinette st with ocean view while AT THE SAME TIME dec 6-1-5-0-4-10 sts evenly on 1st round = 286-325-351-390-420-448 sts. Insert 11-13-13-13-14-14 markers in piece with 26-25-27-30-30-32 sts between each. After 5-8-5-5-8-5 rounds in stockinette st, dec 1 st before every marker - Read DECREASE TIP! Repeat dec on every 6th round a total of 6-6-7-7-7-8 times, then on every other round a total of 3-3-3-4-5-5 times = 187-208-221-247-252-266 sts. After last dec, switch to circular needle size 2.5 mm / US 1or2. K 2 rounds while AT THE SAME TIME adjusting the no of sts to 186-207-219-246-252-264 on last round. ELEVATION IN BACK OF NECK: Now work an elevation in back of neck, back and forth on needle as follows: Insert a marker in the middle st mid front. Start mid back and work until 19 sts remain before marker at the front, turn piece, tighten thread and work until 19 sts remain before marker in the other side. Turn piece, tighten thread and work until 46 sts remain before marker at the front, turn piece, tighten thread and work until 46 sts remain before marker in the other side. Turn piece, tighten thread and work until 67-75-79-85-87-90 sts remain before marker, turn piece, tighten thread and work back until 67-75-79-85-87-90 sts remain before marker in the other side. Turn piece, tighten thread and work until mid back. NECKLINE: P 1 round and K 2 rounds, then work eyelet round as follows: * 1 YO, K 3 tog *, repeat from *-* the entire round = 124-138-146-164-168-176 sts remain on needle. K 2 rounds while AT THE SAME TIME dec 6-8-10-20-18-20 sts evenly on the last round = 118-130-136-144-150-156 sts. P 1 round and K 1 round, and then loosely bind off with P sts. Piece measures approx. 82-85-88-91-94-97 cm / 32¼"-33½"-34⅝"-35¾"-37"-38¼" when flat, it will be longer when dress is worn. TIE WITH CONE: Crochet a ch-row on hook size 2.5 mm/C/2 with off white until row measures approx. 130 cm / 51" (or desired measurement around waist). Then work 1 sl st in 4th ch from hook (= beg of cone). ROUND 1: Work 6 sc in ch-ring. ROUND 2: Work 2 sc in every sc = 12 sc. ROUND 3: Work * 1 sc in first sc, 2 sc in next sc *, repeat from *-* the rest of the round = 18 sc. ROUND 4-7: Work 1 sc in every sc = 18 sc. ROUND 8: Work * 1 sc in first sc, then work the next 2 sc tog *, repeat from *-* the rest of the round = 12 sc. ROUND 9: Work 1 sc in every sc = 12 sc. ROUND 10: Crochet all sc tog 2 by 2 = 6 sc. ROUND 11: Work all sc tog 2 by 2 = 3 sc. Cut the yarn, baste it up and down through sts, pull the thread to tighten and fasten tightly. Crochet another cone. Begin by ch 4 and form a ring with 1 sl st in 1st ch. Then continue as explained above. Sew this cone to the ch-row after the tie has been inserted in the eyelet round. Work another tie for neck with a length of approx. 100 cm / 40". |
|
 |
|
Have you finished this pattern?Tag your pictures with #dropspattern #dancewithmedress or submit them to the #dropsfan gallery. Do you need help with this pattern?You'll find 22 tutorial videos, a Comments/Questions area and more by visiting the pattern on garnstudio.com. © 1982-2026 DROPS Design A/S. We reserve all rights. This document, including all its sub-sections, has copyrights. Read more about what you can do with our patterns at the bottom of each pattern on our site. |
|


With over 40 years in knitting and crochet design, DROPS Design offers one of the most extensive collections of free patterns on the internet - translated to 17 languages. As of today we count 325 catalogs and 12298 patterns - 12288 of which are translated into English (US/in).
We work hard to bring you the best knitting and crochet have to offer, inspiration and advice as well as great quality yarns at incredible prices! Would you like to use our patterns for other than personal use? You can read what you are allowed to do in the Copyright text at the bottom of all our patterns. Happy crafting!
Post a comment to pattern DROPS 128-1
We would love to hear what you have to say about this pattern!
If you want to leave a question, please make sure you select the correct category in the form below, to speed up the answering process. Required fields are marked *.