
Popular categories
Looking for a yarn?


Comments / Questions (68)
![]() Laurence wrote:
Laurence wrote:
Pour le bonnet, la diminution APRÈS doit-elle être faite directement après la diminution AVANT car la maille marquée est déjà tricotée De plus, à 13 cm de hauteur, il faut « tricoter le rang suivant sur l'endroit ainsi : * 1 m end, 2 m ens à l'end *, répéter de *-* EN MÊME TEMPS, rabattre. » mais combien de mailles doit-il rester quand on doit rabattre ?
24.02.2025 - 09:24DROPS Design answered:
Bonjour Laurence, pour les diminutions cf ci-dessous. Notez que le nombre de mailles ne change pas avant de tricoter le dernier rang sur l'endroit car on augmente à chaque fois autant de mailles que l'on en diminue. Bon tricot!
24.02.2025 - 15:30
![]() Laurence wrote:
Laurence wrote:
Pour le bonnet, pour les diminutions AVANT la maille marquée, si on commence 1 maille avant, celle-ci part donc sur l’aiguille auxiliaire et la maille marquée devient alors la maille glissée ?
24.02.2025 - 09:20DROPS Design answered:
Bonjour Laurence, toutes les diminutions se font de chaque côté des marqueurs, ainsi, commencez 1 maille avant celle avec le marqueur, mettez cette maille sur l'aiguille auxiliaire derrière l'ouvrage, glissez la maille avec le marqueur à l'endroit, tricotez ensemble à l'endroit la maille sur l'aiguille auxiliaire et la maille suivante et passez la maille glissée par-dessus la maille tricotée, mettez votre marqueur dans cette maille. Retrouvez cette diminution en vidéo ici. Bon tricot!
24.02.2025 - 15:29
![]() Karen Harrison wrote:
Karen Harrison wrote:
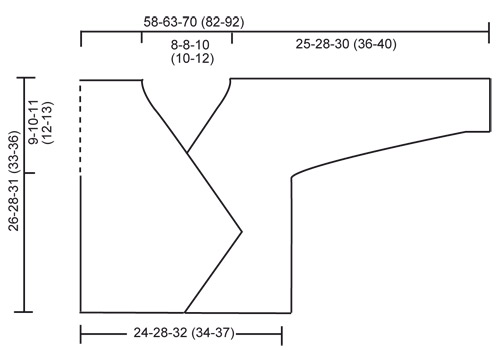
When I'm placing the marker on the left front after 27cm, it's not clear where this needs to be. Do you mean before the sleeve increases or actually the middle of the 'shoulder' as in spouting the stitches bef6the sleeve starts?
23.04.2024 - 13:31DROPS Design answered:
Dear Mrs Harrison, the marker added when piece measures 26-28-31 (33-36) cm from cast on edge should be inserted in the middle of the row, this will mark the top on shoulder, you will then cast on new stitches for neck on back piece and slip stitches aside. Work right front piece mirrored then cast on new stitches between both front pieces, back piece will be measured from the marker added on top of shoulder. Happy knitting!
23.04.2024 - 13:47
![]() Åsa wrote:
Åsa wrote:
Kan ej montera mössan
16.08.2023 - 15:47
![]() Carla Radatz wrote:
Carla Radatz wrote:
I have just started a DROPSbaby 20-1 Sweet Evelina wrap around jacket. Starting at the Left Front Piece , I am unsure as to what is meant by the ‘mid front’. I would be thankful for a clarification. Best Wishes, Carla
17.01.2022 - 11:49DROPS Design answered:
Dear Carla, the "mid front" side will be on the left front piece the end of the row, seen from the right side, this means towards the opening of the jacket opposed to the side sew to the back piece. Happy knitting!
17.01.2022 - 15:20
![]() Anne wrote:
Anne wrote:
Wie funktioniert die Maschenzunahme für den Ärmel? Bei Gr. 50 6M. 2mal, 8 M. 1 Mal und 21 M. 1 Mal bedeutet das, dass ich 41 M. auf einmal zunehme? Oder in einer Reihe 6, in der nächsten wieder 6 usw? Und wenn es 41M. auf einmal sind, warum wird es dann so kompliziert beschrieben?
21.07.2021 - 11:11DROPS Design answered:
Liebe Anne, für den Ärmel (linkes Vorderteil) schlagen Sie die neuen Maschen am Ende jeder Rückreihe so: 6 Maschen 2 Mal, 8 Maschen 1 Mal und 21 Maschen 1 Mal (= 41 neuen Maschen für den Ärmel). Kann es Ihnen helfen? Viel Spaß beim stricken!
21.07.2021 - 14:25
![]() Anne wrote:
Anne wrote:
Ich bin verwirrt mit der Angabe von Hin- und Rückreihe in der Anleitung. Die Abnahmen gegen die vordere Mitte im linken Vorderteil wären doch am Anfang der Hinreihe oder am Schluss der Rückreihe, oder? In der Anleitung steht anders herum...oder hab ich was falsch verstanden?
21.07.2021 - 10:04DROPS Design answered:
Liebe Anne, die Abnahmen gegen die vordere Mitte werden je nach der Größe in jeder Reihe (= am Ende einer Hinreihe und am Anfang einer Rückreihe) und/oder nur in jede 2. Reihe (= am Ende einer Hinreihe). Viel Spaß beim stricken!
21.07.2021 - 10:33
![]() Silvia wrote:
Silvia wrote:
Salve, mi sto cimentando con questo bellissimo modello, ma ho un dubbio circa dove vanno fatti gli aumenti sin dal 2. Ferro. Cosa significa al centro davanti? A metà del ferro? Grazie
25.05.2021 - 14:25DROPS Design answered:
Buonasera Silvia, vuol dire che la parte dove farà gli aumenti sarà verso il centro davanti. Buon lavoro!
25.05.2021 - 23:37
![]() Vivi Karlsson wrote:
Vivi Karlsson wrote:
Var mäter man mitt på axeln?
16.02.2021 - 13:01DROPS Design answered:
Hej Vivi, du måler fra der hvor du satte et mærke, sæt det i en af de masker som er nærmest halsen. God fornøjelse!
16.02.2021 - 13:46
![]() Michaela wrote:
Michaela wrote:
Die Aufnahmen abwechslungsweise bei jeder 2. und 3. R. total 18-20-24 (28-30) Mal wiederholen = 47-54-62 (69-74) M. Nach der letzten Aufnahmen 10 R. re. stricken Die Arbeit misst ca. 11-12-15 (17-18) cm. Das verstehe ich nicht. Wenn ich bei Reihe 2 und dann gleich bei Reihe 3 eine Masche zunehme, dann eine Reihe ohne Zunahme, dann komme ich nicht auf die angegebene Höhe, nach den 10Reihen ohne Zunahme.
11.08.2019 - 07:43
|
|
Sweet Evelina#sweetevelinajacket |
|
 |
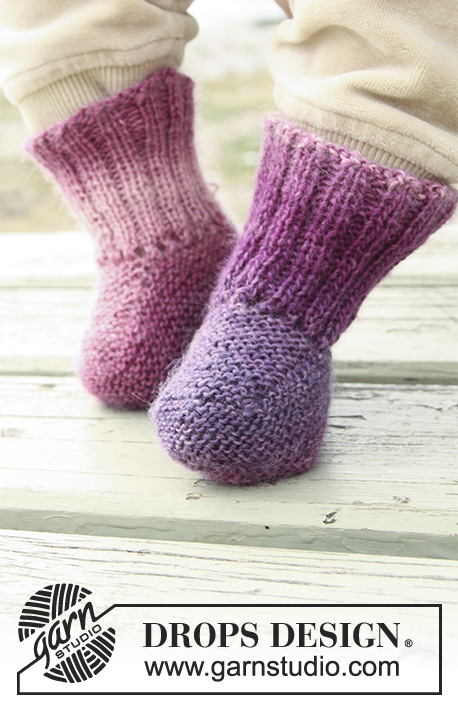 |
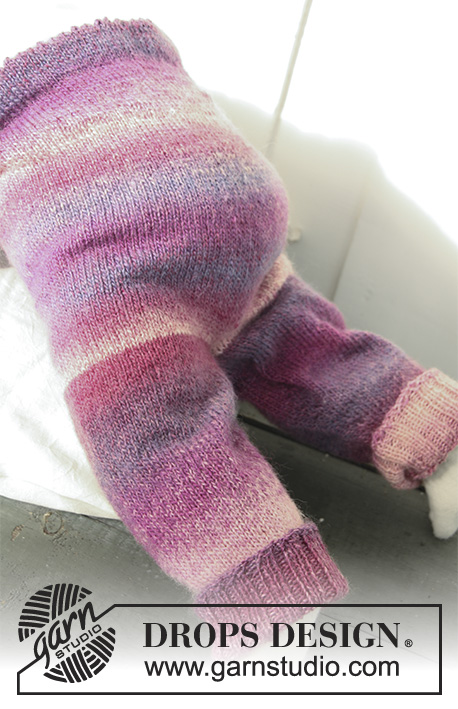
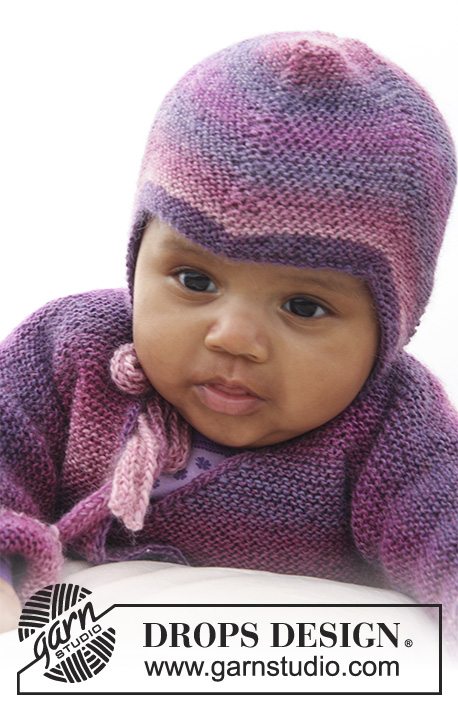
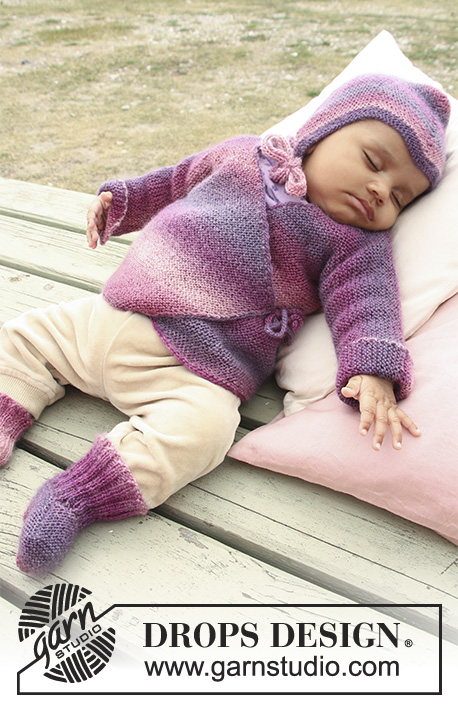
Set of knitted wrap-around jacket in garter st, socks and hat for baby and children in DROPS Delight
DROPS Baby 20-1 |
|
|
JACKET: Worked back and forth on circular needle. Beg on front piece, cast on sts for sleeve and work up to the shoulder. Knit the other front piece, place both front pieces tog and work down the back piece. LEFT FRONT PIECE: LOOSELY cast on 29-34-38 (41-44) sts on circular needle size 3 mm / US 2or3 with Delight. K all rows, i.e work in garter st – AT THE SAME TIME on 2nd row cast on 1 new st towards mid front. Repeat inc towards front edge on every 2nd and 3rd row alternately a total of 18-20-24 (28-30) times = 47-54-62 (69-74) sts. K 10 rows after last inc. Piece measures approx. 11-12-15 (17-18) cm / 4⅜"-4¾"-6" (6¾"-7"). READ ALL OF THE FOLLOWING SECTION BEFORE CONTINUING! On next RS row dec 1 st towards mid front by knitting the last 2 sts tog. Repeat dec on each row (i.e. from RS and WS): a total of 0-0-7 (19-12) times and then on every other row (i.e. from RS): a total of 28-31-29 (21-32) times (a total dec of 28-31-36 (40-44) sts). AT THE SAME TIME when piece measures 17-18-20 (21-23) cm / 6¾"-7"-8" (8¼"-9") cast on new sts at the end of row towards the side of sleeve: 6 sts 2-2-3 (3-3) times, 8 sts 1-1-1 (2-3) times and 21-22-20 (23-24) sts 1 time. After all inc and dec there are 60-65-72 (86-96) sts on the needle for shoulder/sleeve. When piece measures 26-28-31 (33-36) cm / 10¼"-11"-12¼" (13"-14¼") insert a marker = mid on shoulder – AT THE SAME TIME cast on 2 new sts at the end of the needle towards neck, repeat inc on next row towards neck = 64-69-76 (90-100) sts. Put all sts on a stitch holder. RIGHT FRONT PIECE: Cast on and knit as left front piece but opposite. BACK PIECE: Work left front piece onto circular needle, cast on 12-12-16 (16-20) new sts (= back of neck) and work right front piece onto circular needle = 140-150-168 (196-220) sts. NOW MEASURE PIECE FROM MARKERS ON SHOULDERS. Continue to K back and forth on needle. When piece measures 6.5-7.5-8 (8.5-9) cm / 2½"-2⅞"-3⅛" (3¼"-3½") begin to bind off sleeve sts. Bind off at beg of each row in each side as follows: 21-22-20 (23-24) sts 1 time, 8 sts 1-1-1 (2-3) times and 6 sts 2-2-3 (3-3) times = 58-66-76 (82-88) sts on needle. Continue until piece measures approx. 26-28-31 (33-36) cm / 10¼"-11"-12¼" (13"-14¼") – fold piece at markers on shoulders and check that front and back pieces are the same length – bind off. ASSEMBLY: Sew side and sleeve seams tog edge to edge in front loop of outermost sts. CROCHET BORDER: Work with Delight on hook size 2.5 mm/C/2 around the opening of jacket as follows: 1 sc, * ch 2, skip 2 sts/4 rows garter, 1 sc in next st *, repeat from *-*, when at the tip of front piece crochet a ribbon as follows: 1 sc in tip, then work ch for approx. 25 cm / 10", turn and work 1 sl st in each ch on return, then work 1 sc in tip of front piece again, continue crochet border around the jacket until the tip of the other front piece, crochet another ribbon as on first front piece, continue around the rest of the jacket. Work the same way around the opening of the sleeves. Then work another ribbon, similar to the one in each tip, on the inside of the seam in the right side and on the outside of the seam in the left side – make sure that the ribbons are at the same height as tips on front pieces. -------------------------------------------------------- SOCK: The sock is worked back and forth from mid back. Cast on 48-52-56 (56) sts on needle size 2.5mm/US 1or2 with 2 strands Delight. Remove 1 strand and knit rib border (= K2/P2) for 5-6-6 (7) cm / 2"-2⅜"-2⅜" (2¾") – adjust so that next row is worked from WS. P 1 row from WS at the same time dec 14-14-18 (14) sts evenly = 34-38-38 (42) sts. WITH EYELET HOLES: Work next row from RS as follows: K1, *K2 tog, 1 YO *, repeat from *-* and finish with K1. P 1 row from WS. WITHOUT EYELET HOLES: K 1 row from RS and P 1 row from WS. Now put the outermost 12-13-13 (15) sts in each side on a stitch holder. K on each row over the mid 10-12-12 (12) sts for 4-4.5-5.5 (6.5) cm / 1½"-1¾"-2¼" (2⅜"). Put sts from stitch holder back on needle and knit up 10-11-13 (16) sts on each side of mid piece = 54-60-64 (74) sts on needle. K on each row over all sts for 3-4-5 (5) cm / 1⅛"-1½"-2" (2") while at the same time after 1.5-2-2.5 (3) cm / ½"-¾"-⅞" (1⅛"), start dec on every other row as follows until sock is completed: Dec 1 st at the beg and the end of row and K2 tog on each side of the 2 mid sts. Bind off and sew sock tog mid under foot and continue up mid back – sew in outer loops of sts to avoid a chunky seam. If you wish, thread a silk ribbon through the eyelet holes. ------------------------------------------------------------ HAT: INCREASE TIP: All inc are done from RS. Inc 1 st before and after st with marker by making 1 YO. On next round knit YO twisted (i.e knit in the back loop of YO instead of front) to avoid holes. DECREASE TIP: All dec are done from RS. Dec 1 st on each side of st with marker. Beg 1 st before st with marker. Put 1 st on a cable needle behind the piece, slip 1 st (= st with marker), K next st and st on cable needle tog, psso. ---------------------------------------------------------- HAT: Worked back and forth on needle – K all rows (= garter st). Cast on 119-127-135 (139-145) sts on needle size 2.5 mm / US 1or 2 with Delight. K 6 rows (1st row = RS). Insert 7 markers in the piece as follows (from RS): 1st marker in the 1st st on needle, 2nd marker in the 22nd-24th-26st (28th-31st) st, 3rd marker in the 43rd-47th-51st (55th-61st) st, 4th marker in the 60th-64th-68th (70th-73rd) st, 5th marker in the 77th-81st-85th (85th-85th) st, 6th marker in the 98th-104th-110th (112th-115th) st and 7th marker in the last st on the needle. Continue to K – AT THE SAME TIME on 1st row, beg to inc and dec – SEE INCREASE TIP AND DECREASE TIP! Inc 1 st after 1st marker on every other row. Dec 1 st on each side of the 2nd marker every other row. Inc 1 st before 3rd marker on every other row. Inc 1 st after 3rd marker on every 4th row. Dec 1 st on each side of the 4th marker every 4th row. Inc 1 st before 5th marker on every 4th row. Inc 1 st after 5th marker on every other row. Dec 1 st on each side of the 6th marker every other row. Inc 1 st before 7th marker on every other row. When piece measures 13-15-16 (18-19) cm / 5⅛"-6"-6¼" (7"-8") (measured from bottom tip at 2nd and 6th marker) work next row from RS as follows: * K1, K2 tog *, repeat from *-* WHILE binding off. ASSEMBLY: Back of hat = bind off edge, i.e. 2 whole tips and 2 half tips. The 2nd of the 3 whole tips in the opposite side of the piece = cast on edge, goes down to the forehead at the front. Sew the hat tog edge to edge with 1 stitch in each st along the bind off edge as follows: Sew first half tip tog with first half of first whole tip. Continue to sew second half of first whole tip tog with first half of second whole tip. Then sew the other half of the second whole tip tog with the last half tip. Finish by sewing the hat tog mid back – make sure to sew edge to edge to avoid chunky seams. TIES: Cast on 4 sts on needle size 2.5 mm / US 1 with Delight. Knit as follows: * K1, place yarn in front of piece (towards you), slip 1 st as if to P, place yarn behind piece (from you) *, repeat from *-* the rest of row and on all rows. This becomes a tie worked in the round. bind off when the tie measures approx. 20-22-24 (26-28) cm / 8"-8¾"-9½" (10¼"-11"). Knit one more tie. Sew one tie at the bottom of each tip on each side. |
|
 |
|
Have you finished this pattern?Tag your pictures with #dropspattern #sweetevelinajacket or submit them to the #dropsfan gallery. Do you need help with this pattern?You'll find 15 tutorial videos, a Comments/Questions area and more by visiting the pattern on garnstudio.com. © 1982-2026 DROPS Design A/S. We reserve all rights. This document, including all its sub-sections, has copyrights. Read more about what you can do with our patterns at the bottom of each pattern on our site. |
|


With over 40 years in knitting and crochet design, DROPS Design offers one of the most extensive collections of free patterns on the internet - translated to 17 languages. As of today we count 325 catalogs and 12298 patterns - 12288 of which are translated into English (US/in).
We work hard to bring you the best knitting and crochet have to offer, inspiration and advice as well as great quality yarns at incredible prices! Would you like to use our patterns for other than personal use? You can read what you are allowed to do in the Copyright text at the bottom of all our patterns. Happy crafting!
Post a comment to pattern DROPS Baby 20-1
We would love to hear what you have to say about this pattern!
If you want to leave a question, please make sure you select the correct category in the form below, to speed up the answering process. Required fields are marked *.