
Popular categories
Looking for a yarn?


Comments / Questions (64)
![]() Bernard wrote:
Bernard wrote:
Bonjour, j’ai besoin d’aide pour comprendre les diminutions encolure et épaules du dos . Les 8 diminutions? 4 de chaque côté de la torsade du dos ? Merci d’avance
07.04.2021 - 16:47DROPS Design answered:
Bonjour Mme Bernard, il faut plus de mailles en largeur pour des torsades, on va donc diminuer 8 mailles dans M.1 avant de rabattre pour éviter que les épaules soient soudainement plus larges. Répartissez ces diminutions à intervalles réguliers dans les torsades. Bon tricot!
08.04.2021 - 07:06
![]() Sally Mabey wrote:
Sally Mabey wrote:
Ref my previous question and your reply. No, it doesn't help! What constitutes 'an edge stitch'? If it is one garter stitch, then how can you say that this plus 15 purl stitches and M1 = 20? It is 17 stitches! If an edge stitch is more than one garter stitch, then for goodness sake, say so! I'm knitting this for a friend, and I'm going out of my mind trying to get it right.
06.08.2020 - 11:22DROPS Design answered:
Dear Mrs Mabey, the edge stitch is a stitch for the seam allowance you will work in garter stitch - work the 52 sts as follows: 1 st in garter st (= ege st), P 15, M1 (= 20 sts in first size), P 15, 1 edge st in garter st = 1+15+20+15+1=52 sts. Happy knitting!
06.08.2020 - 13:05
![]() Sally Mabey wrote:
Sally Mabey wrote:
On the back piece, after increasing 8 stitches evenly over the centre 12 stitches, I have the correct number of stitches (52) When I do the next bit, 1 garter stitch, P 15, M1 it then say (20 stitches in S size, but I have only done 17. If I carry on following the pattern, when I get to the end of the row, I have 5 stitches left. Is there a mistake in the pattern, or have I misunderstood the instructions?
05.08.2020 - 18:26DROPS Design answered:
Hi Sally, You have 52 stitches and the next row is: 1 edge stitch, purl 15, M.1 ( 20 stitches), purl 15 and 1 edge stitch. This all adds up to 52 . I hope this helps and happy knitting!
06.08.2020 - 07:16
![]() Jeannine Lardy wrote:
Jeannine Lardy wrote:
Je ne peut pas imprimer les explications du modele pouquoi?
08.02.2020 - 13:52DROPS Design answered:
Bonjour Mme Lardy, nous avons pu imprimer ce modèle à l'instant, essayez de bien vérifier les paramètres de votre imprimante, mais essayez également de vider les cookies du navigateur, de rafraîchir la page et d'essayer à nouveau. Si ce problème persiste, merci de bien vouloir nous indiquer quel navigateur vous utilisez. Bon tricot!
10.02.2020 - 08:25
![]() Baby Christiane wrote:
Baby Christiane wrote:
Je viens de finir un de vos modèle j'ai vu que l'on pouvait le publier mais où merci
15.10.2019 - 13:48DROPS Design answered:
Bonjour Mme Baby, vous pouvez le publier sur notre Groupe DROPS Workshop et/ou bien partager votre lien pour notre Galerie #dropsfan. Bon tricot!
15.10.2019 - 14:54
![]() Guilaine wrote:
Guilaine wrote:
Modello molto grazioso, facile da realizzare! grazie. Consiglio tuttavia di fare il lavoro con ferri n°7 per meglio rispettare le misure campioni.Inoltre, per il mio gusto personale ho allungato di 5 cm il tutto viene altrettanto benissimo.
29.06.2016 - 18:07Diana Wald wrote:
Hello. How should I decrease for neck on right front piece? I have 37 stitches on needle on RS, 5 front band, 5 purl, m1, 7 stitches after the 20 cm increase at the side. The decrease tip tells me to decrease 6 stitches for neck inside 5 front band by p2tog. How can I do that when I only have 5 purl stitches after the 5 front band? Thank you.
14.10.2015 - 14:34DROPS Design answered:
Dear Mrs Wald, you will dec the first P st in M.1. Happy knitting!
14.10.2015 - 17:20
![]() Teresa wrote:
Teresa wrote:
¿Es posible que haya un error en las instrucciones correspondientes al delantero derecho? Me refiero en concreto a las disminuciones. Dice lo siguiente: AL MISMO TIEMPO en la vta sig por el LD dism para el cuello – Ver TIP PARA DISMINUCIÓN. Repetir la dism en cada 4-6-6- vta un total de 6-6-7 veces. ¿Cómo es posible que haya que disminuir 6 veces una disminución cuando junto a los puntos del escote en musgo (antes del diagrama) sólo hay 5 puntos? Gracias
05.11.2012 - 13:11DROPS Design answered:
Teresa, las disminuciones del escote aplican después/antes de los 5 pts del borde, según la pieza que estés tejiendo. Delantero derecho, talla S/M: 37 pts menos 6 pts del escote y 6 pts de la sisa = 25 pts restantes. Talla L/XL: 42 pts menos 6 pts del escote y 9 pts de la sisa = 27 pts restantes. Talla XXL/XXXL: 50 pts menos 7 pts del escote y 13 pts de la sisa = 30 pts restantes.
14.11.2012 - 04:49
![]() Tove wrote:
Tove wrote:
Jeg har nu 25 m på h. forstykke, som der skal være, når alle indtagninger/ærmegab er klaret. Men de m er jo ikke nok til at få mønstret OG de 5 m til forkant til at ligne jeres foto !!?? Nogen, der har konstaterett det samme ?
27.05.2012 - 19:05DROPS Design answered:
Det skulle stemme. Du har 20 m til mønstret og 5 m til stolpen (= 25 m). Du strikker til sidst ærmegabskanten som giver ribben om ærmegabet.
22.02.2013 - 10:27
![]() Teresa wrote:
Teresa wrote:
Creo que las instrucciones no indican el número de veces que haría falta repetir el diagrama. Supongo que en el M1 de la talla S, una vez terminada la hilera 16, habría que volver a empezar con la 1 y así sucesivamente. ¿Es correcto? Gracias
18.04.2012 - 16:22
|
|||||||||||||||||||||||||||||||
Vest Divine#vestdivinevest |
|||||||||||||||||||||||||||||||
 |
 |
||||||||||||||||||||||||||||||
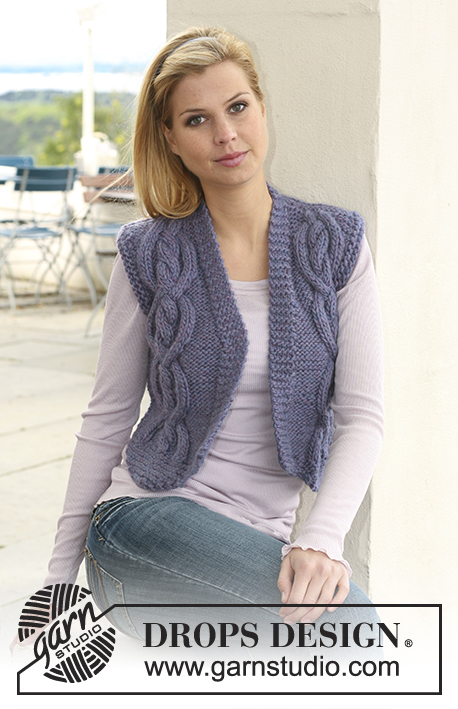
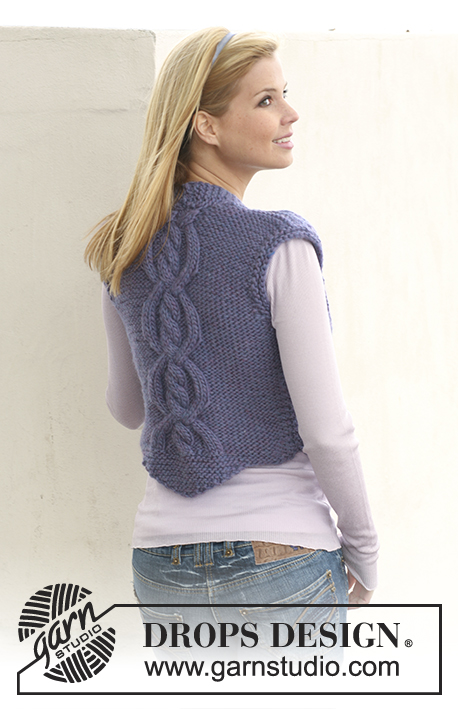
Knitted DROPS waistcoat with cables in ”Snow”. Size S/M - XXL/XXXL
DROPS 121-10 |
|||||||||||||||||||||||||||||||
|
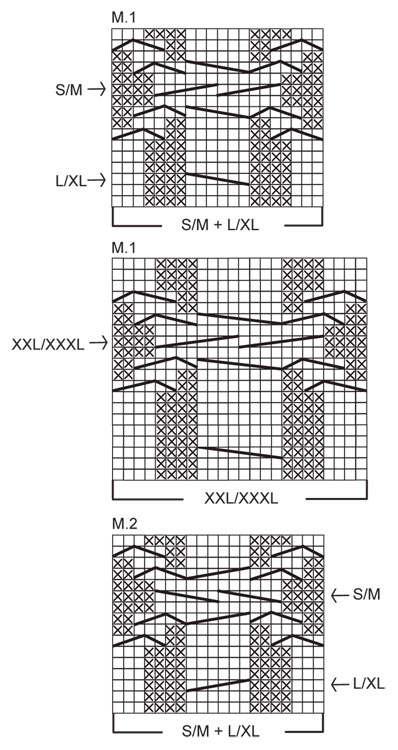
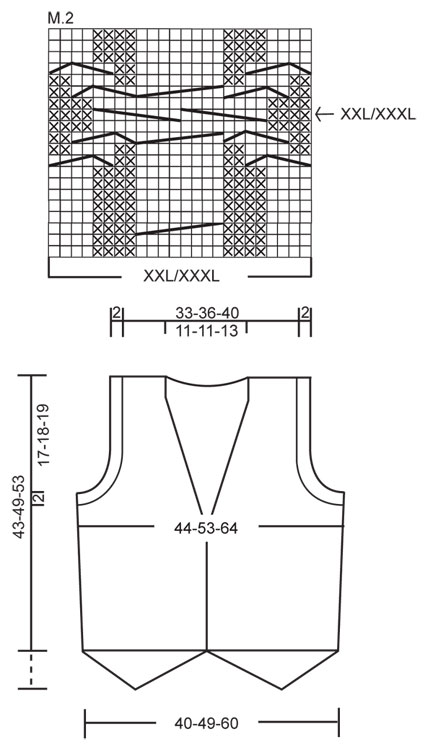
GARTER ST (back and forth on needle): K all rows. INCREASING TIP: Inc from RS inside edge st by making 1 YO. On next row K YO into back of loop to avoid a hole. PATTERN: See diagram M.1 and M.2 – see diagram for your size. Diagram shows the pattern from RS and row 1 in diagram = RS. DECREASING TIP (applies to neckline): Dec 1 st inside the 5 front band sts in garter st. Make all dec from RS. Dec as follows after 5 front band sts: P2 tog. Dec as follows before 5 front band sts: P2 tog into back of loop. -------------------------------------------------------- WAISTCOAT: BACK PIECE: Cast on 2 sts on needle size 8 mm / US 11 with Snow. K 1 row from RS, AT THE SAME TIME inc 2 sts by working 1 st in front and back loop of these 2 sts = 4 sts on needle. K 1 row from WS. Continue in GARTER ST - see above - AT THE SAME TIME inc 1 st each side - See INCREASING TIP. Repeat the inc each side on every row a total of 12-14-16 times = 28-32-36 sts. Now cast on 8-11-15 new sts at the end of the next 2 rows = 44-54-66 sts. Insert a marker in piece – now measure piece from here! Work 4 rows garter st on all sts, AT THE SAME TIME on last row (= WS) inc 8-8-10 sts evenly on the middle 12-12-14 sts = 52-62-76 sts. Work next row as follows from RS: 1 garter st, P 15-20-25, M.1 (= 20 sts in SIZE S/M + L/XL and 24 sts in SIZE XXL/XXXL), P 15-20-25 and 1 garter st. Continue in pattern like this (from WS = 1 garter st, K 15-20-25, M.1 (= 20-20-24 sts), K 15-20-25 and 1 garter st). When piece measures 5-5-6 cm / 2"-2"-2⅜" inc 1 st each side - See INCREASING TIP. Repeat the inc when piece measures 15-15-18 cm / 6"-6"-7" = 56-66-80 sts. Work inc sts in reverse stockinette st (as seen from RS). When piece measures 24-29-32 cm / 9½"-11⅜"-12½" bind off for armhole at the beg of every row each side as follows: 3 sts 1-1-2 times, 2 sts 1-2-2 times and 1 st 1-2-3 times = 44-48-54 sts. After row marked with arrow in diagram, piece now measures approx 40-46-50 cm / 15¾"-18"-19¾", dec (= WS) 8-8-10 sts evenly on sts in M.1 = 36-40-44 sts (work remaining sts as before). On next row (= RS) bind off the middle 10-10-12 sts for neck and complete each shoulder separately. Now K all rows until finished measurements (first row = WS). AT THE SAME TIME on first row from RS dec 1 st on neckline = 12-14-15 sts left on shoulder. Bind off when piece measures 43-49-53 cm / 17"-19¼"-21". RIGHT FRONT PIECE: Cast on 2 sts on needle size 8 mm / US 11 with Snow. K 1 row from RS, AT THE SAME TIME inc 2 sts by working 1 st in front and back loop of these 2 sts = 4 sts on needle. K 1 row from WS. Continue in GARTER ST - see above - AT THE SAME TIME inc 1 st each side - See INCREASING TIP. Repeat the inc each side on every row a total of 8-8-10 times = 20-20-24 sts. Work 2 rows garter st, AT THE SAME TIME cast on 1-4-7 new sts at the end of first row (= towards the side) and 6-8-7 new sts at the end of second row (= towards front edge) = 27-32-38 sts. Insert a marker in piece – now measure piece from here! Work 4 rows garter st on all sts, AT THE SAME TIME on last row (= WS) inc 8-8-10 sts evenly on the middle 12-12-14 sts on the triangle = 35-40-48 sts. Work next row as follows from RS (= from mid front): 5 garter sts (= front band), P 5-7-7, M.1 (= 20 sts in SIZE S/M + L/XL and 24 sts in SIZE XXL/XXXL), P 4-7-11 and 1 garter st. Continue in pattern like this (from WS = 1 garter st, K 4-7-11, M.1 (= 20-20-24 sts), K 5-7-7 and 5 garter sts). AT THE SAME TIME when piece measures 10-10-12 cm / 4"-4"-4¾" inc 1 st at the side - See INCREASING TIP. Repeat the inc when piece measures 20-20-24 cm / 8"-8"-9½" = 37-42-50 sts. Work inc sts in reverse stockinette st (as seen from RS). When piece measures 20-22-23 cm / 8"-8¾"-9" work 2 rows garter st back and forth on the 5 front band sts only (do not work remaining sts), then continue on all sts again. AT THE SAME TIME on next row from RS dec for neck - See DECREASING TIP. Repeat the dec on every 4-6-6 row a total of 6-6-7 times. AT THE SAME TIME when piece measures 24-29-32 cm / 9½"-11⅜"-12½" bind off for armhole at the beg of every row from the side as described for back piece. After all dec for armhole and neck are complete there are 25-27-30 sts left on needle. After the row in diagram marked with arrow, piece now measures approx 40-46-50 cm / 15¾"-18"-19¾", dec (from WS) 8-8-10 sts evenly on sts in M.1 (work remaining sts as before) = 17-19-20 sts left on needle. Now K all rows until piece measures 43-49-53 cm / 17"-19¼"-21" - adjust so that next row is from WS. Now bind off 12-14-15 sts from the side towards the neck for shoulder = 5 sts left on needle for neckline. Continue in garter st back and forth on these sts until neckline measures approx 8-8-9 cm / 3"-3"-3½" and slip sts on a stitch holder – NOTE: measure length from shoulder to mid back on garment and adjust length of neckline accordingly. LEFT FRONT PIECE: Cast on and work like right front piece, but mirrored. Work M.2 instead of M.1. ASSEMBLY: Sew shoulder seams inside bind off row. Graft neckline tog mid back and sew to neckline on back piece with neat sts. SLEEVE EDGES: Pick up from RS approx 40 to 50 sts along armhole inside 1 edge st on needle size 8 mm / US 11 with Snow. K 1 row from WS and K 1 row from RS, then bind off with K sts from WS - NOTE: make sure edge is nice and even. Sew side seams, edge to edge in outer loops of sts to avoid a chunky seam. |
|||||||||||||||||||||||||||||||
Diagram explanations |
|||||||||||||||||||||||||||||||
|
|||||||||||||||||||||||||||||||
 |
|||||||||||||||||||||||||||||||
 |
|||||||||||||||||||||||||||||||
Have you finished this pattern?Tag your pictures with #dropspattern #vestdivinevest or submit them to the #dropsfan gallery. Do you need help with this pattern?You'll find 20 tutorial videos, a Comments/Questions area and more by visiting the pattern on garnstudio.com. © 1982-2026 DROPS Design A/S. We reserve all rights. This document, including all its sub-sections, has copyrights. Read more about what you can do with our patterns at the bottom of each pattern on our site. |
|||||||||||||||||||||||||||||||


With over 40 years in knitting and crochet design, DROPS Design offers one of the most extensive collections of free patterns on the internet - translated to 17 languages. As of today we count 324 catalogs and 12290 patterns - 12280 of which are translated into English (US/in).
We work hard to bring you the best knitting and crochet have to offer, inspiration and advice as well as great quality yarns at incredible prices! Would you like to use our patterns for other than personal use? You can read what you are allowed to do in the Copyright text at the bottom of all our patterns. Happy crafting!
Post a comment to pattern DROPS 121-10
We would love to hear what you have to say about this pattern!
If you want to leave a question, please make sure you select the correct category in the form below, to speed up the answering process. Required fields are marked *.