
Popular categories
Looking for a yarn?


Comments / Questions (12)
![]() Katrin wrote:
Katrin wrote:
Hallo, ich verstehe den Teil mit der Knöchelerhöhung nicht. Ich kann mir nicht vorstellen, wie das Strickstück aussehen soll. Wird der Schaft direkt geschlossen im Kreis gestrickt oder alles flach gestrickt und später zusammengenäht? Danke fûr Antwort! Lg Katrin
17.01.2026 - 21:11DROPS Design answered:
Liebe Katrin, die Arbeit wird in Hin und Rückreihen gestrickt dann zusammengenäht, mit den verkürzten Reihen bekommt man ein besseres Fit oben am Hausschuhen. Viel Spaß beim Stricken!
19.01.2026 - 09:56
![]() Maria Teresa wrote:
Maria Teresa wrote:
Explicação
14.12.2025 - 13:39DROPS Design answered:
Bom dia, Deve ler até ao fundo da página das explicações para ter acesso a toda a informação. Pode também consultar o seprador "Vídeos" onde encontra vários tutoriais para a ajudar a feltrar. Bons tricôs Boas Festas
15.12.2025 - 12:12
![]() Maria Teresa wrote:
Maria Teresa wrote:
O modelo foi corrigido??? só aparece metade das experiências.fico sem saber o que estava mal.vou parar aguardo.obrigado
14.12.2025 - 13:38DROPS Design answered:
Bom dia, Se começou a fazer as pantufas antes de dia 12 de Dezembro, deve conferir o número de malhas após os aumentos/diminuições e as medidas, tal como indicado no texto da correcção. Bons tricôs Boas Festas
15.12.2025 - 12:10
![]() Birgit wrote:
Birgit wrote:
Hallo, ist die 1. Reihe direkt die Reihe nach der Anschlagreihe oder muss ich erst noch eine Reihe linke Maschen stricken und dann beginnt erst die Reihe 1? Ich bin mir unsicher da ja bereits in der 1. Reihe abnehmen soll und weiß auch gar nicht an welcher Stelle der Schuh beginnt. Geht es am Schaft los , dann weiter über die Ferse zur Spitze? Liebe Grüße Biggi
08.09.2025 - 19:43DROPS Design answered:
Liebe Birgit, entschuldigen Sie die späte Antwort. Der Hausschuh beginnt oben am Schaft. Sie nehmen direkt in der ersten Reihe nach dem Anschlagen der Maschen ab, d.h. Sie stricken nicht noch erst eine Reihe links. Viel Spaß beim Stricken!
23.10.2025 - 22:42
![]() Christina wrote:
Christina wrote:
Ich verstehe den Aufbau der Ferse nicht. Gibt es ein Video, wie diese Ferse gestrickt wird? Gibt es eine Skizze, wie die Form aussehen soll?
03.10.2023 - 14:34DROPS Design answered:
Liebe Christina, für die Ferse wird man beidseitig zuerst verkürzten Reihen dann verlängerten Reihen stricken, wenn die erste Ferse auf der rechten Seite (Am Anfang von Hin-Reihen) gestrickt wird, wird man die andere Ferse am anderen Seite (Am Anfang von Rück-Reihen) stricken, dann strickt man den Fuss. Viel Spaß beim stricken!
04.10.2023 - 07:43
![]() A Everts-poelman wrote:
A Everts-poelman wrote:
Ik begrijp de beschrijving niet, zoals ik lees wordt er direct al begonnen met minderen in de eerste toeren van de pijp . DROPS design: Model nr. EE-315 Brei tricotst als volgt (nld 1 = aan de goede kant): 2 st recht samen, 34-38-40-40 tricotst, 2 st recht samen = 36-40-42-42 st. Brei nld 2 als volgt (= aan de verkeerde kant): 2 st av samen, 32-36-38-38 tricotst, 2 st av samen = 34-38-40-40 st. Brei nld 3 als volgt (= aan de goede kant):
01.03.2018 - 12:11
![]() Mariëtte De Vries wrote:
Mariëtte De Vries wrote:
Ik wil de pijpen langer maken, kan dat?
30.12.2015 - 15:28DROPS Design answered:
Hoi Mariëtte. Ja, dat zou mogelijk moeten zijn.
04.01.2016 - 14:26Heidi wrote:
At Row 3 (ANKLE ELEVATION), I thought I understood your KNITTING TIP. I ... K6, turned, slipped next st as if to purl, P5 (to end). I continued in the same manner. Then, I notice at ... NOW INC FOR HEEL AS FOLLOWS ... "Work 10, turn & work 9, work 2 sts in last st on needle ..." If I follow the KNITTING TIP as I understand it, I will ... K10, turn, slip 1 as if to P, P9 (and be finish with the row ... I sure won't have 2 sts left!! So, what am I not understanding?
27.01.2013 - 20:55DROPS Design answered:
At first you work ANKLE ELEVATION, and after that INC for HEEL, and then DEC for HEEL. You don't work them in same time. Also first slipped stitch is included in P 9. You have 1 left - make 2 sts in this stitch.
28.01.2013 - 17:04
![]() Drops Design France wrote:
Drops Design France wrote:
Bonjour Malenfant, après relecture, les explications sont juste ainsi. N'hésitez pas à prendre conseil auprès de votre magasin ou du forum DROPS. Bon tricot.
10.02.2012 - 08:45
![]() MALENFANT wrote:
MALENFANT wrote:
J'ai constaté une seconde anomalie. L'augmentation du talon commence à partir de l'écru et non du beige clair.
08.02.2012 - 22:23
|
|
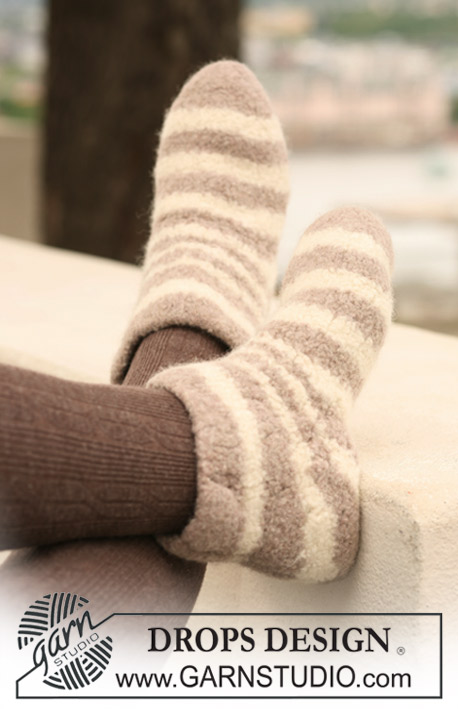
Zebra Sock#zebrasocks |
|
 |
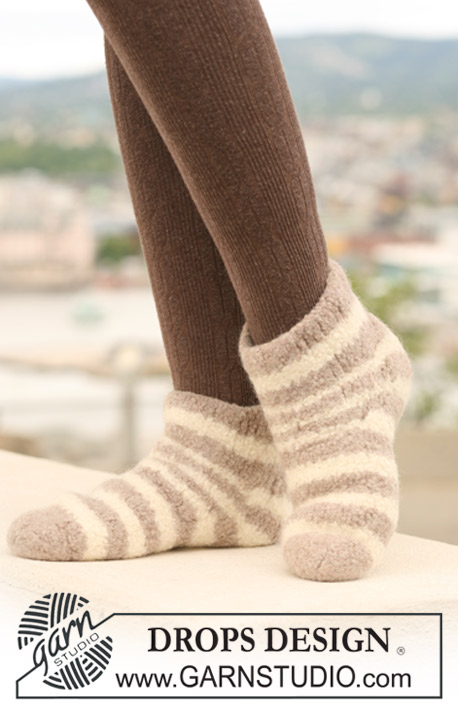 |
DROPS felted slippers with stripe pattern in ”Snow”.
DROPS 124-12 |
|
|
ANKLE ELEVATION: * Work 6-6-7-7 stitches, turn and work 6-6-7-7 stitches on return row– see KNITTING TIP! Work 10-10-12-12 stitches, turn and work 10-10-12-12 stitches on return row. Work 6-6-7-7 stitches, turn and work 6-6-7-7 stitches on return row. * Work 1 row stocking stitch over all stitches. Repeat from *-* on the opposite side. Then work 1 row stocking stitch back from WS over all stitches. KNITTING TIP: Each time the work is turned in the middle of piece, slip the first stitch, tighten the thread and continue knitting as before – there will be a hole but it will even out after felting. -------------------------------------------------------- SLIPPERS – SHORT OVERVIEW OF PIECE: The slippers are worked back and forth in stocking stitch starting at the top of the foot and finishing with the toe. SLIPPER – LEG: Cast on Cast on 36-36-40-44 stitches on needle size 9 mm = US 13 with light beige mix. Work 1 row (from the right side) stocking stitch decreasing/increasing evenly at the same time to adjust to 34-38-40-40 stitches. Purl 1 row. Work ANKLE ELEVATION on the outermost stitches each side - see explanation above! Change to off-white and work 4 rows on all stitches, AT THE SAME TIME on the 3rd row dec 4-4-4-2 stitches evenly by knitting 2 stitches together = 30-34-36-38 stitches. Change to light beige mix and work 2 rows stocking stitch on all stitches. NOW INCREASE FOR HEEL AS FOLLOWS: From the right side (continue with light beige mix): * Work 10-10-11-12 stitches, turn and work 9-9-10-11 stitches, increase 1 stitch by working 2 stitches in last stitch on needle. Work 6-6-7-7 stitches, turn and work 5-5-6-6 stitches on return row, increase 1 stitch by working 2 stitches in last st on needle. Work 1 row on all stitches = 32-36-38-40 stitches *. Repeat from *-* on the opposite side, beginning from the wrong side = 34-38-40-42 stitches. Change to off-white and repeat from *-* 1 more time in each side = 38-40-42-44-46 stitches. Change to light beige mix and repeat from *-* 1 more time in each side = 42-46-48-50 stitches. Remember the knitting tension! NOW DECREASE FOR HEEL AS FOLLOWS: Change to off-white and work next row as follows: * Work 10-10-11-12 stitches, turn and work 8-8-9-10 stitches on return row, decrease 1 stitch by working the last 2 stitches together. Work 6-6-7-7 stitches, turn and work 4-4-5-5 stitches, decrease 1 stitch by working the last 2 stitches together = 40-44-46-48 stitches. Work 1 row on all stitches *. Repeat from *-* on the opposite side with start from the wrong side = 38-42-40-42 stitches. Change to light beige mix and repeat from *-* 1 more time each side = 34-38-40-42 stitches. Change to off-white and repeat from *-* 1 more time each side = 30-34-36-38 stitches. NOW WORK THE FOOT AS FOLLOWS: Insert a marker-thread in the outermost stitch on the side, now measure piece from here. Change to light beige mix and continue with stripes with 4 rows in each colour, AT THE SAME TIME decrease from the right side on upper foot as follows: Work 8-8-9-10 stitches, knit 2 together, work 10-14-14-14 stitches, knit 2 together, work remaining 8-8-9-10 stitches = 28-32-34-36 stitches. Work 1 row over all stitches. Continue in stripes without decreasing until piece measures approx 15-18-22-26 cm = 6"-7"-8¾"-10¼" from marker (finish after a full stripe). Change colour for the toe and complete slipper in this colour. DECREASE FOR TOE AS FOLLOWS: = 28-32-34-36 stitches. ROW 1: Decrease 3-4-4-4 stitches evenly by working 2 stitches together. ROW 2: Work all stitches. Repeat ROW 1 and 2 a total of 5-5-5-5 times = 12-12-14-16 stitches on needle. On next row from the right side, work all stitches 2 by 2 across the row = 6-6-7-8 stitches. Pull thread through remaining stitches, tighten together and fasten. Sew together mid under foot up to cast on row, edge to edge in outer loops of stitches to avoid a chunky seam. An uneven seam will even out after felting. FELTING: The piece can be felted either in the washing machine or the tumble dryer – read description below. Remember: Subsequent washes are as for a normal wool garment. IN WASHING MACHINE: Washing machines will vary when felting. If the piece is not felted enough, it can be felted again. If it is felted too much, it can be stretched to the correct size while still wet. DO THE FOLLOWING: Lay the piece in the washing machine, using a programme of approx. 40 minutes (not a wool programme). Wash at 40 degrees C = 104 degrees F without pre-wash, detergent is optional. After washing, shape the piece while it is still wet. IN TUMBLE DRYER: Felting in a tumble dryer gives good control over the degree of felting. The tumble dryer can be opened during drying to check the size of the piece. If it is not felted enough it can be thoroughly wetted and felted again. If it is felted too much it can be stretched to the correct size while still wet. DO THE FOLLOWING: Lay the piece in water so it becomes completely wet, then place it in the tumble dryer and begin the drying process. Dry to the desired size, checking regularly. |
|
Have you finished this pattern?Tag your pictures with #dropspattern #zebrasocks or submit them to the #dropsfan gallery. Do you need help with this pattern?You'll find 12 tutorial videos, a Comments/Questions area and more by visiting the pattern on garnstudio.com. © 1982-2026 DROPS Design A/S. We reserve all rights. This document, including all its sub-sections, has copyrights. Read more about what you can do with our patterns at the bottom of each pattern on our site. |
|


With over 40 years in knitting and crochet design, DROPS Design offers one of the most extensive collections of free patterns on the internet - translated to 17 languages. As of today we count 324 catalogs and 12290 patterns - 12280 of which are translated into English (US/in).
We work hard to bring you the best knitting and crochet have to offer, inspiration and advice as well as great quality yarns at incredible prices! Would you like to use our patterns for other than personal use? You can read what you are allowed to do in the Copyright text at the bottom of all our patterns. Happy crafting!
Post a comment to pattern DROPS 124-12
We would love to hear what you have to say about this pattern!
If you want to leave a question, please make sure you select the correct category in the form below, to speed up the answering process. Required fields are marked *.