
Popular categories
Looking for a yarn?


Comments / Questions (45)
![]() Lelletta wrote:
Lelletta wrote:
Ok, ora si! Ma allora perché non correggete? Quelle diminuzioni (4-5-5-5-6-6) confondono le idee, non c'entrano nulla. Vi ringrazio comunque per l'attenzione prestatami, buona giornata!
20.09.2025 - 08:15DROPS Design answered:
Buongiorno Lelletta, i numeri 4-5-5-5-6-6 indicano le maglie da intrecciare per il collo per le diverse taglie. Buon lavoro!
20.09.2025 - 08:38
![]() Lelletta wrote:
Lelletta wrote:
No, scusate, forse non mi sono spiegata...partiamo dall'inizio del davanti destro: ci sono 42 maglie. Ne devo diminuire 5 sulle trecce e rimangono SOLO 37 maglie.Come faccio a diminuire le successive 4+5+5+5+6+6, quindi in ed ancora poi 2x3 volte e1x3 volte ed ancora...ancora...e mi dovrebbero rimanere 18 maglie???? 🫣Spero che ora sia più chiaro! Dovete leggere dall'inizio del davanti! Grazie!
19.09.2025 - 18:42DROPS Design answered:
Buonasera Lelletta, parte da 42 maglie per la taglia M, deve diminuire 2 maglie 1 volta e 1 maglia 2 volte = 38 maglie. Poi all'altezza richiesta diminuisce 5 maglie sulle trecce = 33 maglie. Sul ferro successivo intreccia 5 maglie dalla parte del collo = 28 maglie. Poi per modellare la scollatura intreccia 2 maglie 3 volte e 1 maglia 3 volte = 19 maglie. E infine diminuisce 1 maglia sulle trecce = 18 maglie come indicato. Buon lavoro!
19.09.2025 - 23:46
![]() Lelletta wrote:
Lelletta wrote:
Buonasera! Non riesco a capire le diminuzioni per il davanti: taglia M. Con le diminuzioni per lo scalfo da 42 maglie ne rimangono 38 (2-1-1), quindi diminuendo ancora le 5 maglie sulle trecce siamo a 33. A questo punto, dite :" intrecciare 4-5-5-5-6-6 m per lo scollo", cosa significa? Vi ringrazio se potete aiutarmi a capire. Attendo pazientemente una vostra cortese e rapida risposta.
16.09.2025 - 21:33DROPS Design answered:
Buonasera Lelletta, abbiamo modificato la frase per renderla più chiara, deve intrecciare le maglie dalla parte dello scollo. Buon lavoro!
19.09.2025 - 16:24
![]() Lelletta wrote:
Lelletta wrote:
Grazie!
16.06.2025 - 00:37
![]() Lelletta wrote:
Lelletta wrote:
Si si era risolto tutto già dal giorno dopo. Vi ringrazio per l'interessamento! Approfitto per chiedervi cosa intendete dire quando scrivete "i diagrammi mostrano il motivo sul diritto del lavoro", quindi il rovescio non viene considerato? Lo schema disegna solo i ferri dispari? Grazie sempre per la vostra cortesia e disponibilità. Buon lavoro!
14.06.2025 - 23:05DROPS Design answered:
Buonasera Lelletta, i nostri diagrammi mostrano TUTTI i ferri del lavoro, sia quelli di andata che quelli di ritorno. Buon lavoro!
16.06.2025 - 00:27
![]() Lelletta wrote:
Lelletta wrote:
Buonasera, scusate, sto tentando dal pomeriggio di entrare nei miei preferiti, ma quando inserisco la mia mail mi dite che "Il tuo indirizzo e-mail non è valido",. Non ho cambiato nulla, fino a ieri sono entrata senza problemi, cosa è successo? Spero riusciate a risolvermi "l'intoppo". Grazie anticipatamente e buona serata
05.06.2025 - 22:25DROPS Design answered:
Buonasera Lelletta, ha ancora problemi con la sezione dei "preferiti"?
09.06.2025 - 23:59
![]() Guylaine wrote:
Guylaine wrote:
Bonjours j'aimerai beaucoup faire se chandail mes je ne comprend pas les schéma suivant cela fait 3 semaine que j'essai et sa ne fonctionne pas = 1 m end sur l'endroit, env sur l'envers = 1 m env sur l'endroit, end sur l'envers
13.06.2019 - 02:51DROPS Design answered:
Bonjour Guylaine, dans ces diagrammes, sur l'endroit, tricotez les cases vides à l'endroit (jersey endroit) et les cases avec un tiret à l'envers (jersey envers), sur l'envers, vous tricoterez les cases vides à l'envers et les cases avec un tiret à l'endroit. Bon tricot!
13.06.2019 - 09:13
![]() Tina wrote:
Tina wrote:
Hallo, ich habe eine Frage zum Kragen, da steht "alle 2 li. auf 3 li. aufnehmen", irgendwie verstehe ich das nicht, wie das gemeint ist.
23.05.2019 - 00:00DROPS Design answered:
Liebe Tina, Sie stricken zuerst mit Bündchen 2 M re, 2 M li, dann nehmen Sie eine Masche in jeder 2 M li-Partie so daß die Bündchen 2 M re, 3 M li werden, und so weiter stricken. Viel Spaß beim stricken!
23.05.2019 - 09:27
![]() Raven wrote:
Raven wrote:
Yes, thank you very much. That helps a lot. Now I can figure my braid up the sleeve. I've used the basics of the pattern, but made it as a full-on Aran with honeycomb, seed stitch, braid and cable sections. I'm looking forward to wearing it. The basic pattern has lovely contours.
22.01.2018 - 23:11Raven wrote:
Hello, re 123-12 - I need help please understanding the sleeve construction. It says to work in round, but how are the bind-offs done with the joined together in round? Is the "mid under sleeve" at the halfway point between the beginning/end of the round? Is it worked flat putting the mid under sleeve at the beginning/end of each row. I'm confused. Didn't find anything in the videos. Thank you.
20.01.2018 - 19:11DROPS Design answered:
Dear Raven, from the point you start doing the sleeve cap (with binding off the 6 stitches at the underarm (3 and 3 stitches on both side of the marker) you continue the knitting back and forth, and do the binding off at the beginning of the rows. I hope this helps. Happy Knitting!
21.01.2018 - 13:05
|
||||||||||||||||||||||||||||
Warm Wishes |
||||||||||||||||||||||||||||
|
|
||||||||||||||||||||||||||||
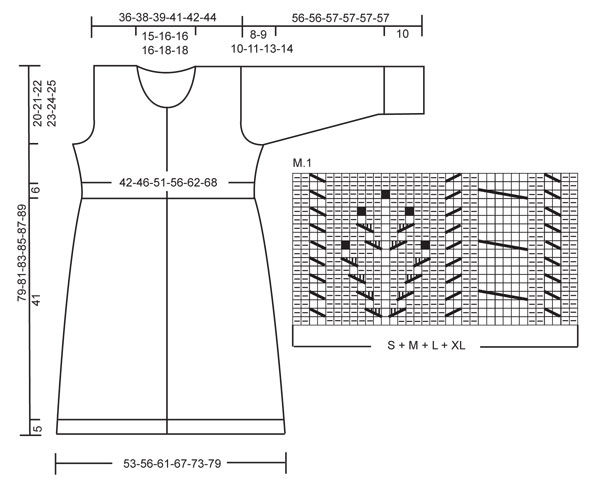
Knitted DROPS jacket with textured pattern and large collar in ”Nepal”. Size S - XXXL.
DROPS 123-12 |
||||||||||||||||||||||||||||
|
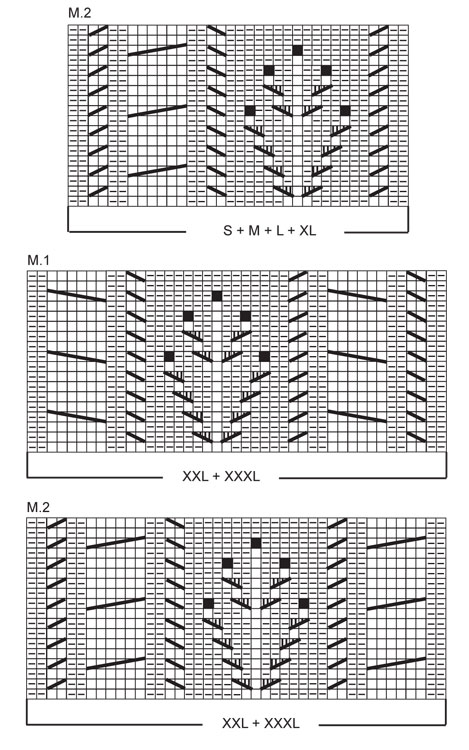
MEASUREMENT TIP: Because of the weight of the yarn all measurements should be made while the garment is hanging, otherwise it will be too long when worn. GARTER ST (back and forth on needle): K all rows. GARTER ST (in the round): K 1 round, P 1 round. PATTERN: See diagram M.1 and M.2 – NOTE: See diagram for your size. Diagram shows the pattern from RS. Row 1 in diagram = WS. INCREASING TIP (applies to garter st at waist): Inc 1 st by making 1 YO, on next row K YO into back of loop to avoid a hole. -------------------------------------------------------- JACKET: BODY PIECE: Worked back and forth on circular needle from mid front. See MEASUREMENT TIP! Cast on 252-268-296-324-352-380 sts (includes 1 edge st each side towards front edge) on circular needle size 4 mm / US 6 with Nepal. P 1 row from WS and continue in rib as follows from RS: 1 edge st in garter st, * K2, P2 *, repeat from *-* until 3 sts remain, finish with K2 and 1 edge st garter st. Continue in rib like this. When piece measures 5 cm / 2" K 1 row from RS, AT THE SAME TIME dec 60-64-76-84-86-94 sts evenly (i.e. K approx every 2nd and 3rd st tog) = 192-204-220-240-266-286 sts. K 1 row from WS and K 1 row from RS. Change to circular needle size 5 mm / US 8 and insert 2 markers in piece, 51-54-58-63-71-76 sts in from each side (= 90-96-104-114-124-134 sts between markers on back piece), let the markers follow the piece as you go along. Work next row as follows from WS: 1 edge st in garter st, M.2 (= 35 sts in SIZE S + M + L + XL and 43 sts in SIZE XXL + XXXL), stockinette st (i.e. P from WS, K from RS) until 36-36-36-36-44-44 sts remain, finish with M.1 (= 35 sts in SIZE S + M + L + XL and 43 sts in SIZE XXL + XXXL) and 1 edge st in garter st. Continue in pattern like this. REMEMBER THE KNITTING GAUGE. When piece measures 7 cm / 2¾" dec 1 st each side of both markers (= 4 dec sts). Repeat the dec on every 4.5 cm / 1¾" a total of 9 times = 156-168-184-204-230-250 sts. After 5 vertical repeats of M.1/M.2 (piece now measures approx 46 cm / 18") change to circular needle size 4 mm / US 6. Now work garter st back and forth on all sts (row 1 = K from WS) – AT THE SAME TIME dec 22-22-24-24-26-26 sts evenly on row 1 = 134-146-160-180-204-224 sts. When 2 rows remain before the garter st measures 6 cm / 2⅜" inc 22-22-24-24-26-26 sts evenly – See INCREASING TIP = 156-168-184-204-230-250 sts. Change back to circular needle size 5 mm / US 8 and continue in pattern as before. AT THE SAME TIME when piece measures 59-60-61-62-63-64 cm / 23¼"-23⅝"-24"-24⅜"-24¾"-25¼" - REMEMBER MEASUREMENT TIP –bind off 6 sts each side for armhole (i.e. 3 sts each side of marker) = 66-72-80-90-100-110 sts on back piece and 39-42-46-51-59-64 sts on each front piece. Now complete front and back pieces separately. BACK PIECE: = 66-72-80-90-100-110 sts. Continue in stockinette st back and forth on needle, AT THE SAME TIME bind off for armhole at the beg of every row each side as follows: 3 sts 0-0-0-0-1-2 times, 2 sts 0-1-2-3-4-4 times and 1 st 2-2-3-4-3-4 times = 62-64-66-70-72-74 sts. When piece measures 77-79-81-83-85-87 cm / 30⅜"-31"-32"-32¾"-33½"-34¼" bind off the middle 24-26-26-26-28-28 sts for neck and complete each shoulder separately. Bind off 1 st on neckline on next row = 18-18-19-21-21-22 sts left on shoulder. Continue until piece measures 79-81-83-85-87-89 cm / 31"-32"-32¾"-33½"-34¼"-35" - REMEMBER MEASUREMENT TIP - and bind off. RIGHT FRONT PIECE: = 39-42-46-51-59-64 sts. Continue in pattern and stockinette st AT THE SAME TIME bind off for armhole at the beg of every row from the side as described for back piece. NOTE: After 3-3-3-3-4-4 vertical repeats of M.1/M.2 continue in reverse stockinette st (as seen from RS) on the 15 sts in "berry motif" (work remaining sts as before). AT THE SAME TIME when piece measures 69-71-73-73-75-77 cm / 27⅛"-28"-28¾"-28¾"-29½"-30⅜" - adjust so that next row is from WS - dec 5 sts on the 3 cables towards front edge by P2 tog across each cable. On next row from mid front bind off 4-5-5-5-6-6 sts for neck. Bind off to shape the neckline at the beg of every row from mid front as follows: 2 sts 3 times and 1 st 3 times = 19-19-20-22-25-26 sts left on shoulder. Continue until 1 row remains before front piece measures the same as back piece. Now dec 1-1-1-1-4-4 sts evenly on cables on shoulder by K2 tog = 18-18-19-21-21-22 sts left on needle. Bind off on next row. LEFT FRONT PIECE: Like right front piece, but mirrored. SLEEVE: Worked in the round. Cast on 54-63-63-63-72-72 sts on double pointed needles size 4 mm / US 6 with Nepal and K 1 round. Now continue in rib as follows: * K2, P2, K2, P3 *, repeat from *-* to end. When rib measures 3 cm / 1⅛" dec all P3 to P2 = 48-56-56-56-64-64 sts. Continue with K2/P2 until rib measures 10 cm / 4". Now K 1 round, AT THE SAME TIME dec 8-14-14-14-20-20 sts evenly = 40-42-42-42-44-44 sts. P 1 round, then change to double pointed needles size 5 mm / US 8 and continue in stockinette st. AT THE SAME TIME when piece measures 12-12-13-14-12-13 cm / 4¾"-4¾"-5⅛"-5½"-4¾"-5⅛" inc 2 sts mid under sleeve. Repeat the inc on every 3.5-3.5-2.5-2-2-1.5 cm / 1¼"-1¼"-⅞"-¾"-¾"-½" a total of 10-10-13-15-16-19 times = 60-62-68-72-76-82 sts. When piece measures 48-47-47-46-44-43 cm / 19"-18½"-18½"-18"-17¼"-17" bind off 6 sts mid under sleeve and bind off for sleeve cap at the beg of every row each side as follows: 2 sts 2-3-3-4-4-5 times and 1 st 2-2-2-3-4-4 times, then 2 sts each side until piece measures 55-55-56-56-56-56 cm / 21⅝"-21⅝"-22"-22"-22"-22". Now bind off 3 sts at beg of the next 2 rows and bind off remaining sts. Piece measures approx 56-56-57-57-57-57 cm / 22"-22"-22½"-22½"-22½"-22½". ASSEMBLY: Sew shoulder seams. Set in sleeves. RIGHT FRONT BAND: Pick up from RS approx 165 to 181 sts (divisible by 4 + 1) along right front piece on circular needle size 4 mm / US 6 with Nepal (pick up inside 1 edge st). K 1 row from WS and K 1 row from RS. Continue in rib as follows with start from WS (= from neck towards bottom edge): 1 garter st, * P2, K2 *, repeat from *-* until 4 sts remain and finish with P2 and 2 garter sts. Continue in rib like this until front band measures approx 2.5 cm / ⅞" and now make 8 buttonholes evenly distributed. 1 BUTTONHOLE = bind off 1 st and cast on 1 new st on next row (for neatest result make buttonhole in a P-section, as seen from RS). NOTE: Place the bottom buttonhole approx 16-18 cm / 6"-7" from bottom edge and the top one 1 cm / ½" from neckline. When rib measures 5 cm / 2" bind off with K over K and P over P. LEFT FRONT BAND: Repeat along left front piece, but do not make buttonholes. NOTE: Make sure to pick up the same no of sts on both front bands. COLLAR: Pick up from RS approx 95 to 120 sts round neck (also on front bands) on circular needle size 4 mm / US 6 with Nepal. K 1 row from WS, then K 1 row from RS, AT THE SAME TIME inc evenly to 122-126-130-138-142-150 sts. Continue in rib as follows from WS: 2 garter sts, * K2, P2 *, repeat from *-* until 4 sts remain and finish with K2 and 2 garter sts (this will be RS when collar is folded down). When collar measures approx 16 cm / 6" inc all P2 to P3 (as seen from RS when collar is folded down). When collar measures approx 20-21-21-21-22-22 cm / 8"-8¼"-8¼"-8¼"-8¾"-8¾" inc all P3 to P4. Bind off with K over K and P over P when collar measures approx 24-26-26-26-28-28 cm / 9½"-10¼"-10¼"-10¼"-11"-11". |
||||||||||||||||||||||||||||
Diagram explanations |
||||||||||||||||||||||||||||
|
||||||||||||||||||||||||||||
 |
||||||||||||||||||||||||||||
 |
||||||||||||||||||||||||||||
Have you finished this pattern?Tag your pictures with #dropspattern or submit them to the #dropsfan gallery. Do you need help with this pattern?You'll find 17 tutorial videos, a Comments/Questions area and more by visiting the pattern on garnstudio.com. © 1982-2026 DROPS Design A/S. We reserve all rights. This document, including all its sub-sections, has copyrights. Read more about what you can do with our patterns at the bottom of each pattern on our site. |
||||||||||||||||||||||||||||


With over 40 years in knitting and crochet design, DROPS Design offers one of the most extensive collections of free patterns on the internet - translated to 17 languages. As of today we count 325 catalogs and 12298 patterns - 12288 of which are translated into English (US/in).
We work hard to bring you the best knitting and crochet have to offer, inspiration and advice as well as great quality yarns at incredible prices! Would you like to use our patterns for other than personal use? You can read what you are allowed to do in the Copyright text at the bottom of all our patterns. Happy crafting!
Post a comment to pattern DROPS 123-12
We would love to hear what you have to say about this pattern!
If you want to leave a question, please make sure you select the correct category in the form below, to speed up the answering process. Required fields are marked *.