
Popular categories
Looking for a yarn?


Comments / Questions (83)
![]() Simone Van Der Gaag wrote:
Simone Van Der Gaag wrote:
Thank you for the lovely pattern. I knitted it with handspun yarn and it worked out very well. I really love the pattern amd the fact you almost knit the whole cardigan in one piece. Great!
01.02.2021 - 09:23
![]() Jo wrote:
Jo wrote:
Can you clarify the ribbing please? Is it two by two or four by four or two by four. (The site isn’t allowing me to write asterisks or numbers so apologies for weird phrasing.) thanks.
28.12.2020 - 14:05
![]() Sylvia Lees wrote:
Sylvia Lees wrote:
You say to buy 7 buttons, and to make 7 buttonholes, but there are 8 in the picture. Why?
23.05.2020 - 21:07DROPS Design answered:
Dear Sylvia, there are 7 buttons on tthe sweter seen at the picture, the top button is abot 1-1.5 cm from the top, the bottom is left open. Where do you see an 8th? Happy Knitting!
25.05.2020 - 00:42
![]() Ine wrote:
Ine wrote:
Is er al iemand die het vest met lange mouwen heeft gebreid..? ( geprobeerd te breien..) Gelukkig 2020!
01.01.2020 - 12:58
![]() Lee wrote:
Lee wrote:
Would it be possible to give instructions on how to modify this sweater to a pull over instead of button front?
22.07.2019 - 21:45
![]() Anja wrote:
Anja wrote:
Hallo, Ik brei graag top-down en wil dat model ook zo breien. Zou het met het patroon lukken wanneer ik het omkeer en i.p.v. steken bijv. 2 steken Samen te breien - 1 steek toevoegen? Zou het lukken?
07.03.2019 - 11:09DROPS Design answered:
Dag Anja,
Theoretisch zou je het om moeten kunnen keren. Waar je meerdert moet je dan minderen en vice versa. Zo kun j e ook de kabel andersom breien. Het is wel verstandig om het eerst even goed uit te denken en evt. ook uit te schrijven.
07.03.2019 - 20:42Arcadia wrote:
I'm not sure if I've understood correctly. I have just finished the rib. The next row, on the RS (where the rib looks like KK PPPP KK) is KNIT (with decreases - K2, * K2 tog, K2 tog, K2 *) Now it's asking for reverse stocking, which means the RS is all PURL - but I just did a row of KNIT. Is it correct that on the RS there's one row of KNIT before PURLing the rest of the garment? Thank you :)
01.05.2018 - 03:17DROPS Design answered:
Dear Arcadia, Knit the sts as described on first row after rib (= from RS) then continue with reversed stocking st (= P from RS and K from WS). Happy knitting!
02.05.2018 - 09:45
![]() Bärbel wrote:
Bärbel wrote:
Hallo liebes Drops-Team, ich habe eben die Anleitung ausgedruckt. Leider ist das Diagramm und die Zeichnung mit den Maßen nicht dabei, auch nicht in der Druckvorschau. Da werden auch nur 2 Seiten angezeigt. Wie könnt Ihr mir helfen? LG, Bärbel
10.03.2018 - 10:50DROPS Design answered:
Liebe Bärbel, prüfen Sie die Druckeinstellungen, damit alle Seiten gedrückt werden. Viel Spaß beim stricken!
12.03.2018 - 08:35
![]() Marti Hand wrote:
Marti Hand wrote:
I have a question about the number of stitches for the size Small. My test sample came out correct -> 17x22 stitches = 4"x4" in Alaska. The number of cast on stitches called for = 240 stitches =56" in circumference...is the number of CO stitches correct for a size small? My hip measurement is 35 inches, and feel the above 56" is much too big to fit my frame. Either I'm super small or Norwegians are super big! If this is the case, can you please provide knitting instructions for XS?
16.11.2017 - 13:03DROPS Design answered:
Dear Mrs Hand, you first work in rib, so that you need more sts for the correct width, then you will decrease to 164 sts in size S after ribbing. If your tension is fine, you will the finished measurements as in chart at the bottom of the pattern. Happy knitting!
16.11.2017 - 13:28
![]() Anja wrote:
Anja wrote:
Hey ihr Lieben! Ist das Zufall oder habt Ihr meinen Namen, den ich dieser Jacke meinem Projekt dazu in der großen Strickcommunity gegeben hab, verwendet? Ist mir nur grad so aufgefallen. Vorher hatte die Jacke nämlich nur diese Nummer und ich hab mein Projekt "Keltischer Wintertraum" genannt... LG Anja
25.10.2017 - 09:46DROPS Design answered:
Liebe Anja, die Namen der Modellen sind aus der Empfehlungen und Vorschläge der Website Besucher ausgewählt; es ist dann nur Zufall.
25.10.2017 - 12:22
|
|||||||||||||||||||||||||
Celtic Winter#celticwintercardigan |
|||||||||||||||||||||||||
|
|
|||||||||||||||||||||||||
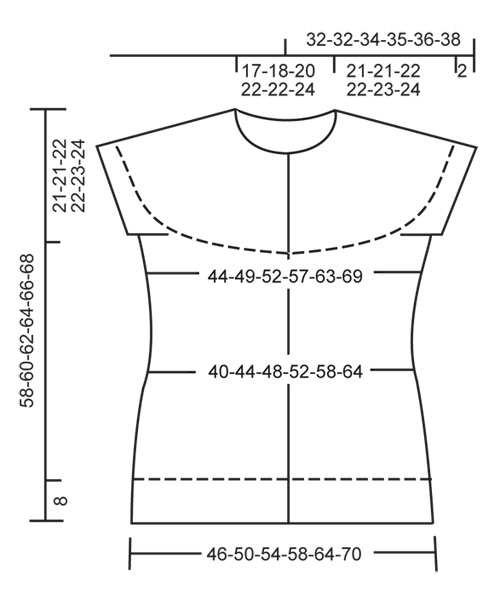
DROPS waistcoat in ”Alaska” with raglan and cables on yoke. Size S to XXXL.
DROPS 121-27 |
|||||||||||||||||||||||||
|
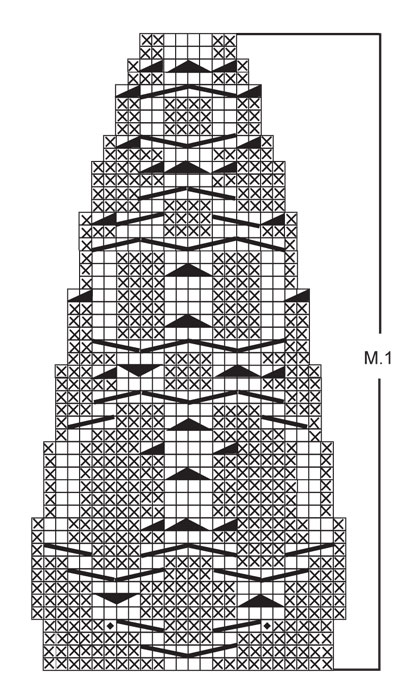
GARTER ST (back and forth on needle): K all rows. PATTERN: See diagrams M.1 – pattern in diagram is seen from RS. BUTTONHOLES: Make buttonholes on right front band. 1 buttonhole = K tog 3rd and 4th st from mid front and make 1 YO. Make buttonholes when piece measures: SIZE S: 12, 19, 26, 34, 41, 49, 56 cm / 4¾",7½",10¼",13⅜",16⅛",19¼",22". SIZE M: 12, 20, 28, 36, 43, 51, 58 cm / 4¾",8",11",14¼",17",20",22¾". SIZE L: 12, 20, 28, 36, 44, 52, 60 cm / 4¾",8",11",14¼",17¼",20½",23⅝". SIZE XL: 12, 21, 29, 37, 45, 54, 62 cm / 4¾",8¼",11⅜",14½",17¾",21¼",24⅜". SIZE XXL: 12, 21, 30, 39, 47, 56, 64 cm / 4¾",8¼",11¾",15¼",18½",22",25¼". SIZE XXXL: 12, 21, 30, 39, 48, 57, 66 cm / 4¾",8¼",11¾",15¼",19",22½",26". -------------------------------------------------------- -------------------------------------------------------- BODY PIECE: Worked back and forth on circular needle from mid front. Cast on 240-264-282-306-336-366 sts (includes 5 front band sts each side towards mid front) on circular needle size 4 mm / US 6 with Alaska. Continue as follows from RS: 5 front band sts in GARTER ST – see above, K2, * P4/ K2 *, repeat from *-* and finish with 5 front band sts in garter st. When rib measures 8 cm / 3⅛" work (make sure next row is from RS) change to needle size 5 mm / US 8. Work next row as follows from RS: 5 front band sts in garter st, K2, * K2 tog, K2 tog, K2 *, repeat from *-* and finish with 5 front band sts in garter st = 164-180-192-208-228-248. Continue in reverse stockinette st and front bands in garter st as before. Insert a marker 43-47-50-54-59-64 sts in from each side (= 78-86-92-100-110-120 sts between markers on back piece). REMEMBER THE GAUGE! When piece measures 10-10-11-11-12-12 cm / 4"-4"-4⅜"-4⅜"-4¾"-4¾" dec 1 st each side of both markers, and repeat the dec on every 2 cm / ¾" a total of 5 times = 144-160-172-188-208-228 sts. AT THE SAME TIME when piece measures 12 cm / 4¾" make BUTTONHOLES on right front band – see above! When piece measures 22-22-23-23-24-24 cm / 8¾"-8¾"-9"-9"-9½"-9½" inc 1 st each side of both markers, and repeat the inc on every 3 cm / 1⅛" a total of 4 times = 160-176-188-204-224-244 sts. When piece measures 37-39-40-42-43-44 cm / 14½"-15¼"-15¾"-16½"-17"-17¼" bind off 6-6-8-8-10-10 sts each side for armhole on next row from RS (= 3-3-4-4-5-5 sts each side of marker) = 148-164-172-188-204-224 sts left on needle. Put piece aside. SLEEVE EDGES: Worked back and forth on circular needle. Cast on 58-61-70-73-78-79 sts on circular needle size 4 mm / US 6. K 3 rows and work next row as follows: bind off the first 3-3-4-4-5-5 sts, K sts on row until 3-3-4-4-5-5 sts remain, bind off theses sts, cut the thread = 52-55-62-65-68-69 sts remain on needle. Put piece aside and knit the other sleeve edge. YOKE: Slip sts from sleeve edges on the same circular needle size 5 mm / US 8 as body piece where bind off for armholes = 252-274-296-318-340-362 sts. K 1 row from WS and work 0-0-2-2-4-6 rows in reverse stockinette st with front bands in garter st. Work next row as follows from RS: 5 front band sts in garter st, P10, * inc 1 st in each of the next 2 sts and K these 4 sts, P20 *, repeat from *-* a total of 10-11-12-13-14-15 times, inc 1 st in each of the next 2 sts and K these 4 sts, P10, and 5 front band sts in garter st = 274-298-322-346-370-394 sts. Now continue in M.1 with front bands in garter st as before (first row = WS). On row 4 in M.1 inc 2 sts in each repeat as per the diagram = 296-322-348-374-400-426 sts. Now complete M.1. After M.1 there are 98-106-114-122-130-138 sts on needle. Work 1 row from WS. Change to circular needle size 4 mm / US 6. K 1 row from RS, at the same time dec 16-18-22-24-30-30 sts evenly (do not dec on front bands) = 82-88-92-98-100-108 sts. K 1 row. Insert a marker mid back. Continue in garter st on all sts, at the same time work shortened rows mid back as follows (first row = RS): K 7 sts past marker mid back, turn, K 7 sts past marker on the other side, turn, K 14 sts past marker, turn, K 14 sts past marker on the other side, turn, and continue like this with 7 more sts before each turn until you have work a total of 35-35-35-42-42-42 sts each side of marker. Turn, K all sts on row and then work 3 rows on all sts. Bind off with K sts from RS. ASSEMBLY: Sew sleeve edges tog, edge to edge and sew openings under sleeves. Sew on buttons. |
|||||||||||||||||||||||||
Diagram explanations |
|||||||||||||||||||||||||
|
|||||||||||||||||||||||||
 |
|||||||||||||||||||||||||
 |
|||||||||||||||||||||||||
Have you finished this pattern?Tag your pictures with #dropspattern #celticwintercardigan or submit them to the #dropsfan gallery. Do you need help with this pattern?You'll find 18 tutorial videos, a Comments/Questions area and more by visiting the pattern on garnstudio.com. © 1982-2026 DROPS Design A/S. We reserve all rights. This document, including all its sub-sections, has copyrights. Read more about what you can do with our patterns at the bottom of each pattern on our site. |
|||||||||||||||||||||||||


With over 40 years in knitting and crochet design, DROPS Design offers one of the most extensive collections of free patterns on the internet - translated to 17 languages. As of today we count 324 catalogs and 12291 patterns - 12281 of which are translated into English (US/in).
We work hard to bring you the best knitting and crochet have to offer, inspiration and advice as well as great quality yarns at incredible prices! Would you like to use our patterns for other than personal use? You can read what you are allowed to do in the Copyright text at the bottom of all our patterns. Happy crafting!
Post a comment to pattern DROPS 121-27
We would love to hear what you have to say about this pattern!
If you want to leave a question, please make sure you select the correct category in the form below, to speed up the answering process. Required fields are marked *.