
Looking for a yarn?


Comments / Questions (83)
![]() Vibeke wrote:
Vibeke wrote:
Jeg strikker i Drops Alaska, i en udgået farve, holder strikkefastheden. Der er en anden, der har kommenteret om for lidt beregnet garnmængde her i rækken af kommentarer/spørgsmål.\r\nMvh. Vibeke
06.09.2024 - 09:32DROPS Design answered:
Hej Vibeke, åh ja, det stemmer, én i small for 13 år siden. Men der bør altså ikke være fejl i garnforbruget, så havde vi hørt det... Hvis vi skal kunne gå videre med opskriften, skal vi bruge trøjens nøjagtige mål, og en totaltvægt på trøjen, for at udelukke at der ikke har været for lidt garn i ét eller et par af nøglerne.... hvis du vil hjælpe os med det, kan design beslutte om de bør se på den igen.
06.09.2024 - 12:15
![]() Vibeke Enghoff Jensen wrote:
Vibeke Enghoff Jensen wrote:
11 nøgler har ikke været nok til str L, så jeg har måttet korrigere/spare i ribben og sy knapper i med andet garn. Har I beregnet garnmængden rigtigt, eller er der noget, jeg har overset? Venlig hilsen Vibeke
01.09.2024 - 20:53DROPS Design answered:
Hej Vibeke, der er mange som har strikket denne vest og vi har aldrig hørt om at der skulle være for lidt garn.... Strikker du i DROPS Alaska og holder du strikkefastheden?
06.09.2024 - 08:26
![]() Heiko -- Bitte Wählen Sie -- Deutsch wrote:
Heiko -- Bitte Wählen Sie -- Deutsch wrote:
Hallo, ich würde mich wahnsinnig freuen, wenn Ihr eine Anleitung online stellen würdet von dieser Weste als Pullover von oben nach unten gestrickt. Oder Tipps, wie es machbar ist. Vielen, vielen Dank Melanie
27.08.2024 - 10:58DROPS Design answered:
Lieber Heiko, hier finder Sie alle unsere Modellen für Pullover mit Zöpfe, gerne filtern Sie mehr; damit finden Sie vielleicht Inspiration. Viel Spaß beim Stricken!
28.08.2024 - 08:02
![]() Martina Heppke wrote:
Martina Heppke wrote:
Meine Frage gilt der 6. Reihe der Passe. Ist RR. 5 M re, 2 M auf Hilfsnadel vor die Arbeit legen, 2 Re, 2 Re von der Hilfsnadel. Sollten hier nicht 2x li Maschen gestrickt werden, damit diese auf der Vorderseite re erscheinen? Vielen Dank,
03.08.2024 - 11:03DROPS Design answered:
Liebe Frau Heppke, bei dieser Reihe werden die 4 rechten Maschen rechts gestrickt, aber dann bei der nächsten Hinreihe werden diese 4 Maschen in 2 geteilt und dann strickt man linke Maschen dazwischen. Viel Spaß beim Stricken!
05.08.2024 - 07:24
![]() Kathleen wrote:
Kathleen wrote:
Can anyone tell me how to add the sleeves to this pattern as per the photographs of Alline and Elinor?
13.05.2024 - 23:18DROPS Design answered:
Dear Kathleen, in this video, we show how to add the sleeves onto the body to work the yoke. This should help you to visualize how to do ; the first rows might look a bit tricky but after some rows it will work nice. Happy knitting!
14.05.2024 - 07:50
![]() Hélène wrote:
Hélène wrote:
Bonjour, le même modèle avec des manches est-il disponible ? merci
05.09.2023 - 11:46DROPS Design answered:
Bonjour Hélène, je suis désolée, nous avons seulement une version "sans manches" - retrouvez ici nos modèles de pulls avec torsades et empiècement arrondi dans cette même tension pour vous inspirer. Bon tricot!
05.09.2023 - 13:50
![]() Henny wrote:
Henny wrote:
Hallo, Als ik maat L wil breien en dus een omtrek van 113 cm zou moeten hebben bij een stekenproef van 17 st. per 10 cm. kom ik uit op 192 steken. In het patroon staan er 282 aangegeven. Wordt het vestje dan niet veel te wijd?
18.10.2021 - 10:38DROPS Design answered:
Dag Henny,
Na de boord worden er steken geminderd, zodat je 192 steken over houdt. Als ik het goed is, is de omtrek van maat L op de heupen 108 cm (2 x 54). Met een stekenverhouding van 17 steken in de breedte is 10 cm in de breedte heb je ongeveer 1,7 x 108 = 184 steken nodig. Met de bies erbij klopt dat dus wel aardig.
19.10.2021 - 13:02
![]() Alexandra Janse wrote:
Alexandra Janse wrote:
Bonjour Je tricote ce magnifique modèle dans une taille intermédiaire. Pour les côtes, la longueur 80 cm de l'aiguille diamètre 4 est bien trop courte, pour le jersey en 5 c'est la limite du confort 80 cm... Cela doit être douloureux en xxxl. Heureusement la nouvelle collection indique la longueur des aiguilles en fonction de la taille. Bonnes mailles
08.09.2021 - 09:00
![]() Adela wrote:
Adela wrote:
No aparece el patron del jersey con las distintas medidas...
18.05.2021 - 18:19
![]() Simone Van Der Gaag wrote:
Simone Van Der Gaag wrote:
Thank you for the lovely pattern. I knitted it with handspun yarn and it worked out very well. I really love the pattern amd the fact you almost knit the whole cardigan in one piece. Great!
01.02.2021 - 09:23
|
|||||||||||||||||||||||||
Celtic Winter#celticwintercardigan |
|||||||||||||||||||||||||
|
|
|||||||||||||||||||||||||
DROPS waistcoat in ”Alaska” with raglan and cables on yoke. Size S to XXXL.
DROPS 121-27 |
|||||||||||||||||||||||||
|
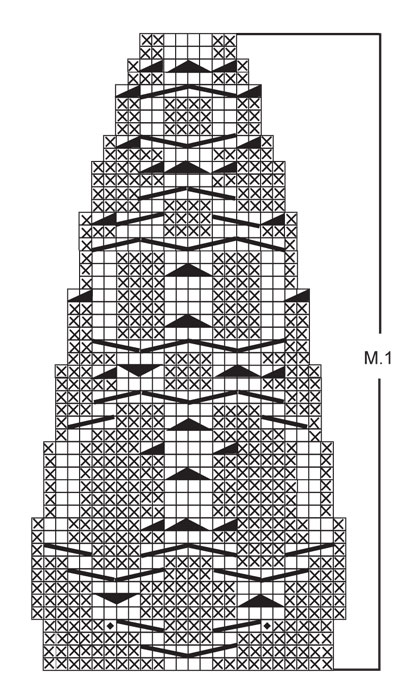
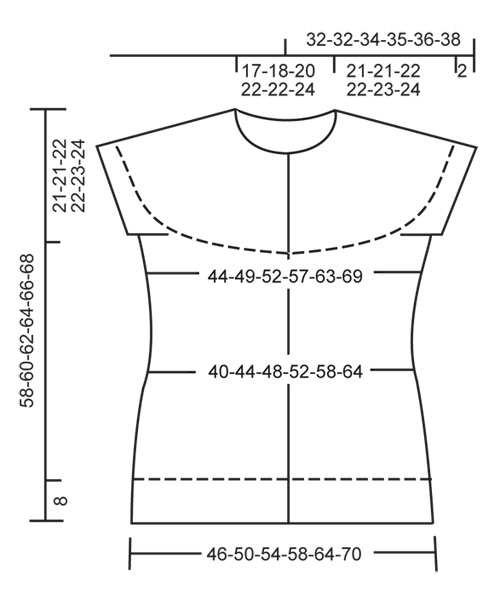
GARTER ST (back and forth on needle): K all rows. PATTERN: See diagrams M.1 – pattern in diagram is seen from RS. BUTTONHOLES: Make buttonholes on right front band. 1 buttonhole = K tog 3rd and 4th st from mid front and make 1 YO. Make buttonholes when piece measures: SIZE S: 12, 19, 26, 34, 41, 49, 56 cm / 4¾",7½",10¼",13 3/8",16 1/8",19¼",22". SIZE M: 12, 20, 28, 36, 43, 51, 58 cm / 4¾",8",11",14¼",17",20",22¾". SIZE L: 12, 20, 28, 36, 44, 52, 60 cm / 4¾",8",11",14¼",17¼",20½",23 5/8". SIZE XL: 12, 21, 29, 37, 45, 54, 62 cm / 4¾",8¼",11 3/8",14½",17¾",21¼",24 3/8". SIZE XXL: 12, 21, 30, 39, 47, 56, 64 cm / 4¾",8¼",11¾",15¼",18½",22",25¼". SIZE XXXL: 12, 21, 30, 39, 48, 57, 66 cm / 4¾",8¼",11¾",15¼",19",22½",26". -------------------------------------------------------- -------------------------------------------------------- BODY PIECE: Worked back and forth on circular needle from mid front. Cast on 240-264-282-306-336-366 sts (includes 5 front band sts each side towards mid front) on circular needle size 4 mm / US 6 with Alaska. Continue as follows from RS: 5 front band sts in GARTER ST – see above, K2, * P4/ K2 *, repeat from *-* and finish with 5 front band sts in garter st. When rib measures 8 cm / 3 1/8'' work (make sure next row is from RS) change to needle size 5 mm / US 8. Work next row as follows from RS: 5 front band sts in garter st, K2, * K2 tog, K2 tog, K2 *, repeat from *-* and finish with 5 front band sts in garter st = 164-180-192-208-228-248. Continue in reverse stockinette st and front bands in garter st as before. Insert a marker 43-47-50-54-59-64 sts in from each side (= 78-86-92-100-110-120 sts between markers on back piece). REMEMBER THE GAUGE! When piece measures 10-10-11-11-12-12 cm / 4''-4''-4 3/8''-4 3/8''-4¾''-4¾'' dec 1 st each side of both markers, and repeat the dec on every 2 cm / 3/4'' a total of 5 times = 144-160-172-188-208-228 sts. AT THE SAME TIME when piece measures 12 cm / 4¾'' make BUTTONHOLES on right front band – see above! When piece measures 22-22-23-23-24-24 cm / 8 3/4"-8 3/4"-9"-9"-9½"-9½" inc 1 st each side of both markers, and repeat the inc on every 3 cm / 1 1/8'' a total of 4 times = 160-176-188-204-224-244 sts. When piece measures 37-39-40-42-43-44 cm / 14½"-15 1/4"-15 3/4"-16½"-17"-17 1/4" bind off 6-6-8-8-10-10 sts each side for armhole on next row from RS (= 3-3-4-4-5-5 sts each side of marker) = 148-164-172-188-204-224 sts left on needle. Put piece aside. SLEEVE EDGES: Worked back and forth on circular needle. Cast on 58-61-70-73-78-79 sts on circular needle size 4 mm / US 6. K 3 rows and work next row as follows: bind off the first 3-3-4-4-5-5 sts, K sts on row until 3-3-4-4-5-5 sts remain, bind off theses sts, cut the thread = 52-55-62-65-68-69 sts remain on needle. Put piece aside and knit the other sleeve edge. YOKE: Slip sts from sleeve edges on the same circular needle size 5 mm / US 8 as body piece where bind off for armholes = 252-274-296-318-340-362 sts. K 1 row from WS and work 0-0-2-2-4-6 rows in reverse stockinette st with front bands in garter st. Work next row as follows from RS: 5 front band sts in garter st, P10, * inc 1 st in each of the next 2 sts and K these 4 sts, P20 *, repeat from *-* a total of 10-11-12-13-14-15 times, inc 1 st in each of the next 2 sts and K these 4 sts, P10, and 5 front band sts in garter st = 274-298-322-346-370-394 sts. Now continue in M.1 with front bands in garter st as before (first row = WS). On row 4 in M.1 inc 2 sts in each repeat as per the diagram = 296-322-348-374-400-426 sts. Now complete M.1. After M.1 there are 98-106-114-122-130-138 sts on needle. Work 1 row from WS. Change to circular needle size 4 mm / US 6. K 1 row from RS, at the same time dec 16-18-22-24-30-30 sts evenly (do not dec on front bands) = 82-88-92-98-100-108 sts. K 1 row. Insert a marker mid back. Continue in garter st on all sts, at the same time work shortened rows mid back as follows (first row = RS): K 7 sts past marker mid back, turn, K 7 sts past marker on the other side, turn, K 14 sts past marker, turn, K 14 sts past marker on the other side, turn, and continue like this with 7 more sts before each turn until you have work a total of 35-35-35-42-42-42 sts each side of marker. Turn, K all sts on row and then work 3 rows on all sts. Bind off with K sts from RS. ASSEMBLY: Sew sleeve edges tog, edge to edge and sew openings under sleeves. Sew on buttons. |
|||||||||||||||||||||||||
Diagram explanations |
|||||||||||||||||||||||||
|
|||||||||||||||||||||||||
|
|||||||||||||||||||||||||
|
|||||||||||||||||||||||||
Have you finished this pattern?Tag your pictures with #dropspattern #celticwintercardigan or submit them to the #dropsfan gallery. Do you need help with this pattern?You'll find 19 tutorial videos, a Comments/Questions area and more by visiting the pattern on garnstudio.com. © 1982-2025 DROPS Design A/S. We reserve all rights. This document, including all its sub-sections, has copyrights. Read more about what you can do with our patterns at the bottom of each pattern on our site. |
|||||||||||||||||||||||||


With over 40 years in knitting and crochet design, DROPS Design offers one of the most extensive collections of free patterns on the internet - translated to 17 languages. As of today we count 314 catalogs and 11822 patterns - 11812 of which are translated into English (US/in).
We work hard to bring you the best knitting and crochet have to offer, inspiration and advice as well as great quality yarns at incredible prices! Would you like to use our patterns for other than personal use? You can read what you are allowed to do in the Copyright text at the bottom of all our patterns. Happy crafting!
Post a comment to pattern DROPS 121-27
We would love to hear what you have to say about this pattern!
If you want to leave a question, please make sure you select the correct category in the form below, to speed up the answering process. Required fields are marked *.