
Popular categories
Looking for a yarn?


Comments / Questions (17)
![]() Ingrid wrote:
Ingrid wrote:
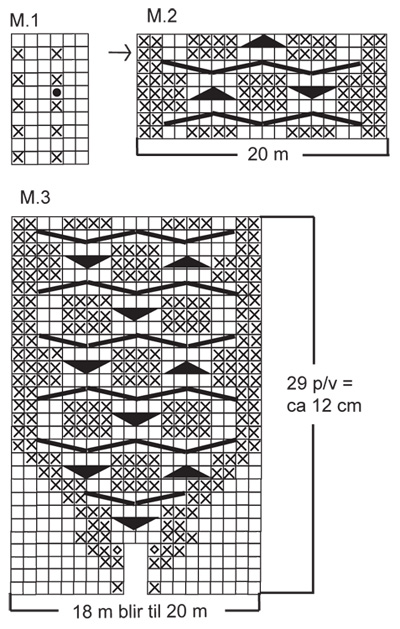
Hallo, was bedeutet der Pfeil beim Diagram M2?
15.05.2024 - 20:42DROPS Design answered:
Liebe Ingrid, die letzte Reihe bei der Passe muss die mit dem Pfeil in M.2 sein - siehe unter RUNDPASSE UND HALS:... Weiterstricken bis die Arbeit unten ca. 138-150-160-170-180-190 cm misst. So abschliessen dass die letzte R. diejenige mit dem Pfeil markierte Reihe im Diagramm ist.. Viel Spaß beim Stricken!
16.05.2024 - 08:02
![]() Brusq Elena wrote:
Brusq Elena wrote:
La phrase "Continuer jusqu'à environ 138-150-160-170-180-190 cm de hauteur", est-elle correcte?
14.04.2018 - 21:49DROPS Design answered:
Bonjour Mme Brusq, tout à fait, c'est la longueur totale de la partie de l'empiècement tricotée dans le sens de la longueur et mesurée le long du bord le plus long (bas de l'empiècement). Bon tricot!
16.04.2018 - 10:22
![]() Dea wrote:
Dea wrote:
Ho ancora una domanda. Quando dice di inserire il segnapunti al centro sotto la manica, devo metterlo sulla maglia centrale delle 9 oppure no? Grazie
01.03.2016 - 14:56DROPS Design answered:
Buongiorno Dea, sì è corretto, il segnapunti dev'essere al centro dello scalfo, quindi nel suo caso al centro delle 9 m avviate sotto la manica. Buon lavoro!
01.03.2016 - 15:22
![]() Dea wrote:
Dea wrote:
La mia domanda era di altro genere. Ho letto bene le misure che devo raggiungere, ma siccome il lavoro si incurva e il centimentro non è curvo, avevo bisogno di sapere come fare per misurare nel modo migliore, comunque spero di aver trovato il metodo giusto per la misurazione. Grazie.
04.02.2016 - 20:53
![]() Dea wrote:
Dea wrote:
Un'altra domanda. Quando misuro la lunghezza finale dello sprone come mi devo comportare? Lavorando a ferri accorciati il lavoro si incurva, quindi la misurazione come dovrò farla? Da lato a lato senza considerare l'incurvatura? Grazie.
01.02.2016 - 12:01DROPS Design answered:
Buonasera Dea, nel testo viene indicato quali devono essere le misure dello sprone nel lato più lungo e in quello più corto, in particolare viene indicato di continuare fino a quando il lavoro misura circa 138-150-160-170-180-190 cm sul lato più lungo (= parte inferiore) e circa 35-37-40-42-45-47 cm lungo l’altro lato (= parte superiore). Ci riscriva se ha altri dubbi. Buon lavoro!
01.02.2016 - 22:05
![]() Dea wrote:
Dea wrote:
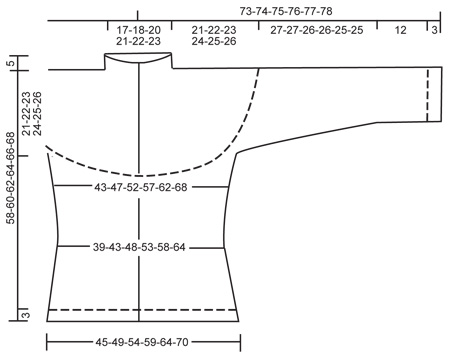
Cosa vuol dire "18 m blir til 20 m" e "29 p/v = ca 12 cm" nel diagramma M3? Purtroppo è scritto in norvegese. Grazie.
31.01.2016 - 17:21DROPS Design answered:
Buonasera Dea, il diagramma M.3 parte con 18 m che al 4° ferro diventano 20 m, ed è lungo 29 ferri che corrispondono a circa 12 cm. Buon lavoro!
31.01.2016 - 19:35
![]() DROPS Deutsch wrote:
DROPS Deutsch wrote:
Die deutsche Anleitung ist jetzt korrigiert.
08.03.2010 - 08:46
![]() Christina Cyrol wrote:
Christina Cyrol wrote:
Vorsicht. In der deutschen Anleitung für verkürzte Reihen ist ein Druckfehler! Arbeitet lieber nach englischer, französischer, niederländischer oder skandinavischer Anleitung. Dort stimmt es.
07.03.2010 - 03:45
![]() Christina Cyrol wrote:
Christina Cyrol wrote:
In der deutschen Anleitung für die verkürzten Reihen ist ein Druckfehler. Habe es leider zu spät gemerkt und musste es wieder aufmachen. Schade.
07.03.2010 - 03:40
![]() Regula wrote:
Regula wrote:
Süss!
29.06.2009 - 13:19
|
|||||||||||||||||||||||||
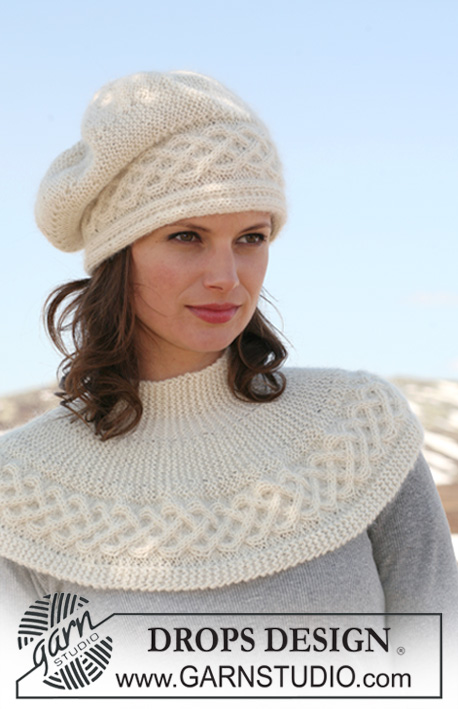
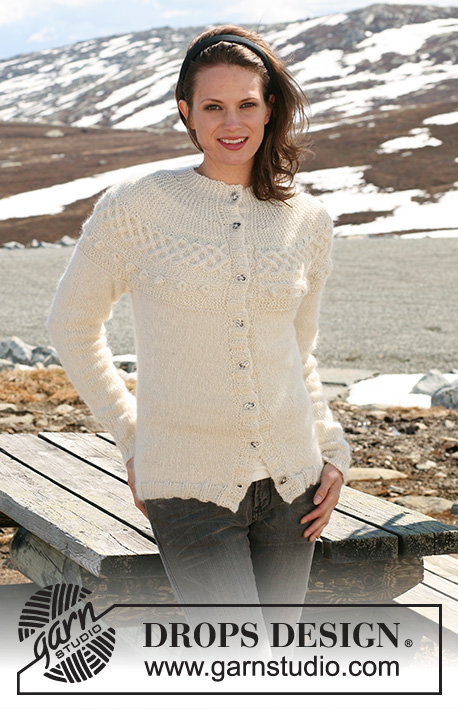
Forever Intertwined |
|||||||||||||||||||||||||
 |
 |
||||||||||||||||||||||||
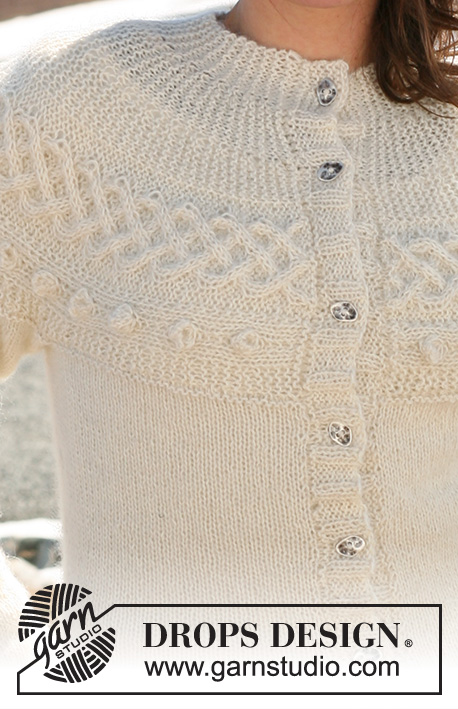
DROPS jacket in ”Alpaca” and ”Kid-Silk” with yoke knitted from side to side. Size S to XXXL
DROPS 115-31 |
|||||||||||||||||||||||||
|
GARTER ST (back and forth on needle): K all rows. SHORTENED ROWS: To make yoke wider along the bottom work shortened rows as follows (beg from RS): * work row to marker-3, turn piece, tighten thread and work return row, work row to marker-2, turn piece, tighten thread and work return row, work row to marker-1, turn piece and work return row, work 2 rows on all sts *, repeat from *-*. I.e. 1 repeat = 8 rows at bottom and 2 rows at top. PATTERN: See diagram M.1, M.2 and M.3 – pattern in diagram is seen from RS and shows 1 pattern repeat. Row 1 = WS. DECREASING TIP: Dec as follows from RS before marker: K2 tog. Dec as follows from RS after marker: K2 tog into back of loop. ---------------------------------------------------------- ---------------------------------------------------------- JACKET: Work yoke and neck first from side to side, from mid front to mid front, then pick up sts in bottom edge of yoke and work body piece from top down. YOKE AND NECK: Worked back and forth on circular needle. Cast on 47-49-51-52-54-56 sts on circular needle size 4.5 mm / US 7 with 1 thread of each quality. K 2 rows (row 1 = RS). Work next row as follows from RS: K10, P2, K2 in next st, P4, K2 in each of the next 2 sts, P4, K2 in next st, P2, K 21-23-25-26-28-30 = 51-53-55-56-58-60 sts. Work next row as follows from WS: K 21-23-25-26-28-30, M.2 (= 20 sts), M.1 (= 6 sts) and K4. Insert 3 markers in piece as follows (from RS): MARKER-1 after 4 sts, MARKER-2 after 33-35-37-38-40-42 sts and MARKER-3 after 42-44-46-47-49-51 sts = 9 sts at the top for neck after the last marker. Let these markers follow the piece as you go along. Work SHORTENED ROWS – see above – AT THE SAME TIME continue in pattern as follows (from RS): 4 garter sts, M.1, M.2 and 21-23-25-26-28-30 garter sts. Continue until piece measures approx 138-150-160-170-180-190 cm / 54¼"-59"-63"-66¾"-70¾"-74¾" on the longer side (= bottom) – adjust so that the last row is the row marked with an arrow in diagram. NOTE: Measure piece when it is lying flat. Piece now measures approx 35-37-40-42-45-47 cm / 13¾"-14½"-15¾"-16½"-17¾"-18½" along the other side (= the top). Work 1 row (from RS), AT THE SAME TIME K tog the 2 K sts in M.2 to 1 st, and the 4 K sts in M.2 to 2 sts (= 4 dec sts) = 47-49-51-52-54-56 sts. K 1 row on all sts from WS, and bind off loosely with K sts from RS. Remove markers and insert 4 new markers in the bottom edge to yoke as follows: MARKER-1, after 19-21-23-25-27-29 cm / 7½"-8¼"-9"-9¾"-10⅝"-11⅜", MARKER-2, 31-33-34-35-36-37 cm / 12¼"-13"-13⅜"-13¾"-14¼"-14½" from first marker, MARKER-3, 38-42-46-50-54-58 cm / 15"-16½"-18"-19¾"-21¼"-22¾" from second marker, MARKER-4, 31-33-34-35-36-37 cm / 12¼"-13"-13⅜"-13¾"-14¼"-14½" from third marker = approx 19-21-23-25-27-29 cm / 7½"-8¼"-9"-9¾"-10⅝"-11⅜" left after the last marker. BODY PIECE: Worked back and forth on circular needle from mid front. Pick up sts with 1 thread of each quality on circular needle size 4.5 mm / US 7 in bottom edge of yoke as follows: 34-38-41-45-49-52 sts to Marker-1 (= left front piece), cast on 9-9-11-13-14-18 new sts (= under sleeve), skip forward to marker-2, pick up 68-76-82-90-98-104 sts to marker-3, (= back piece), cast on 9-9-11-13-14-18 new sts (= under sleeve), skip forward to marker-4, pick up 34-38-41-45-49-52 sts (= right front piece) = approx 154-170-186-206-224-244 sts. K 1 row WS. NOW MEASURE PIECE FROM HERE! Continue in stockinette st with 1 garter st each side. Insert a marker 38-42-46-51-56-61 sts in from each side (to mark the sides). REMEMBER THE GAUGE! When piece measures 4 cm / 1½" dec 1 st each side of both markers – SEE DECREASING TIP! Repeat the dec on every 4 cm / 1½" a total of 4 times = 138-154-170-190-208-228 sts. When piece measures 20 cm / 8" inc 1 st each side of both markers (inc by working 2 sts in 1 st), and repeat the inc on every 3-3-3.5-3.5-4-4 cm / 1⅛"-1⅛"-1¼"-1¼"-1½"-1½" a total of 5 times = 158-174-190-210-228-248 sts. When piece measures 33-34-35-36-37-38 cm / 13"-13⅜"-13¾"-14¼"-14½"-15" change to circular needle size 3.5 mm / US 4. K 1 row from RS, AT THE SAME TIME inc 20-22-24-28-28-32 sts evenly = 178-196-214-238-256-280 sts. P 1 row from WS and continue in rib as follows (as seen from RS): 1 edge st in garter st, * K2, P4 *, repeat from *-*, finish with K2 and 1 edge st in garter st. When rib measures 3 cm / 1⅛" bind off loosely with K over K and P over P. LEFT FRONT BAND: Pick up 116-120-124-128-132-136 sts on along left front piece on circular needle size 3.5 mm / US 4 with 1 thread of each quality: K 2 rows, AT THE SAME TIME on last row inc 23-25-27-29-31-33 sts evenly = 139-145-151-157-163-169 sts. Work next row as follows (from WS): 2 garter sts, * P2, K4 *, repeat from *-* until 11 sts remain, finish with P2 and 9 garter sts at the top. Continue like this for 3 cm / 1⅛" and bind off. RIGHT FRONT BAND: Like left front band, but after 1 cm / ⅜" make 8-8-8-9-9-9 buttonholes evenly distributed. 1 BUTTONHOLE = bind off 1 st and cast on 1 new st over bind off st on return row. Make buttonholes in P-sections. Place the top buttonhole 4 sts from the top and the bottom one approx 3 cm / 1⅛" from bottom edge. SLEEVE: Worked in the round on double pointed needles. Pick up 55-59-61-63-66-66 sts on double pointed needle size 4.5 mm / US 7 with 1 thread of each quality between marker-1 and marker-2 on yoke, and pick up 1 st in each of the 9-9-11-13-14-18 sts cast on under sleeve on body piece = 64-68-72-76-80-84 sts. Now measure piece from here. P 1 round and continue in stockinette st – insert a marker mid under sleeve. When piece measures 5-4-4-5-2-5 cm / 2"-1½"-1½"-2"-¾"-2" dec 1 st each side of marker – SEE DECREASING TIP! Repeat the dec on every 3-2.5-2-2-2-1.5 cm / 1⅛"-⅞"-¾"-¾"-¾"-½" a total of 8-10-12-11-13-15 times = 48-48-48-54-54-54 sts. AT THE SAME TIME when piece measures 28 cm / 11" work M.3 on the middle 18 sts (on round 4 in M.3 inc 2 sts = 50-50-50-56-56-56 sts in total on needle), with remaining sts in stockinette st. After M.3 work 1 round with K over K and P over P, AT THE SAME TIME K2 tog on the 4 middle sts = 48-48-48-54-54-54 sts. Change to double pointed needles size 3.5 mm / US 4 and continue in rib, K2 / P4 – make sure that K and P sts in rib sits over K and P sts from M.3. bind off loosely with K over K and P over P when sleeve measures approx 43 cm / 17". Work the other sleeve by picking up sts between marker-3 and marker-4 on yoke. Sew on buttons. |
|||||||||||||||||||||||||
Diagram explanations |
|||||||||||||||||||||||||
|
|||||||||||||||||||||||||
 |
|||||||||||||||||||||||||
 |
|||||||||||||||||||||||||
Have you finished this pattern?Tag your pictures with #dropspattern or submit them to the #dropsfan gallery. Do you need help with this pattern?You'll find 23 tutorial videos, a Comments/Questions area and more by visiting the pattern on garnstudio.com. © 1982-2026 DROPS Design A/S. We reserve all rights. This document, including all its sub-sections, has copyrights. Read more about what you can do with our patterns at the bottom of each pattern on our site. |
|||||||||||||||||||||||||


With over 40 years in knitting and crochet design, DROPS Design offers one of the most extensive collections of free patterns on the internet - translated to 17 languages. As of today we count 325 catalogs and 12298 patterns - 12288 of which are translated into English (US/in).
We work hard to bring you the best knitting and crochet have to offer, inspiration and advice as well as great quality yarns at incredible prices! Would you like to use our patterns for other than personal use? You can read what you are allowed to do in the Copyright text at the bottom of all our patterns. Happy crafting!
Post a comment to pattern DROPS 115-31
We would love to hear what you have to say about this pattern!
If you want to leave a question, please make sure you select the correct category in the form below, to speed up the answering process. Required fields are marked *.