
Popular categories
Looking for a yarn?


Comments / Questions (68)
![]() Susie Romano wrote:
Susie Romano wrote:
Do you by chance have this sweater one size smaller for size 5? i'm trying to convert it down and having trouble. any help is greatly appreciated!
25.06.2014 - 00:25
![]() Monique wrote:
Monique wrote:
PASSE: Bei jeder 4. R.:4-3-2-2 Mal abn. und danach bei jeder 2. R.: 14-17-20-22 Mal. Wie oft muss ich bei jeder 4. R. 4-3-2-2 Mal abn.? auch 17 Mal wie danach bei jeder 2. R.??? und später: was mache ich mit den 12 M. auf dem Hilfsfaden?
25.02.2014 - 17:32DROPS Design answered:
Liebe Monique, Sie nehmen in jeder Abnahme-R 8 M ab, je 2 an jedem Markierer (siehe Tipp zum Abnehmen über der Anleitung). In den ersten beiden Abnahme-R nehmen Sie aber nicht an den Ärmeln ab, d.h. Sie nehmen nur 4 M pro R ab. Zuerst in jeder 4. R 4-3-2-2 mal abnehmen. Dann arbeiten Sie die 8 Abn. in jeder 2. R 14-17-20-22 mal. Die beidseitig je 12 stillgelegten M brauchen Sie für die Halsblende, die Erklärung finden Sie am Ende der Anleitung zur Passe.
25.02.2014 - 21:25
![]() Božena Koubková wrote:
Božena Koubková wrote:
Prosím o upřesnění návdu. jsem začátečník, ale nezdá se mi postup při pletení těla svetru, už vypracování první a druhé řady. A vzor pletení podle obrázku rovněž neodpovídá, nebo se pletu? Děkuji.
22.01.2014 - 17:58
![]() Jennifer wrote:
Jennifer wrote:
Can you please tell me if the top of the main body of the sweater (after switching to smaller needles) is worked in stockinette or 1x1 rib?do you stay with the rib stitch or go back to stockinette? Thanks!
04.01.2014 - 06:31DROPS Design answered:
Dear Jennifer, you continue in Rib K1/P1 on whole yoke. Happy knitting!
04.01.2014 - 10:40
![]() Evelien wrote:
Evelien wrote:
Ik probeer de mouw er tussen te krijgen maar ik krijg het echt niet voor elkaar. Kan iemand mij helpen alsjeblieft
03.03.2013 - 11:49DROPS Design answered:
Kijk eerst op de instructievideo voor "raglan". Je hebt afgekant voor de armsgaten. Je breit het rechter voorpand, plaats nu de st voor het ene mouw op de nld boven de afgekante st voor het armsgat. Brei achterpand, plaats st voor de tweede mouw en brei het linker voorpand. Je breit nu verder als beschreven en minder voor de raglan. De schouder/mouw gaat nu vormen.
03.03.2013 - 17:40
![]() Evelien wrote:
Evelien wrote:
Is er van mijn vorige vraag ook een filmpje beschikbaar. Om de een of andere reden kan ik het mij niet visualiseren
20.02.2013 - 14:39DROPS Design answered:
Ja, kijk onderaan het patroon. Hier staat het filmpje voor raglan. De panden zijn hier wel afzonderlijk gebreid, maar het principe is hetzelfde.
20.02.2013 - 16:56
![]() Evelien wrote:
Evelien wrote:
Hoi, Kan iemand mij helpen. Ik ben met dit patroon voor mijn dochter bezig. Wat ik alleen niet begrijp is het tussenvoegen van de mouwen. Volgens patroon moet ik de hele mouw (die in de rondte gebreid is) tussen voegen waar ik de 8 steken voor het armsgat heb geminderd. Maar ik kom er niet uit. Kan iemand mij helpen??
18.02.2013 - 15:07DROPS Design answered:
Je moet de st van de mouw gewoon op de breinld zetten op dat tussenstukje, dwz, eerst de st van het rechter voorpand, dan mouw 1 (boven de 8 afgekante st), dan achterpand, mouw 2 en linker voorpand. Brei door zoals beschreven en je zal zien hoe de schouder wordt gevormd. De 8 st eindigen als een kleine opening in de oksel. Veel plezier.
18.02.2013 - 15:52
![]() LeeAnn wrote:
LeeAnn wrote:
I'm confused about the neck shaping. When it says to slip 12 stitches each side onto stitch holders is it referring to the 1 st 12 stitches each side which would be the CF placket + ? Am I suppose to work each side of neck separately? How can there be only 57 stitches on row ?? Please help me to understand these confusing directions.
09.10.2012 - 04:50DROPS Design answered:
Dear LeeAnn, When the jacket is almost finished, you will shape for the neckline, so put the first 12 sts each side in a st holder (8 front band sts + 4 stocking sts) and continue as before, back and forth, at the same time, you will bind off at the beg of every row each side : 2 sts 2 times + 1 st 4 times. When you have 57 sts (all sizes) left, you pick up 24 sts (incl sts on st holders) along neckline to get at total of 105 sts and work the collar as stated. Happy knitting!
14.11.2012 - 16:28
![]() LeeAnn wrote:
LeeAnn wrote:
I'm confused about the neck shaping. When it says to slip 12 stitches each side onto stitch holders is it referring to the 1 st 12 stitches each side which would be the CF placket + ? Am I suppose to work each side of neck separately? How can there be only 57 stitches on row ?? Please help me to understand these confusing directions.
09.10.2012 - 04:49
![]() Rutj wrote:
Rutj wrote:
Working the yoke, where do I slip the 12 st each side. Is that each side of markers in between the sleeves (from shoulder to shoulder). I dont know where to start to slip the stitches. Also in regards to the 57 remaining stitches, is this a total remaining of all stitches or just the stitches from shoulder to shoulder.
17.02.2012 - 15:13
|
|
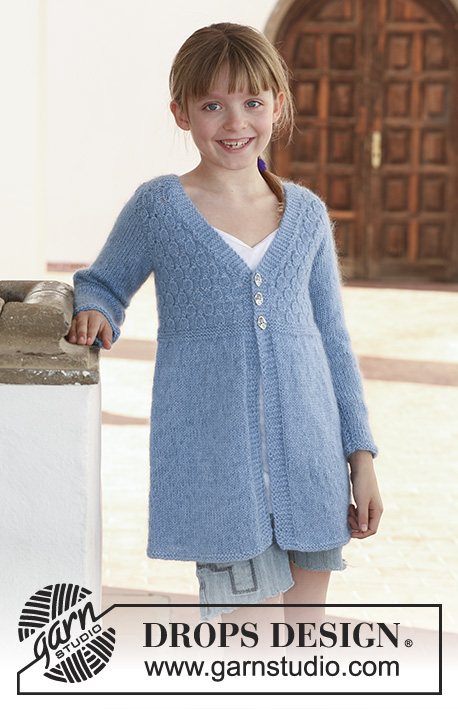
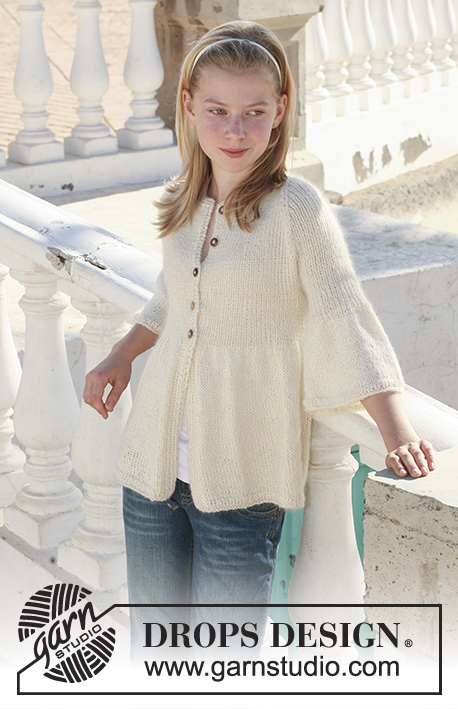
Abril Kids#abrilkidscardigan |
|
 |
 |
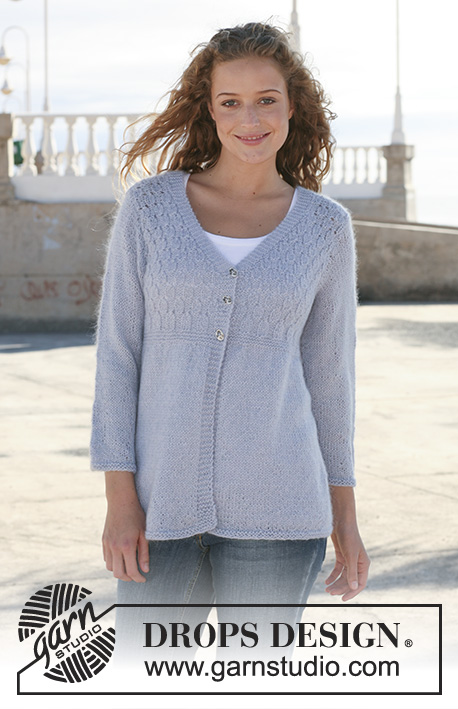
Knitted DROPS jacket with rib and raglan sleeve in ”Alpaca” and ”Kid-Silk”. Size 7 – 14 years.
DROPS 112-9 |
|
|
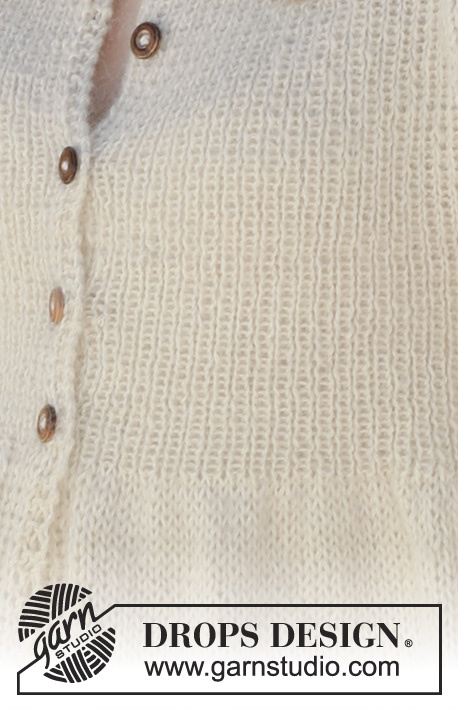
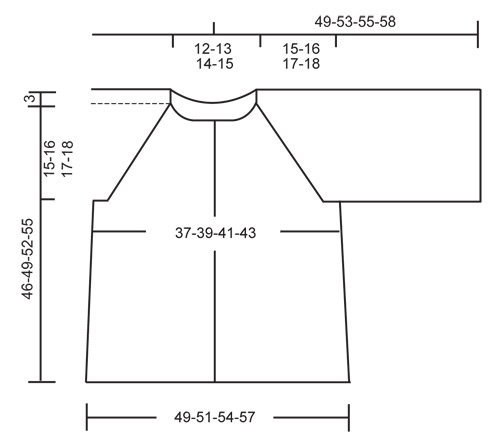
GARTER ST (back and forth on needle): K all rows. BUTTONHOLES: Make buttonholes on right front band. 1 buttonhole = bind off 4th st from mid front and cast on 1 new st on return row. Make buttonholes when piece measures: SIZE 7/8 years: 25, 29, 34 and 39 cm /9¾", 11⅜", 13⅜" and 15¼" SIZE 9/10 years: 27, 32, 37 and 42 cm / 10⅝", 12½", 14½" and 16½" SIZE 11/12 years: 28, 32, 36, 40 and 45 cm / 11", 12½", 14¼", 15¾" and 17¾" SIZE 13/14 years: 30, 34, 38, 43 and 48 cm / 11 ¾", 13⅜", 15", 17" and 19" KNITTING TIP: If your knitting gauge is too tight, the raglan will be too short and the armhole too small. You may compensate for this by working 1 extra round without dec with regular intervals in between rounds with dec. DECREASING TIP (applies to raglan): Make all dec from the RS. Beg 2 sts before marker: K2 tog, marker, slip 1 st as if to K, K1, psso. -------------------------------------------------------- BODY PIECE: Worked back and forth on circular needle from mid front. Cast on 161-169-177-185 sts (includes 8 front band sts each side towards mid front) on circular needle size 6 mm / US 10 with 1 thread of each quality held together. Continue as follows from RS: 2 garter sts, K1, P1, K1, P1, K1, P1, (= front band), 145-153-161-169 stockinette sts, and finish with P1, K1, P1, K1, P1, K1, 2 garter sts (= front band). Work 1 more row like this and continue as follows from RS: 2 garter sts, K1, P1, K1, P1, K1, P1, (= front band), rib K1/P1 on the next 144-152-160-168 sts and finish with K1 and front band (= 8 sts): P1, K1, P1, K1, P1, K1, 2 garter sts. Work 1 more row like this and now continue in stockinette st with front bands as before. When piece measures 24-26-27-29 cm / 9½"-10¼"-10⅝"-11⅜" change to needle size 3.5 mm / US 4, P 1 row from WS and continue as follows from RS: 2 garter sts, K1, P1, K1, P1, K1, P1, (= front band), rib K1/P1 on the next 144-152-160-168 sts and finish with K1 and front band (= 8 sts): P1, K1, P1, K1, P1, K1, 2 garter sts (= front band). Remember BUTTONHOLES on right front piece – see above. Insert 2 markers in piece, 44-46-48-50 sts in from each side (back piece = 73-77-81-85 sts). When piece measures 31-33-35-37 cm / 12¼"-13"-13¾"-14½" bind off 8 sts each side for armhole (= 4 sts on each side of marker) = 145-153-161-169 sts. Put piece aside and knit the sleeves. SLEEVE: Worked in the round on double pointed needles. Cast on 52-56-60-64 sts on double pointed needles size 6 mm / US 10 with 1 thread of each quality. Insert a marker at beg of round (= mid under arm). Work 2 rounds stockinette st, 2 rounds rib K1/P1, and continue in stockinette st. When piece measures 20-21-21-21 cm / 8"-8¼"-8¼"-8¼" change to double pointed needles size 3.5 mm / US 4, work 1 round stockinette st and continue in rib K1/P1. When piece measures 28-30-31-32 cm / 11"-11¾"-12¼"-12½" bind off 4 sts on each side of marker = 44-48-52-56 sts. Put piece aside and knit the other sleeve. YOKE: SEE KNITTING TIP! Slip sleeves on the same circular needle size 3.5 mm / US 4 as body piece where bind off for armholes = 233-249-265-281 sts. Insert a marker in all transitions between body piece and sleeves = 4 markers. Continue in rib with front bands as before. AT THE SAME TIME dec for raglan – SEE DECREASING TIP! NOTE! Make the first 2 dec on body piece only and not on the sleeves. Dec on every 4th row a total of 4-3-2-2 times and then on every other row 14-17-20-22 times. NOTE: On rows with no dec K 1 st on each side of markers from RS. AT THE SAME TIME when piece measures 40-43-46-49 cm / 15¾"-17"-18"-19¼" slip 12 sts each side on stitch holders for neck and bind off to shape the neckline towards mid front at the beg of every row each side: 2 sts 2 times and 1 st 4 times. When all dec are complete there are 57-57-57-57 sts on row. Pick up 24-24-24-24 sts (incl sts on stitch holders) along neckline on each front piece = 105-105-105-105 sts. Work 6 rows garter st, AT THE SAME TIME dec 23-17-15-11 sts evenly on first row = 82-86-90-94 sts. Bind off. ASSEMBLY: Sew opening under arms. Sew on buttons. |
|
 |
|
Have you finished this pattern?Tag your pictures with #dropspattern #abrilkidscardigan or submit them to the #dropsfan gallery. Do you need help with this pattern?You'll find 16 tutorial videos, a Comments/Questions area and more by visiting the pattern on garnstudio.com. © 1982-2026 DROPS Design A/S. We reserve all rights. This document, including all its sub-sections, has copyrights. Read more about what you can do with our patterns at the bottom of each pattern on our site. |
|


With over 40 years in knitting and crochet design, DROPS Design offers one of the most extensive collections of free patterns on the internet - translated to 17 languages. As of today we count 324 catalogs and 12290 patterns - 12280 of which are translated into English (US/in).
We work hard to bring you the best knitting and crochet have to offer, inspiration and advice as well as great quality yarns at incredible prices! Would you like to use our patterns for other than personal use? You can read what you are allowed to do in the Copyright text at the bottom of all our patterns. Happy crafting!
Post a comment to pattern DROPS 112-9
We would love to hear what you have to say about this pattern!
If you want to leave a question, please make sure you select the correct category in the form below, to speed up the answering process. Required fields are marked *.