
Popular categories
Looking for a yarn?


Comments / Questions (29)
![]() Sanne wrote:
Sanne wrote:
Op de foto lijkt de tuniek getailleerd, maar op het getekende patroon is het een A-lijn. Wat is het model van deze tuniek? Naald 7 geeft grote gaten, terwijl het op de foto niet zulke grote gaten zijn. Klopt naald 7? Er staat dat je bovenaan de schouderbandjes 4 toueren in ribbelsteek moet breien, maar op de foto is dat niet terug te zien. Is de foto de correcte foto bij dit patroon?
09.05.2023 - 15:55DROPS Design answered:
Dag Sanne,
Het is een a-lijn tuniek en niet getailleerd. Je, de naalddikte klopt, maar maak altijd een proeflapje om te controleren of de stekenverhouding klopt en pas eventueel de naalddikte aan totdat je op de juiste verhouding komt. Ik denk dat de ribbelsteken wegvallen op de foto.
11.05.2023 - 21:10
![]() Kim Adams wrote:
Kim Adams wrote:
I am making this top in XL. I have cast off a total of 6 stitches per side to begin the arm hole. For the back , the instructions say to bind off 2 stitches 3 times at the beg of each row (for a total of 6 fewer stitches ) then 1 stitch at the beg of each row 2 times (for a total of 2 fewer stitches). This would mean 8 fewer stitches. Your directions say that I should have 53 (16 fewer). Please explain? If I am to bind off at the beginning AND end of each row - do you have a tutorial??
04.08.2020 - 01:01DROPS Design answered:
Dear Mrs Adams, you are supposed to cast off the stitches for the armhole on each side, ie 2 sts a total of 3 times on each side (= 2 sts at the beg of the next 6 rows) then 1 st 2 times on each side (= 1 st at the beg of next 4 rows) = you will have cast off 8 sts on each side. Happy knitting!
04.08.2020 - 09:37
![]() Maria Grazia Vitturini wrote:
Maria Grazia Vitturini wrote:
Nel misurare il campione (filato Bomull, ferro 7 mm) non sono sicura di quanto deve essere tesa la maglia, dato che l'effetto è una rete piuttosto lassa. Forse dovrei stirarlo?
07.07.2015 - 15:07DROPS Design answered:
Buongiorno Maria Grazia, i capi lavorati ai ferri non andrebbero mai stirati, deve trattare il campione come il capo finale, bloccandolo con degli spilli. La tensione deve essere quella del capo finale, senza tirare troppo il lavoro. Buon lavoro!
07.07.2015 - 15:16
![]() Maria Grazia Vitturini wrote:
Maria Grazia Vitturini wrote:
Nel misurare il campione (filato Bomull, ferro 7 mm) non sono sicura di quanto deve essere tesa la maglia, dato che l'effetto è una rete piuttosto lassa. Forse dovrei stirarlo?
07.07.2015 - 14:57DROPS Design answered:
Buongiorno Maria Grazia, i capi lavorati ai ferri non andrebbero mai stirati, deve trattare il campione come il capo finale, bloccandolo con degli spilli. La tensione deve essere quella del capo finale, senza tirare troppo il lavoro. Buon lavoro!
07.07.2015 - 15:16
![]() Maria Grazia Vitturini wrote:
Maria Grazia Vitturini wrote:
Buongiorno, ho realizzato il capo con il filato e i ferri indicati ma, prima di completare il dietro, ho esaurito il filato e le misure non corrispondono. Credo che il problema sia dovuto alla difficoltà incontrata nel misurare il con esattezza il campione. Potete darmi un suggerimento? Grazie in anticipo. Maria Grazia Vitturini
07.07.2015 - 13:06DROPS Design answered:
Buongiorno Maria Grazia, che difficoltà ha incontrato nel misurare il campione? Se il campione corrisponde a quello indicato la quantità di filato indicata è sufficiente a realizzare il modello. Il filato è quello suggerito? Buon lavoro!
07.07.2015 - 14:20
![]() Ardelicia wrote:
Ardelicia wrote:
Guten Abend, ich habe da eine Verständnisfrage zur Größe S. Nachdem man 7 mal nach jeweils 6 1/2 cm M abnimmt, wird dann nach insgesamt 50 cm die Arbeit geteilt. Alledings ergeben doch die ersten 6 cm + (7 * 6 1/2 cm) insgesamt 51,5 cm. Wie kann man denn dann nach 50 cm die Arbeit teilen? Vielen Dank für die Antwort schonmal im voraus.
01.05.2014 - 21:20DROPS Design answered:
Liebe Ardelicia, die erste Abnahme machen Sie ja bereits nach einer Gesamthöhe von 6 cm. Dann nehmen Sie noch weitere 6 x nach jeweils 6,5 cm ab, das macht 39 cm. 6 cm + 39 cm = 45 cm bei insgesamt 7 Abnahmen.
02.05.2014 - 00:29
![]() Heidi Andersen wrote:
Heidi Andersen wrote:
Det står pinne 7? men da blir det jo kjempestore masker, og det står jo 5.5, men syntes også det blir stort, hva gjør jeg?
17.04.2014 - 19:08DROPS Design answered:
Hei Heidi. Denne skal strikkes meget löst og du skal bruge den pind som skal til for at faa 14 m x 17 p glattstrikke paa 10x10 cm. Vi anbefaler pinde 7, men strik en pröve og se hvad du skal bruge. God fornöjelse.
22.04.2014 - 17:16
![]() Nita Krygier wrote:
Nita Krygier wrote:
Got to the point where I need to decrease from 180 st. to 110. Confused about what alternate means. Every other marker? Or alternate right and left sides of marker? Thanks.
24.03.2014 - 19:13DROPS Design answered:
Dear Mrs Krygier, you will dec 1 st at each marker (=10 dec/dec round) a total of 7 times every 6.5-8cm (see size). On 1st dec round dec on the right side of every marker, on 2nd dec round, dec on the left side of every marker. Repeat alternately on the right and on the left side of every marker until all dec are done. Happy knitting!
25.03.2014 - 09:06
![]() Gwen Shaw wrote:
Gwen Shaw wrote:
Please can you advise re sizing, what is L or XL. I don't know which size to knit, Thank you.
18.05.2013 - 08:25DROPS Design answered:
Dear Mrs Shaw, to figure out which size to make, the best is to measure a garment that you already have and like the size of and compare with the chart. Happy knitting!
18.05.2013 - 09:02
![]() Carol Singer wrote:
Carol Singer wrote:
Does decease 1 stitch to the right and to the left alternately of all markers mean to the right and left on same row or to the right of all markers on one row and then the left of all markers on the next decease row?
20.04.2013 - 22:37DROPS Design answered:
Dear Mrs Singer, it means to dec on the same row eg for 1st dec k2 tog before all markers and for 2nd dec, k2 tog after all markers and repeat these 2 dec. Happy knitting!
22.04.2013 - 09:02
|
|
Aliz#aliztunic |
|
|
|
|
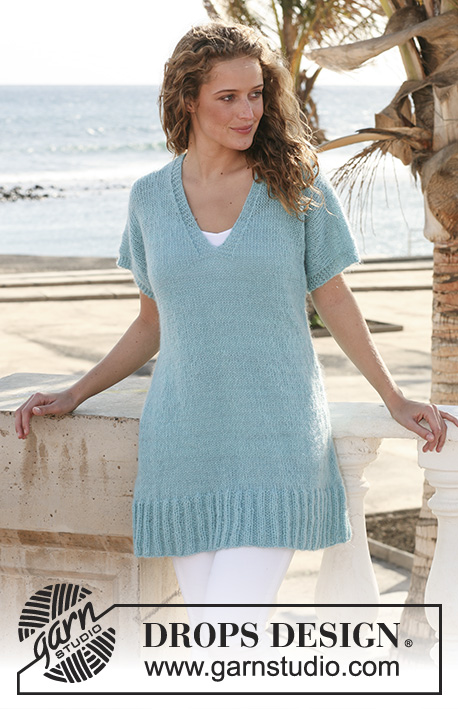
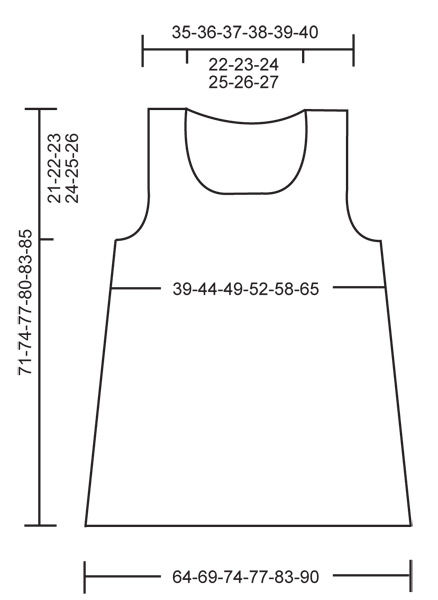
Knitted DROPS tunic in ” Bomull-Lin”. Size S - XXXL.
DROPS 112-10 |
|
|
GARTER ST (in the round): K 1 round, P 1 round. GARTER ST (back and forth on needle): K all rows. DECREASING TIP: Dec 1 st by K2 tog. -------------------------------------------------------- TUNIC: Worked in the round on circular needle. Cast on 180-190-210-220-230-250 sts on circular needle size 7 mm / US 10½ with 1 thread Bomull-Lin. Work 4 rounds garter st – SEE ABOVE – and continue in stockinette st. REMEMBER THE KNITTING GAUGE! When piece measures 6 cm / 2⅜" insert 10 markers in piece with 18-19-21-22-23-25 sts between each marker. Dec 1 st to the right and to the left alternately of all markers on every 6.5-7-7.5-7.5-8-8 cm / 2½"-2¾"-2⅞"-2⅞"-3⅛"-3⅛" a total of 7 times – SEE DECREASING TIP = 110-120-140-150-160-180 sts. Now insert 2 new markers, 1 at beg of round and 1 after 55-60-70-75-80-90 sts (to mark the sides). When piece measures 50-52-54-56-58-59 cm / 19¾"-20½"-21¼"-22"-22¾"-23¼" bind off 3 st on each side of markers at the sides and complete each piece separately. BACK PIECE: = 49-54-64-69-74-84 sts. Continue in stockinette st, AT THE SAME TIME bind off for armhole each side at the beg of every row: 2 sts 0-1-2-3-3-4 times and 1 st 0-0-2-2-4-6 times = 49-50-52-53-54-56 sts. When piece measures 67-70-73-76-79-81 cm / 26⅜"-27½"-28¾"-30"-31"-32" bind off the middle 29-30-32-33-34-36 sts for neck and complete each side separately. Bind off 1 st on neckline on next row = 9-9-9-9-9-9 sts left on shoulder. When piece measures 69-72-75-78-81-83 cm / 27⅛"-28⅜"-29½"-30¾"-32"-32¾" work 4 rows garter st – SEE ABOVE - and bind off. Piece measures approx 71-74-77-80-83-85 cm / 28"-29⅛"-30⅜"-31½"-32¾"-33½". FRONT PIECE: = 49-54-64-69-74-84 sts. Continue in stockinette st, AT THE SAME TIME bind off for armhole as described for back piece. AT THE SAME TIME when piece measures 55-58-61-63-66-68 cm / 21⅝"-22¾"-24"-24¾"-26"-26¾" bind off the middle 11-12-14-15-16-18 sts for neck and complete each side separately. Bind off to shape the neckline at the beg of every row from mid front: 2 sts 3 times and 1 st 4 times. After all dec are complete there are 9-9-9-9-9-9 sts left on shoulder. When piece measures 69-72-75-78-81-83 cm / 27⅛"-28⅜"-29½"-30¾"-32"-32¾" work 4 rows garter st and bind off. Piece measures approx 71-74-77-80-83-85 cm / 28"-29⅛"-30⅜"-31½"-32¾"-33½". ASSEMBLY: Sew shoulder seams. CROCHET BORDER: Crochet a border round neckline and armholes with crochet hook size 3 mm / C and 2 threads Bomull-Lin as follows: 1 sc, * 2 ch, skip approx 1 cm / ⅜", 1 sc *, repeat from *-* and finish with 1 sl st in first sc. |
|
 |
|
Have you finished this pattern?Tag your pictures with #dropspattern #aliztunic or submit them to the #dropsfan gallery. Do you need help with this pattern?You'll find 17 tutorial videos, a Comments/Questions area and more by visiting the pattern on garnstudio.com. © 1982-2026 DROPS Design A/S. We reserve all rights. This document, including all its sub-sections, has copyrights. Read more about what you can do with our patterns at the bottom of each pattern on our site. |


With over 40 years in knitting and crochet design, DROPS Design offers one of the most extensive collections of free patterns on the internet - translated to 17 languages. As of today we count 325 catalogs and 12298 patterns - 12288 of which are translated into English (US/in).
We work hard to bring you the best knitting and crochet have to offer, inspiration and advice as well as great quality yarns at incredible prices! Would you like to use our patterns for other than personal use? You can read what you are allowed to do in the Copyright text at the bottom of all our patterns. Happy crafting!
Post a comment to pattern DROPS 112-10
We would love to hear what you have to say about this pattern!
If you want to leave a question, please make sure you select the correct category in the form below, to speed up the answering process. Required fields are marked *.