
Popular categories
Looking for a yarn?


Comments / Questions (127)
![]() Marianne Acketoft wrote:
Marianne Acketoft wrote:
Hej,! När jag skall börja på andra ärmen så hittar jag inte rätt ställe på garnnystanet för att få samma randning på ärmen. Är det inte möjligt , på bilden ser ju randningen likadan ut på de två halvorna?
23.11.2020 - 08:29DROPS Design answered:
Hei Marianne. Hvert nøste er ikke helt lik. Om du strikker med en print farger er den farget med en metode som kalles “fancy dyeing” som er forskjellig fra andre metoder ettersom det i hvert fargeparti er små variasjoner i både mønster og nyanse. Dette er ikke en feil, men en del av garnets egenskaper. mvh DROPS design
24.11.2020 - 12:13
![]() Ulli wrote:
Ulli wrote:
Oooh, jetzt bin ich völlig verwirrt. Etwa die 5 abgek. Maschen von vorne mit den hinteren vom gleichen Bein? Zwischen den Beinen heißt doch 5 Maschen vom rechten Bein mit 5 Maschen vom linken Bein, oder? Die Strecke von den 2 cm geteilt und die 5 abgeketteten Maschen bilden ja einen rechten Winkel. Und genau dann bekomm ich die Klinke. Ich bitte um Entschuldigung, aber ich bin grad völlig abgehängt.
05.11.2020 - 14:20DROPS Design answered:
Liebe Ulli, Sie nähen zuerst die obersten 2 cm an jedem Bein zusammen und nähen dann die abgeketteten Maschen vom vorderen Teil an den hinteren Teil. Die Anleitung wurde inzwischen ergänzt. Gutes Gelingen nun - und Sie können gerne jederzeit wieder fragen! :-)
05.11.2020 - 23:17
![]() Ulli wrote:
Ulli wrote:
Hallo, in der Deutschen Anleitung fehlen die Informationen, wie die Hose zusammengenäht werden soll. Wenn ich einfach die 2 cm Seiten und die 5 abgeketteten Maschen von rechtem und linken Bein gegeneinander nähe, entsteht eine kleine Klinke. Soll das so sein, oder mach ich was falsch? Es wäre schön, wenn man die Anleitung hier ergänzen könnte.
04.11.2020 - 20:27DROPS Design answered:
Liebe Ulli, danke für den Hinweis, die deutsche Anleitung wird korrigiert. Die abgekettenen Maschen von vorne nähen Sie zusammen mit den abgekettetenen Maschen von Hinten (= zwischen den Beinen). Viel Spaß beim stricken!
05.11.2020 - 10:16
![]() Esther Van Der Voorn wrote:
Esther Van Der Voorn wrote:
The pattern states that the Left Half is worked as the Right Half, but assembled with the wrong side out. My knitting is not reversible because I am including 4 different yarns and knitting them in stripes. Should I work the Left Half as a mirror image of the Right Half instead so that I can assemble them with both right sides out?
01.05.2020 - 04:35DROPS Design answered:
Dear Mrs Van Der Voorn, yes you have then probably work the left front piece as a mirrored image to get the right side and wrong side being the same on both pieces. Happy knitting!
04.05.2020 - 09:58
![]() Damaris wrote:
Damaris wrote:
Die Anleitung ist wirklich toll und auch die Jacke ist super! Nur braucht man ewig lange um das Teil zu stricken weils kraus rechts ist. In der gleichen Zeit könnte man die selbe Jacke zwei Mal in glatt rechts stricken, somit erfordert das Ganze etwas Ausdauer. Wenn man die aber beweist hat man dann eine super süße Jacke in Händen, die einen interessanten Aufbau hat!
09.03.2020 - 11:44
![]() Hazel Johnston wrote:
Hazel Johnston wrote:
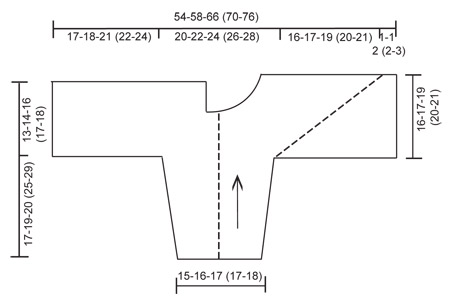
The baby I would like to knit a garment for is average size 6 months, so I was looking for a pattern for 9 to 12 months old. I am not sure of the measurements in your pattern and therefore unsure whether to go for 6 - 9 months or 12 - 18 months. It may help to know the age the baby in the picture is wearing. Thank you
08.01.2020 - 22:20DROPS Design answered:
Hi Hazel, There is a sketch at the bottom of the pattern with the measurements for the different sizes. Happy knitting!
09.01.2020 - 07:18
![]() Louise Maheux wrote:
Louise Maheux wrote:
1 must be so very dense! I still don't get how to put the pieces together. Could you be clearer? Thanks
08.01.2020 - 19:57DROPS Design answered:
Dear Mrs Maheux, you have to sew cast off stitches on both half back pieces together - then fold piece on shoulder and sew seam under sleeve and along sides. Do not hesitate to contact your DROPS store (even per mail or telephone) for any further individual assistance. Happy assembly!
09.01.2020 - 09:29
![]() Hazel Johnston wrote:
Hazel Johnston wrote:
The baby I would like to knit a garment for is average size 6 months, so I was looking for a pattern for 9 to 12 months old. I am not sure of the measurements in your pattern and therefore unsure whether to go for 6 - 9 months or 12 - 18 months. It may help to know the age the baby in the picture is wearing. Thank you
08.01.2020 - 18:25
![]() Louise P Sasseville Maheux wrote:
Louise P Sasseville Maheux wrote:
I'm having such difficulty with how to sow the two pieces together. Which pieces go I align together to start with? Please answer as I'm pulling my hair out! Thanks Louise
07.01.2020 - 06:16DROPS Design answered:
Dear Mrs Maheux, you will sew together both half back pieces on mid back, then sew sleeve and sides on each part. Happy knitting!
07.01.2020 - 08:59
![]() Louise wrote:
Louise wrote:
How many sts should I ha left after the 50 sts increase in the Killian pattern
12.11.2019 - 19:42DROPS Design answered:
Dear Louise, when all increases and decreases for neck (including sts slipped on a thread ) you should have 121 sts for the front piece. Happy knitting!
13.11.2019 - 08:49
|
||||
Killian#killianset |
||||
|
|
||||
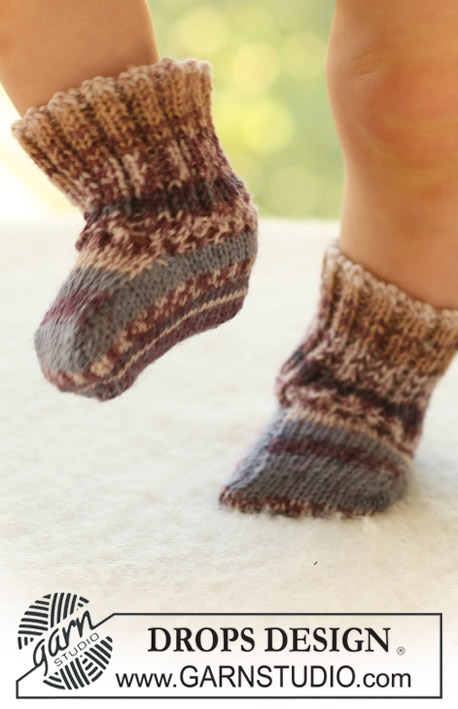
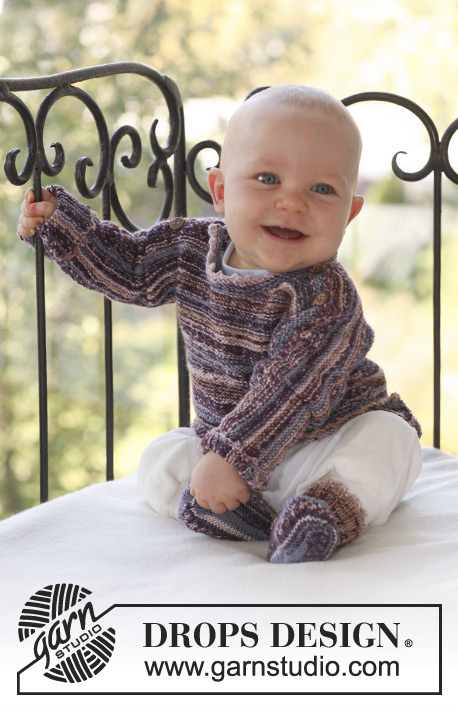
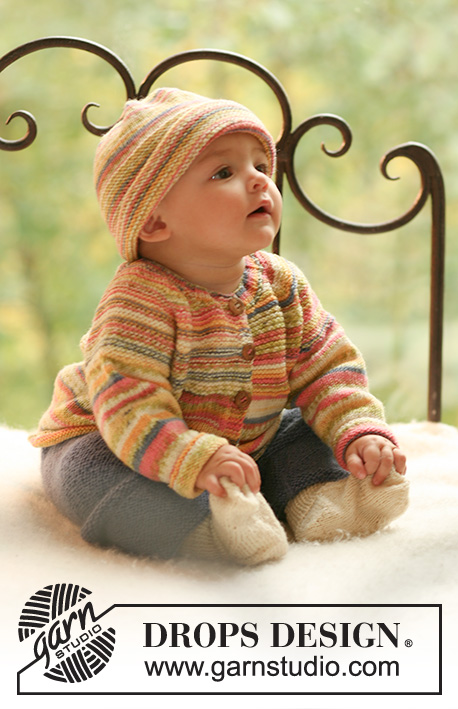
Set of knitted domino jacket in garter st in DROPS Fabel and pants in rib st in DROPS Alpaca for baby and children
DROPS Baby 18-25 |
||||
|
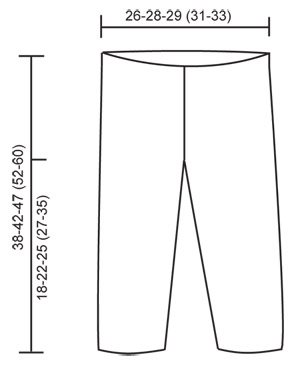
JACKET: INCREASING TIP: Inc 1 st on each side of st with marker by making 1 YO. On return row work YO into back of st in order to avoid a hole. ---------------------------------------------------------- JACKET: Worked from side to side from sleeve towards the middle of jacket, in 2 pieces sewn tog mid back afterwards. RIGHT HALF: Worked back and forth on circular needle in garter st. Cast on 36-38-40 (40-42) sts on circular needle size 3 mm [US 2or3] with Fabel and work garter st. REMEMBER THE KNITTING GAUGE! When piece measures 6-6-5 (5-6) cm [2⅜"-2⅜"-2" (2"-2⅜")] inc 1 st each side and repeat the inc on every 8th row a total of 6-7-9 (11-13) times = 48-52-58 (62-68) sts. Continue until piece measures 17-19-20 (25-29) cm [6¾"-7½"-8" (9¾"-11⅜")] – adjust so that next row is from RS. BODY PIECE: K 1 row from RS, at the end of row cast on 41-43-50 (53-58) sts (= towards back piece) = 89-95-108 (115-126) sts. NOW MEASURE PIECE FROM HERE! Work return row. Insert a marker from RS in the second st on row (= right side of piece) and continue in garter st, AT THE SAME TIME inc 1 st on each side of st with marker on every other row a total of 38-40-46 (48-50) times – SEE INCREASING TIP. AT THE SAME TIME when piece measures 8½-9-10½ (11-12) cm [3¼"-3½"-4¼" (4⅜"-4¾")] continue on the last 60-65-74 (79-86) sts only on the left side of piece as seen from the RS (= back piece). Slip remaining sts on a stitch holder. BACK PIECE: Continue until piece measures 13-14-16 (17-18) cm [5⅛"-5½"-6¼" (6¾"-7")] (from where sts were cast on for back piece), and bind off. FRONT PIECE: Slip sts from stitch holder back on needle, but leave 9-10-10 (10-12) sts towards back piece on stitch holder for neckline. Continue to inc on every other row, AT THE SAME TIME bind off 1 st towards neckline on every 4th row a total of 6-7-7 (7-7) times. AT THE SAME TIME when piece measures 14-15-17 (18-19) cm [5½"-6"-6¾" (7"-7½")] (from where inc for front pieces beg) bind off for 3-4-4 (5-5) buttonholes as follows (from neckline, i.e. from WS): work 2 sts, bind off 2 sts, * work 12-9-11 (9-10) sts, bind off 2 sts *, repeat from *-* a total of 2-3-3 (4-4) times, and then work remaining sts on row. On return row cast on 2 new sts over the bind off sts. After dec and inc are complete there are 90-93-109 (115-121) sts on row. Now bind off 51-52-62 (66-70) sts from WS from neckline and down along front band = 39-41-47 (49-51) sts left on row. Continue in garter st back and forth on these sts for approx 1-1-2 (2-3) cm [⅜"-⅜"-¾" (¾"-1⅛")] (fold piece double by shoulder to measure front piece to back piece) and bind off. LEFT HALF: Like right half, but without buttonholes – this half is assembled with WS out. ASSEMBLY: Place the 2 halves towards each other and sew tog mid back – edge to edge in order to avoid a chunky seam. Fold jacket double and sew under arm and side seams in outer loops of sts. Sew on buttons. NECKLINE: Pick up 55 to 75 sts (incl sts on stitch holders) round neckline on circular needle size 3 mm [US 2or3] with Fabel. Work 3 rows garter st back and forth on needle and bind off. ---------------------------------------------------------- PANTS: INCREASING TIP: Inc 1 st on each side of the 2 K sts mid back (marker sits between these 2 sts). Inc by working 2 sts in 1 st and incorporate inc sts in rib as you go along. DECREASING TIP: Dec 1 st on each side of marker mid front. Dec as follows before marker: K2 tog. Dec as follows after marker: slip 1 st as if to K, K1, psso. LEG: Worked in the round on double pointed needles. Cast on 56-60-64 (68-72) sts on double pointed needles size 3 mm [US 2or3] with Alpaca. Insert a marker at beg of round = inside of leg. Continue as follows: K1, * P2 / K2 *, repeat from *-* and finish with P2 and K1. When piece measures 4-6-4 (4-5) cm = 1½"-2⅜"-1½" (1½"-2") inc 1 st on each side of marker by K 2 sts in 1 st on every 5-6-8 (9-12) round a total of 8 times = 72-76-80 (84-88) sts. When leg measures 16-20-23 (25-33) cm [6¼"-8"-9" (9¾"-13")] divide the piece by marker and continue back and forth on needle (to make it easier to slip both legs on the same circular needle afterwards), AT THE SAME TIME cast on 1 new st each side for seam = 74-78-82 (86-90) sts. When piece measures 18-22-25 (27-35) cm [7"-8¾"-9¾" (10⅝"-13¾")] bind off 5 sts each side (= 1 edge st, K1, P2 and K1) = 64-68-72 (76-80) sts. Put piece aside and knit the other leg in the same way. PANTS: Slip both legs on the same circular needle size 3 mm [US 2or3] = 128-136-144 (152-160) sts. Insert 1 marker mid front and 1 marker mid back (both markers should sit between 2 K sts). Continue in rib, K2 / P2, AT THE SAME TIME inc mid back and dec mid front as follows: INC MID BACK: Inc 2 sts – SEE INCREASING TIP. Repeat the inc on every 4th round a total of 4 times. DEC MID FRONT: Dec 2 sts – SEE DECREASING TIP. Repeat the dec on every 4th round a total of 8 times. After all inc and dec are complete there are 120-128-136 (144-152) sts on round. Continue in rib until piece measures 38-42-47 (52-60) cm [15"-16½"-18½" (20½"-23⅝")], bind off. ASSEMBLY: Sew inside of legs at the top inside 1 edge st. Sew opening between legs, front of leg towards back of leg. |
||||
Diagram explanations |
||||
|
||||
 |
||||
 |
||||
Have you finished this pattern?Tag your pictures with #dropspattern #killianset or submit them to the #dropsfan gallery. Do you need help with this pattern?You'll find 14 tutorial videos, a Comments/Questions area and more by visiting the pattern on garnstudio.com. © 1982-2026 DROPS Design A/S. We reserve all rights. This document, including all its sub-sections, has copyrights. Read more about what you can do with our patterns at the bottom of each pattern on our site. |
||||


With over 40 years in knitting and crochet design, DROPS Design offers one of the most extensive collections of free patterns on the internet - translated to 17 languages. As of today we count 324 catalogs and 12291 patterns - 12281 of which are translated into English (US/in).
We work hard to bring you the best knitting and crochet have to offer, inspiration and advice as well as great quality yarns at incredible prices! Would you like to use our patterns for other than personal use? You can read what you are allowed to do in the Copyright text at the bottom of all our patterns. Happy crafting!
Post a comment to pattern DROPS Baby 18-25
We would love to hear what you have to say about this pattern!
If you want to leave a question, please make sure you select the correct category in the form below, to speed up the answering process. Required fields are marked *.