
Popular categories
Looking for a yarn?


Comments / Questions (41)
![]() Michaela wrote:
Michaela wrote:
Wunderschön! bitte bitte ganz schnell anleitung auf deutsch!
10.02.2007 - 18:28
![]() Martina Werhand wrote:
Martina Werhand wrote:
Bitte dieses Modell auch ins Deutsche übersenden. Es ist traumhaft!
05.02.2007 - 12:31Bente Handeland wrote:
Denne måååå bare bli med. Nydelig.
21.01.2007 - 11:22
![]() githa larsen wrote:
githa larsen wrote:
den må bare med...
20.01.2007 - 12:33
![]() Käthe wrote:
Käthe wrote:
Utrolig smuk, den vil jeg lave!
06.01.2007 - 00:40
![]() Unn wrote:
Unn wrote:
Denne var helt nydelig, den MÅ med!
04.01.2007 - 12:12
![]() Marianne wrote:
Marianne wrote:
Super flot
03.01.2007 - 19:42
![]() vera friis wrote:
vera friis wrote:
den kan man bare ikke "leve" uden,super flot,det må blive en af de første!
31.12.2006 - 11:38Gitte wrote:
Den er bare super. Den må jeg lave.
30.12.2006 - 18:34Camilla wrote:
Här är "gosetröjan" som man ändå kan känna sig snygg i.
25.12.2006 - 21:45
|
||||||||||||||||||||||||||||
Selene#selenesweater |
||||||||||||||||||||||||||||
|
|
||||||||||||||||||||||||||||
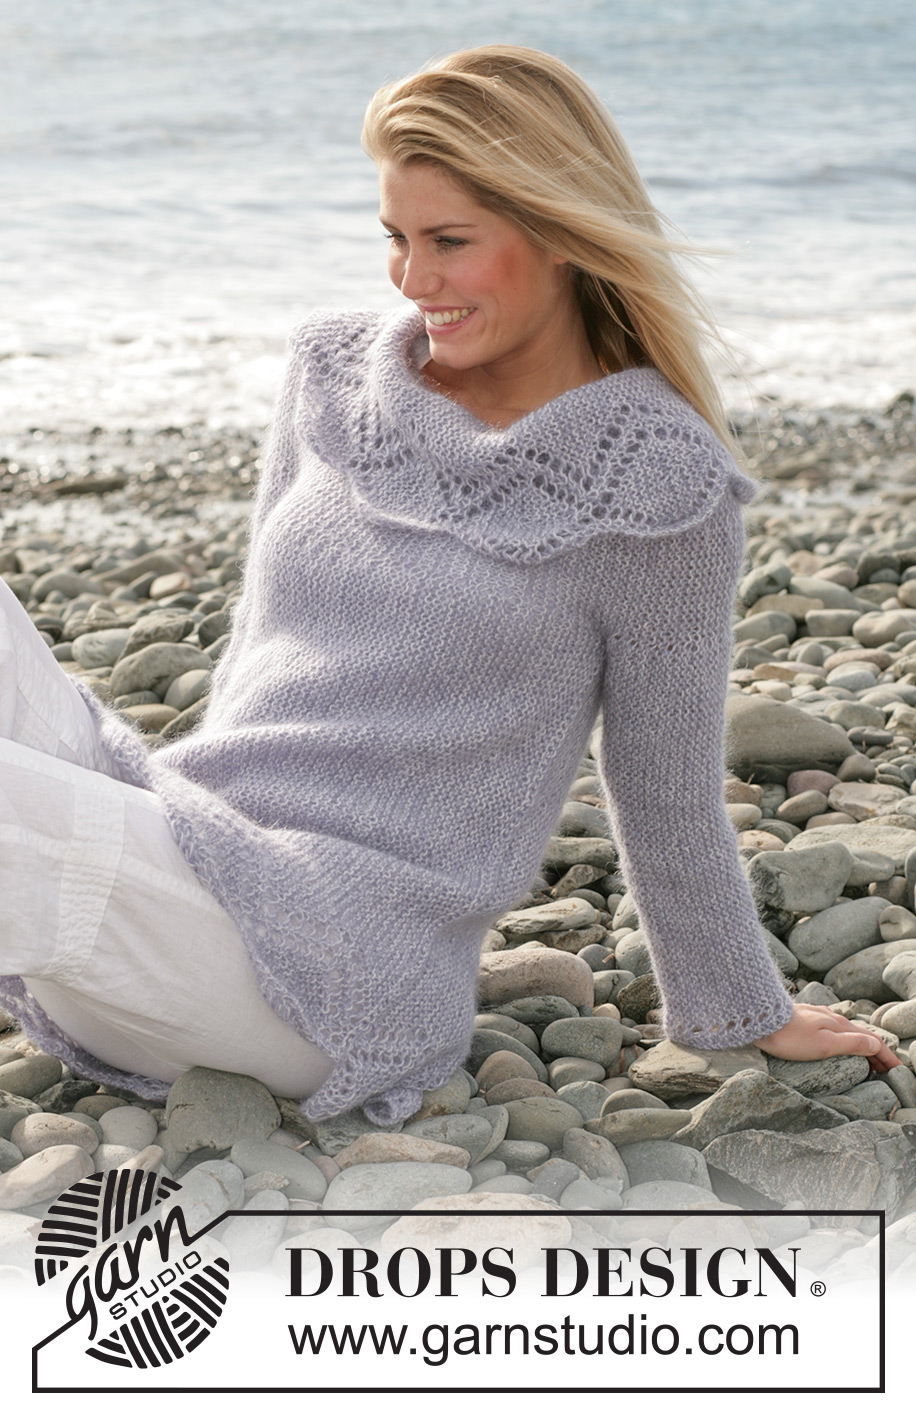
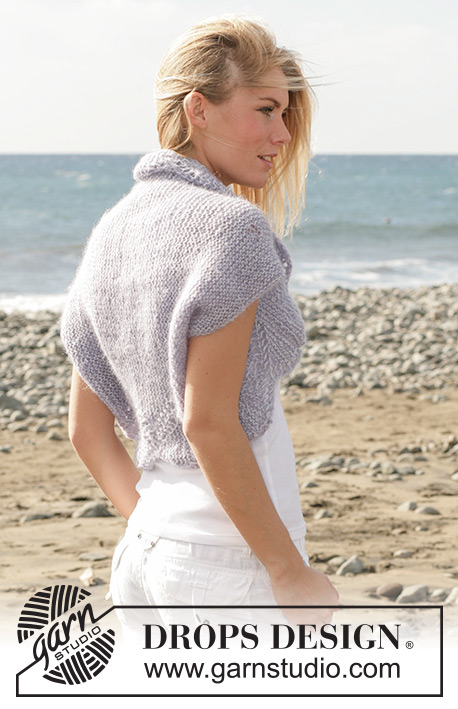
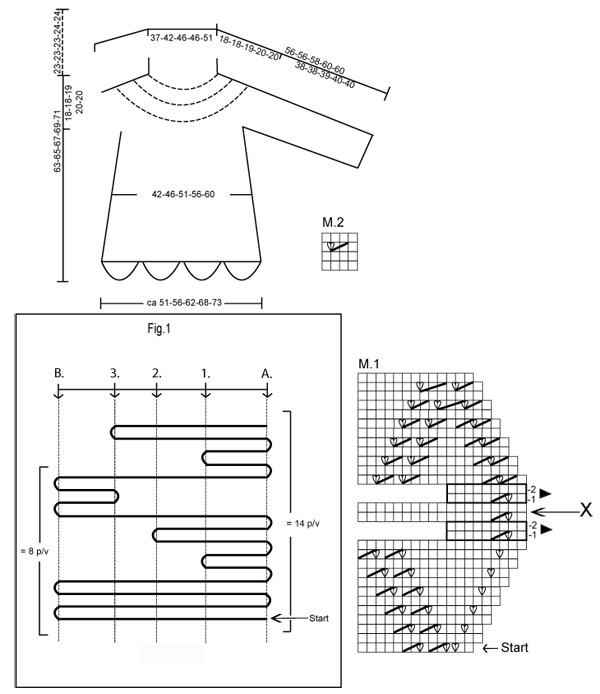
DROPS jumper in garter sts with lace pattern in “Alpaca” and “Vivaldi”. Size S - XXL
DROPS 101-3 |
||||||||||||||||||||||||||||
|
Knitting gauge: 14 sts x 28 rows on needles size 7 mm / US 10 ½ with 1 strand of each quality (double strand) in garter sts = 10 x 10 cm / 4" x 4". Knitting tip: For every turning slip first st as if to knit and tighten the yarn in order to minimize a hole at the turning point. Turnings = See Fig.1. Fig.1 illustrates a written explanation below. Knit with shortened rows in the middle of piece to slightly shape the jumper and to get a wide neck – read knitting tip. Begin as follows: *knit from bottom edge on all sts, turn and knit return row. - knit all sts, turn and knit return row - knit to marker-1, turn and knit return row - knit to marker-2, turn and knit return row - knit all sts, turn and knit to MT-3, turn, knit return row (towards collar), turn and knit return row to bottom edge - knit to marker-1, turn and knit return row - knit to marker-3, turn and knit return row* Repeat from *-*. Lace pattern: See chart M.1 and M.2. Lace Pattern tip: chart M.1 is knitted at the beg. of each row. Begin at the "start" arrow at the right bottom side of M.1. Tips: If collar becomes too wide, you can sew an elastic around approx 25 cm / 9¾" from collar edge to hold the collar in place. ___________________________________________________________________ JUMPER The jumper is knitted from side to side from bottom edge towards collar in garter sts. Beg mid left side, continue over back piece, right sleeve, front piece and then left sleeve. Back piece: Loosely cast on 120-123-126-130-133 sts on needle size 7 mm / US 10 ½ with 1 strand of each quality (double strands). Knit 1 row garter sts (seam edge at side). Insert 3 markers, from bottom edge towards the collar, as follows: marker-1 after 72-74-76-77-80 sts marker-2 after 80-83-85-87-90 sts marker-3 after 88-91-94-97-99 sts Leave all markers in the same place until piece is completed to make sure the turnings are in line throughout. The number of sts before and after the marker will vary because of the pattern. Knit the turnings as described above, at the same time work chart M.1 at the beg of each row at bottom edge and at collar – see Lace pattern tip (remember it’s only the rows going all the way to bottom edge (Fig. 1 = 14 rows) and to collar (Fig. 1 = 8 rows) that are counted as rows in M.1). Continue like this until you have knitted 4.5-5.5.5-6-6.5 repeats of M.1 at bottom edge (for size S, L and XXL: to the symbol X in diagram M.1). Piece measures approx 42-46-51-56-60 cm – measured approx. 25 cm / 9¾" from the bottom edge of the back and front piece- see measuring chart. Right sleeve: Size S, L and XXL: Knit from neckline towards bottom edge 9 sts past marker-1 and put remaining sts from back and front piece on a holder. Remember to leave marker-2, marker-3 and marker-4 where they are. Size M and XL: Cut the yarn and beg at bottom edge. Put sts on a holder until there are 8 sts left before marker-1. Knit 1 row on remaining sts towards collar, turn the piece and knit return row. Remember to leave marker-2, marker-3 and marker-4 where they are. All sizes: Cut the yarn. Cast on 20 new sts for sleeves over the sts on holder. Knit 1 row over these 20 sts and turn the piece. At the end of next row cast on 20 new sts and knit 1 row over the 40 new sts. Turn the piece. At the end of next row cast on 13-13-15-16-16 new sts. Insert a marker at the bottom of sleeve (measure from this point onwards). Now knit up towards the collar = 1st row the turning pattern. Continue with turnings, at the same time work diagram M.1 on collar and M.2 on the 4 sts at the bottom of sleeve. After 58-65-79-86-78 rows from marker at bottom of sleeve (piece measures approx 21-23-28-32-28 cm from marker at bottom of sleeve) loosely bind off the lower 13-13-15-16-16 sts. Now knit 1 row on the next 40 sts only. Turn the piece and knit return row. On next row bind off the lower 20 sts and knit 1 row but only on the next 20 sts. Turn the piece and knit return row. On next row bind off the lower 20 sts, at the same time continue from 1st row of the turning pattern towards the neck. Sts left on needle are part of the front piece. Front piece: Continue with turnings and M.1 on collar and bottom edge and knit towards the bottom edge (make sure to continue M.1 from back piece, i.e. for size S, L and XXL by the X symbol, for size M and XL at the beginning of diagram), at the same time put sts from holder back on needle. Insert a marker in piece (= mid side – measure from here onwards). Continue until there are 9-10-11-12-13 repeats of M.1 along bottom edge, piece measures approx 42-46-51-56-60 cm – measured from the marker at the side and approx 25 cm / 9¾" from the bottom edge - see measuring chart. Size S, L and XXL: Knit 1 row towards neckline. Left sleeve: Knit like right sleeve but bind off sts at the sides instead of putting sts on a holoder. When sleeve is completed there will be 8-9-10-11-11 repeats of M.1 on collar. Bind off loosely. Assembly: Sew under arm seams with small, neat sts. Sew the side seam from top of collar down to bottom edge – sew tog first garter st row and bind off row. |
||||||||||||||||||||||||||||
Diagram explanations |
||||||||||||||||||||||||||||
|
||||||||||||||||||||||||||||
 |
||||||||||||||||||||||||||||
 |
||||||||||||||||||||||||||||
Have you finished this pattern?Tag your pictures with #dropspattern #selenesweater or submit them to the #dropsfan gallery. Do you need help with this pattern?You'll find 13 tutorial videos, a Comments/Questions area and more by visiting the pattern on garnstudio.com. © 1982-2026 DROPS Design A/S. We reserve all rights. This document, including all its sub-sections, has copyrights. Read more about what you can do with our patterns at the bottom of each pattern on our site. |
||||||||||||||||||||||||||||


With over 40 years in knitting and crochet design, DROPS Design offers one of the most extensive collections of free patterns on the internet - translated to 17 languages. As of today we count 324 catalogs and 12290 patterns - 12280 of which are translated into English (US/in).
We work hard to bring you the best knitting and crochet have to offer, inspiration and advice as well as great quality yarns at incredible prices! Would you like to use our patterns for other than personal use? You can read what you are allowed to do in the Copyright text at the bottom of all our patterns. Happy crafting!
Post a comment to pattern DROPS 101-3
We would love to hear what you have to say about this pattern!
If you want to leave a question, please make sure you select the correct category in the form below, to speed up the answering process. Required fields are marked *.