DROPS Alpaca
DROPS Alpaca
100% Alpaca
from 3.40 £ /50g
DROPS Vivaldi
DROPS Vivaldi
56% Mohair, 30% Polyamide, 14% Wool
Discontinued
find alternatives
DROPS SS24

Selene

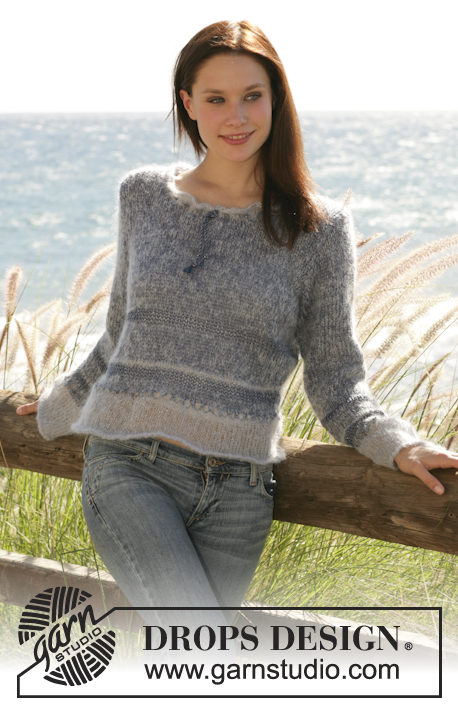
DROPS jumper in garter sts with lace pattern in “Alpaca” and “Vivaldi”. Size S - XXL

DROPS 101-3
Size: S – M – L – XL - XXL

Materials: DROPS Alpaca from Garnstudio
300-300-350-350-400 g colour no 8105, light grey
and use: DROPS Vivaldi from Garnstudio
200-200-250-250-300 g colour no 24, light purple

DROPSpointed needles size 7 mm or size needed to obtain the correct knitting tension. For this pattern it is very important to adhere to number of rows per 10 cm.

-------------------------------------------------------

Alternative Yarn – See how to change yarns here
Yarn Groups A to F – Use the same pattern and change the yarn here
Yarn usage using an alternative yarn – Use our yarn converter here

-------------------------------------------------------

DROPS Alpaca
DROPS Alpaca
100% Alpaca
from 3.40 £ /50g
DROPS Vivaldi
DROPS Vivaldi
56% Mohair, 30% Polyamide, 14% Wool
Discontinued
find alternatives

Pattern instructions

NOTE: This pattern is written in British English. All measurements in charts are in cm. For conversion from cm to inches - click here. There are different terms for crocheting in British and American English. If this pattern includes crochet, click for "crochet terms" here. For this pattern in American English, please click here.
Knitting tension: 14 sts x 28 rows on needles size 7 mm with 1 thread of each quality (double thread) in garter sts = 10 x 10 cm.

Knitting tip: For every turning slip first st as if to knit and tighten the thread in order to avoid a hole in the transitions.

Turnings = See Fig. 1. Fig. 1 illustrates a written explanation below
Knit with shortened rows in the middle of piece to slightly shape the jumper and to get a wide neck – read knitting tip.
Begin as follows:
*knit from bottom edge on all sts, turn and knit return row.
- knit all sts, turn and knit return row
- knit to MT-1, turn and knit return row
- knit to MT-2, turn and knit return row
- knit all sts, turn and knit to MT-3, turn, knit return row (towards collar), turn and knit return row to bottom edge
- knit to MT-1, turn and knit return row
- knit to MT-3, turn and knit return row*
Repeat from *-*.

Lace pattern: See Diagram M.1 and M.2.

Lace Pattern tip: M.1 is knitted at the beg. of each row. Begin at the “start” arrow at the right bottom side of M.1.

Tips: If collar becomes too wide, you can sew an elastic around approx 25 cm from collar edge to hold the collar in place.
___________________________________________________________________

JUMPER
The jumper is knitted from side to side from bottom edge towards collar in garter sts. Beg mid left side, continue over back piece, right sleeve, front piece and then left sleeve.

Back piece: Loosely cast on 120-123-126-130-133 sts on needle size 7 mm with 1 thread of each quality (double thread). Knit 1 row garter sts (seam edge at side). Insert 3 marking threads, from bottom edge towards the collar, as follows:
MT-1 after 72-74-76-77-80 sts
MT-2 after 80-83-85-87-90 sts
MT-3 after 88-91-94-97-99 sts
Leave all MT in the same place until piece is completed to make sure the turnings are in line throughout. The number of sts before and after the MT will vary because of the pattern. Knit the turnings as described above, at the same time knit M.1 at the beg of each row at bottom edge and at collar – see Lace pattern tip (remember it’s only the rows going all the way to bottom edge (Fig. 1 = 14 rows) and to collar (Fig. 1 = 8 rows) that are counted as rows in M.1). Continue like this until you have knitted 4.5-5.5.5-6-6.5 repeats of M.1 at bottom edge (for size S, L and XXL: to the symbol X in diagram M.1). Piece measures approx 42-46-51-56-60 cm – measured approx. 25 cm from the bottom edge of the back and front piece- see measuring chart.

Right sleeve:
Size S, L and XXL: Knit from neckline towards bottom edge 9 sts past MT-1 and put remaining sts from back and front piece on a thread. Remember to leave MT-2, MT-3 and MT-4 where they are.
Size M and XL: Cut the thread and beg at bottom edge. Put sts on a thread or a stitch holder until there are 8 sts left before MT-1. Knit 1 row on remaining sts towards collar, turn the piece and knit return row. Remember to leave MT-2, MT-3 and MT-4 where they are.
All sizes: Cut the thread. Cast on 20 new sts for sleeves over the sts on thread or stitch holder. Knit 1 row over these 20 sts and turn the piece. At the end of next row cast on 20 new sts and knit 1 row over the 40 new sts. Turn the piece. At the end of next row cast on 13-13-15-16-16 new sts. Insert a MT at the bottom of sleeve (measure from this point onwards). Now knit up towards the collar = 1st row the turning pattern. Continue with turnings, at the same time knit M.1 on collar and M.2 on the 4 sts at the bottom of sleeve. After 58-65-79-86-78 rows from MT at bottom of sleeve (piece measures approx 21-23-28-32-28 cm from MT at bottom of sleeve) loosely cast off the lower 13-13-15-16-16 sts. Now knit 1 row on the next 40 sts only. Turn the piece and knit return row. On next row cast off the lower 20 sts and knit 1 row but only on the next 20 sts. Turn the piece and knit return row. On next row cast off the lower 20 sts, at the same time continue from 1st row of the turning pattern towards the neck. Sts left on needle are part of the front piece.

Front piece: Continue with turnings and M.1 on collar and bottom edge and knit towards the bottom edge (make sure to continue M.1 from back piece, i.e. for size S, L and XXL by the X symbol, for size M and XL at the beginning of diagram), at the same time put sts from thread back on needle. Insert a MT in piece (= mid side – measure from here onwards). Continue until there are 9-10-11-12-13 repeats of M.1 along bottom edge, piece measures approx 42-46-51-56-60 cm – measured from the MT at the side and approx 25 cm from the bottom edge - see measuring chart.
Size S, L and XXL: Knit 1 row towards neckline.

Left sleeve: Knit like right sleeve but cast off sts at the sides instead of putting sts on a thread. When sleeve is completed there will be 8-9-10-11-11 repeats of M.1 on collar. Cast off loosely.

Assembly: Sew under arm seams with small, neat sts. Sew the side seam from top of collar down to bottom edge – sew tog first garter st row and cast off row.


Diagram

symbols = K
symbols = double yo, on return row knit 1 yo and drop the other
symbols = K2 tog
symbols = K3 tog
symbols = knit these 2 shortened rows in garter sts independent of the shorten rows (Fig. 1). Knit p-1, turn the work and knit p-2. Then continue with turnings.
symbols = Shorten rows- shows how to garment is knitted.
symbols = the arrows indicates the marking threads (MT)
symbols = bottom edge
symbols = neckline
diagram
diagram
Do you have a question? See a list of frequently asked questions (FAQ)

Knitting tension is what determines the final measurements of your work, and is usually measured per 10 x 10 cm. It is provided like so: number of stitches in width x number of rows in height - eg: 19 stitches x 26 rows = 10 x 10 cm.

The knitting tension is very individual; some people knit/crochet loosely while others work tightly. You adjust the knitting tension with the needle size, which is why the suggested needle size is only meant as a guide! You need to adjust this (up or down) to ensure that YOUR knitting tension matches the knitting tension provided in the pattern. If you work with a different knitting tension than provided you will have a different yarn consumption, and your work will have different measurements than what the pattern suggests.

The knitting tension also determines which yarns can replace each other. As long as you achieve the same knitting tension you can replace one yarn with another.

See DROPS lesson: How to measure your tension/gauge

See DROPS video: How to make a gauge tension swatch

The required amount of yarn is provided in grams, eg: 450 g. To calculate how many balls you’ll need you first need to know how many grams are in 1 ball (25g, 50g or 100g). This information is available if you click on the individual yarn quality on our pages. Divide the amount required with the amount of each ball. For example, if each ball is 50g (the most common amount), the calculation will be as follows: 450 / 50 = 9 balls.

The important thing when changing from one yarn to another is that the knitting/crochet tension remains the same. This is so that the measurements of the finished piece will be the same as on the sketch provided. It is easier to achieve the same knitting tension using yarns from the same yarn group. It is also possible to work with multiple strands of a thinner yarn to achieve the knitting tension of a thicker one. Please try our yarn converter. We recommend you to always work a test swatch.

Please NOTE: when changing yarn the garment might have a different look and feel to the garment in the photo, due to individual properties and qualities of each yarn.

See DROPS lesson: Can I use a different yarn than the one mentioned in the pattern?

All our yarns are categorised into yarn groups (from A to F) according to thickness and knitting tension – group A contains the thinnest yarns and group F the thickest. This makes it easier for you to find alternative yarns to our patterns, should you wish to switch yarn. All yarns within the same group have a similar knitting tension and can easily replace each other. However, different yarn qualities have different structures and properties which will give the finished work a unique look and feel.

Click here for an overview of the yarns in each yarn group

At the top of all our patterns you’ll find a link to our yarn calculator, which is a helpful tool should you wish to use a different yarn than suggested. By filling in the yarn quality you wish to replace, the amount (in your size) and number of strands, the calculator will present good alternative yarns with the same knitting tension. Additionally it will tell you how much you’ll require in the new qualities and whether you’ll need to work with multiple strands. Most skeins are 50g (some are 25g or 100g).

If the pattern is worked with multiple colours, every colour will have to be calculated separately. Similarly, if the pattern is worked with several strands of different yarns (for example 1 strand Alpaca and 1 strand Kid-Silk) you will have to find alternatives for each, individually.

Click here to see our yarn calculator

Since different yarns have different qualities and textures we have chosen to keep the original yarn in our patterns. However, you can easily find options among our available qualities by using our yarn calculator, or simply pick a yarn from the same yarn group.

It is possible that some retailers still have discontinued yarns in stock, or that someone has a few skeins at home that they would like to find patterns for.

The yarn calculator will provide both alternative yarn as well as required amount in the new quality.

If you think it's hard to decide what size to make, it can be a good idea to measure a garment you own already and like the size of. Then you can pick the size by comparing those measures with the ones available in the pattern's size chart.

You'll find the size chart at the bottom of the pattern.

See DROPS lesson: How to read size chart

The needle size provided in the pattern serves only as a guide, the important thing is to follow the knitting tension. And since knitting tension is very individual, you will have to adjust the needle size to ensure that YOUR tension is the same as in the pattern – maybe you’ll have to adjust 1, or even 2 needle sizes, up or down to achieve the correct tension. For this, we recommend that you work test swatches.

Should you work with a different knitting tension than the one provided, the measurements of the finished garment might deviate from the measurement sketch.

See DROPS lesson: How to measure your tension/gauge

See DROPS video: How to make a tension/gauge swatch

Working a garment top-down provides more flexibility and room for personal adjustment. For example it is easier to try the garment on while working, as well as making adjustments to length of yoke and shoulder caps.

The instructions are carefully explaining every step, in the correct order. Diagrams are adjusted to the knitting direction and are worked as usual.

The diagram depicts all rows/rounds, and every stitch seen from the right side. It is read from bottom to top, from right to left. 1 square = 1 stitch.

When working back and forth, every other row is worked from the right side and every other row is worked from the wrong side. When working from the wrong side, the diagram will have to be worked reversed: from left to right, knit stitches are purled, purl stitches are knit etc.

When working in the round every round is worked from the right side and the diagram are worked from right to left on all rounds.

See DROPS lesson: How to read knitting diagrams

The diagram depicts all rows/rounds, and every stitch seen from the right side. It is worked from bottom to top, from right to left.

When working back and forth every other row is worked from the right side: from right to left and every other row is worked from the wrong side: from left to right.

When working in the round, every row in the diagram are worked from the right side, from right to left.

When working a circular diagram you start in the middle and work your way outwards, counter clockwise, row by row.

The rows usually start with a given number of chain stitches (equivalent to the height of the following stitch), this will either be depicted in the diagram or explained in the pattern.

See DROPS lesson: How to read crochet diagrams

Instructions for working several diagrams after each other on the same row/round, will often be written like so: “work A.1, A.2, A.3 a total of 0-0-2-3-4 times". This means you work A.1 once, then A.2 is worked once, and A.3 is repeated (in width) the number of times provided for your size – in this case like so: S = 0 times, M = 0 times, L=2 times, XL= 3 times and XXL = 4 times.

The diagrams are worked as usual: begin with the first row in A.1, then work the first row in A.2 etc.

See DROPS lesson: How to read knitting diagrams

See DROPS lesson: How to read crochet diagrams

The total width of the garment (from wrist-to-wrist) will be larger in the larger sizes, despite the actual sleeves being shorter. The larger sizes have longer sleeve caps and wider shoulders, so there will be a good fit in all sizes.

The measurement sketch/schematic drawing provides information regarding the full length of the garment. If it’s a jumper or a jacket the length is measured from the highest point on the shoulder closest to the neckline, and straight down to the bottom of the garment. It is NOT measured from the tip of shoulder. Similarly, the length of yoke is measured from the highest point on the shoulder and down to where yoke is split into body and sleeves.

On a jacket measures are never taken along bands, unless specifically stated. Always measure inside band stitches when measuring the length.

See DROPS lesson: How to read a schematic drawing

Diagrams are often repeated on the round or in height. 1 repeat is the diagram the way it appears in the pattern. If it says to work 5 repeats of A.1 in the round, then you work A.1 a total of 5 times after/next to each other in the round. If it says to work 2 repeats of A.1 vertically/in height you work the entire diagram once, then begin again at the start and work the entire diagram one more time.

Chain stitches are slightly narrower than other stitches and to avoid working the cast-on edge too tight, we simply chain more stitches to begin with. The stitch count will be adjusted on the following row to fit the pattern and measurement sketch.

The rib edge is more elastic and will contract slightly compared to, for example, stocking stitch. By increasing before the rib edge, you avoid a visible difference in width between the rib edge and the rest of the body.

It’s very easy to cast off too tightly, and by making yarn overs while casting off (and simultaneously casting these off) you avoid a too tight cast off edge.

See DROPS video: How to bind off with yarn overs (yo)

To achieve an even increase (or decrease) you can increase on, for example: every 3rd and 4th row alternately, like so: work 2 rows and increase on the 3rd row, work 3 rows and increase on the 4th. Repeat this until the increase is complete.

See DROPS lesson: Increase or decrease 1 st on every 3rd and 4th row alternately

Should you prefer to work in the round instead of back and forth, you may of course adjust the pattern. You’ll need to add steeks mid-front (usually 5 stitches), and follow the instructions. When you would normally turn and work from the wrong side, simply work across the steek and continue in the round. At the end you’ll cut the piece open, pick up stitches to work bands, and cover the cut edges.

See DROPS video: How to knit steeks and cut open

Should you prefer to work back and forth instead of in the round, you may of course adjust the pattern so you work the pieces separately and then assemble them at the end. Divide the stitches for the body in 2, add 1 edge stitch in each side (for sewing) and work the front and back pieces separately.

See DROPS lesson: Can I adapt a pattern for circular needles into straight needles?

Pattern repeats can vary slightly in the different sizes, in order to get the correct proportions. If you’re not working the exact same size as the garment in the photo, yours might deviate slightly. This has been carefully developed and adjusted so that the complete impression of the garment is the same in all sizes.

Make sure to follow instructions and diagrams for your size!

If you have found a pattern you like which is available in women’s size it’s not very difficult to convert it to men’s size. The biggest difference will be the length of sleeves and body. Start working on the women size that you think would fit across the chest. The additional length will be worked right before you cast off for the armhole/sleeve cap. If the pattern is worked top-down you can add the length right after the armhole or before the first decrease on sleeve.

Regarding additional yarn amount, this will depend on how much length you add, but it is better with a skein too many than too few.

All yarns will have excess fibres (from production) that might come off as lint or shedding. Brushed yarns (ie hairier yarns) have more of these loose, excess fibres, causing more shedding.

Shedding also depends on what is worn under or over the garment, and whether this pulls at the yarn fibres. It’s therefore not possible to guarantee that there will be no shedding

Below are some tips on how to get the best result when working with hairier yarns:

1. When the garment is finished (before you wash it) shake it vigorously so the looser hairs come off. NOTE: do NOT use a lint roller, brush or any method that pulls at the yarn.

2. Place the garment in a plastic bag and put it in your freezer - the temperature will cause the fibres to become less attached to each other, and excess fibres will come off easier.

3. Leave in the freezer for a few hours before taking it out and shaking it again.

4. Wash the garment according to the instructions on the yarn label.

Pilling is a natural process that happens to even the most exclusive of fibers. It's a natural sign of wear and tear that is hard to avoid, and that is most visible in high friction areas of your garment like a sweater's arms and cuffs.

You can make your garment look as new by removing the pilling, using a fabric comb or a pill/lint remover.

Still can't find the answer you need? Then scroll down and leave your question so one of our experts can try to help you. This will be done normally within 5 to 10 working days.
In the meantime, you can read the questions and answers that others have left to this pattern or join the DROPS Workshop on Facebook to get help from fellow knitters/crocheters!

You might also like...

Post a comment to pattern DROPS 101-3

We would love to hear what you have to say about this pattern!

If you want to leave a question, please make sure you select the correct category in the form below, to speed up the answering process. Required fields are marked *.

Comments / Questions (41)

country flag Pascaline wrote:

Bonjour Merci beaucoup Après avoir bien étudier les explications effectivement j'ai compris comment placer les marqueurs Très bonne journée Pascaline

30.08.2023 - 08:27

country flag Van Loocke Pascaline wrote:

Bonjour Il faut monter 126 m Je dois placer 3 marqueurs à 76m. 85m et 94m Je ne comprends pas si l'on additionne 76 +85 +94 cela fait beaucoup plus que 126 Pourriez vous m'éclairer SVP Merci Cordialement Pascaline 0

29.08.2023 - 09:59

country flag Van Loocke Pascaline wrote:

Bonjour Il faut monter 126 m (L) et placer 3 marqueurs à 76m. 85m et 94m Je ne comprends pas parce que si l'on additionne 76+85+94 cela fait beaucoup plus de mailles que 126 Pourriez vous m'éclairer SVP Merci beaucoup Bien cordialement Pascaline

29.08.2023 - 09:55

DROPS Design answered:

Bonjour Pascaline, comptez les 85 et les 94 mailles à partir du début du rang, pas à partir du marqueur précédent. Bon tricot!

30.08.2023 - 07:35

country flag Josie wrote:

Merci beaucoup

30.05.2023 - 11:34

country flag Josie wrote:

Bonjour, je souhaiterais réaliser ce joli modèle mais la vivaldi n'existe plus. Que me conseillez vous SVP ? Merci et belle journée à vous.

29.05.2023 - 22:07

DROPS Design answered:

Bonjour Josie, vous pouvez utiliser 1 fil DROPS Brushed Alpaca Silk ou bien 2 fils DROPS Kid-Silk - retrouvez un exemple ici. Utilisez le convertisseur pour connaître la quantité correspondante nécessaire; votre magasin pourra vous assister (même par mail ou téléphone) dans le choix de la couleur si besoin Bon tricot!

30.05.2023 - 11:16

country flag Gonnie Weustenraad wrote:

Hallo ik maak met drops garen bovengenoemde patroon en snap bij de uitleg M.1 niet het zwarte/dichte pijltje. Wat wordt met die 2 dichte zwarte pijltjes wijzend naar rechts bedoeld? Er staat dat die nld helemaal gebreid wordt zonder te keren in de naald, en dan, brei nld-1, keer het werk en brei nld-2.... Ik snap niet wat ik hier moet doen... Aantal naalden fig.1 komt nergens overeen met aantal nld M.1 Hoop dat jullie mij kunnen helpen.

25.01.2023 - 10:25

DROPS Design answered:

Dag Gonnie,

De beschrijving van het symbool was wat onduidelijk en ik heb het nu aangepast. Deze 2 verkorte naalden brei je in ribbelsteek.

29.01.2023 - 19:10

country flag Mariann Fjellandsbø wrote:

Hei ! Er det mulig å strikke kragen for seg og sy den på halsen ,etter på ?? Og hvor mange masker legger vi opp da ?

14.02.2020 - 17:27

country flag Irene Nykvist wrote:

Helt ljuvlig tröja! Skall kragen stickas samtidigt som själva bakstycket hela vägen ner? Förstår inte mönstret. Är ändå en van stickare. Skall sticka den största storleken och det står att jag skall lägga upp 133 maskor, är kragen inräknad i det???

06.12.2018 - 12:41

DROPS Design answered:

Hei Irene. Ja, kragen er en del av genseren og det strikkes i ett stykke. Du strikker M.1 i begge ytterkanter av arbeidet så du får mønster både nederst rundt hoften og øverst på halskragen. God fornøyelse

06.12.2018 - 12:56

country flag Therese wrote:

Hej! Jag blir lite förvirrad över att det står att endast varven som går ända upp till kragen (8 var ) och ända ner till nederkanten (14 varv) ingår i M1. För när man gjort dessa varv stämmer det ju inte överens med hela M1.& heller inte med bilden på mönstret. Eller tänker jag fel? Tacksam för lite hjälp! :)

24.11.2018 - 21:09

country flag Lelletta wrote:

Vorrei anche sapere se i gomitoli LACE che nella descrizione riportate con un filato di 400 metri per 50 gr. è al contrario da intendersi di 100 gr. come penso, in quanto ovviamente ciò cambierebbe il numero dei gomitoli.Vi ringrazio molto e Vi auguro buona giornata e buon lavoro!

21.11.2016 - 00:46

DROPS Design answered:

Buongiorno Lelletta. Il filato Lace è molto sottile con una resa molto alta. L'indicazione di 400 m per 50 g è corretta. Buon lavoro!

21.11.2016 - 07:01