
Popular categories
Looking for a yarn?


Comments / Questions (20)
![]() Suzie Leblanc wrote:
Suzie Leblanc wrote:
Merci beaucoup. C’est maintenant plus clair.
24.03.2025 - 16:36
![]() Suzie Leblanc wrote:
Suzie Leblanc wrote:
Je tricote le modèle 100-27 en taille S. À l’épaule droite à 55 cm je ne comprends pas ce paragraphe. Pourquoi tricoter au point mousse les 14 mailles du milieu sur deux rangs? Je ne comprends absolument pas le reste du paragraphe, rabattre et diminuer pour l’épaule. J’ai besoin de votre savoir. Merci à l’avance.
23.03.2025 - 22:35DROPS Design answered:
Bonjour Mme Leblanc, ce sont les 14 mailles du milieu devant que l'on va tricoter au point mousse, autrement dit, pour le devant droit, les 14 premières mailles en début de rang sur l'endroit (pour le devant gauche, les 14 premières mailles sur l'envers), cela forme ainsi la bordure d'encolure. Vous rabattez ensuite 10 m pour l'encolure = il reste 4 m point mousse côté encolure et vous diminuez ensuite pour l'encolure 9 x 1 m tous les 2 rangs à 4 mailles point mousse du bord (cf DIMINUTIONS) Bon tricot!
24.03.2025 - 09:43
![]() Gail wrote:
Gail wrote:
I would really like to make this vest in a hip length. Do you have any suggestions?
20.05.2024 - 19:18DROPS Design answered:
Dear Gail, you might find inspiration in our patterns for vest with open front, see here, remember to add filters if needed. Happy knitting!
21.05.2024 - 14:01
![]() Kim Hanson wrote:
Kim Hanson wrote:
Where are the instructions for what length to have the button holes? I understand how to make the buttonholes but not sure many inches i knit before i make the first, second and third buttonhole
05.10.2023 - 19:00DROPS Design answered:
Hi Kim, The measurements for working the buttonholes are at the top of the pattern, under Buttonholes. Happy knitting!
06.10.2023 - 06:40
![]() Regina Hapka wrote:
Regina Hapka wrote:
Ich habe folgendes Problem: egal ob ich ein Bündchen mit 1 M re/1 M li, 2 M re/2 M li oder wie in dieser Strickanleitung kraus re. stricke, immer schlägt bei mir das Bündchen nach außen um. Was mache ich verkehrt?
04.10.2021 - 17:02DROPS Design answered:
Liebe Frau Hapka, Sie können die Jacke/den Pullover mit Stecknadeln auf einer geeigneten Unterlage spannen, anfeuchten (z.B. mit einer Sprühflasche für Blumen) und trocknen lassen, danach entfernen Sie die Stecknadeln, dann sollte sich der Rand nicht mehr rollen/umschlagen. Viel Spaß beim stricken!
05.10.2021 - 06:56
![]() Sandra Zinn wrote:
Sandra Zinn wrote:
Would like to make this pattern in a fingering weight wool. After obtaining guage to you think it would look ok.
09.03.2018 - 17:11DROPS Design answered:
Dear Mrs Zinn, this pattern is worked with a sport yarn (Cotton Viscose) and a worsted yarn (Bomull-Lin) worked together. For any help adjusting in any other kind of yarn please contact the yarn where you bought your yarn. Happy knitting!
12.03.2018 - 07:59
![]() "Hanneke" wrote:
"Hanneke" wrote:
Ik begrijp de tip voor het afkanten bij de mouwsgaten niet? Wordt bedoeld na of voor 4 steken, of na of voor 4 naalden ribbelsteek? Is het optioneel, kan ik op mijn eigen manier afkanten?
29.12.2017 - 12:44DROPS Design answered:
Hoi Hanneke, De tip geeft aan op welke manier je afkant, zodat je een mooi stekenbeeld geeft. In de beschrijving staat hoe vaak en om de hoeveel naalden je moet meerderen. Omdat je zowel bij het linker armsgat als bij het rechter armsgat afkant moet je soms voor en soms na de ribbelsteken afkanten (dus in spiegelbeeld zeg maar). Als je het patroon volgt en precies doet wat er staat wijst het zichzelf wel.
29.12.2017 - 19:47
![]() Pamela Waggoner wrote:
Pamela Waggoner wrote:
I am knitting pattern 100-27. I am having a hard time trying to figure out the back piece. I am at the part where I have knitted 4 rows garter stitch and now I am ready to bind off 33 stitches for neck. What I'm not understanding is how I proceed with the neck and shoulders. I will have 16 stitches on each side. How do I knit from one shoulder side to the other side due to the bind off stitches in the middle.
02.05.2017 - 02:45DROPS Design answered:
Dear Mrs Waggoner, when you have bound off the 33 sts for neck, continue each shoulder separately until piece measures 78 cm, ie work first one shoulder (leave sts on 2nd shoulder unworked), and when 1st shoulder is bound off, work sts on 2nd shoulder (join the yarn again and work as first shoulder). Happy knitting!
02.05.2017 - 13:19
![]() Tanja Parkkima wrote:
Tanja Parkkima wrote:
Pitääkö kädentien 11 silmukan päättämisen jälkeen tehdä vielä kavennuksia työn vasemmassa reunassa? Tätä en ohjeesta löydä. Ohjeessa kehoitetaan jatkamaan sileää neuletta aina 64cm asti, jolloin tulee etureunan uloimpien 10 silmukan päättäminen. Sitä seuraa viimeisten 12 silmukoiden päättämiset.
24.10.2014 - 09:29DROPS Design answered:
Kun olet päättänyt ensimmäiset 11 s kädentietä varten, teet vielä kädentien kavennukset kuten takana, eli kavennat 10 x 1 s.
27.10.2014 - 16:17
![]() Tanja wrote:
Tanja wrote:
XXXL- kokoa tehdessäni minulla on oikeassa etukappaleessa kaikkien viimeisten kavennusten jälkeen puikolla yhteensä 28s ohjeessa mainitun 18s sijaan. Missä pitäisi vielä kaventaa ylimääräisten 10 silmukan verran?
20.10.2014 - 16:39DROPS Design answered:
Tarkistin ohjeen luvut ja ne ovat oikeat. Olethan tehnyt kädentien kavennukset? Kädentien kavennusten jälkeen, työssä on jäljellä 40 s. Päätät vielä pääntietä varten 10 + 12 s = 18 s.
23.10.2014 - 17:19
|
|
Calamity Jane#calamityjanevest |
|
 |
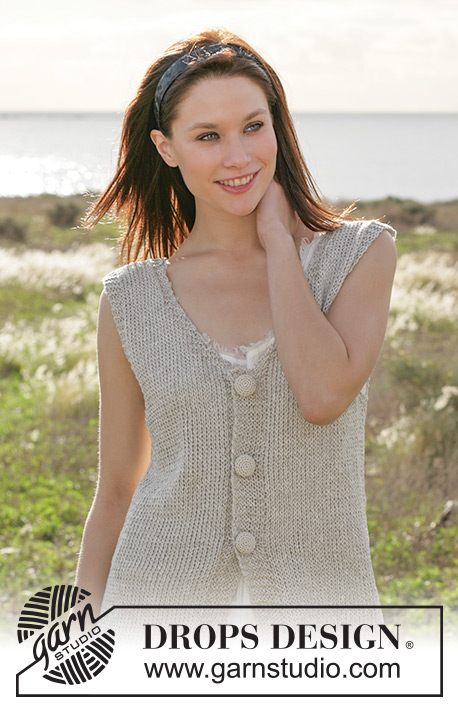 |
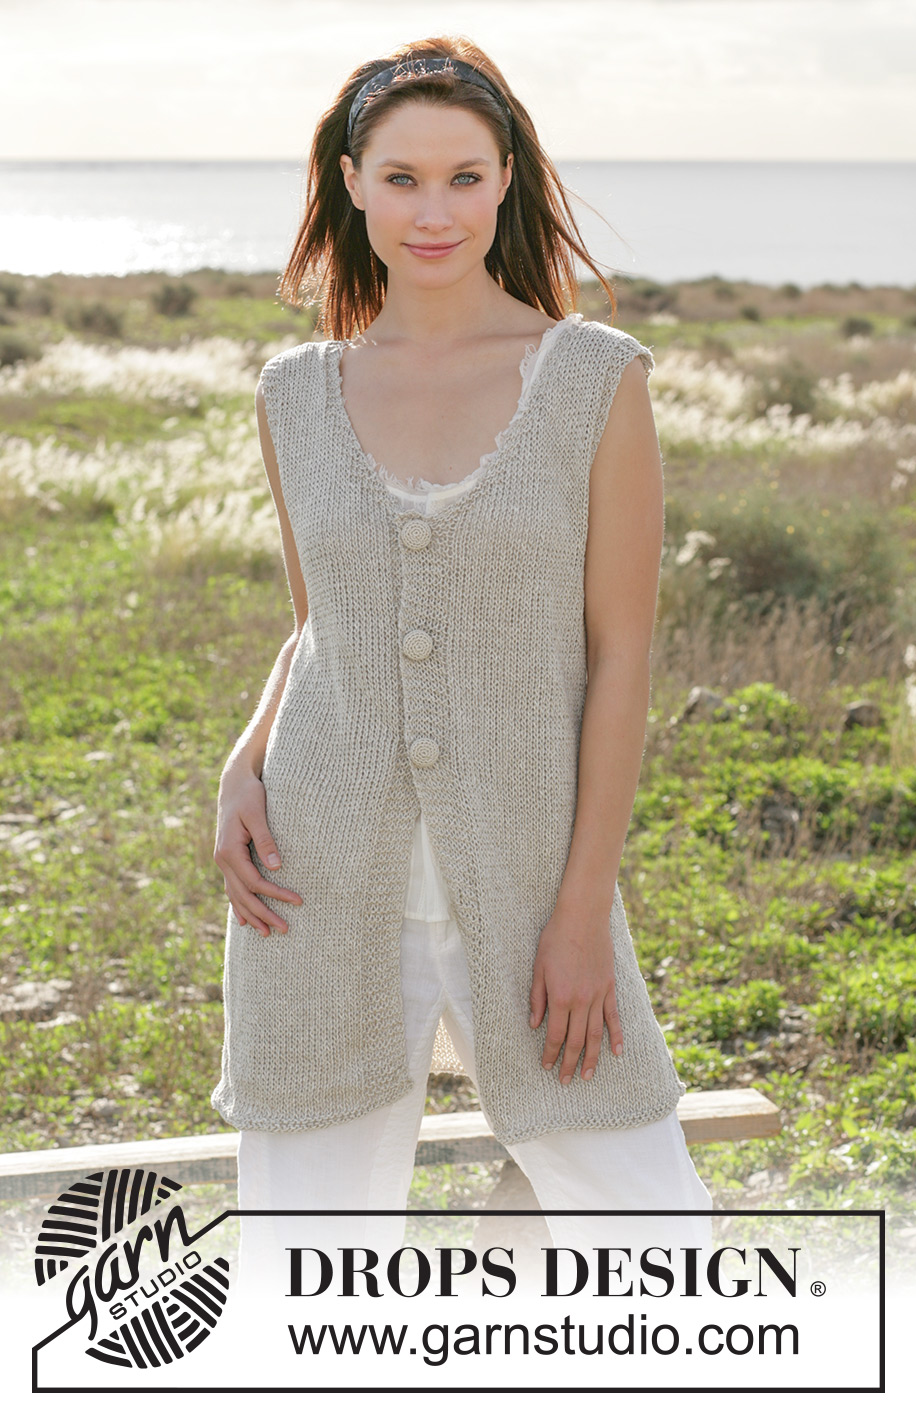
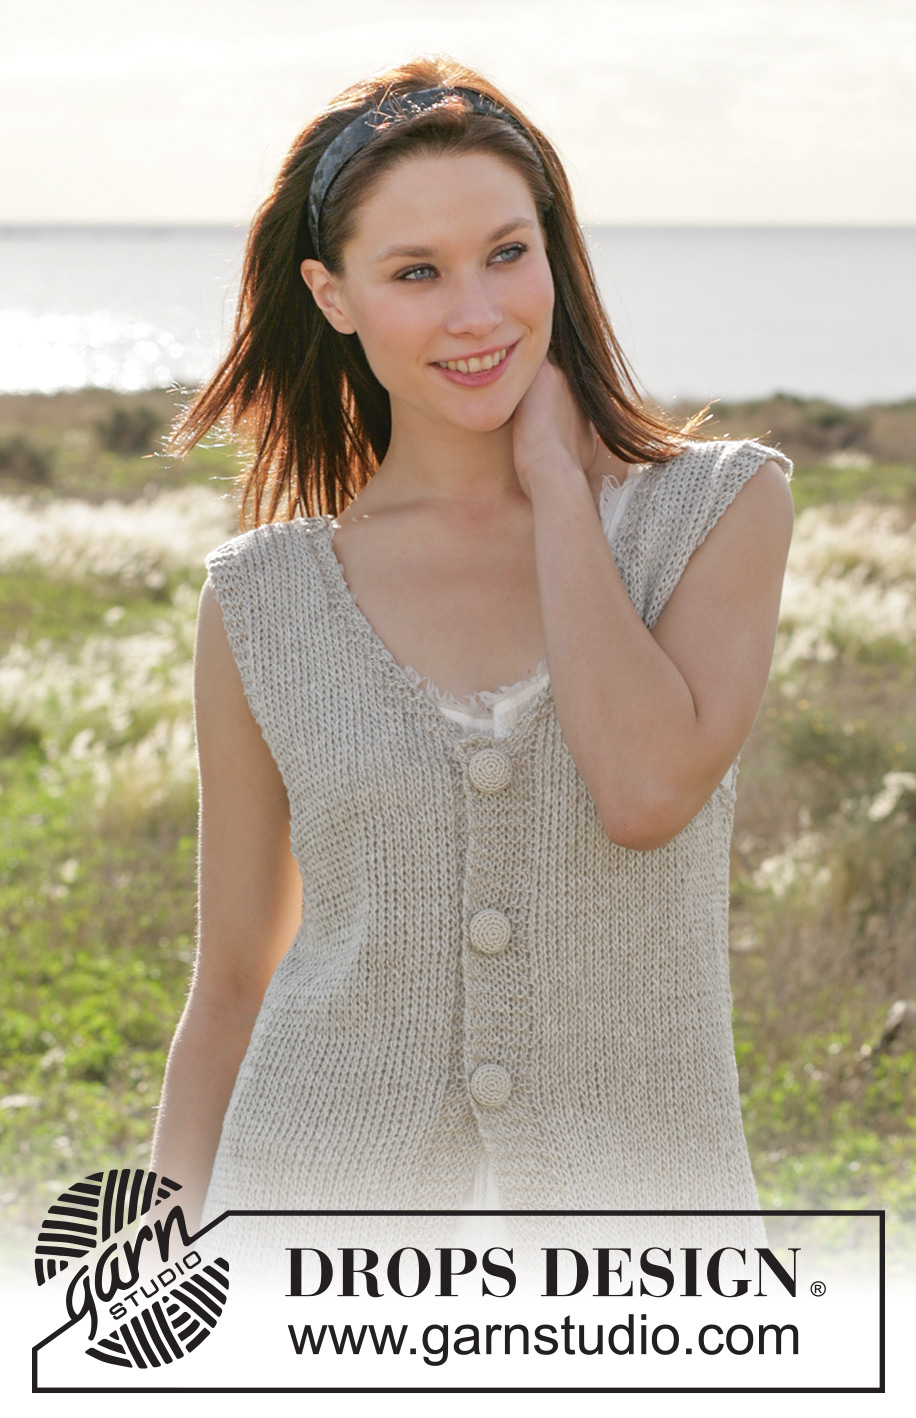
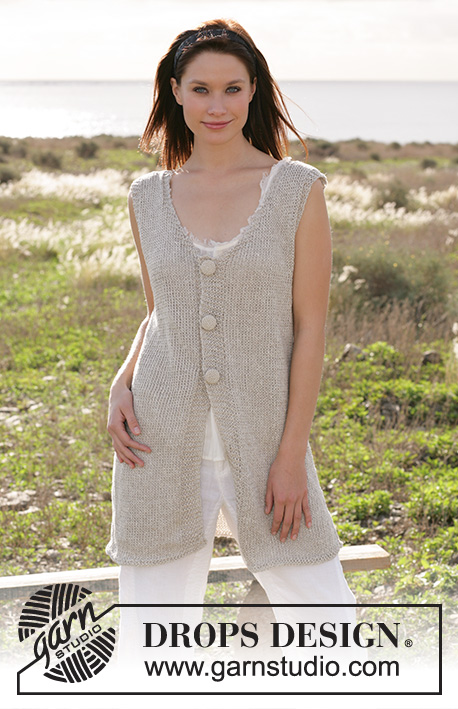
DROPS long vest knitted in garter sts with ”Bomull-Lin” and buttons in ”Cotton Viscose”
DROPS 100-27 |
|
|
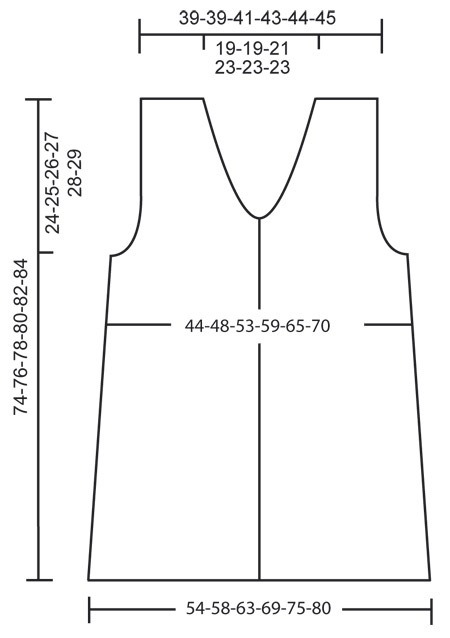
Knitting gauge: 16 sts x 20 rows stockinette sts with Bomull-Lin = 10 x 10 cm / 4" x 4". Garter st back and forth: Knit all rows Tips for decrease (applies to armhole and neckline): Knit all dec on RS. Dec as follows after 4 sts garter st: Slip 1 st as if to knit, K1, psso. Dec as follows after 4 sts garter st: K2 tog. Button hole: bind off for buttonhole on right front edge: 1 button hole = bind off 3rd and 4th st from mid front. On next row cast on 2 new sts over bind off sts. Bind off for button hole when piece measures: Size S: 38, 46 and 54 cm / 15",18",21¼" Size M: 40, 48 and 56 cm / 15¾",19",22" Size L: 41, 49 and 57 cm / 16⅛",19¼",22½" Size XL: 43, 51 and 59 cm / 17",20",23¼" Size XXL: 45, 53 and 61 cm / 17¾",21",24" Size XXXL: 47, 55 and 63 cm / 18½",21⅝",24¾" Back piece: Cast on 88-95-103-112-122-130 sts (incl 1 edge st each side) on needle size 6 mm / US 10 with Bomull-Lin. Knit 4 rows garter sts – see explanation above, continue in stockinette sts. When piece measures 5 cm / 2" bind off 1 st each side, repeat on every 4.5-4.5-4.5-5-5-5 cm / 1¾"-1¾"-1¾"-2"-2"-2" a total of 8 times = 72-79-87-96-106-114 sts. When piece measures 49-50-51-52-53-54 cm / 19¼"-19¾"-20"-20½"-21"-21¼" knit 2 rows garter sts on outermost 7-9-10-12-13-15 sts each side (stockinette st remaining sts). On next row bind off outermost 3-5-6-8-9-11 sts off each side for armhole. Then dec 1 sts for armhole on every other row – read Tips for decrease: 2-3-5-6-9-10 times = 62-63-65-68-70-72 sts. Continue in stockinette st with 4 sts in garter sts each side. When piece measures 70-72-74-76-78-80 cm / 27½"-28⅜"-29⅛"-30"-30¾"-31½ knit 4 rows garter sts over middle 38-39-41-44-44-44 sts (work remaining sts like before). Then bind off middle 30-31-33-36-36-36 sts for neck = 16-16-16-16-17-18 sts left on each shoulder. Continue to knit with 4 garter sts each side of neckline and 4 garter sts at the side. Bind off when piece measures 74-76-78-80-82-84 cm / 29⅛"-30"-30¾"-31½"-32¼"-33". Right front piece: Cast on 48-52-56-60-65-69 sts (incl 1 edge st on side edge and 8 front band sts) on needle size 6 mm / US 10 with Bomull-Lin. Knit 4 rows garter sts. Continue in stockinette sts but knit the 8 front band sts in garter sts until completion. Bind off for button holes – see explanation above. When piece measures 5 cm / 2" bind off on side as for back piece = 40-44-48-52-57-61 sts. When piece measures 49-50-51-52-53-54 cm / 19¼"-19¾"-20"-20½"-21"-21¼" knit 2 rows garter sts on outermost 7-9-10-12-13-15 sts on side (work remaining sts in stockinette st – knit front edge in garter sts). Then bind off for armhole as back piece. Continue in stockinette sts but knit the 4 sts each side and front edge in garter sts. At the same time when piece measures 55-57-58-60-62-64 cm / 21⅝"-22½"-22¾"-23⅝"-24⅜"-25¼" knit 2 rows garter sts over 14 sts towards front edge (work remaining sts in stockinette sts – knit 4 sts on side in garter sts ). Bind off 10 sts on next row from front edge and then continue to dec 1 st at neckline on every other row – read Tips for decrease: 9-10-11-12-12-12 times = 16-16-16-16-17-18 sts left on shoulder. Bind off when piece measures 74-76-78-80-82-84 cm / 29⅛"-30"-30¾"-31½"-32¼"-33". Left front piece: Cast on and work as right but reversed. Assembly: Sew shoulder seams. Sew side seams within 1 edge st. Button cover: Crochet 3 button covers on crochet hook size 3 mm / C with Cotton Viscose as follows: Ch 2, then crochet 6 sc in the first ch, complete with 1 sl st in first sc of round (= 1st round.). 2nd round: Crochet 2 sc in each sc = 12 sc. 3rd round: * crochet 1 sc in 1st sc, crochet 1 sc in 2nd sc, crochet 2 sc in 3rd sc *, repeat from *-* and finish with 1 sl st in 1st sc of round = 16 sc. 4th, 5th and 6th round: Crochet 1 sc in each sc. 7 th round: Crochet 1 sc in every other sc = 8 sc. Finish off with 1 sl st in 1st sc on round. Put buttons inside cover, sew around edge and pull tog. |
|
 |
|
Have you finished this pattern?Tag your pictures with #dropspattern #calamityjanevest or submit them to the #dropsfan gallery. Do you need help with this pattern?You'll find 19 tutorial videos, a Comments/Questions area and more by visiting the pattern on garnstudio.com. © 1982-2026 DROPS Design A/S. We reserve all rights. This document, including all its sub-sections, has copyrights. Read more about what you can do with our patterns at the bottom of each pattern on our site. |
|


With over 40 years in knitting and crochet design, DROPS Design offers one of the most extensive collections of free patterns on the internet - translated to 17 languages. As of today we count 324 catalogs and 12290 patterns - 12280 of which are translated into English (US/in).
We work hard to bring you the best knitting and crochet have to offer, inspiration and advice as well as great quality yarns at incredible prices! Would you like to use our patterns for other than personal use? You can read what you are allowed to do in the Copyright text at the bottom of all our patterns. Happy crafting!
Post a comment to pattern DROPS 100-27
We would love to hear what you have to say about this pattern!
If you want to leave a question, please make sure you select the correct category in the form below, to speed up the answering process. Required fields are marked *.